
New audio reference sticky suggestion thread


For some reason I can no longer edit the two huge posts I have above. I can't add anymore.
Can someone who posted closer to the top of this thread (a year+ ago) edit their posts? Is it just me?
The Vehicle Speed Sense wire (VSS) is in the stock harness. It's at pin I in the picture posted by Socket7 and it's green/red.
Can someone who posted closer to the top of this thread (a year+ ago) edit their posts? Is it just me?
The Vehicle Speed Sense wire (VSS) is in the stock harness. It's at pin I in the picture posted by Socket7 and it's green/red.
Last edited by firebirdude; Nov 3, 2011 at 02:30 PM.


Thread Starter
Deals on wheels
Joined: Apr 2005
Posts: 987
Likes: 6
From: Murfreesboro, TN
I tried to edit it by finding the post number and changing the link from the "edit" of the last post I did.. it gave me this message "The administrator has specified that you can only edit messages for 43200 minutes after you have posted. This limit has expired, so you must contact the administrator to make alterations on your message."

I was talking with Zoom44 about this earlier today, apparently they had to enable this setting because spammers / bots were exploiting a code in vB and editing old posts to insert pr0n pics, etc
So for now you can only edit posts for 2 weeks.
IB is looking into this so hopefully they get it figured out.
So for now you can only edit posts for 2 weeks.
IB is looking into this so hopefully they get it figured out.
mwahahaha 30 more days of editing. Get your recommendations in now. It'll be stickied soon. Though it sucks I won't be able to continually edit the sticky to update it....
Speaker sizes & specs:
base radio:
Front mounting depth (Base and Bose system): 3" safe, about 3.125" to glass (distance to window glass. deeper speakers can probably be mounted with a baffle)
What parts can I replace? (Bose and non-Bose):
Non-Bose system: Anything. Any of the speakers or the headunit may be replaced with any aftermarket equipment without any special precautions.
Bose system: The front tweeters, center speaker, rear 6x9's and headunit may be be replaced with any aftermarket equipment. The front 9" woofers in the doors and the rear Bose amp cannot be replaced alone with aftermarket.
Head unit:
Stock car harness is J-01:
- How to remove headunit.
Headunit removal. Obviously ignore the IceLink stuff if you're not installing an ipod module.
Another headunit walkthrough
Basic Installation:
Amp installation:
Door/system wire colors:
- I want more bass. What are my options?
-List of RX8 specific subwoofer boxes
- Adding an aftermarket amp to the factory headunit (Bose and without Bose) / What is a line output converter (LOC)?
So you want to install an aftermarket amplifier, but your factory radio does not have RCA connections. What do you do? You use a line output converter. Also commonly called a source level converter. Features and build quality aside, all line output converters (LOC) accept a regular speaker wire input and convert it into an RCA connection. Now it's as simple as plugging your RCA cables into the LOC and then into your amplifier. But which LOC should I buy? What's the difference? Basically, we can split LOC into two categories: powered and non-powered. Powered LOC require a separate +12V source be ran to it for power. Non-powered does not require this.
A majority of LOC on the market are the simple non-powered design. If you walk into a car audio store and ask for a line output converter, you'll be getting a non-powered one. They are cheap and are generally effective. Prices usually range from about $15-$35. Here is an example of one.

As you can see, it just requires that you splice into your existing factory speaker wires to "hi-jack" the signal, to which it converts into RCA connections on the other side. Almost every LOC will have two or more potentiometers on it to allow the user to increase or decrease the signal strength being output to the amp.
For a slightly more elaborate setup, using a powered LOC is recommended. These quality products generally offer many useful features such as adjustable crossover points, equalizing options and signal summing. The RCA signal output from these are generally much stronger than what a non-powered LOC is capable of. Here is an example:

The above picture is the Audiocontrol LC6i. Some other options are the Rockford Fosgate 360.1 or 360.2 and the JL Audio Cleansweep.
For those with the Bose system, it is to the users advantage to "hi-jack" their signal prior to entering the Bose amplifier in the rear of the car. The Bose amplifier adds some wild EQ curves to an otherwise smooth output from the Bose headunit. For those just adding subwoofers, this many not be an issue. However those replacing all Bose speakers and using all aftermarket amplifiers will want to have an even frequency curve to input into their aftermarket amps. The very best way to do this is to purchase one of the powered LOC mentioned above and tap into your factory speaker wires prior to them entering the Bose amp. Most of those LOC will "add" or "sum" all the signals on each speaker wire together, then split them up into separate RCA connections for Front, Rear, and Subwoofer out. For those people using a non-powered LOC, it is best to tap AFTER the Bose amp. The signal coming from the stock Bose headunit is low level. It is simply not strong enough to use without a powered LOC.
A great thread discussing this
So to recap, powered LOCs tap in before the Bose amp. Non-powered LOCs tap after the Bose amp.
- iPod integration modules available.
Many of the following modules require that your factory headunit's firmware be greater than 9.55. To find out which revision your Mazda RX-8 has, make sure the radio (FM) is turned on, then press and hold "TEXT." Then, also press and hold "1" at the same time for a few more seconds. The LCD should then report your firmware version.
Walkthrough on how to install ANY of these integration modules
XCarLink (formally AudioLink) = Retains steering wheel controls, charges iPod, options available for USB, mini-jack, video, bluetooth, and iPod connections. No song data displayed on RX8 readout above headunit. Will not work with below 9.55, 9.81, or 10.01 firmware.
Dension IceLink
DICE Electronics = Pretty much identical to the XCarLink but the R2 kit advertises that it will show song data on the RX8's screen above the headunit.
Axxess = Biggest advantage of this module is that it connects via the MiniDisc/Tape port on the rear of the factory headunit vice using the Satellite Radio port that every other one uses. So if you have the Satellite Radio option, you can now have iPod too! Displays song data on RX8 display. Retains Steering wheel controls, etc.
Neo Prolink
GROM Audio = Identical to the XCarLink. They also offer a USB style connector.
Mazda DOES offer an iPod integration kit very similar to all of these.
AuxMod will work with any firmware version
CD hack - iPod mod will work with any firmware version
Beefed up version of CD hack - iPod mod to include more control and works with any firmware version
- Making adapter plates for front Bose woofers
The front door speakers on RX8's equipped with the Bose system are 9" woofers. They are also very shallow for a woofer of that diameter. This is a very uncommon shape for aftermarket replacements. It is recommended that one install a 6.5" component set in it's place. The 6.5" woofer will install in place of the 9" woofer and the tweeter will replace the factory Bose tweeter. Adapter plates must be made in order to mount the new, smaller, woofer in the door. DO NOT make the adapter rings out of wood. Moisture will enter the door panel and warp/ruin them over time. Plexiglass or Lexan is recommended. These items can be found at Home Depot or Lowes. They are commonly sold in the window department. Do not attempt to use the thinnest sheet they sell. (0.094 I believe) That stuff chips, cracks and crumbles to bits between installation and daily vibration abuse. The next thickness up is about 0.224. This is much stronger and highly recommended. Once you have the proper materials, it's pretty obvious what we're trying to do. You need to cut the product into a circular shape roughly 9" in diameter so it can be mounted using the screw holes the 9" woofer used. Then cut a smaller hole in the center of it just large enough to mount your new 6.5" woofer in place. Measure twice and cut once. I found a jigsaw to be easy to work with. Use a fine tooth blade. It helps greatly to slowly pour ice water over the blade/cut as you are cutting. This keeps the blade and plastic cool and helps prevent the plastic from melting and rejoining right behind the cut you just made. When drilling holes, start with the smallest drill bit you have as a pilot. Do a quality job the first time so you won't be tearing the door apart again later.
Speaker sizes & specs:
base radio:
- front mids: 6x8", hole is 5x375" x 7.625" (door photo)
- 5x7" speakers will also work, it's the same mounting holes as 6x8"
- front tweeters: 1" (photo in sailpod)
- rear mids: 6x9" (photo)
- all speakers are 4ohm impedance
- front mids: 9", hole is about 8.4" diameter (door photo, photos of speaker and speaker opening & more)
- impedance: .5 ohms
- front tweeters: 2"
- impedance: 4 ohms
- rear mids: 6x9" (photo)
- impedance: 2 ohms
- rear tweeters: 2" (photo, another rear tweeters & mids photo)
- impedance: 4 ohms
- front center speaker: 3", but you can make a 4" fit (photo)
- impedance: 4 ohms
Front mounting depth (Base and Bose system): 3" safe, about 3.125" to glass (distance to window glass. deeper speakers can probably be mounted with a baffle)
What parts can I replace? (Bose and non-Bose):
Non-Bose system: Anything. Any of the speakers or the headunit may be replaced with any aftermarket equipment without any special precautions.
Bose system: The front tweeters, center speaker, rear 6x9's and headunit may be be replaced with any aftermarket equipment. The front 9" woofers in the doors and the rear Bose amp cannot be replaced alone with aftermarket.
Head unit:
Stock car harness is J-01:
- service manual's PIN-out
- good info on headunit PIN-out and wire colors
- dimming behavior and some other pin/harness info
- harness photos on a car w/ Bose: photo 1, photo 2
- doesn't look like we're going to get an actual RX8 specific harness from Metra or Scosche other than what comes with the Metra kit, but you can use any J-01 harness (e.g. one for 2003 Proteges)
- existing harnesses are missing a lot of pins from the top 2 center rows (the smaller pins)
- harness, into car:
- Scosche MA03B (only has 2 pins in top 2 rows)
- Metra Turbowire 70-7903 (has 3 pins in top 2 rows)
- reverse harness, into radio:
- Scosche MA03RB (only has 2 pins in top 2 rows)
- Best Kits BHO7902 (only has 2 pins in top 2 rows)
- Metra Turbowire 71-7903 (not sure about pins)
- base headunit:
- requires line-output converter(LOC) to use any aftermarket amplifier with RCA inputs. See section regarding LOC's for more info.
- Bose headunit:
- the signal into the amp is flat. Out of the Bose amp, not at all flat.
- Some guidance on hooking up an LOC. Also, instructions on tapping into the inputs to the rear amp
- Both HUs output differential speaker-level signals. Do not hook the HU signal directly to an amp's line-level/high-level inputs. Instead, connect to a line output converter first. Otherwise, frying of HU may occur.
- Some HU output analysis and LOC discussion
- Removing stock headunit breaks A/C and heater operation. An aftermarket installation kit is required when replacing Bose or non-Bose factory headunits to retain all stock functions, except steering wheel controls. In order to retain full steering wheel controls, you must also purchase an adapter to be installed with the Metra kit. The exact one will depend on what brand headunit you're installing, but PAC Audio makes them all. Factory navi will be unaffected when replacing the headunit.
- The following headunit replacement kits are available:
- Metra dash kit (A must read for those with Bose)
-They actually offer 4 different versions of the Metra RX8 kit. They offer piano black and flat black versions of both single and double din kits. The model numbers are as follows:
95-7510 = Double din flat black
95-7510HG = Double din high-gloss black
99-7510 = Single din flat black
99-7510HG = Single din high-gloss black
However the kit has had some reported problems here and there. Many have reported their disappointment with the color/finish match on the kit. Also, several have reported issues with their HVAC systems malfunctioning. Visit this thread for more info. Please be aware there has been many satisfied customers as well, so don't think the kit is total garbage. There has been several firmware version updates released. Please ensure you're getting a kit with the latest firmware or you plan on updating it yourself. - Corksport RX-8 Stereo Replacement kit (no longer available)
- Kanatech RX-8 Car AV Installation Set, (this is same as Corksport's kit) can possibly still be ordered via Japanparts
- Metra dash kit (A must read for those with Bose)
- How to remove headunit.
Headunit removal. Obviously ignore the IceLink stuff if you're not installing an ipod module.
Another headunit walkthrough
Basic Installation:
Amp installation:
- What is a proper ground?
- Running amp power through firewall behind washer fluid (shorest path, but only good for 8awg wire or smaller)
- Running amp power through rubber grommet on driver's side (longer)
- Remote turn-on: How to tap into accessory plug. Also note that the pink/black and yellow/white wires on the Bose amp inputs are hot only when ignition is on. You could probably use one of these as well.
- How to remove front door panels
- Base stereo speaker replacement, with Focal Polyglass 165V2 6.5" components
- Avoid using MDF for baffles, as water tends to build up during heavy rain. Better to use Lexan or black ABS plastic (source)
- How to run speaker wire into the doors through the Molex (additional photos from an 8)
- DIY: How to replace rear 6x9 speakers (includes rear seat removal)
Door/system wire colors:
- base radio:
- Door left: +R -W (tweeter same)
- Door right +W/B -Y/R (tweeter same)
- Rear left +V -P
- Rear right +W/L -B/L
- Bose radio:
- Door tweet left +R -W (door speaker connected direct to amp)
- Door tweet right +W/R -Y/R (door speaker connected direct to amp)
- Centre mid +L/B -G/Y
- Rear left +V -P (tweeters are co-axial, same colors)
- Rear right +W/L -B/L (tweeters are co-axial, same colors)
- DIY: Custom Sub Box Install (Two Alpine 10" Type-Es in a custom box with a 350W Alpine amp)
- DIY: Fiberglass Speaker Enclosure Dual 12" Orion xtr pro subs, Orion 900 amp, documents entire install and fiberglass work
- I want more bass. What are my options?
- Many people have reported increased bass and overall sound quality from replacing the factory headunit (Bose or non-bose) to an aftermarket unit. So if you're planning on doing this anyway, it might be wise to start with that before spending money on other equipment.
- To add a small amount of bass, a popular choice is to install an all-in-one powered subwoofer. Bazooka makes many of them in all different sizes and power ratings. . The major advantage of these options is that they are lightweight, relativity cheap and easy to install/uninstall. Those that race can uninstall one of these in easily under 60 seconds.
- Another popular choice is to add a small subwoofer inside the trunk access panel between the rear seats. A hole would obviously have to be cut in the panel and an enclosed box would need to be constructed on the rear of the panel. Then a separate amplifier would be required to power said subwoofer. Below are a few links to pics.
- Tamas's trunk passthrough install
- More trunk passthrough pics OP's pics are dead, but click on sig. Also more pics on page 2.
- Even more trunk passthrough pics Page 2 shows pics of a 10" installed.
- If you want a ton of boom, then you'll have to install one of the boxes mentioned here. These can accommodate up to two 12" subwoofers.
-List of RX8 specific subwoofer boxes
- Adding an aftermarket amp to the factory headunit (Bose and without Bose) / What is a line output converter (LOC)?
So you want to install an aftermarket amplifier, but your factory radio does not have RCA connections. What do you do? You use a line output converter. Also commonly called a source level converter. Features and build quality aside, all line output converters (LOC) accept a regular speaker wire input and convert it into an RCA connection. Now it's as simple as plugging your RCA cables into the LOC and then into your amplifier. But which LOC should I buy? What's the difference? Basically, we can split LOC into two categories: powered and non-powered. Powered LOC require a separate +12V source be ran to it for power. Non-powered does not require this.
A majority of LOC on the market are the simple non-powered design. If you walk into a car audio store and ask for a line output converter, you'll be getting a non-powered one. They are cheap and are generally effective. Prices usually range from about $15-$35. Here is an example of one.
As you can see, it just requires that you splice into your existing factory speaker wires to "hi-jack" the signal, to which it converts into RCA connections on the other side. Almost every LOC will have two or more potentiometers on it to allow the user to increase or decrease the signal strength being output to the amp.
For a slightly more elaborate setup, using a powered LOC is recommended. These quality products generally offer many useful features such as adjustable crossover points, equalizing options and signal summing. The RCA signal output from these are generally much stronger than what a non-powered LOC is capable of. Here is an example:
The above picture is the Audiocontrol LC6i. Some other options are the Rockford Fosgate 360.1 or 360.2 and the JL Audio Cleansweep.
For those with the Bose system, it is to the users advantage to "hi-jack" their signal prior to entering the Bose amplifier in the rear of the car. The Bose amplifier adds some wild EQ curves to an otherwise smooth output from the Bose headunit. For those just adding subwoofers, this many not be an issue. However those replacing all Bose speakers and using all aftermarket amplifiers will want to have an even frequency curve to input into their aftermarket amps. The very best way to do this is to purchase one of the powered LOC mentioned above and tap into your factory speaker wires prior to them entering the Bose amp. Most of those LOC will "add" or "sum" all the signals on each speaker wire together, then split them up into separate RCA connections for Front, Rear, and Subwoofer out. For those people using a non-powered LOC, it is best to tap AFTER the Bose amp. The signal coming from the stock Bose headunit is low level. It is simply not strong enough to use without a powered LOC.
A great thread discussing this
So to recap, powered LOCs tap in before the Bose amp. Non-powered LOCs tap after the Bose amp.
- iPod integration modules available.
Many of the following modules require that your factory headunit's firmware be greater than 9.55. To find out which revision your Mazda RX-8 has, make sure the radio (FM) is turned on, then press and hold "TEXT." Then, also press and hold "1" at the same time for a few more seconds. The LCD should then report your firmware version.
Walkthrough on how to install ANY of these integration modules
XCarLink (formally AudioLink) = Retains steering wheel controls, charges iPod, options available for USB, mini-jack, video, bluetooth, and iPod connections. No song data displayed on RX8 readout above headunit. Will not work with below 9.55, 9.81, or 10.01 firmware.
Dension IceLink
DICE Electronics = Pretty much identical to the XCarLink but the R2 kit advertises that it will show song data on the RX8's screen above the headunit.
Axxess = Biggest advantage of this module is that it connects via the MiniDisc/Tape port on the rear of the factory headunit vice using the Satellite Radio port that every other one uses. So if you have the Satellite Radio option, you can now have iPod too! Displays song data on RX8 display. Retains Steering wheel controls, etc.
Neo Prolink
GROM Audio = Identical to the XCarLink. They also offer a USB style connector.
Mazda DOES offer an iPod integration kit very similar to all of these.
AuxMod will work with any firmware version
CD hack - iPod mod will work with any firmware version
Beefed up version of CD hack - iPod mod to include more control and works with any firmware version
- Making adapter plates for front Bose woofers
The front door speakers on RX8's equipped with the Bose system are 9" woofers. They are also very shallow for a woofer of that diameter. This is a very uncommon shape for aftermarket replacements. It is recommended that one install a 6.5" component set in it's place. The 6.5" woofer will install in place of the 9" woofer and the tweeter will replace the factory Bose tweeter. Adapter plates must be made in order to mount the new, smaller, woofer in the door. DO NOT make the adapter rings out of wood. Moisture will enter the door panel and warp/ruin them over time. Plexiglass or Lexan is recommended. These items can be found at Home Depot or Lowes. They are commonly sold in the window department. Do not attempt to use the thinnest sheet they sell. (0.094 I believe) That stuff chips, cracks and crumbles to bits between installation and daily vibration abuse. The next thickness up is about 0.224. This is much stronger and highly recommended. Once you have the proper materials, it's pretty obvious what we're trying to do. You need to cut the product into a circular shape roughly 9" in diameter so it can be mounted using the screw holes the 9" woofer used. Then cut a smaller hole in the center of it just large enough to mount your new 6.5" woofer in place. Measure twice and cut once. I found a jigsaw to be easy to work with. Use a fine tooth blade. It helps greatly to slowly pour ice water over the blade/cut as you are cutting. This keeps the blade and plastic cool and helps prevent the plastic from melting and rejoining right behind the cut you just made. When drilling holes, start with the smallest drill bit you have as a pilot. Do a quality job the first time so you won't be tearing the door apart again later.
Last edited by firebirdude; Nov 23, 2011 at 12:28 PM.
- Front Bose speakers cutting out? No bass from Bose system?
DIY: Bose speakers in the doors not working? $1.67 relay fix.
- Common problems with the Metra kit
Clock does not keep time, runs slow, runs fast: This is a common problem that Metra acknowledges. The firmware of the axxess box needs to be updated. This can be done by sending the Axxess box to Metra for them to update free of charge, or you can purchase the small update cable online and update the firmware yourself. However, the cable is known to run about 50 bucks.
Older versions of the Metra kit had a poor piano black finish on the faceplate. Here's a picture. As you can see, the finish has pretty bad orange peel. This was corrected in their newer kits. No model numbers were changed so we have no way of knowing how old the kit is until you buy it and see for yourself.
Many users have reported problems with various features of their HVAC systems after installation of this kit. Sometimes it's the rear defroster, or recirculation, or A/C button, etc etc. No end-all fix has been found. Some people solve their problem by simply exchanging the Axxess box for a new one. Others seem to have their problem fixed with a simple firmware update (explained above). And still others just live with it.
- Can I install the factory navigation system from another RX8 into my non-navi RX8?
Is it possible? Yes. Is it worth the labor? Absolutely not. The factory navigation is dated and never was as user friendly as anything aftermarket. In addition, the installation of the navigation pop-up screen, gps antenna, navigation dvd player, touchpad, wiring harnesses, etc makes it a lose/lose. It's simply not worth all the effort and cost, to install an inferior navigation system. It is recommended to simply replace the factory headunit with an aftermarket double-din unit with built in navigation or purchase an outboard stand alone GPS such as one made by Garmin or Magellan.
- I removed and re-installed my factory headunit and now certain buttons/amber display doesn't work!
The actual face of the factory headunit is a separate piece from the actual CD player hardware. Like aftermarket faceplates, the connection is made with a set of male/female push pins. If, while pushing on the center of the faceplate, your display/buttons work again, this is certainly your problem. If pushing on the face of the headunit doesn't help, it is still advised to remove the headunit again and ensure the faceplate is tightly secured to the CD hardware.
The top amber colored display gets its info from a ribbon cable. This is another thing that is commonly bumped lose during headunit removal. Remove the headunit and A/C vents and ensure the ribbon cable is secure.
- What are some recommendations on brand names?
This list is by no means designed to be all inclusive, but rather to help those that may be just starting out or have been out of the hobby for a number of years. Also, some brand names make many lines of equipment from low-end to high-end. Price being your big clue obviously. Additionally, some brands may produce one piece of equipment very well and other pieces not so much. Great headunits for examples, but low quality speakers or amps. I'll try to note those where I can. Though everyone may not agree on my suggestions, this is just a ballpark.
Top tier: Focal, Diamond, Rainbow, Morel, CDT Audio, Arc Audio, Boston Acoustics, MMats, Zapco, USAmps, Polk, RE Audio, JL Audio, Image Dynamics, JBL, Infinity, Digital Designs
Mid tier: Diamond, CDT Audio, Boston Acoustics, Alpine, Rockford Fosgate, Kicker, Kenwood, Pioneer (headunits), Sony (headunits), Polk, RE Audio, JL Audio, Bazooka (subwoofers), Image Dynamics, JBL, Infinity, Soundstream, MB Quart
Bottom tier (avoid): Jenson, Pyle, Pyramid, Rockwood, Dual, Pioneer (speakers), Sony (everything except headunits), Visionik, Volfenhag, Crunch, Soundstorm, Lightening Audio, Bazooka (everything except subwoofers), Boss, XO Vision, Audiovox, MTX (sorry, it's true), Eclipse (sorry, it's true)
- Satellite radio connection options for the stock headunit
- What's a CarPC? How can I install one in my RX8?
A CarPC or Carputer is simply a custom computer that one builds and integrates into the car to control all A/V functions and possibly engine parameter monitoring. The main computer is usually hidden away in the trunk, glove box or under the dash and the monitor is either mounted in the factory navigation location or using the Metra headunit replacement kit.
-What gauge power wire should I use with my aftermarket amp?
Before selecting what gauge power wire you should use, it is important to understand that not all wire is created equal. Generic brands generally use thicker insulation and less copper to make it appear to be the same size, when in fact it's not. Also note that some use a large mix of aluminum and copper (maybe 90%-10% mix) rather than pure copper (98+%). This lowers the total amperage carrying capacity of the wire greatly. Now, we need to calculate the maximum possible current draw of the amplifier(s) in your system. Most every aftermarket amplifier has one or more fuses along the side of it. Add up the fuse values for all amplifiers in your system. For example, your subwoofer amp has two 40 amp fuses and your cabin speaker amp has three 20 amp fuses. Your total maximum possible current draw amount is 140 amps. Take that number, along with the total length of the main power wire run, and find your wire gauge on the table below. (note this is for 100% copper wire. If your wire is mixed, bump up one size) It is also important to use the same size ground wire and you use for power wire.

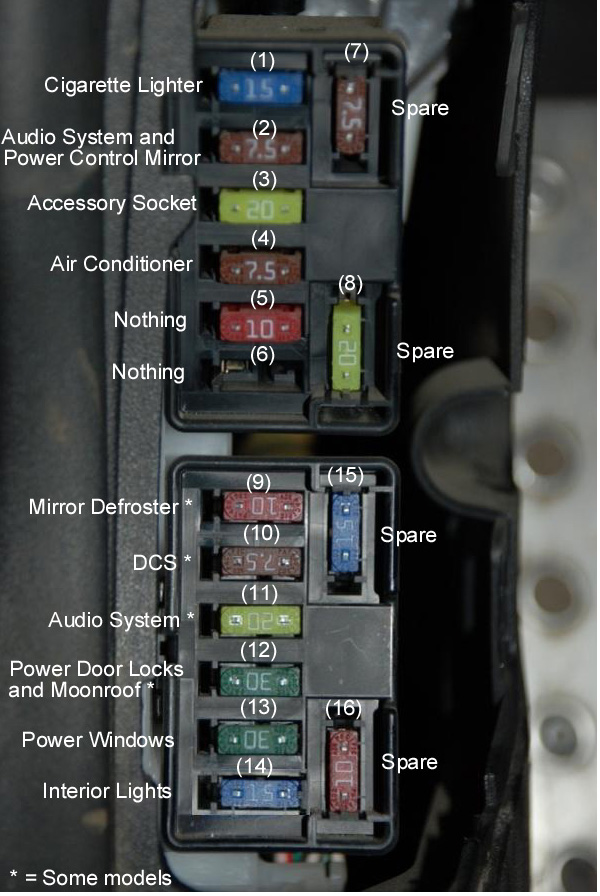
-Where should I tap into in my fuse box to get power?
- How to remove the rear seats :
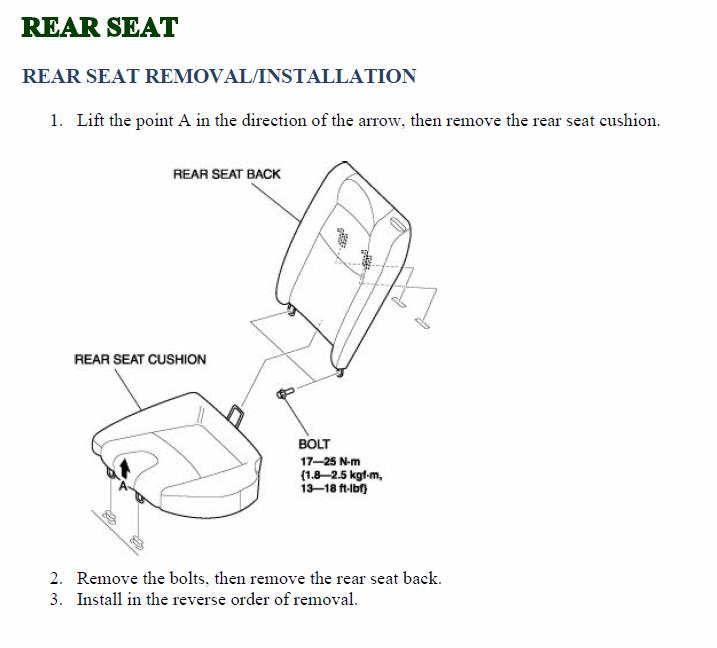
Pull straight up on the front of the bottom cushion (point A). Sometimes it's a little stiff, but give it a solid jerk upward. Now remove the bottom cushions from the car. Remove the two bolts from the bottom of each seat back (total of four bolts). Push the seat back straight up towards the car's headliner. As you can see in the above pic, each seat back has small little "hooks" that clip in similar in the way the seat bottom clipped in. Once they're unclipped, remove the seat back from the car. Install in reverse order. Ensure both seat parts and actually clipped down into place. Give them a solid push downward until you hear/feel the snap.
- What Optima battery should I use?
If you want to install an Optima battery (red or yellow top), the Optima 35R is the correct size to use with the RX8. You will also need the height adapter tray that is often included with the battery (although I've seen them sold without the tray too). The "R" stands for reverse. Meaning the side post terminals are on the opposite side from normal. Without the reverse terminals, you would be forced to extend your battery cables in order to connect them to the battery.The yellow top is rated at 650 CCA and the red top is rated at 720 CCA. The red top is a high quality battery that is maintenance free, vibration resilient, and can be mounted in any orientation. The yellow offers these same features, but also has a deep cycle ability. This means that it can be drained completely dead and then recharged without any adverse effects to the battery. This can be done repeatedly. In more common terms, the battery has no memory effect like most other car batteries do. If you plan on playing your system/having electronics on without the car running, by all means, the yellow top is the better option. If you never have any electronics on once the car is turned off, you will not notice any advantages of the yellow top over the red top. In fact, the red top offers a higher CCA rating and is less expensive. It would be the better choice in this situation.
- Hardwiring radar detector / Mounting radar detectors
Essentially you're just wiring +12V accessory (power only when key is on) and ground to the radar detector. One note though, some radar detectors run off +12VDC and others off +5VDC. You should either buy the hardwire kit specially made for your specific radar detector OR you can wire your ACC and ground connections directly to the cigarette lighter plug the radar came with. +12V on the nipple or tip of the plug and ground to the outer pressure plates on the sides. Stash it all under the dash and run the radar power wire to wherever you have the radar mounted. The cigarette lighter plug steps the +12 down to +5V. It's exactly the same as if it were plugged into the cigarette lighter.
How to hardwire your radar detector and mount near center windshield
Country Joy Crafts super solid radar detector mount. There are two mounting sizes offered. RX8 owners have debated about the correct sizes for certain year RX8's. But it IS confirmed that Mazda has used both size mirror posts in the RX8. So you will need to measure your rear-view mirror post with a tape measure and find out yourself.
Blendmount is anther option for mounting your radar detector.
- Headlights dimming with bass? Charging system upgrades/ High Output Alternators
The stock alternator is rated at 100amps. When shopping for a high output alternator, it is of the utmost importance to find out the amperage output AT IDLE. I have run across many alternators that are labeled as high output, which in fact are, but only at 2k RPM and above. While sitting at idle they actually output LESS amperage then the factory alternator! A complete waste of money for the car audio world if your headlights dim everytime you're stopped at a streetlight.
Irragi Alternators the RX8 is not specifically listed in these, but the owner has been contacted and says they can make them. Price quoted was $419-$459 for 180-220amp. I have personally used their alternators in past vehicles of mine with many years of great success. Another option for the 8 is the ProPower alternator. The group buy may be over, but the alternators are still being made. So it's another option. Ohio Generator also has been making quality H/O alternators for years. Give them a call and I'm 100% positive they will be able to provide you with an alternator that will fit into the RX8.
- SAFELY installing remote start on a manual trans RX8 AND operating with factory keyfob!
- Auto window up/down with the factory keyfob
- How to remove door panels
- How to make your windows have one-touch down AND UP!
- No heat? No A/C? This may be your fix!
- How to remove your headliner
- Navi System FAQ
- Replacing interior and exterior bulbs with LEDs
- How to replace red LEDs in factory headunit Another one
- Replace the red LEDs behind your factory dash cluster
- DIY Footwell LEDs for $10!
- How to code a NEW KEYFOB yourself!
- How to fix center armrest slanted/broken button
DIY: Bose speakers in the doors not working? $1.67 relay fix.
- Common problems with the Metra kit
Clock does not keep time, runs slow, runs fast: This is a common problem that Metra acknowledges. The firmware of the axxess box needs to be updated. This can be done by sending the Axxess box to Metra for them to update free of charge, or you can purchase the small update cable online and update the firmware yourself. However, the cable is known to run about 50 bucks.
Older versions of the Metra kit had a poor piano black finish on the faceplate. Here's a picture. As you can see, the finish has pretty bad orange peel. This was corrected in their newer kits. No model numbers were changed so we have no way of knowing how old the kit is until you buy it and see for yourself.
Many users have reported problems with various features of their HVAC systems after installation of this kit. Sometimes it's the rear defroster, or recirculation, or A/C button, etc etc. No end-all fix has been found. Some people solve their problem by simply exchanging the Axxess box for a new one. Others seem to have their problem fixed with a simple firmware update (explained above). And still others just live with it.
- Can I install the factory navigation system from another RX8 into my non-navi RX8?
Is it possible? Yes. Is it worth the labor? Absolutely not. The factory navigation is dated and never was as user friendly as anything aftermarket. In addition, the installation of the navigation pop-up screen, gps antenna, navigation dvd player, touchpad, wiring harnesses, etc makes it a lose/lose. It's simply not worth all the effort and cost, to install an inferior navigation system. It is recommended to simply replace the factory headunit with an aftermarket double-din unit with built in navigation or purchase an outboard stand alone GPS such as one made by Garmin or Magellan.
- I removed and re-installed my factory headunit and now certain buttons/amber display doesn't work!
The actual face of the factory headunit is a separate piece from the actual CD player hardware. Like aftermarket faceplates, the connection is made with a set of male/female push pins. If, while pushing on the center of the faceplate, your display/buttons work again, this is certainly your problem. If pushing on the face of the headunit doesn't help, it is still advised to remove the headunit again and ensure the faceplate is tightly secured to the CD hardware.
The top amber colored display gets its info from a ribbon cable. This is another thing that is commonly bumped lose during headunit removal. Remove the headunit and A/C vents and ensure the ribbon cable is secure.
- What are some recommendations on brand names?
This list is by no means designed to be all inclusive, but rather to help those that may be just starting out or have been out of the hobby for a number of years. Also, some brand names make many lines of equipment from low-end to high-end. Price being your big clue obviously. Additionally, some brands may produce one piece of equipment very well and other pieces not so much. Great headunits for examples, but low quality speakers or amps. I'll try to note those where I can. Though everyone may not agree on my suggestions, this is just a ballpark.
Top tier: Focal, Diamond, Rainbow, Morel, CDT Audio, Arc Audio, Boston Acoustics, MMats, Zapco, USAmps, Polk, RE Audio, JL Audio, Image Dynamics, JBL, Infinity, Digital Designs
Mid tier: Diamond, CDT Audio, Boston Acoustics, Alpine, Rockford Fosgate, Kicker, Kenwood, Pioneer (headunits), Sony (headunits), Polk, RE Audio, JL Audio, Bazooka (subwoofers), Image Dynamics, JBL, Infinity, Soundstream, MB Quart
Bottom tier (avoid): Jenson, Pyle, Pyramid, Rockwood, Dual, Pioneer (speakers), Sony (everything except headunits), Visionik, Volfenhag, Crunch, Soundstorm, Lightening Audio, Bazooka (everything except subwoofers), Boss, XO Vision, Audiovox, MTX (sorry, it's true), Eclipse (sorry, it's true)
- Satellite radio connection options for the stock headunit
- Adding-on the factory satellite radio equipment: First, your headunit must be satellite ready. You must have the SAT button on your headunit. 2004 and early 2005 RX8's did not come with this, and as such, their headunit would have to be swapped out with a newer one before adding any additional equipment (SAT equipped vehicles production date 8/1/2004 (VIN 50143221)). Second, just because your headunit already has the SAT button, it does not mean you have all the satellite radio equipment installed and can just start your subscription. If you cannot hear the Sirius ad channel when pressing the button, you don't have the equipment installed. Those looking to add the equipment will need part numbers 0000-81-G01B (~$300) and 0000-81-K02B (~$12).
- Adding an outboard satellite radio receiver: Any outboard sat radio receiver can be used with the RX8 factory headunit. All of the receivers have a built-in FM transmitter BUT THEY SUCK. You will want a hard wired connection for the best sound quality satellite radio can offer. Couple ways you can do this. First method is to use the XM or Sirius FM adapter kit. This will sit in-line with your headunit's antenna plug. For XM sat receivers, the kit is XMFM1. For Sirius receivers, the kit is FMDA25. From here, use the suction cup the kit came with or purchase one of the many aftermarket brackets to hold your receiver in a desirable location. Another method to achieve the same sound quality is to install one of the RX8 iPod adapters that feature a 3.5mm headphone plug. Most satellite receivers have a 3.5mm headphone plug, so this would enable you to listen to satellite radio OR your iPod with the same connector.
- What's a CarPC? How can I install one in my RX8?
A CarPC or Carputer is simply a custom computer that one builds and integrates into the car to control all A/V functions and possibly engine parameter monitoring. The main computer is usually hidden away in the trunk, glove box or under the dash and the monitor is either mounted in the factory navigation location or using the Metra headunit replacement kit.
- Unbeatable source of CarPC info
- Solid DIY RX8 CarPC walkthrough
- Though it's dated and the pics are broken, here's a walkthrough on powering the factory navigation hood without all the nav equipment.
- Other threads and walkthroughs can be found using the search function with the terms "carpc" or "carputer".
-What gauge power wire should I use with my aftermarket amp?
Before selecting what gauge power wire you should use, it is important to understand that not all wire is created equal. Generic brands generally use thicker insulation and less copper to make it appear to be the same size, when in fact it's not. Also note that some use a large mix of aluminum and copper (maybe 90%-10% mix) rather than pure copper (98+%). This lowers the total amperage carrying capacity of the wire greatly. Now, we need to calculate the maximum possible current draw of the amplifier(s) in your system. Most every aftermarket amplifier has one or more fuses along the side of it. Add up the fuse values for all amplifiers in your system. For example, your subwoofer amp has two 40 amp fuses and your cabin speaker amp has three 20 amp fuses. Your total maximum possible current draw amount is 140 amps. Take that number, along with the total length of the main power wire run, and find your wire gauge on the table below. (note this is for 100% copper wire. If your wire is mixed, bump up one size) It is also important to use the same size ground wire and you use for power wire.
-Where should I tap into in my fuse box to get power?
- How to remove the rear seats :
Pull straight up on the front of the bottom cushion (point A). Sometimes it's a little stiff, but give it a solid jerk upward. Now remove the bottom cushions from the car. Remove the two bolts from the bottom of each seat back (total of four bolts). Push the seat back straight up towards the car's headliner. As you can see in the above pic, each seat back has small little "hooks" that clip in similar in the way the seat bottom clipped in. Once they're unclipped, remove the seat back from the car. Install in reverse order. Ensure both seat parts and actually clipped down into place. Give them a solid push downward until you hear/feel the snap.
- What Optima battery should I use?
If you want to install an Optima battery (red or yellow top), the Optima 35R is the correct size to use with the RX8. You will also need the height adapter tray that is often included with the battery (although I've seen them sold without the tray too). The "R" stands for reverse. Meaning the side post terminals are on the opposite side from normal. Without the reverse terminals, you would be forced to extend your battery cables in order to connect them to the battery.The yellow top is rated at 650 CCA and the red top is rated at 720 CCA. The red top is a high quality battery that is maintenance free, vibration resilient, and can be mounted in any orientation. The yellow offers these same features, but also has a deep cycle ability. This means that it can be drained completely dead and then recharged without any adverse effects to the battery. This can be done repeatedly. In more common terms, the battery has no memory effect like most other car batteries do. If you plan on playing your system/having electronics on without the car running, by all means, the yellow top is the better option. If you never have any electronics on once the car is turned off, you will not notice any advantages of the yellow top over the red top. In fact, the red top offers a higher CCA rating and is less expensive. It would be the better choice in this situation.
- Hardwiring radar detector / Mounting radar detectors
Essentially you're just wiring +12V accessory (power only when key is on) and ground to the radar detector. One note though, some radar detectors run off +12VDC and others off +5VDC. You should either buy the hardwire kit specially made for your specific radar detector OR you can wire your ACC and ground connections directly to the cigarette lighter plug the radar came with. +12V on the nipple or tip of the plug and ground to the outer pressure plates on the sides. Stash it all under the dash and run the radar power wire to wherever you have the radar mounted. The cigarette lighter plug steps the +12 down to +5V. It's exactly the same as if it were plugged into the cigarette lighter.
How to hardwire your radar detector and mount near center windshield
Country Joy Crafts super solid radar detector mount. There are two mounting sizes offered. RX8 owners have debated about the correct sizes for certain year RX8's. But it IS confirmed that Mazda has used both size mirror posts in the RX8. So you will need to measure your rear-view mirror post with a tape measure and find out yourself.
Blendmount is anther option for mounting your radar detector.
- Headlights dimming with bass? Charging system upgrades/ High Output Alternators
The stock alternator is rated at 100amps. When shopping for a high output alternator, it is of the utmost importance to find out the amperage output AT IDLE. I have run across many alternators that are labeled as high output, which in fact are, but only at 2k RPM and above. While sitting at idle they actually output LESS amperage then the factory alternator! A complete waste of money for the car audio world if your headlights dim everytime you're stopped at a streetlight.
Irragi Alternators the RX8 is not specifically listed in these, but the owner has been contacted and says they can make them. Price quoted was $419-$459 for 180-220amp. I have personally used their alternators in past vehicles of mine with many years of great success. Another option for the 8 is the ProPower alternator. The group buy may be over, but the alternators are still being made. So it's another option. Ohio Generator also has been making quality H/O alternators for years. Give them a call and I'm 100% positive they will be able to provide you with an alternator that will fit into the RX8.
- SAFELY installing remote start on a manual trans RX8 AND operating with factory keyfob!
- Auto window up/down with the factory keyfob
- How to remove door panels
- How to make your windows have one-touch down AND UP!
- No heat? No A/C? This may be your fix!
- How to remove your headliner
- Navi System FAQ
- Replacing interior and exterior bulbs with LEDs
- How to replace red LEDs in factory headunit Another one
- Replace the red LEDs behind your factory dash cluster
- DIY Footwell LEDs for $10!
- How to code a NEW KEYFOB yourself!
- How to fix center armrest slanted/broken button
Last edited by firebirdude; Dec 1, 2011 at 07:49 PM.

One might include a section on the addition of sound-dampening material (and advice to stay away from the asphalt-based stuff. As you know, I'm a big fan of Second Skin.
https://www.rx8club.com/series-i-interior-audio-electronics-24/cheapest-audio-upgrade-ever-%3D-%2450-215671/ among others.
https://www.rx8club.com/series-i-interior-audio-electronics-24/cheapest-audio-upgrade-ever-%3D-%2450-215671/ among others.

So far I have replaced the front tweeters with a set of kappa 10.9t as well as the rear deck with a set of kappa 693.9i. I would like to replace the front speakers as well as remove the bose amps add an aftermarket amp and not add a subwoofer.
What would be a good pair of front speakers to put in considering I'm removing the woofers in the doors and not planning to add a subwoofer?
What would be a good pair of front speakers to put in considering I'm removing the woofers in the doors and not planning to add a subwoofer?
Last edited by Stars25; Dec 26, 2011 at 10:05 PM.
Thread Starter
Deals on wheels
Joined: Apr 2005
Posts: 987
Likes: 6
From: Murfreesboro, TN
Update on the battery section needed - I had the 35R in my car and it went bad (right after the warranty expired :\ ) and had to have it replaced - they gave me a new battery I'm pretty sure it's the red top 35 - it didn't have the side terminals but also didn't need the extension that the 35R had or any kind of height adapters. - also when I put my car in the Optima web site that's the recommended battery
Updated in the sticky wikked. Thanks.
I don't think you'll be pleased with the results, aftermarket amp or not. You're replacing a 9" speaker designed to provide extensive low end punch with a 6 1/2" mid-range speaker. The 9" doesn't even have to be high quality to bump more than a 6 1/2". Without a subwoofer, I just don't think you'll be happy with the replacement. You might think about a cheap low power Bazooka tube. Light, small, inexpensive, built-in amp and super easy to install and remove. Probably $150 and an hour to install. 30 seconds to remove for the track.
So far I have replaced the front tweeters with a set of kappa 10.9t as well as the rear deck with a set of kappa 693.9i. I would like to replace the front speakers as well as remove the bose amps add an aftermarket amp and not add a subwoofer.
What would be a good pair of front speakers to put in considering I'm removing the woofers in the doors and not planning to add a subwoofer?
What would be a good pair of front speakers to put in considering I'm removing the woofers in the doors and not planning to add a subwoofer?
What about installing a subwoofer and still replacing the front 9" speakers?
My front driver side amp has already failed totally and the passenger side is on and off. I have two relays I could replace on the amps but I would much rather spend however much to actually improve the front speakers.
The only reason I didn't want to install a sub woofer was because of the many rattles but I'm in the process of getting them all taken care of by reading through the rattle hunt topic.
Would it be a good idea to replace the fronts with 6.5" as well as add a subwoofer? I don't fully understand everything in the audio aspect yet, but would I need more than one aftermarket amp if I want to power all my speakers as well as a subwoofer?
Another option that would still only require one amp would be to use a 5-channel amp, such as the Kicker ZX700.5. 4 of the channels for the cabin speakers and the 5th higher-power channel to power any subwoofer you want. But you'll have to pick out a subwoofer and enclosure yourself. Odds are you'll spend more money.
You don't sound like you're looking to spend much money and aren't looking for a large amount of bass. Just trying to get your stereo up and running again mainly. Here's a 10" 100W model that comes with all the wiring you'd need. I know my way around an RX8 and around audio equipment, so I could have that installed in under an hour. It's really very easy. If I was really feeling frisky, I could just tap the power from the rear cigarette lighter and have it done in under 30 minutes. The sub amp is fused with a 15amp fuse and probably pulls half that during normal operation. The cig lighter circuit is fused at least 15 amp from the factory (think it's 20 amp actually), so it really wouldn't be a problem.
Last edited by firebirdude; Dec 27, 2011 at 12:13 PM.

Sure. Of course you can do that. That's why I mentioned the Bazooka tube. It's a subwoofer with vented enclosure and amp all built into one. You'd still need a 4-channel amp to power all your cabin speakers, but the subwoofer situation would all be taken care of.
Another option that would still only require one amp would be to use a 5-channel amp, such as the Kicker ZX700.5. 4 of the channels for the cabin speakers and the 5th higher-power channel to power any subwoofer you want. But you'll have to pick out a subwoofer and enclosure yourself. Odds are you'll spend more money.
You don't sound like you're looking to spend much money and aren't looking for a large amount of bass. Just trying to get your stereo up and running again mainly. Here's a 10" 100W model that comes with all the wiring you'd need. I know my way around an RX8 and around audio equipment, so I could have that installed in under an hour. It's really very easy. If I was really feeling frisky, I could just tap the power from the rear cigarette lighter and have it done in under 30 minutes. The sub amp is fused with a 15amp fuse and probably pulls half that during normal operation. The cig lighter circuit is fused at least 15 amp from the factory (think it's 20 amp actually), so it really wouldn't be a problem.
I am reading this topic (https://www.rx8club.com/series-i-interior-audio-electronics-24/diy-self-amplified-bazooka-tube-install-bta10100-143458/) about how to install that specific tube, and it says the cig lighter power will cause the speaker to pop when turned on so most likely I'll follow that install thread.
One more question
 There is an abundance of opinions on this forum about which sound deadening material to use. Since you have a ton of experience with the audio in the RX8, which one would you recommend?
Last edited by Stars25; Dec 27, 2011 at 04:35 PM.
Thank you firebirdude! I'm looking at different sub-amp combos and I think I might go with the infinity basslink just because it will take up a bit less space than the bazooka tube.
I am reading this topic (https://www.rx8club.com/showthread.php?t=143458) about how to install that specific tube, and it says the cig lighter power will cause the speaker to pop when turned on so most likely I'll follow that install thread.
One more question There is an abundance of opinions on this forum about which sound deadening material to use. Since you have a ton of experience with the audio in the RX8, which one would you recommend?
I am reading this topic (https://www.rx8club.com/showthread.php?t=143458) about how to install that specific tube, and it says the cig lighter power will cause the speaker to pop when turned on so most likely I'll follow that install thread.
One more question
There is an abundance of opinions on this forum about which sound deadening material to use. Since you have a ton of experience with the audio in the RX8, which one would you recommend?
Thread
Thread Starter
Forum
Replies
Last Post
Touge
Canada Forum
3
Sep 10, 2015 08:07 AM