
Smutterbutter Build


Driving my unreliable rx8
Joined: Oct 2012
Posts: 2,051
Likes: 7
From: Alvarado, Tx
Check the step wear on your spare iron. If it is good just use it. The only thing I haven't seen that you should have bought is a Starrett 380-18 precision straight edge $64 from amazon
You can use that to make sure the irons are really flat after grinding and aren't twisted or have any low spots.
You can use that to make sure the irons are really flat after grinding and aren't twisted or have any low spots.

Thread Starter
Listen...you smell that?
Joined: Sep 2012
Posts: 228
Likes: 2
From: Pewaukee, WI
Thanks for the heads up for a good deal on a straight edge! Just ordered the last one available! For some reason back when I was collecting tools for the rebuild I could only fine really expensive ones.
I had to look back a ways in this thread but I measured the step wear on the first rear iron to be about 4 thousands which if I remember right is pretty borderline as far as needing to be resurfaced or not.
Where did I put that quote for a reman from Mazmart again, hmmmmm...
I had to look back a ways in this thread but I measured the step wear on the first rear iron to be about 4 thousands which if I remember right is pretty borderline as far as needing to be resurfaced or not.
Where did I put that quote for a reman from Mazmart again, hmmmmm...

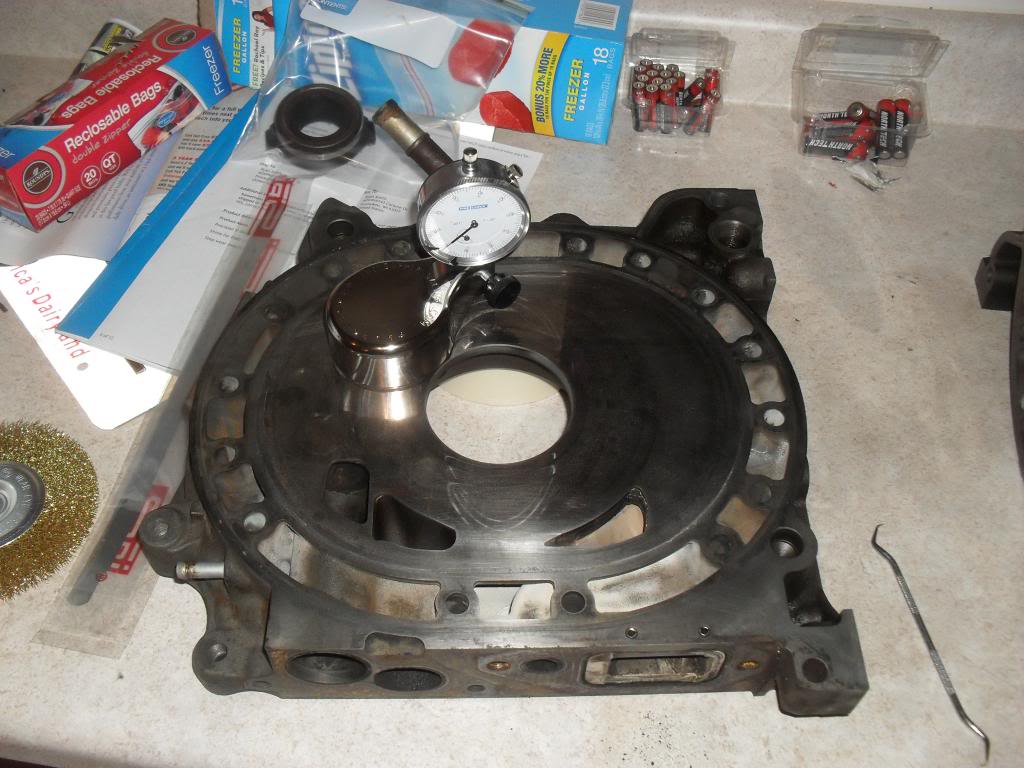
You should have bought this...
Its the only legit tool to actually measure stepwear with.
Step wear measuring tool
Its the only legit tool to actually measure stepwear with.
Step wear measuring tool
Thread Starter
Listen...you smell that?
Joined: Sep 2012
Posts: 228
Likes: 2
From: Pewaukee, WI
You should have bought this...
Its the only legit tool to actually measure stepwear with.
Step wear measuring tool
Its the only legit tool to actually measure stepwear with.
Step wear measuring tool
Shazzam!
Thread Starter
Listen...you smell that?
Joined: Sep 2012
Posts: 228
Likes: 2
From: Pewaukee, WI
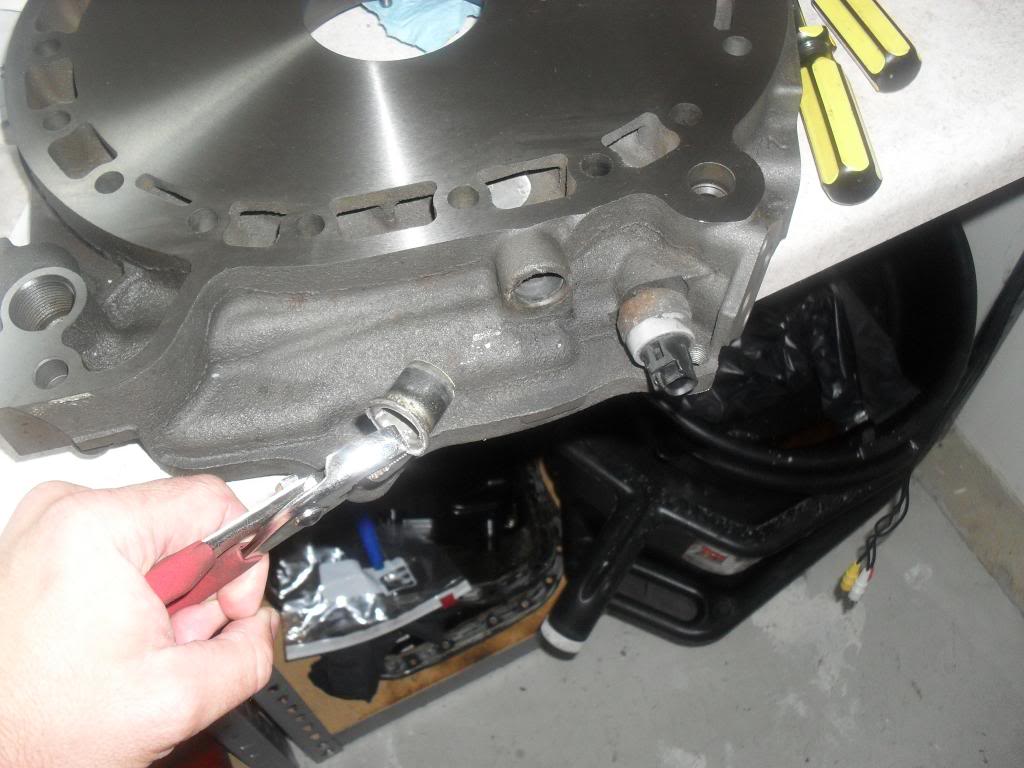
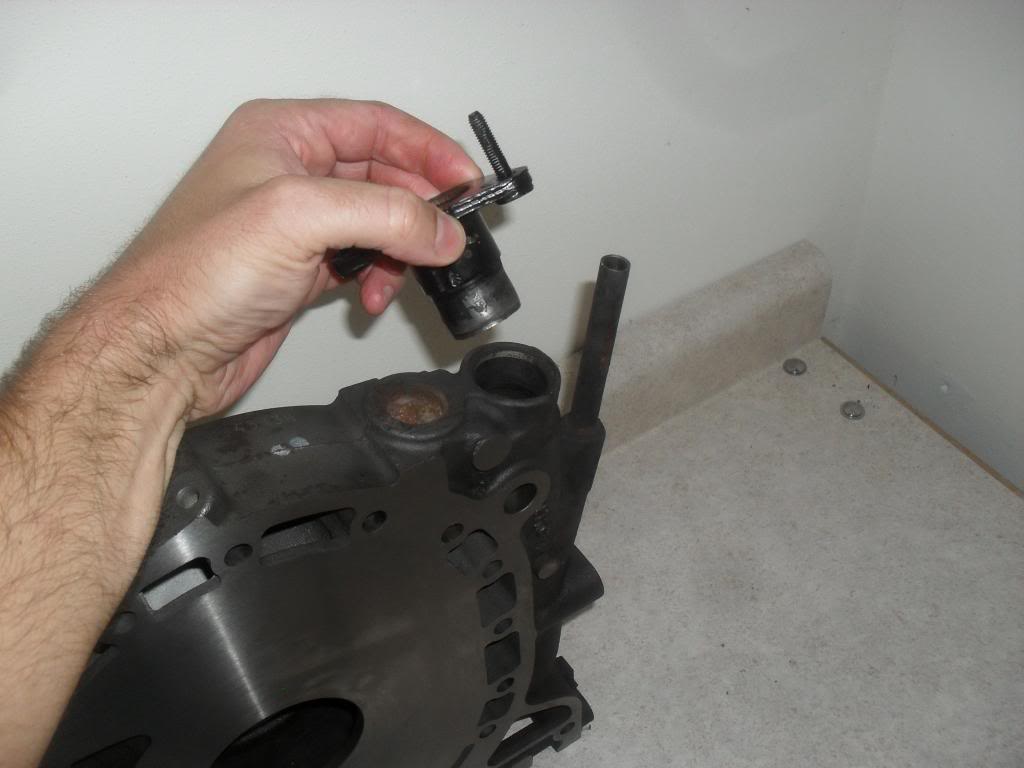
Magic indeed good sir! I'll tell you what was magic was how easy I slid that coolant pipe out! Hopefully the new one will go in that shmoove. I'll order 2-3 of them just to make sure I get it in and the position right, they're only 8 bucks from mazdaspeed.
Driving my unreliable rx8
Joined: Oct 2012
Posts: 2,051
Likes: 7
From: Alvarado, Tx
I'm glad to see that worked good. The plates do look good.
Have you bought your mazsport oil regulator? If not I have a real easy cheap way to raise your pressure. And you are able to return it to stock if you decide to.
Have you bought your mazsport oil regulator? If not I have a real easy cheap way to raise your pressure. And you are able to return it to stock if you decide to.
Thread Starter
Listen...you smell that?
Joined: Sep 2012
Posts: 228
Likes: 2
From: Pewaukee, WI
Not yet, I was going to go with their oil pressure regulator and water pump. Although I've seen here and there that Mazda updated the S1 water pumps to resolve the cavitation issue. If there's truth to that I may just get a used updated one. I've got a upgraded starter ready to put on, a newish set of oil coolers/lines, and will get a new radiator/hoses too.

They fixed the S1? I know they updated the S2 but its not swappable as far as I know. Edit: I don't keep up with this stuff but it would be news to me.
Last edited by J8635621; Sep 1, 2013 at 07:36 PM.
Driving my unreliable rx8
Joined: Oct 2012
Posts: 2,051
Likes: 7
From: Alvarado, Tx
Not yet, I was going to go with their oil pressure regulator and water pump. Although I've seen here and there that Mazda updated the S1 water pumps to resolve the cavitation issue. If there's truth to that I may just get a used updated one. I've got a upgraded starter ready to put on, a newish set of oil coolers/lines, and will get a new radiator/hoses too.
I Looked at a few videos of people smashing the regulator tops then adjusted the bolt length to be about the same compression level on the spring. I got lucky and my first try it gave me 127 PSI. You can use a compressor to test it, but I just installed mine and checked it.
If you were wrong then Just pull the oil pan and give it another try. I'd error to the side of too little instead of too much.
The only problem I've seen with this is sometimes I have to turn the dip stick a little to make it go in the last inch. If you used a set screw instead of a bolt it would probably cure that.
Last edited by logalinipoo; Sep 2, 2013 at 09:01 AM.
Thread Starter
Listen...you smell that?
Joined: Sep 2012
Posts: 228
Likes: 2
From: Pewaukee, WI
Use a Fine Thread 5/16"(I think) BOTTOM tap. Tap the hole in the end of the regulator. Screw in a 1.25" long bolt with a backup nut and Tighten down the nut. Then shim the relief in the front housing with a few washers.
I Looked at a few videos of people smashing the regulator tops then adjusted the bolt length to be about the same compression level on the spring. I got lucky and my first try it gave me 127 PSI. You can use a compressor to test it, but I just installed mine and checked it.
If you were wrong then Just pull the oil pan and give it another try. I'd error to the side of too little instead of too much.
The only problem I've seen with this is sometimes I have to turn the dip stick a little to make it go in the last inch. If you used a set screw instead of a bolt it would probably cure that.

Mazmart said it wasnt possible to fit the S2 water pump on the S1 front cover.
The oil pressure regulator should be the same I think.
Increasing the oil pressure requires two things, the modified regulator and three small shims for a bolt/spring in the front cover.
The oil pressure regulator should be the same I think.
Increasing the oil pressure requires two things, the modified regulator and three small shims for a bolt/spring in the front cover.
Thread Starter
Listen...you smell that?
Joined: Sep 2012
Posts: 228
Likes: 2
From: Pewaukee, WI
That's what I thought. The regulator and shims you get from mazmart don't require any extra modification to work. I was confused by what logalinipoo was describing. I assume there's a few ways to DIY but I'm all for using a kit.
Yea you can make your own by crushing the stock regulator, but for $100 why not do it proper and buy a legit one.

FWIW I squashed my own and was amazed at how easy it was to do .
Driving my unreliable rx8
Joined: Oct 2012
Posts: 2,051
Likes: 7
From: Alvarado, Tx
Yeah Smutter, I wish I had taken some pics (but wanted to test it first). It is really simple and only 5 to 10 bucks. If you are intrested PM me and I'll send you my number.
Instead of crushing it I did the same thing with a bolt and no risk to messing up the threads on the bottom.
Last edited by logalinipoo; Sep 2, 2013 at 10:15 PM.
If you are putting together an engine and its a last minute thing I can understand using a press, but if you are planning out a long build why not?
Which could lead to piston ring failure and blowing welds on manifold gaskets.
Thread Starter
Listen...you smell that?
Joined: Sep 2012
Posts: 228
Likes: 2
From: Pewaukee, WI
So I'm thinking I'm gonna send the spare rear iron I have from the first engine off to either RacingBeat or Mazdatrix to get lapped. I haven't called yet but I assume they will replace the heater core pipe themselves which will give me some piece of mind that it won't leak.
The other thing I having a hard time finding any info on is how to properly replace that oil filler connector to the middle iron. My guy said just to clean it up with some brake cleaner and put some blue gel Loctite around it and push it in. Searching isn't really giving me any useful info, maybe racing beat will share their method when I call tomorrow.
The other thing I having a hard time finding any info on is how to properly replace that oil filler connector to the middle iron. My guy said just to clean it up with some brake cleaner and put some blue gel Loctite around it and push it in. Searching isn't really giving me any useful info, maybe racing beat will share their method when I call tomorrow.

Registered
Joined: Jun 2010
Posts: 15
Likes: 0
Here is my take on the el cheapo pressure regualtor.. it running around 7-7,5bar
I used spring thats normally in in the front cover, its longer and stiffer and will still allow the entire hole in the regulator body to be uncovered while maintaining 7-8 bar.
if you press the stock regulator till you have this pressure the spring is already almost binded and can only allow a few mm of travel anymore.
http://www.rx7club.com/attachments/n...1042011474-jpg
I saw the photos of the wear mark at the exh port and I am also wondering where it came from. I opened up my engine and it was mint exept for the apex seals to be like a banana and the side seals to be almost 1mm too short.
step wear was quite acceptable but there is 1 scuff at the exh port just like yours. 1 corner seal was broken in 2, but at the place where the wear mark is at the exh port the cornerseal doesnt come, so I am a bit in the dark what caused it.
oh, and the engine was bought as good with unkown mileage and ran for about 2 years in our track mx-5 with megasquirt injection, OMP deleted and only premix.
Last edited by Rub20b; Sep 25, 2013 at 09:45 AM.
Thread Starter
Listen...you smell that?
Joined: Sep 2012
Posts: 228
Likes: 2
From: Pewaukee, WI
Slowly! 2 kids under 3, work, and wife don't leave a lot of opportunity to hide out in the garage. I have managed complete a few odds and ends though like
1.Disassembled LIM completely, hard to imagine any of those valves could move at all anymore with the amount of carbon build up. I'll try to dig up some pics, it was pretty impressive.
2.Had 2 flywheels resurfaced, 2 is always better than 1 right?
3. Sent all six fuel injectors to Deatschwerks for cleaning and flow testing, turns out they really weren't in too bad of shape, still some improvement made though
4. Bought Mazmart water pump, thermostat, and oil pressure regulator, atkins thermo pellet, RB sandwich plate, and water temp port, probably a few other things I can't remember
Next I think I'm gonna re-measure clearances one last time, go through all my disassembly notes and make the big long order sheet for mazdaspeedmotorsports.
Goal is to be up and running by April for the first Solo event of the year...