When you click on links to various merchants on this site and make a purchase, this can result in this site earning a commission. Affiliate programs and affiliations include, but are not limited to, the eBay Partner Network.
So , not quite what you hoped for . But a good improvement all the same !
Precisely,...though I'm still getting things sorted, e.g. engine break-in, minor boost leaks, AFRs, and EBC tuning, before doing a few bonafide WOT runs to quantify improvement / performance.
I've learned so much on my journey from the likes of those listed in my thread initial post, ...and have gained more respect for what's being done here. We h/b and are very fortunate to h/b able to manage the inevitable "losses" along the way to some achievements.
This is a recurring cautionary note to self...
EDIT: This clip does not engender for me remorse or regret for having boosted my 8, I enjoyed the challenge, and love the result ; rather... the level of thoughtfulness that is required ...at every step along the way...
not quite what I had hoped to see, but close enough
Originally Posted by TeamRX8 on 9-7-2020
JCB is about the only other lowmount even close. It’d be interesting to see what that system could do with a slightly smaller 6062 over the 6266 to hit that output and manifold pressure target.
Congratulations on your success those numbers are great, hopefully you can enjoy the finished product for a short time before deciding on another slight modification to start.
I find these threads fascinating to follow and appreciate all the information sharing.
I find these threads fascinating to follow and appreciate all the information sharing.
Thank you
Thanks Northzone! If you've read my thread you know it's been a journey...of cyclic learning, achievements, & failures. Sometimes I feel a bit like the mythological character Sisyphos...........
Anyway, atm I'm just wanting to get her tuned well...I.e. to a nice fun, but "safe" level, sort a few aesthetic issues, and enjoy.
Well, I deleted the last VD I posted, ~ 340wHP & ~290 ftlbs ...as it appeared optimistic, and I've not been able to duplicate that performance at ~10#. So, I have to conclude that there was some error involved. The VD posted 8/1 is accurate ...as I've duplicated those performance #s.
Installed a new offset coupler pre-compressor today and resolved a vac leak, which had been causing elevated AFRs on WOT. With that resolved ...and presuming it holds, I'll attempt to optimize spool..., and better hold boost to redline (8k). More to come...
Well, put about 1,000 miles on her last week driving down to see my Mom and back.
She drove like a champ, and in ~90°F ambient maintained:
- IATs: ambient + 9 (+/- 3) °F ,
- ECT: 190 (+/- 10)°F,
- Oil T: 183 (+/- 5)°F
I kept boost ~9# b/c there were simply no E85 stations along the route. In ~ 450 miles there were zero w/in ~ 20 - 30 miles of my route! Soon as I returned I made the 30 min. drive in our Expedition to refill my 14 gal can. I did not realize how lucky I am to have two E85 carrying stations close to my home.
Backpressure is building more quickly w/the 5862 forcing my WG open sooner than I'd like at my current WG spring level. So, I think I need to transition to a 4-port solenoid in order to attain & sustain my top end goal w/out increasing my WG spring. More to come on that.
I've not had any success attempting to pair my MAC 4-port solenoid and Greddy Profec B Spec II controller. The 4-port switches and diverts airflow between A & B ports with an independent 12v source, but not under Greddy PBS II modulation. When installed ...I can hear and feel the solenoid switching..., but it does not provide control. I contacted Greddy tech support and was told that their controllers are specifically designed for 3 port controllers and consequently the 4-port wouldn't work. Fair enough. Don't really know how "technical" the tech was b/c he couldn't explain why. Lol.
Anyway, as they say "where there's a will there's a way" - not always - ; nevertheless I thought I'd check here. I've not been able to find any specific information addressing the MAC 4-port solenoid w/ the Greddy PBS II compatibility ...in the manual, via Google or forum search. "4-port" searches here return threads regarding the 4-port engine.
So, my question: has anyone been able to successfully run a MAC 4-port solenoid w/ a Greddy PBS II? If so, how?
That is looking ............ sweet as ! Are you able to compare with the other turbo ?
Thanks!
My general impressions to date are:
- the 5862 appears to spool ~100-200 rpm faster under WOT
- the 5862 faster spool comes at the cost of increased back pressure, ...acceptable for my power goals, but which I've had to work to mitigate
- but the 6266 ...when spooled and pulling... is a beast on the Renesis. (Gives as much as the Rene can handle)
Was the engine low on compression? How many miles were you able to put on it while turbo'd?
I'd also be interested if you are still considering selling your old turbo given it is still in decent condition.
Yes, my low budget rebuild served me well..., but it was time. I put ~20k turbo miles on the previous rebuilt engine & 6266 before installing the reman and 5862.
I was continuing to experience boost &/or vac leaks which wreak havoc w/ AFRs, so decided it was time to pull my turbo piping and put proper bead rolls on them.
Since all the DIY bead roller tool vids I saw required welding...., thought I'd share my simpler version which got the job done. Required:
- vice grips
- large washer
- fence post bracket (or exhaust hanger bracket)
Assembly:
1. Cut notch in bottom jaw of vice grips
2. Fit large washer in notch on vice grips
3. Use fence or exhaust bracket and vice-grips w/ washer fitted together as bead rolling tool.
The set-up cost $1.65, price of the fence bracket... as I had everything else, and produces uniform smooth beads on the kit sections for a DIY manual operation.
I'm hoping having all post MAF sections properly beaded will produce and sustain a "tight" system, and eliminate the nagging leaks I was seeing particularly on WOT runs from low rpm when the rate of airflow is accelerating most rapidly.
And you don't sacrifice the vice grips, i.e. just remove the washer until you need a bead rolling tool in the future.
9.23.22 Update: Properly bead rolling the charge sections of my kit h/b considerably effective. For more than a year now ...boost leaks h/b eliminated.
Nice work ! Hard to believe a pro kit was relying on stitch welds like that! I actually went and bought a bead roller recently off Ebay, which wasn't very expensive and made the job super easy. But If I'd seen how easily you were able to do it I'm sure I wouldn't have bothered.
Nice work ! Hard to believe a pro kit was relying on stitch welds like that! ....
Originally Posted by strokercharged95gt
Good work on the bead roller. A little heat in the tubing would probably help a bit aswell.
Thanks guys!
Brett - True. Smh I knew so little when I began...
Stroker - What and miss the opportunity to build Popeye forearms. Seriously, good idea...will definitely introduce a little heat next time.
She goes back together this weekend. Looking forward to evaluating the impact.
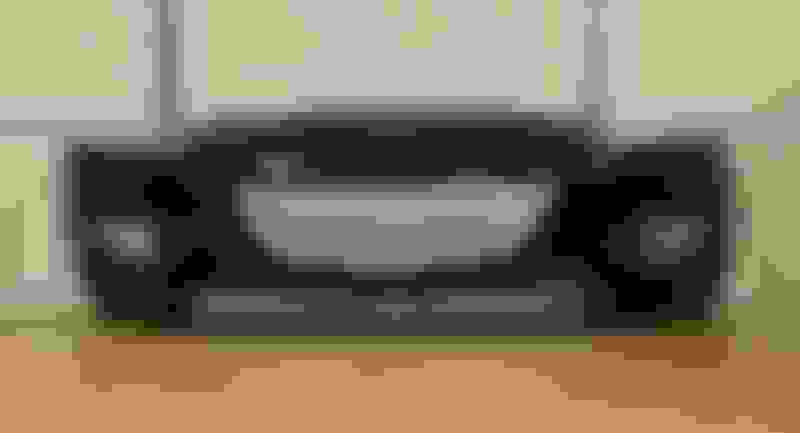
With the bumper off to do the section bead rolling... I addressed a few other items I noticed on inspection:
. 1. IC couplers: IC couplers were rubbing and "wearing" against the fog light mount towers.
- Resolution: Trimmed the offending towers and added some additional protection over the couplers.
2. Air bypassing the rad: My rad being completely sealed around... I found that the air pressure being created was causing the aluminum undertray to deflect downward, tear away the sealing material, and allow air to pass under the rad.
- Resolution: Fabricated a simple bracket to tie the undertray to the the rad, eliminating undertray deflection, and air bypassing the rad.
3. Protection: Got her "masked up": installed protective mesh grill over bumper openings to protect IC, rad, & oil coolers.
Undertray supported and IC couplers protected
.
resealed
. Masked up" .
 08-01-2021, 05:37 PM


 ; rather... the level of thoughtfulness that is required ...at every step along the way...


 Seriously, good idea...will definitely introduce a little heat next time.