
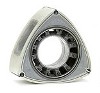
DIY: RB Gauge Pod + Nordskog Digital Gauges


OK, I have read this post back when you published - nice mod. I'm curious of the dimmer function. You said you used the ashtray light circuit? Is that what RB does also with there mech gauges? I'm curious about a complete dimming function I guess. Seems you said either 100% with lights off, and 50% with lights on, correct?

Thread Starter
Administrator
iTrader: (7)
Joined: Mar 2004
Posts: 22,606
Likes: 3,474
From: The Dark Side
Yup, Racing Beat recommends tapping into the ashtray light on their insturctions. (Nordskog had similar instructions)
I remember reading that my guagues were not intended to have full dimming options (as our gauge cluster) has but I'm pretty sure that if wired properly it might work. Not sure exactly how to pull that off though.
What guages are you trying to get to dim?
I remember reading that my guagues were not intended to have full dimming options (as our gauge cluster) has but I'm pretty sure that if wired properly it might work. Not sure exactly how to pull that off though.
What guages are you trying to get to dim?


Thread Starter
Administrator
iTrader: (7)
Joined: Mar 2004
Posts: 22,606
Likes: 3,474
From: The Dark Side
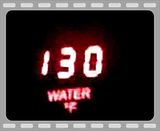
Just wanted to update everyone on these guages. I finally ran into a problem with them. Here's a crappy cell phone video I took while trying to drive.
As you can see, the temp readings are all over the place!
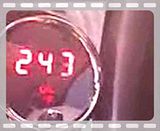
Now the question is: What's causing the false readings? Is it the gauge itself, a connection, or a bad sending unit?
In order to try and rule out the gauge as faulty, I swapped the sending lines from my water temp and my oil temp. ie; the water temp would now show oil readings and vice versa
This was super easy to do, simply unscrew the gauge pod and swap the BLUE wires for the two gauges.
Here's a video of what happened:
That pretty much ruled out the Oil Temp gauge as now the Water temp gauge is doing the same thing.
Next step was to check all my connections. Again, this is fairly easy as the ground wires are easy to spot in the engine bay and all the gauges share the same ground wire. (post 1 talks about soldering 3 wires off the main ground)
Conclusion: must be a bad sending unit.
Since I've had the gauges for a few months, I decided it was best to contact Nordskog directly about the problem. I sent them an email and they were VERY quick to respond. The Manager at Nordskog agreed that the symptoms all pointed to a bad sending unit and all they needed was an address to ship out a replacement. now THAT'S great service!! I had the replacement part 2 days later.
Happy to report that after swapping out the sending unit this past weekend, the gauges are now working PERFECTLY! A big thanks to Nordskog for stepping up and being helpful.
Removing the RB adaptor to replace the sending unit is not all that tough but is is made more difficult since all your connections are already in place. (as opposed to when you installed it) This is where I was glad I had left plenty of extra slack when I originally installed everything. (the extra slack was zip tied underneath the dash, not in the engine bay)
Hope this helps...
As you can see, the temp readings are all over the place!
Now the question is: What's causing the false readings? Is it the gauge itself, a connection, or a bad sending unit?
In order to try and rule out the gauge as faulty, I swapped the sending lines from my water temp and my oil temp. ie; the water temp would now show oil readings and vice versa
This was super easy to do, simply unscrew the gauge pod and swap the BLUE wires for the two gauges.
Here's a video of what happened:
That pretty much ruled out the Oil Temp gauge as now the Water temp gauge is doing the same thing.
Next step was to check all my connections. Again, this is fairly easy as the ground wires are easy to spot in the engine bay and all the gauges share the same ground wire. (post 1 talks about soldering 3 wires off the main ground)
Conclusion: must be a bad sending unit.
Since I've had the gauges for a few months, I decided it was best to contact Nordskog directly about the problem. I sent them an email and they were VERY quick to respond. The Manager at Nordskog agreed that the symptoms all pointed to a bad sending unit and all they needed was an address to ship out a replacement. now THAT'S great service!!
I had the replacement part 2 days later.Happy to report that after swapping out the sending unit this past weekend, the gauges are now working PERFECTLY! A big thanks to Nordskog for stepping up and being helpful.
Removing the RB adaptor to replace the sending unit is not all that tough but is is made more difficult since all your connections are already in place. (as opposed to when you installed it) This is where I was glad I had left plenty of extra slack when I originally installed everything. (the extra slack was zip tied underneath the dash, not in the engine bay)
Hope this helps...


What pointy ears?
Joined: Jul 2006
Posts: 301
Likes: 6
From: California
Good to hear you got the problem fixed! I remembered speaking with Nordskog support (for information) and they were quite responsive.
No problems with my gauges --- still work like a champ! But, yeah, I agree with your "ignorance is bliss" statement about temps --- it's amazing how hot this engine gets in the summer in the deserts of the southwest US
No problems with my gauges --- still work like a champ! But, yeah, I agree with your "ignorance is bliss" statement about temps --- it's amazing how hot this engine gets in the summer in the deserts of the southwest US

Hi Jedi,great write up. You inspired me to do the same so now i have all items purchased and ready to install. I've noticed that the gauges do not sit flush on the Racing Beat pod,due to the curvature of it. Is this the same with yours?
Thread Starter
Administrator
iTrader: (7)
Joined: Mar 2004
Posts: 22,606
Likes: 3,474
From: The Dark Side
hey irx: glad to hear you've been inspired!
yeah, due to the natural curvature of the pod, there will be areas where it does not sit flush but because the side of the gauges are also black, you will not notice this once it's installed.
yeah, due to the natural curvature of the pod, there will be areas where it does not sit flush but because the side of the gauges are also black, you will not notice this once it's installed.
Question
How come this Oil Pressure sending unit in Pic 1
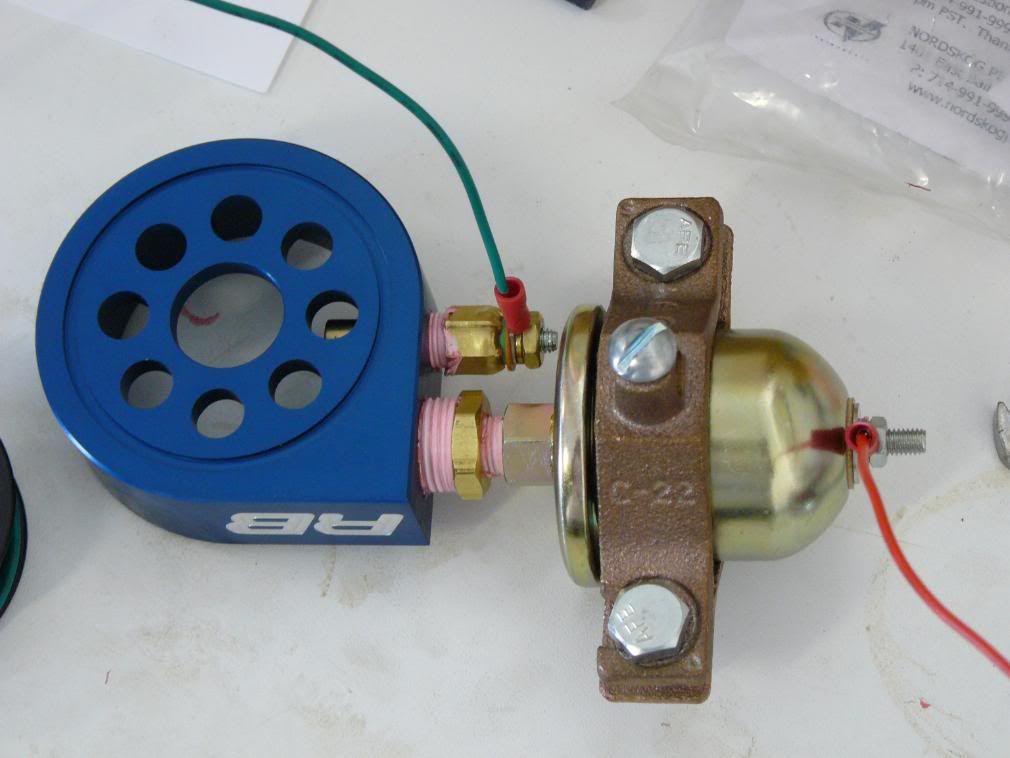
Is not the same as the one in the wiring picture?

I purchased the one in the top picture, will it work, and what is that copper clamp around it? Mine did not come with one.
Thanks in Advance.
Is not the same as the one in the wiring picture?
I purchased the one in the top picture, will it work, and what is that copper clamp around it? Mine did not come with one.
Thanks in Advance.

