When you click on links to various merchants on this site and make a purchase, this can result in this site earning a commission. Affiliate programs and affiliations include, but are not limited to, the eBay Partner Network.
No it's definitely an M8... I'm not sure why there is so much clearance.
Weird. Well anyways I ordered one from this page here (as you can see there are only two options available in the M8/12mm size, so I picked the one with the largest outer diameter (3/4 inch) so as to match the original as closely as possible), so hopefully it will work even though it doesn't have quite so much outer diameter (closer to 20mm OD instead of the strangely large 31.88mm OD you measured on the original)!
One more part down. Now I'm just waiting on that spacer and my new blue hump hose to arrive! The blue is sold out now, but don't worry - I did snag the last 3" wide by 3" long blue hose they had, after measuring my own stock black/orange one! Can't wait to start getting this underway!
One other thing - was the Pettit kit built to run with the stock catalytic converter? Or do you have to have a catless midpipe like a BHR, Megan Racing, TurboXS, Agency Power, etc. in order to keep the presumably-increased exhaust output from frying the stock cat? And is this in any way contingent on how much boost you're running? I ask because I'm in California and paranoid about getting pulled over for exhaust noise from a BHR pipe/GReddy Exhaust, being told to pop my hood, and subsequently getting my car impounded and held hostage for the obviously-insanely-modded engine and street-illegal supercharger :/
I'm sure the one you ordered will be fine, I'm not sure why this spacer is so large.
For what it's worth, I had BHR make me a resonated midpipe with a cat, but instead of the normal cat, I sent them an HJS cat. Look into them a little bit - it seems to be the only non-OEM cat that can handle our exhaust temps. Not cheap, but should be worth it. Also, BHR's midpipe isn't super loud, which would be good for you. I haven't fired my car up yet though, so can't say for sure.
Let me know if you need more information on this.
I'm rolling on a BHR mid-pipe myself with the single resonator. Why did you install a cat? I'm pretty sure we can't pass emissions with a supercharger - even with a cat, so I would assume it's not for that purpose... Is it just for quieting the car down a bit more, maybe reducing the caustic exhaust smell? Is it a high-flow cat, or just OEM standard spec?
Last edited by OtherSyde; Mar 31, 2019 at 09:31 PM.
I had a high flow cat on my car according to the previous owner. I switched to a BHR mid pipe when I was chasing an ignition issue and wanted to rule out a clogged cat. When I pulled it off, the cat was pretty clogged. I am guessing it had maybe 20k miles on it. I have no idea what brand it was.
I have been running cat less now for like 3 years and have passed emissions with my cobb even when I was not exempt. No check engine lights but obviously the smell is pronounced.
I have been running cat less now for like 3 years and have passed emissions with my cobb even when I was not exempt. No check engine lights but obviously the smell is pronounced.
I'm assuming you're talking about passing the the OBD-II test, and not the sniffer test?
Hey OtherSyde, if you're back with your car, can you get me dimensions on the RX8Performance intake filter? I think you were the one that had that. I'd need diameter at the top and bottom and length (not including the part you clamp to the pipe).
I'm assuming you've installed and it fits under the bumper just fine?
Thanks.
Yep, I'm back with my car and I do have the RX8Perfromance intake. I have not installed it yet. I have little doubt it'll fit, since it was explicitly designed for our superchargers. But I'll measure it all out once I get home tomorrow.
Hey OtherSyde, if you're back with your car, can you get me dimensions on the RX8Performance intake filter? I think you were the one that had that. I'd need diameter at the top and bottom and length (not including the part you clamp to the pipe).
I'm assuming you've installed and it fits under the bumper just fine?
Thanks.
Hey. Making a new post so the forums will ping your email and alert you if you're subscribed to the thread. So I took a bunch of rough measurements of it but I missed the part in your post about not needing the connector attached, so just add about an inch of length to the visible pipe (the silicone connector slides down onto the intake pipe about an inch)...
.
.
.
.
Let me know if you need more measurements/estimates/guesstimations!
[EDIT] - Just noticed you said "intake filter" - the actual filter is about 5" in diameter and 8" long, give or take. I think it's the same size filter that the AEM intake uses, and it's the same filter used by the turbo CAI kit that this one is based on -I can't imagine why it wouldn't fit under our bumpers. It should fit fine. I guess I'll know pretty soon though.
Last edited by OtherSyde; Mar 31, 2019 at 10:21 PM.
who makes this ??? im going to need it for my kit!!!
Originally Posted by OtherSyde
Hey. Making a new post so the forums will ping your email and alert you if you're subscribed to the thread. So I took a bunch of rough measurements of it but I missed the part in your post about not needing the connector attached, so just add about an inch of length to the visible pipe (the silicone connector slides down onto the intake pipe about an inch)...
Let me know if you need more measurements/estimates/guesstimations!
In other news, I've been a very busy beaver as far as progress on my SC and the parts it needs...
I got my TiAL blow-off valve! Came with the 1" flanges as well.
Holy crap this thing is enormous! It barely fits! Also, it turns out I did have the second-generation upgraded aluminum Pettit BOV instead of the crappy first-gen plastic one, but oh well.
The included flow diagram
Is this correct? Can someone verify if I've got the flow direction right on this or tell me if I put it on backwards somehow?
I got my LRB Speed aluminum intake tray! Apparently I've gotta bend it into shape myself though...
Lots of silicone tubing for vacuum hoses, oil return, coolant, etc.
Got my Bennett Built aluminum coolant tank setup! Had to buy separate caps but that's fine, I am liking the square ACDelco caps I found online!
I had previously cut my gaskets from the brown Karropak paper-like gasket material, but I started to think that it was too thin - so I ordered some 1/16" Viton sheet and used a silver marker to trace the previous gaskets, and a scalpel to cut out some thicker ones.
The new gauge material on the left is almost exactly the same thickness as the older (and very fried, torn up) original Pettit gasket material. I think it'll work smashingly.
This is the exact nomenclature of the Viton gasket sheeting, in case anyone is needing to make some gaskets (evidently the Pettit originals rarely survive more than one installation due to engine heat).
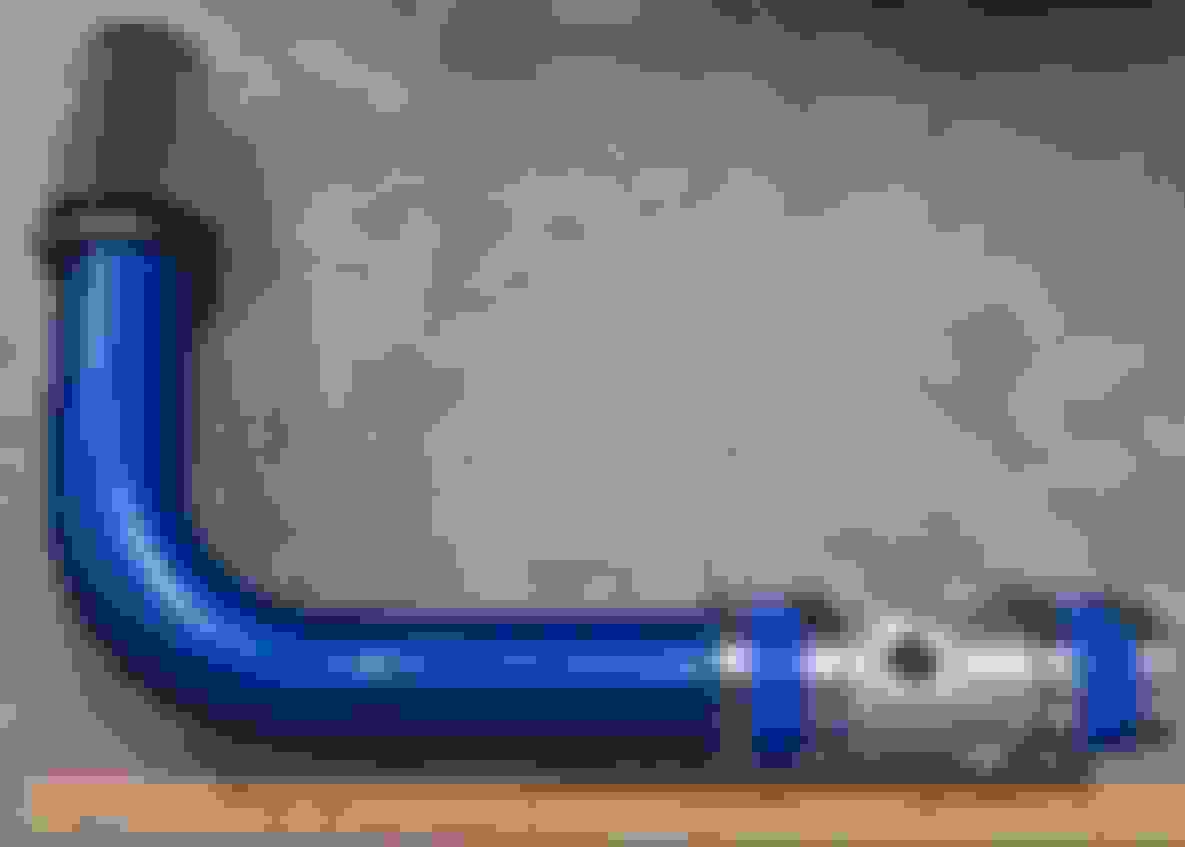
I also received my M8 12mm aluminum spacer for the water-pump mounting bracket! I have two extras if someone needs one.
Spacer fits perfectly on an M8 stud, and seems like it will be the right width with the water pump installed. That M8 hex-head bolt you see here is a temporary mount I just found in my garage; the real 150mm M8 double-ended stud (just like the original from the Pettit kit) is coming in the mail in a week or so. I had to order two, so if anyone needs an extra one it's up for grabs as I won't need a second one.
Additionally, I completed the paint job on the kit by finishing the UIM. Once I'd cut away the masked areas to expose the silver lettering, I coated it with several layers of gloss clear-coat high-temp engine enamel for longevity/durability.
And here it is, mocked up on my dead engine!
Front angle! I also replaced the black hump-hose and black BOV tubing with blue versions.
Passenger side angle!
Drivers side angle!
So yeah - busy/productive couple of weeks! I don't know when I will actually get this sucker installed, but the time is drawing near for sure and I'm getting excited! I think I've got most of it figured out at this point, except for the wiring situation - that's the only thing that's gonna throw me. And I still need a supercharger base-tune as well. Gotta figure that out before starting as well.
And jorx7 - the intake kit is made especially for the Pettit kit by RX8Performance.com. It's an adapted version of the kit they made for the GReddy turbo kit. Email Scott Glassburn - scott@rx8performance.com - and he can get you one fabricated with the MAF tube and silicone couplers in the color of your choice!
Thanks for all the pics. Also, your setup is looking sweet! Makes me want to get my act together... but I'm starting to build a house and looking for a new job so, I've been a bit busy. It looks like we've gone the same route on most of our goodies. I had BennettBuilt make those tanks for me too, got the TiAL valve, the LRB tray, etc. Should look good.
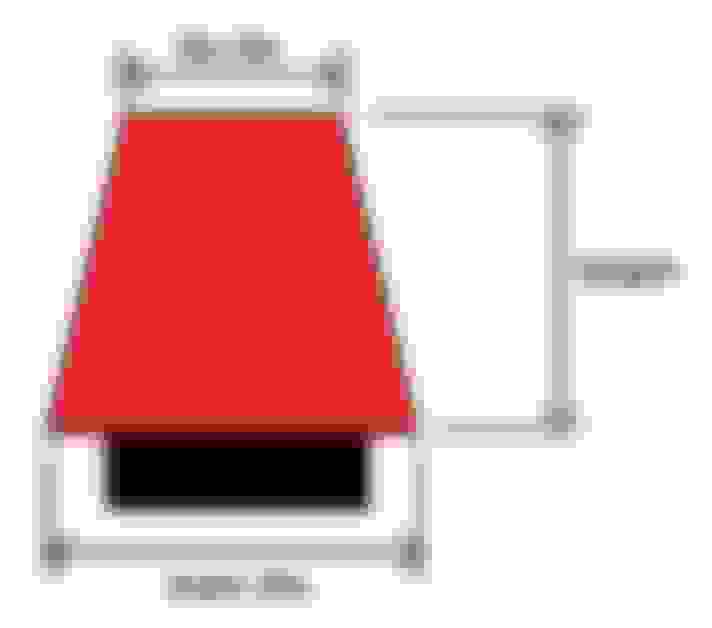
As far as dimensions, what I really need is for the filter (like you saw) - see attached ghetto sketch. I'm going to order an AEM Dry Flow filter, but need the "base" (large) outside diameter, the "top" (small) outside diameter, and the length from base to top of the filter part only. Also, just to double-check as mine isn't with me, it's a 3.5" dia. pipe, right? If you could confirm those 4 filter dimensions, I'd really appreciate it! I didn't get a filter with mine.
Also, what are you hooking to the nipple on the driver side of the Pettit intake casting? Returning vacuum lines there instead of to the intake by the MAF?
Hey OtherSyde, another request lol. Can you get a pic showing how much clearance is between the blower and the engine? I was going to add some insulation there to keep the blower cool but I'm not sure how much room I have. Thanks!
hey othersyde can you post some more shots of how your vacuum lines are running. my intercooler is getting made next week, so want to have better idea as to routing the hoses.
also any one just cap off the oil injectors with a vacuum cap?? we did it on rx7s all the time to improve oil flow through the system
I don't have much to add here other than to say the RENESIS is much different than older 13B's and most people suggest throwing your old engine "tricks" out the window when dealing with this engine. This is just what I've seen from research here, not first-hand experience.
Keck, I noticed his supercharger looked way nicer than mine too. What I saw was it's one made by Autorotor, while mine is from Kenne Bell. They're one company now I think. I had mine rebuilt and the outside looks as shitty as it did when I sent it in lol.
Thanks for all the pics. Also, your setup is looking sweet! Makes me want to get my act together... but I'm starting to build a house and looking for a new job so, I've been a bit busy. It looks like we've gone the same route on most of our goodies. I had BennettBuilt make those tanks for me too, got the TiAL valve, the LRB tray, etc. Should look good.
As far as dimensions, what I really need is for the filter (like you saw) - see attached ghetto sketch. I'm going to order an AEM Dry Flow filter, but need the "base" (large) outside diameter, the "top" (small) outside diameter, and the length from base to top of the filter part only. Also, just to double-check as mine isn't with me, it's a 3.5" dia. pipe, right? If you could confirm those 4 filter dimensions, I'd really appreciate it! I didn't get a filter with mine.
Thanks! One day I will stop prettying it up and actually install the damn thing - it's been gradually gestating in my garage for over two years now! But yeah, Keck - my compressor is Autorotor, and it came to me broken and in pieces so I sent it to Kenne Bell to have it repaired, refurbished, and reassembled!
Anyways, here's the pics of the K&N filter supplied with the CAI...
. Inner Diameter - 3.5" and it fits perfectly snug onto the CAI pipe, meaning the pipe is 3.5" external diameter. . . Total Outer Diameter - about 4.25" . . End Diameter - 3 and 1/8" . . Total Length - Just under 7 and 3/4" . . Measured at the point of least clearance, the ruler is sitting on the little unused raised bolt-hole you see in the next picture. About 1/4" at the tightest spot there, but heat-shielding is generally soft and malleable to some extent, so you could either squeeze some 1/2" thick stuff in there, or else just cut it appropriately. . . Maybe 1/2" of clearance in most areas?
.
. I can easily stick my fingers between the engine and compressor. There's probably enough clearance to get some 1/2" thick insulation or heat-shielding in there . .
Last edited by OtherSyde; Apr 3, 2019 at 08:00 PM.