When you click on links to various merchants on this site and make a purchase, this can result in this site earning a commission. Affiliate programs and affiliations include, but are not limited to, the eBay Partner Network.
Pretty sure it’s not. The ignition relay power supply runs into the ignition condensor and Pin C on the OE coils, but that’s the eliminated circuit on this harness. The wire that runs to the condensor (technically a capacitor) is black/white and then the bolt down tab on the body of it is the ground point. It goes away more or less.
The trigger/primary winding ground wire to Pin B on the OE coils is black though and it’s functionally retained on the harness. If it’s broken the coils won’t function. This is one of three total grounds on the IGN-1A setup and still Pin B. Pin A is the trigger wire on both too, Pin C is now the secondary winding ground to the rotor/head being fired, new Pin D is the B- ground, and new Pin E is the B+ power supply that replaces what was the Pin C coil power supply on the OE harness. Technically it wasn’t eliminated, if I understand it correctly they just use the original ignition relay power to now instead trigger the harness relay to supply high amp power direct from the battery through Pin E. Which we already know that part of the circuit is working properly.
Yeah its not the black/white wire on the condenser circuit. Just a black wire (assumed ground) that ran through the main loom that was broken. Funny thing is that I check continuity between Pin B ground on the factory coil harness and that wire and got nothing, no continuity. But when I connected that wire to other grounds, I got the coils to fire. Maybe that goes to a sensor ground on the ECU, either way it seems to be fixed.
So you�re saying that even though it ran perfect up until he swapped from the D585 coils that despite these new coils are putting out 2x+ the juice of the D585 it can�t light off the same spark plugs?
Hey you gotta check all the boxes, just going off what I have had happen before.
I know people are selling mounts for like $150 for these coils.
All I did here is get four bolts (6" inches in length) with top nuts and 10 spacers about 2"in length.
Cut 2 spacers in half drill 4 holes in my scrap metal mount I made, run the 4 bolts through the holes and finish like so.
I also arranged them in the firing position of the engine so as you look from the driver side fender, the bottom left is leading front, bottom right is leading rear, etc. Replacing a coil would take about 2-3 minutes. I also flipped the front two coils around to give more space for the spark plugs wires as they were damn near touching my ECU box in the configuration below. None of the coils touch and plenty of air around them to breathe.
Last edited by strokercharged95gt; 08-20-2019 at 12:06 PM.
Oh yeah, referring back to the factory coil wiring diagram above, that #19 on the black Pin B coil wire grounding point is one of the grounding tabs for the engine wiring harness on top of the engine there. If you have the actual paperbook electrical manual it ties all that stuff together. The early online version is missing a bunch of details. You can’t really rely on that. Go buy the book.
the condensor grounding tab bolts directly on top. That’s why it’s grounding point is a solid black circle rather than a numbered tab.
Wow what a difference. Usually takes about 2-3 seconds of cranking before the motor fires. It now fires in less than one second. I actually thought something was wrong because it started to quickly.... Time to start upping the water/methanol nozzles...
First pull last night on the new coils setup. I put the 500 cc/min nozzle back in at the pre-turbo location. Still 500 cc/min in the Greddy elbow. Also changed the setting on the controller to start injecting at 10 psi and be full on by 25 psi.
Please ignore the funny spike in the graph, I found that my negative battery terminal was a little loose and was likely the cause of that. A bit lean (12:1) after 5,000, but I will adjust. You can see the big knock reading (red line) on decel when I get a huge blast of fire out of the rear.
Assuming that the AEM progressive controller is truly progressive, and at 21 psi with 1000 cc/min of injection, I should have been injecting roughly 733 cc/min of 50:50 on that pull (365/365). Also aout ~35% ethanol content in the fuel tank. Didn't detect any hesitation or ignition breakup on multiple pulls. I still see a rise in IATs 104 to 127 F (+23 F) during a quick blast from 35 to 85 mph. I don't want to swap the 1000 cc/min nozzle in because they do a poor job of atomization. I'm actually thinking of adding another 500 cc/min nozzle just after the intercooler to give me more capacity without sacrificing atomization.
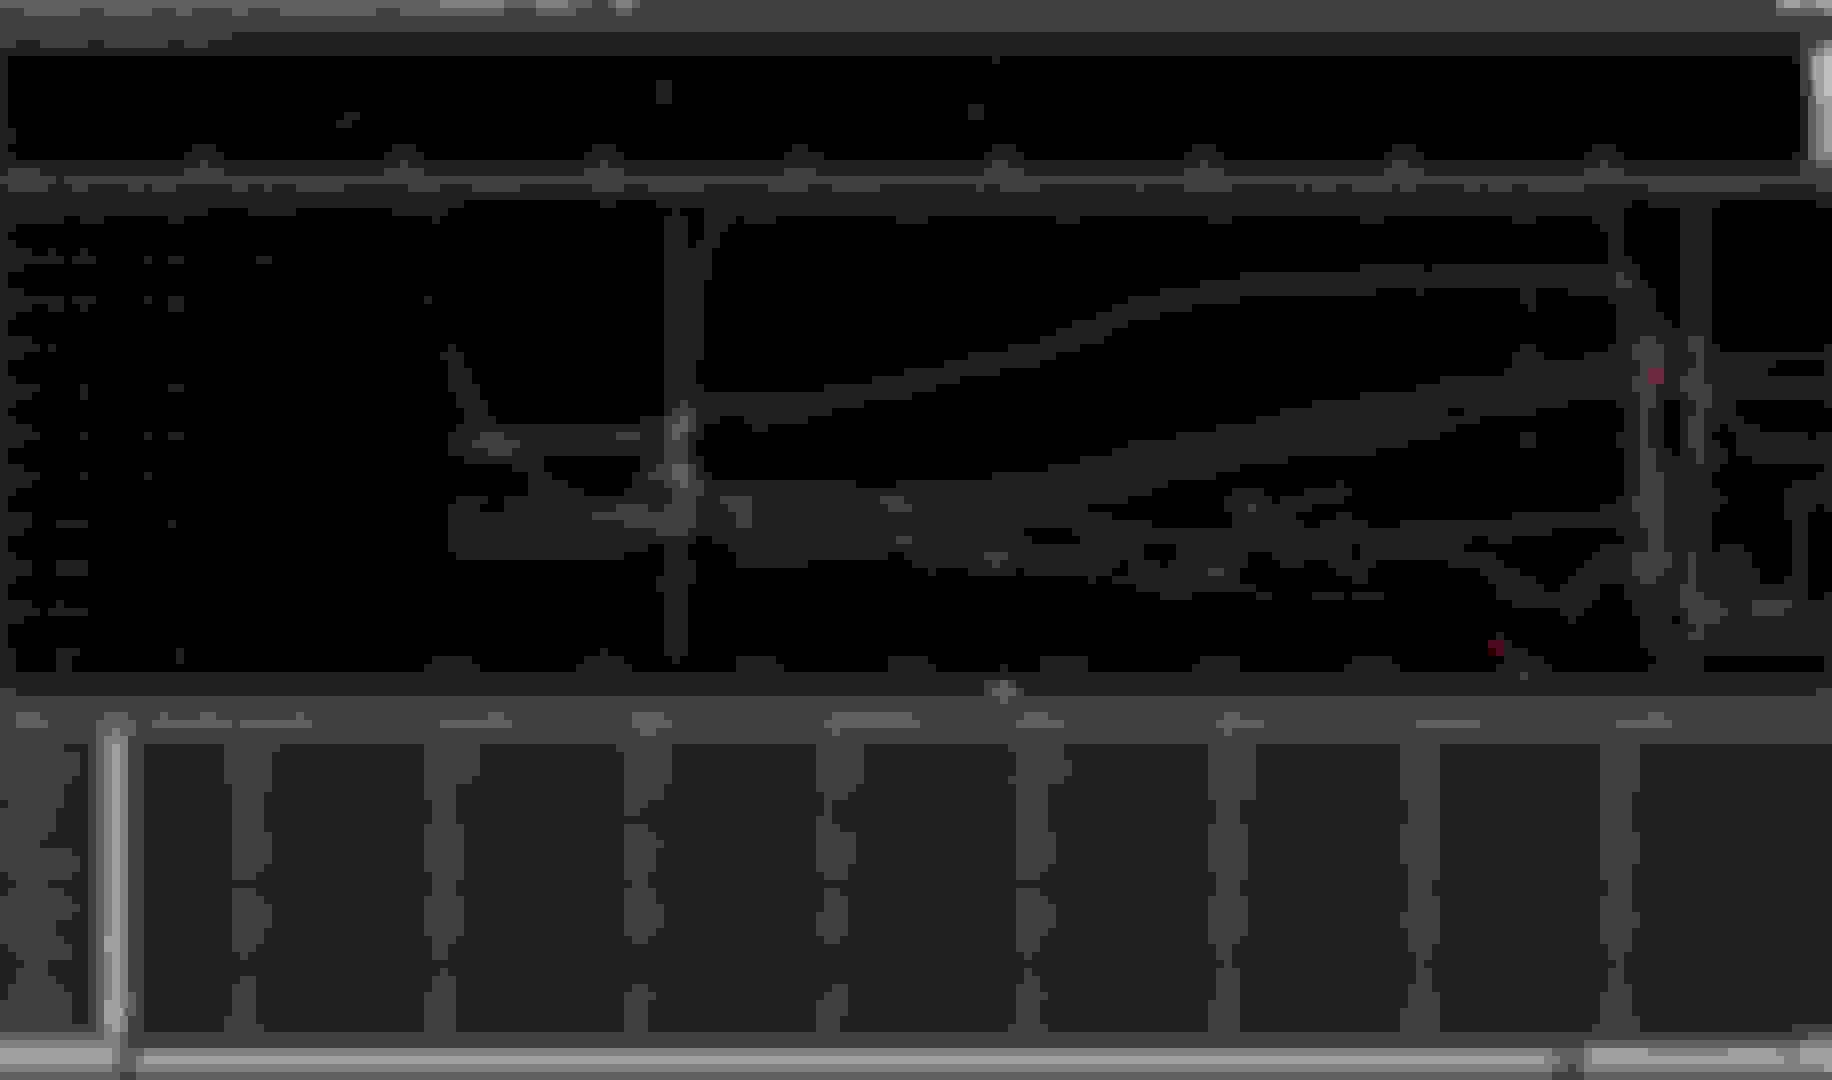
Anyway, I saw about a 10 MPH/S acceleration through 3rd gear on this pull though I stopped about 1,200 RPMs short of the rev limiter as I wasn't sure how good the fuel mixture was. I have also been working on my transient fuel now that I understand better how Adaptronics works. From the graph below, looks like I have it pretty much dialed in as tip in fuel was between 12-14:1 A/F with no rich or lean spikes...
As mentioned above, when I hit 97 mph trap in the 1/8th mile I was at about 10.35 MPH/S through 3rd gear. I really need to be about 10.5-10.75 MPH/S through 3rd gear to have a shot at a 100 MPH trap speed.
Based on my data, I think I should need to be at about 23-24 psi. Either way, I would like to make sure I have everything dialed in as good as possible before I get back to the track in the fall.....
Last edited by strokercharged95gt; 08-24-2019 at 12:23 PM.
The nozzle has a check valve on it. With the pump at 200 psi on full power, I bet its requires a good 10-20 psi to break the valve. Not worried about the 10-20 inches of HG vacuum.
I like to delay until 10 psi so the pre-turbo nozzle doesn't slow the spool up by peppering the compressor blade water.
I should probably do a simple test and see how much the nozzle can discharge in one minute to verify.
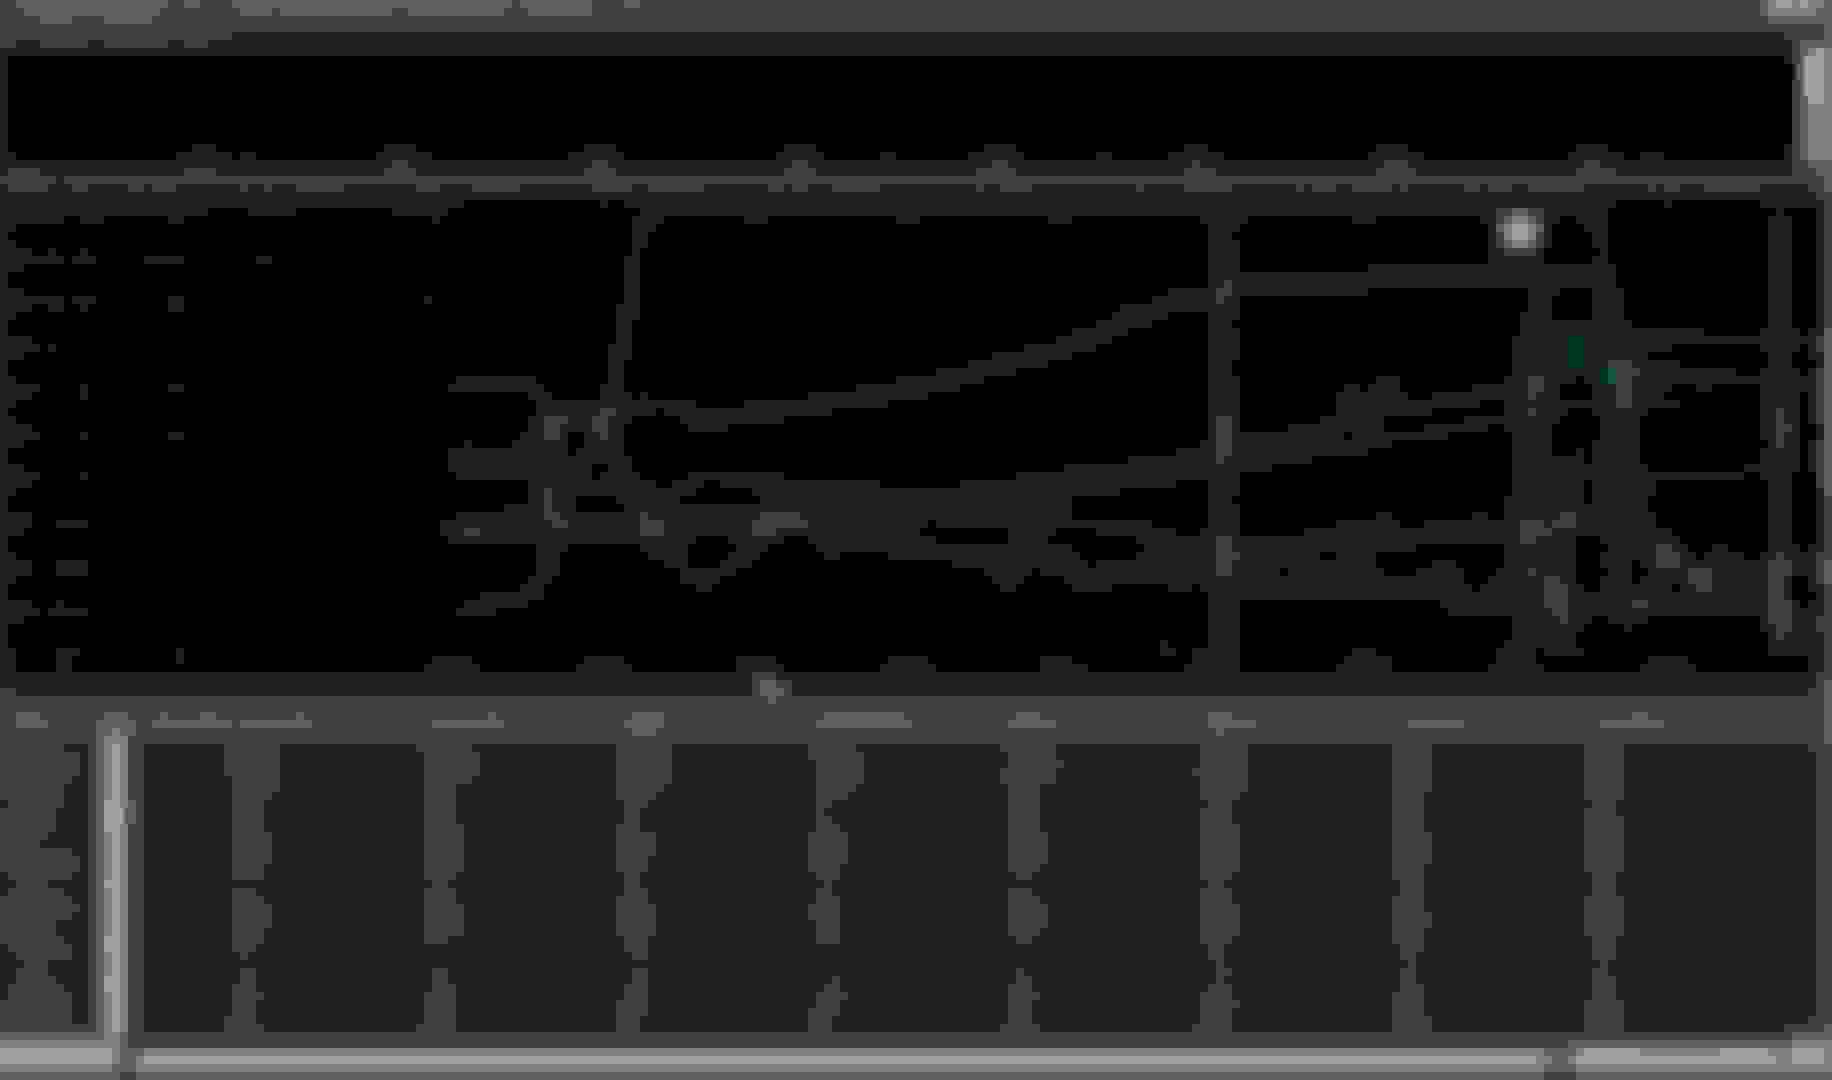
Took the car out this weekend an did a bunch of pulls and I am getting still those RPM spikes (seen in the previous log at 6,000). I thought it was a loose ground on the battery but it is still doing it.
The only time it shows up as at WOT at 5,000 RPMs up. I can feel hesitation when it spikes and I need to fix. I'm thinking of soldering and o-ring directly to that ground point I just re-soldered, or is it just the ESS acting up? It definitely appears that the ESS is dropping signal for a fraction of a second.
I'll post a log of one of the worst examples of the RPMs spiking when I get home.
Last edited by strokercharged95gt; 08-26-2019 at 04:44 PM.
I seem to recall reading somewhere on the forum where other REW swaps had to shim the ESS slightly? Not sure if that’s sound advice or not, just something I recall ...
Definitely not that. If you use the correct front pulley hub and shim the front pulley bolt you can get your ESS aligned real nice with the trigger wheel. I have put 10k miles on the car with the ESS like this and never had an issue.
Took the ESS sensor off and cleaned even though it was clean. Added another ground and i'm still getting the issue. I can take the car slowly up to 8,000 RPMs and I get a nice straight tach signal every-time. As soon as I got WOT, I see a tach spike around 5,500-6,500 every single ******* time. The computer flips out and see's an exponential increase in engine speed and dumps fuel and the car hesitates. For some reason with the new coil setup I am getting interference with the RPM signal under heavy load and have no idea how to fix it.
Its gotta be some type of interference with the new coils under heavy load and the tach signal/injectors. The speed sensor taken from CAN is unaffected as the speed output is still linear....
Look at how weird this 1.5 second log looks. Its like all at once the injectors go haywire and the RPM spikes.... AFR dips to 10.3
Last edited by strokercharged95gt; 08-27-2019 at 07:10 PM.
Well I deleted my initial post after realizing I was rushing too much. The main issues is rpm rollercoasters up/down from 5,647 / 6,843 / 5,693 / 6,935 / 5,775 over a 0.25 sec period. The question is whether it’s electrical or mechanical, but I’m struggling to think how it could do that on/off mechanically in such small increments and time periods. So my inclination is electrical.
it tells you why systems run the condensor and also some earthing tips for coils and the ecu.
Thanks a bunch for that video. I will change my grounds around and see where that gets me. I'm almost 100% positive that these are the issues i'm seeing since I didn't make any changes to the software and this only happened after I added the bigger coils and the additional wiring. I actually added another engine ground to the shock tower to try and make sure I had more than enough (always thought more was better), but I think all I did is create a longer route for grounding and more interference. I will remove that first and see if I can clear this up.
I moved the grounds around and tried all the tricks I know. Engine ground is on the rotor housing. Battery ground is on the shock tower. Positive it on the starter. No ground between engine and near the shock tower (factory ground still on passenger side of engine).
Took the car out and again at 6k. What next?? Run the battery negative all the way back to the battery??? When these coils get all wound up they are playing havok on my ECU/sensors. I can wind the car up to 8,000 at 1/4 throttle and nothing bad happens. Once the car is under full load with RPMs rising fast, this happens....

 08-19-2019, 07:56 PM