Esmeril Turbo Kit Review & Pics


RotoRocks Powered
Joined: May 2006
Posts: 1,236
Likes: 6
From: Delray Beach, FL

Static, please don't take it the wrong way. I have a tendency to fill myself up with wine closer to the end of the day, and then who knows what I can post.
next time you see something like that, just look at the time stamp of the post, and and think to yourself something like "Vlad is just drunk again..."


I actually didn't mean anything at all. Just saw the word "possible", and figured, let me use it in the opposite way. however your interpretation is as good as any
Static, please don't take it the wrong way. I have a tendency to fill myself up with wine closer to the end of the day, and then who knows what I can post.
next time you see something like that, just look at the time stamp of the post, and and think to yourself something like "Vlad is just drunk again..."


 just checking in for the review and pics ......


Thread Starter
The Professor
Joined: Aug 2004
Posts: 3,479
Likes: 7
From: Omaha, NE
DIY - Fuel Pump Install
Tried the fuel pump last night. I had originally set aside about an hour for the job then had some plans with the girlfriend. Big Mistake.
The swap took about 2 to 2.5 hours. And depending on your success could take you probably a minimum of an hour and a half.
So lets see some pics!
Useful tools:
Compressed Air (canned or from air compressor)
Electrical Contact cleaner
WD40
Thick metal ruler (can find at hardware store)
Rubber Mallet
Very thin slotted screwdriver
Big thick screwdriver
Long small slotted screwdriver
Patience
Prep: Make sure that you have the low fuel light on. Pop the hood and open the fuse box. Remove the 20Amp fuel pump fuse. Go in the car and turn the car to the "on" position but don't start it. turn the car off and go unhook the negative battery cable. Go back inside and turn the key to the ON position. Ok...
Step 1: Remove the driver's side rear seat by pulling up sharply on the front of the cushion until both locking tabs release.
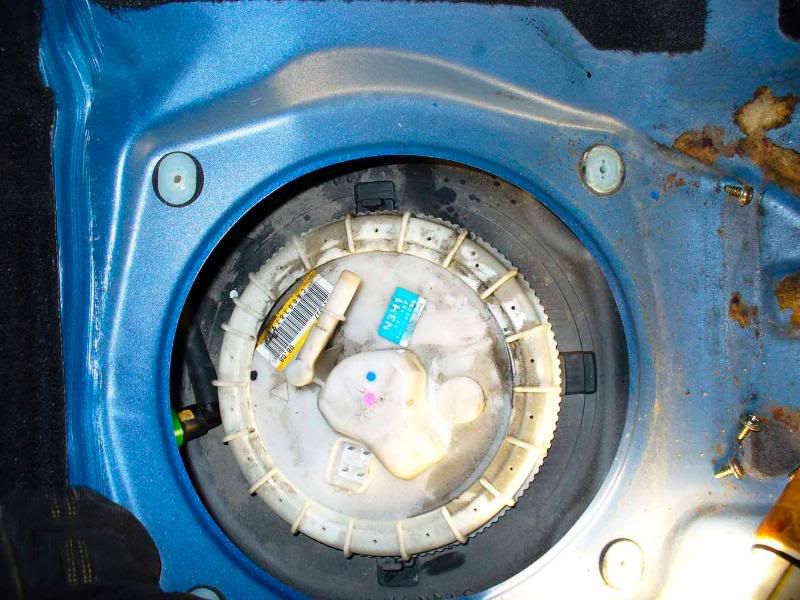
Step 2: Remove the 4 phillips screws holding the aluminum plate over the fuel pump and unclip the wire harness tab from the plate.
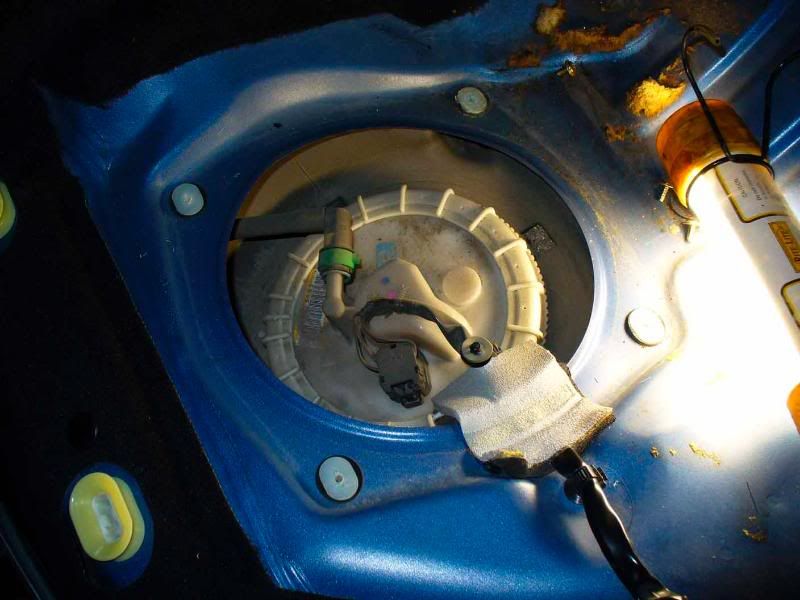
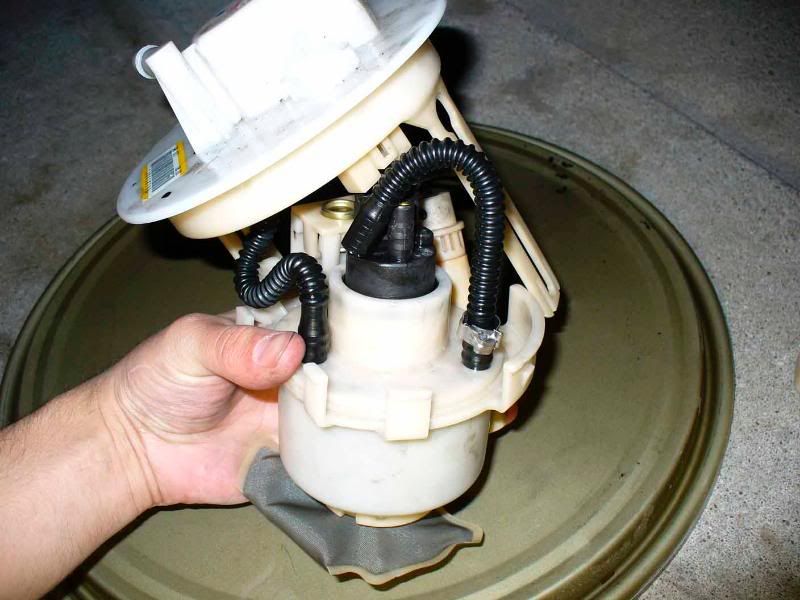
Step 3: Dirty Fuel pump. My car doesn't really see bad weather and its in this condition so your mileage may vary depending on what kind of conditions you drive it in. First things first, lets clean some stuff up. Use some electrical contact cleaner and try and blast as much of the stuff off the top and off from around the ring as you can. After you get most of the grime off hit it with some compressed air to get the pooling solvent off the top of the thing.
- Next Lube the hell out of it. You want to soak the entire top ring in WD40 or similar. Let it sit for about 20 minutes. Make sure you use enough to pool it in the top ring area and around the lower black ring that you can barely see.
I already took it off in the above picture but you want to remove the quick connect fuel line. Basically just gently take off the colored ring from around the fuel line and it will come off freely
Step 4: Below pic shows the thickness of the metal ruler used for the job of removing the ring. Note how the top of the pump is drenched with WD40. Probably a good idea to let it set for 10-20 minutes to penetrate.
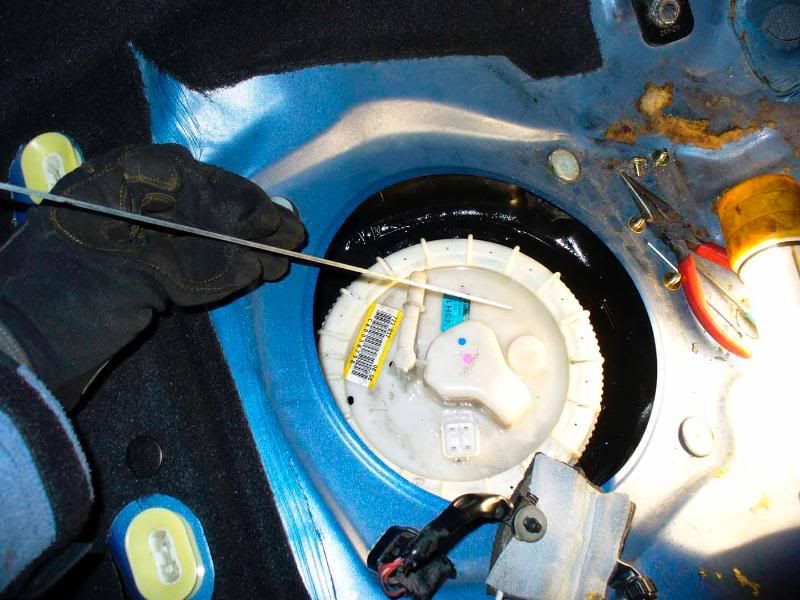
Step 5: remove the ring. Now that harmless looking ring that is around the assembly is on at around 90ft/lb. The special service tool costs $235 I think. But we're real men... so were going to remove the ring using the ruler and the rubber mallet. You can try a large screwdriver if you want but the tabs have a tendency to break off if you accidentally hit too hard. The ruler distributes the pressure.
You need to break the two black lock tabs off with the large screwdriver before you begin or they will hold the ring in place. They are on the top and bottom.
Basically put the ruler against the tabs on the top and hit it at about nail hammering hardness. If you really rock the thing its just going to break the tabs off. After you get it to move a little bit keep going till its completely off, be careful that the center doesn't rotate when you are rotating the outer ring or you will rip the fuel level sender out. You also have to alternate which tabs you hit, work your way around hit it from every tab you can and alternate a lot, if you just try to pound one tab with all your might its not going to come off.
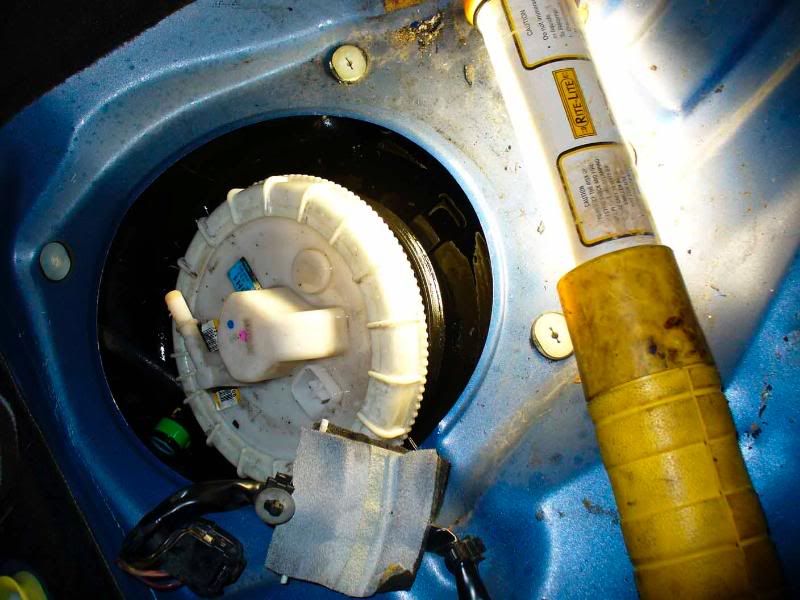
Step 6: remove the fuel level sender wire. This is the black& red wire that is seen here disconnected. You need to remove this before you take the pump assembly out of the tank. It only has a few inches of play so be very careful not to tug.
At this point I want you to memorize the orientation and location of the fuel pickup (other fuel line that goes into the top of the pump assebly. It is important that when you put the fuel pump back it in goes in exactly the way you took it out, or else it will get tangled on your fuel level sensor and you will have an inaccurate fuel gauge (like I did)
Then remove the blue return line seen here with the blue quick disconnect fitting around it on the top of the pump. Take the pump out of the tank.

Step 7: take the thing apart. disconnect the electrical connection from the fuel pump in the center, and use the thin slotted screwdriver to pry the metal clamp off the fuel line going to the top of the fuel pump.
Use the thin flat screwdriver to unhook the two tabs holding the bottom part of the fuel pump to the plastic case (this pic shows them already separated) A wood chisel might be helpful if you have one. The fuel and WD40 has made everything slippery, don't stab yourself.
Since you unhooked the fuel line and the electrical connection the stock pump should slide right out now and you will be able to see the fuel filter. Use the thin slotted screwdriver to remove the locking ring holding the fuel filter assembly to fuel pump. Don't loose anything and make sure you keep track of the black rubber o ring pictured here, it goes on the top side of the fuel pump as it slides back in the carrier assembly.
(New fuel pump pictured)
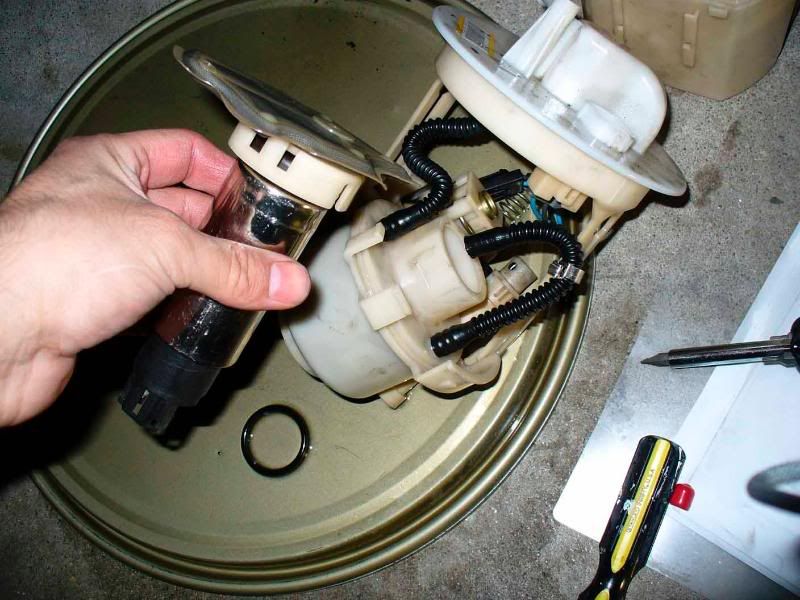
Reassemble the damn thing. Make sure to use a metal hose clamp on the fuel line going into the fuel pump, should be included in the Esmeril kit.
Once you get everything back on:
1) make sure the pump assembly sits at the bottom of the tank and not on the alt. fuel hose when you put it in.
2) make sure when you are re-hammering it on the center part doesn't twist. Make note that the arrow faces the front of the car.
3) make sure you clean the WD40 off the top of the fuel pump with the electrical contact cleaner before you re-connect the electrical connection. Blast it with compressed air to dry it.
I think the replacement ring is around $40 if you just want to cut if off.
The swap took about 2 to 2.5 hours. And depending on your success could take you probably a minimum of an hour and a half.
So lets see some pics!
Useful tools:
Compressed Air (canned or from air compressor)
Electrical Contact cleaner
WD40
Thick metal ruler (can find at hardware store)
Rubber Mallet
Very thin slotted screwdriver
Big thick screwdriver
Long small slotted screwdriver
Patience
Prep: Make sure that you have the low fuel light on. Pop the hood and open the fuse box. Remove the 20Amp fuel pump fuse. Go in the car and turn the car to the "on" position but don't start it. turn the car off and go unhook the negative battery cable. Go back inside and turn the key to the ON position. Ok...
Step 1: Remove the driver's side rear seat by pulling up sharply on the front of the cushion until both locking tabs release.
Step 2: Remove the 4 phillips screws holding the aluminum plate over the fuel pump and unclip the wire harness tab from the plate.
Step 3: Dirty Fuel pump. My car doesn't really see bad weather and its in this condition so your mileage may vary depending on what kind of conditions you drive it in. First things first, lets clean some stuff up. Use some electrical contact cleaner and try and blast as much of the stuff off the top and off from around the ring as you can. After you get most of the grime off hit it with some compressed air to get the pooling solvent off the top of the thing.
- Next Lube the hell out of it. You want to soak the entire top ring in WD40 or similar. Let it sit for about 20 minutes. Make sure you use enough to pool it in the top ring area and around the lower black ring that you can barely see.
I already took it off in the above picture but you want to remove the quick connect fuel line. Basically just gently take off the colored ring from around the fuel line and it will come off freely
Step 4: Below pic shows the thickness of the metal ruler used for the job of removing the ring. Note how the top of the pump is drenched with WD40. Probably a good idea to let it set for 10-20 minutes to penetrate.
Step 5: remove the ring. Now that harmless looking ring that is around the assembly is on at around 90ft/lb. The special service tool costs $235 I think. But we're real men... so were going to remove the ring using the ruler and the rubber mallet. You can try a large screwdriver if you want but the tabs have a tendency to break off if you accidentally hit too hard. The ruler distributes the pressure.
You need to break the two black lock tabs off with the large screwdriver before you begin or they will hold the ring in place. They are on the top and bottom.
Basically put the ruler against the tabs on the top and hit it at about nail hammering hardness. If you really rock the thing its just going to break the tabs off. After you get it to move a little bit keep going till its completely off, be careful that the center doesn't rotate when you are rotating the outer ring or you will rip the fuel level sender out. You also have to alternate which tabs you hit, work your way around hit it from every tab you can and alternate a lot, if you just try to pound one tab with all your might its not going to come off.
Step 6: remove the fuel level sender wire. This is the black& red wire that is seen here disconnected. You need to remove this before you take the pump assembly out of the tank. It only has a few inches of play so be very careful not to tug.
At this point I want you to memorize the orientation and location of the fuel pickup (other fuel line that goes into the top of the pump assebly. It is important that when you put the fuel pump back it in goes in exactly the way you took it out, or else it will get tangled on your fuel level sensor and you will have an inaccurate fuel gauge (like I did
)Then remove the blue return line seen here with the blue quick disconnect fitting around it on the top of the pump. Take the pump out of the tank.
Step 7: take the thing apart. disconnect the electrical connection from the fuel pump in the center, and use the thin slotted screwdriver to pry the metal clamp off the fuel line going to the top of the fuel pump.
Use the thin flat screwdriver to unhook the two tabs holding the bottom part of the fuel pump to the plastic case (this pic shows them already separated) A wood chisel might be helpful if you have one. The fuel and WD40 has made everything slippery, don't stab yourself.
Since you unhooked the fuel line and the electrical connection the stock pump should slide right out now and you will be able to see the fuel filter. Use the thin slotted screwdriver to remove the locking ring holding the fuel filter assembly to fuel pump. Don't loose anything and make sure you keep track of the black rubber o ring pictured here, it goes on the top side of the fuel pump as it slides back in the carrier assembly.
(New fuel pump pictured)
Reassemble the damn thing. Make sure to use a metal hose clamp on the fuel line going into the fuel pump, should be included in the Esmeril kit.
Once you get everything back on:
1) make sure the pump assembly sits at the bottom of the tank and not on the alt. fuel hose when you put it in.
2) make sure when you are re-hammering it on the center part doesn't twist. Make note that the arrow faces the front of the car.
3) make sure you clean the WD40 off the top of the fuel pump with the electrical contact cleaner before you re-connect the electrical connection. Blast it with compressed air to dry it.
I think the replacement ring is around $40 if you just want to cut if off.
Last edited by staticlag; Jan 26, 2009 at 07:32 PM.
Thread Starter
The Professor
Joined: Aug 2004
Posts: 3,479
Likes: 7
From: Omaha, NE
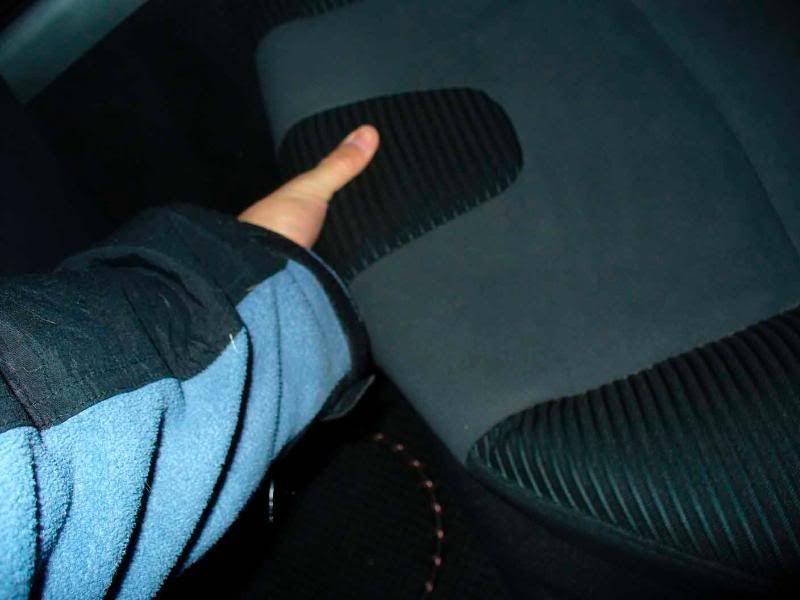
Impressions: Feels good, warmed it up and gave it a few redline runs, no starvation. I ran it without the seat cushion on when I drove it to the gas station so that I could quickly check to see if it was leaking.
The real test is when you put a full tank of gas in it, then the fuel level will be pressing on the ring and the assembly.
Its a good idea to take a fire extinguisher with you on the first couple trips.
I would like to remind everyone that this diy is at your own risk.
The real test is when you put a full tank of gas in it, then the fuel level will be pressing on the ring and the assembly.
Its a good idea to take a fire extinguisher with you on the first couple trips.
I would like to remind everyone that this diy is at your own risk.
Last edited by staticlag; Feb 23, 2008 at 01:37 PM.
Thread Starter
The Professor
Joined: Aug 2004
Posts: 3,479
Likes: 7
From: Omaha, NE
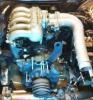
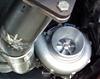
Esmeril kit includes a high volume one. This is probably the most difficult part of the turbo install.

RX-8s Official Cool Guy
Joined: Mar 2004
Posts: 2,150
Likes: 1
From: Vancouver BC
Thread Starter
The Professor
Joined: Aug 2004
Posts: 3,479
Likes: 7
From: Omaha, NE
RX-8s Official Cool Guy
Joined: Mar 2004
Posts: 2,150
Likes: 1
From: Vancouver BC

Vegas rx8!
Joined: Mar 2007
Posts: 1,286
Likes: 0
From: Las Vegas
great DIY! it definitely helps a noob like me see things from a different level.
but i do have 1 question. the new fuel pump is that skinny silver tube you slipped into the white plastic container? i always had the impression that a new fuel pump would replace the whole unit.
but i do have 1 question. the new fuel pump is that skinny silver tube you slipped into the white plastic container? i always had the impression that a new fuel pump would replace the whole unit.
Thread Starter
The Professor
Joined: Aug 2004
Posts: 3,479
Likes: 7
From: Omaha, NE
great DIY! it definitely helps a noob like me see things from a different level.
but i do have 1 question. the new fuel pump is that skinny silver tube you slipped into the white plastic container? i always had the impression that a new fuel pump would replace the whole unit.
but i do have 1 question. the new fuel pump is that skinny silver tube you slipped into the white plastic container? i always had the impression that a new fuel pump would replace the whole unit.
-Dan

Legend in the making
Joined: Jul 2007
Posts: 187
Likes: 0
From: Chicago/Joliet, Illinois
Static....I pm'ed you not too long ago about my esmeril it coming. They should be starting on it this week or next. But, I have no tools at the house so DIY for me is not an option. I found a really great shop that's close that will be doing it. Anyways, I will make my own thread with numbers, just so we can compare seeing as how were getting the same kit. Did you get the interceptor-x? I got one with mine....
I also bought a few products from BHR ( Charles) to compliment the kit The radiator I got from him looks great.....
This should all be installed towards the end or March..
I also bought a few products from BHR ( Charles) to compliment the kit
The radiator I got from him looks great.....This should all be installed towards the end or March..


Hmmmmmm.........
Joined: Mar 2005
Posts: 3,564
Likes: 6
From: Melbourne, Australia
Couple of questions on the fuel pump DIY...
I must be blind as I cant see them.
Also, is the filter in amongst those pics?
Cheers
Andrew
Originally Posted by staticlag
You need to break the two black lock tabs off with the large screwdriver before you begin or they will hold the ring in place. They are on the top and bottom.
Also, is the filter in amongst those pics?
Cheers
Andrew