
Interest in US-made Burnout KD-IV kit?


Thread Starter
Registered User
Joined: Apr 2006
Posts: 670
Likes: 0
I should think that goes without saying with a reputable vendor, but there's often no way to know that ahead of time. Ken says, "Ask anyone on the AE86 or RX-7 forums about Shine Auto Project, if you're curious."
Thread Starter
Registered User
Joined: Apr 2006
Posts: 670
Likes: 0
BTW-I think I am going to have them mold and make a 3-hole gauge pod. Ken and I will discuss it tomorrow while I'm there. If I can get this done in the next 30 days, ya'll are going to owe me big time. I'll be taking up a "Send Photomunkey to SEMA 2007" collection, so don't be stingy!
Eric
Eric

Registered
Joined: Apr 2006
Posts: 1,539
Likes: 0
shine has a website which is under construction, www.shineautoproject.com
they do have a link there to their ebay store
they do have a link there to their ebay store

Thread Starter
Registered User
Joined: Apr 2006
Posts: 670
Likes: 0
Originally Posted by samspick
I just got it from shinauto... front burnout and autobahn sides.. great fitment!
Thread Starter
Registered User
Joined: Apr 2006
Posts: 670
Likes: 0
Final test fitting was a success today, but we didn't take photos this time. I had to load up the car and get home. More than likely a little custom sanding will be necessary on each on of the rear pieces for a perfect fit on a car, but Ken and the guys are possibly going to re-do the upper lip of the rear molds. It's really only the slightest issue... so slight that I picked up my kit today! I'll be working on the wet sanding and finishing this week at the body shop in my town!
The front and sides fit great! I can't wait to have the parts on my car... BTW-on the ride home my two-year-old daughter was constantly kicking the crap out of my front lip and it came through in perfect condition! Now that's durability!
The front and sides fit great! I can't wait to have the parts on my car... BTW-on the ride home my two-year-old daughter was constantly kicking the crap out of my front lip and it came through in perfect condition! Now that's durability!
I'm Kind of a Big Deal
Joined: Aug 2003
Posts: 918
Likes: 0
From: Columbus, Ohio
Part I:
Photo,
I'm glad to hear things went well. Can you explain further or show in a photo what you mean by re-do the upper lip of the rear molds?
Will you be doing the work on your own car at a buddy's body shop? If not, will you be able to give me an idea of what kind of a cost could potentially be involved in getting the kit finished at a body shop?
Part II:
Shine,
As soon as that slight adjustment is made on the rear molds (if there is going to be some) and we see a couple pics, how do we get payment to you?
Thanks.
Thread Starter
Registered User
Joined: Apr 2006
Posts: 670
Likes: 0
Okay, at the rear bumper corner, the piece has to curve upwards and inwards at the same time. When Shine added the material for the sticky-tape lip on the inside, along the upper edge, at the very end of the piece, the "lip"caused a little more curve than necessary. Sanding this area down with a flat sanding block or die-grinder (to dish it slightly), on the INSIDE of the piece, returns it to a perfect fit. I PERSONALLY did this with 4 driver's side pieces yesterday, using my car as the template (which does leave little scratches on my finish which I'll have to buff later). I'm talking tolerances within 1 mm here, or the thickness of the double-sided sticky tape. The side piece is also to be held on with two screws in the back of the wheel arch, so the tape is added insurance, and a buffer between the fiberglass and the bumper-cover paint. I will post photos when I have my kit installed.
If you don't want to wait, Shine Auto can produce the pieces with the molds as they are now (which is what we were checking). It's simply a matter of custom-fitting the pieces to your car during the test fitting.
Where KS-Auto included some wierd stick-on weather stripping, I recommend getting some 3/8ths or 5/16ths black vinyl tubing, and carefully splitting one side of the tubing to form a "C" shape. This goes between the upper edge of the front lip and the front bumper, and on the upper edge of the sides, before and after the doors (not where the sticky tape goes below the door). The goal is to protect your paint, save money, and still look fantastic. Again, I will post photos showing this. KS-Auto's weather strip was approximately 3/16ths inch thick, so in places, they didn't try to get the fiberglass incredibly close to the body. Samspick, you need to add this to your kit or you're going to chew through your paint, especially on the front bumper cover.
You can call Ken at Shine Auto Project at 909-773-0820 to order... tell him Eric sent you!
Thread Starter
Registered User
Joined: Apr 2006
Posts: 670
Likes: 0
Footnote: on the rear sides, where there's a little too much curve at the tip, this makes the middle of the piece not fit flush, which means the sticky-tape wouldn't grab... That's why it must be sanded to fit.
I'm Kind of a Big Deal
Joined: Aug 2003
Posts: 918
Likes: 0
From: Columbus, Ohio
Eric,
Thank you for the explanation. I think that I have a pretty good idea of what you are referring too but I will wait for the photos as to get the visual aspect of your comments.
Is your kit going to fit flush to the body or have small gaps because of the double-sided tape/ black vinyl tubing you referred too? For instance my oem appearance package sits flush to the body and I like that. Will this be the end result of your kit?
Thread Starter
Registered User
Joined: Apr 2006
Posts: 670
Likes: 0
It's possible to sand the edges of the kit very tight, but, since the original side skirts were not designed to fit that tight, there would be slight gaps. The double sided tape adds a little space, but it is extremely minimal. The main concern with a fiberglass part (as opposed to OEM polyurethane, is to prevent the fiberglass from chewing through your paint. OEM pieces are made in a vastly different process, so the way their flanges fit against the body is completely different from a fiberglass part.
The side skirt flange was adapted from the Autobahn side skirt, so it fits like that piece. It actually looked like the Autobahn side skirt was stolen from KS-Auto then slightly changed at the rear to be different. They're extremely similar! I like the cleaner look of the Burnout side than the Autobahn, but that's just me.
I'll show you what I mean when I mount my kit, with the described tubing being used as a "buffer" between the body and the fiberglass.
Thread Starter
Registered User
Joined: Apr 2006
Posts: 670
Likes: 0
I've listed the JDM Burnout Type II kit on eBay... http://cgi.ebay.com/ebaymotors/ws/eB...6947&rd=1&rd=1
If someone wants JDM only, this is a DEAL!
If someone wants JDM only, this is a DEAL!
I'm Kind of a Big Deal
Joined: Aug 2003
Posts: 918
Likes: 0
From: Columbus, Ohio
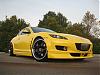
Do you know that all along I thought those pics (the red 8 with the black pieces) were of the kit that Shine had made, not the original Burnout from Japan.
So have we not seen what Shine's kit will look like yet?
I'm confused.
So have we not seen what Shine's kit will look like yet?
I'm confused.
Thread Starter
Registered User
Joined: Apr 2006
Posts: 670
Likes: 0
You might be confused, but I'm not. The first pics I posted were of the JDM Burnout test fitting. Those are the ones showing my license plates. The Shine Auto test fitting is clearly labeled in the 2nd batch of photos posted. In the eBay posting, believe I used a couple from the Shine Auto test fitting to show the appearance from the side and rear. Once mounted, they are indistinguishable. The main differences are 1- availability of the Shine pieces, 2- the flexible fiberglass material, 3- changes to how the kit mounts for all 5 pieces.
I'm Kind of a Big Deal
Joined: Aug 2003
Posts: 918
Likes: 0
From: Columbus, Ohio
They look the same to me. Is that good or bad??? 
I thought that you mentioned they were tweaking the front, sides and rears for better fitment as well as look, yes? Subtle and less aggressive, which I like.
I thought that you mentioned they were tweaking the front, sides and rears for better fitment as well as look, yes? Subtle and less aggressive, which I like.

Registered User
Joined: Jun 2006
Posts: 100
Likes: 0
Hey there guys,
The parts look the same after you mount them on. We made improvements to the way the parts mount, not the way they look. We added a flange on the sideskirts to allow for double-side taping, which the original Burnout's didn't have and we did the same thing for the rear. The original Burnout rear pieces required you to drill a hole into a painted area of your bumper. I doubt many people would like that, so we added a flange for double-side taping instead. Some parts of the flange affected the way the rear fit with the bumper, but once we sand down that flange in key places, it allowed the piece to sit more flush with the bumper.
These parts are ready to go. Email us at shineautoproject@gmail.com or PM me.
Ken
I'm Kind of a Big Deal
Joined: Aug 2003
Posts: 918
Likes: 0
From: Columbus, Ohio
https://www.rx8club.com/showpost.php...6&postcount=17
Eric or Ken,
In the link above, the right rear JDM Burnout as a gap (that I don't care for) between the rear flare and the black plastic exhaust shroud. I'm hoping that your version has it "hugging" the exhaust shroud like our oem rear flare does. Is this the case for your version?
Thanks guys.
Eric or Ken,
In the link above, the right rear JDM Burnout as a gap (that I don't care for) between the rear flare and the black plastic exhaust shroud. I'm hoping that your version has it "hugging" the exhaust shroud like our oem rear flare does. Is this the case for your version?
Thanks guys.
Registered User
Joined: Jun 2006
Posts: 100
Likes: 0
Originally Posted by success07
https://www.rx8club.com/showpost.php...6&postcount=17
Eric or Ken,
In the link above, the right rear JDM Burnout as a gap (that I don't care for) between the rear flare and the black plastic exhaust shroud. I'm hoping that your version has it "hugging" the exhaust shroud like our oem rear flare does. Is this the case for your version?
Thanks guys.
Eric or Ken,
In the link above, the right rear JDM Burnout as a gap (that I don't care for) between the rear flare and the black plastic exhaust shroud. I'm hoping that your version has it "hugging" the exhaust shroud like our oem rear flare does. Is this the case for your version?
Thanks guys.
The Burnout Type-1 has that gap you are referring to.

Initially, when we got the Type-2 kit in, we thought it mounted on the same way, so we stuck it on the car with clear tape in that type of position.
However, we later discovered that the type-2 is different and sits flush against the rear plastic piece. This is probably why the Type-2 rear is more expensive than the Type-1.


I hope this helps.