
Interest in US-made Burnout KD-IV kit?


Originally Posted by PhotoMunkey
Which rule would I be changing? "One cocktail at a time"?
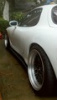
Now to get that pesky rear wing situation handled...
Now to get that pesky rear wing situation handled...
the cocktail rule is a guideline... the rear wing is fine.. but the rear i got changed all the rules by accident, but in a good way...
win win... a nice tight 45deg front shot would be great.. the bigger the better, if you could send it to myscreenname@ gmail.commmmmmmm
beers

Originally Posted by ShineAutoProject
if anyone needs prices, here are the new prices:
Front lip $250
Sides $350
Rear add ons $150
shipping $100 to the lower 48 states. Contact us if you're interested.
shineautoproject@gmail.com 3 sets in stock
Front lip $250
Sides $350
Rear add ons $150
shipping $100 to the lower 48 states. Contact us if you're interested.
shineautoproject@gmail.com 3 sets in stock
Originally Posted by PhotoMunkey
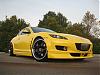
Photo sent. It pretty much looks the same in the front as the test fit photos, only the paint's better now.
thx..
beers
I'm Kind of a Big Deal
Joined: Aug 2003
Posts: 918
Likes: 0
From: Columbus, Ohio
Ken,
FYI, your pm box is full. Left you a v-mail and sent you an e-mail. Just covering all my basis.
Eric,
The car looks great. Flat black wing in the near future? I think it would tie it all together if so.
FYI, your pm box is full. Left you a v-mail and sent you an e-mail. Just covering all my basis.
Eric,
The car looks great. Flat black wing in the near future? I think it would tie it all together if so.

Thread Starter
Registered User
Joined: Apr 2006
Posts: 670
Likes: 0
Originally Posted by success07
The car looks great. Flat black wing in the near future? I think it would tie it all together if so.
My graphics still haven't arrived yet.

Bruce Van
Joined: Jan 2006
Posts: 874
Likes: 0
From: the OC
I just stumbled upon this thread and think this kit looks outstanding. It's very "conservative" compared to a lot of other kits I've seen, which is why I really dig it.
I don't have any experience with bodywork and don't have a clue as to how much it would cost to have a shop fit, paint, and mounting somethink like this. If it's not crazy expensive, I might be able to convice the girlfriend to figure this into my car allowance.
How much would you think a decent shop would charge?

Registered User
Joined: Jun 2006
Posts: 100
Likes: 0
I have someone , an individual, who does painting on the side. He does a GOOD job for a reasonable price. You are from Orange County correct. He's from Gardena. I can refer you to him. He's painting one of our aero kits rights now. I'm picking it up tomorrow.
Ken
Ken
Bruce Van
Joined: Jan 2006
Posts: 874
Likes: 0
From: the OC
Yup. I'm in OC. I'd love to see pictures once you get it. So how much do you think it will run? I don't need an exact figure, just a ball park. You can PM me if you want to keep it more private. Thanks.
Thread Starter
Registered User
Joined: Apr 2006
Posts: 670
Likes: 0
Bruce_van- I was just out in the OC on Monday and Tuesday last week. I'm out there a couple times per month and would be happy to show you in person. Also, search back a few pages in this thread and I believe Ken posted the prices for all of the pieces. Compared to full, bumper-replacement kits, the prices are extremely reasonable. The kit is also very easy to mount on the car. It can be done very carefully by the layman with simply hand tools and 10 "body screws and washers" from an auto parts store.
Professional sanding and painting is highly recommended though.
Professional sanding and painting is highly recommended though.


I'm Kind of a Big Deal
Joined: Aug 2003
Posts: 918
Likes: 0
From: Columbus, Ohio
Just got back into the country and my kit was waiting for me at my office.
Looks good.
One rear piece will need some sanding or something of the sorts, as it was a little rough at the far tip nearest to the exhaust shroud.
Ken,
Are the slight indentations in the pieces where we should make the holes for mounting?
Looking forward to test fitting and getting this stuff painted.
Although, the weather in Ohio is terrible so who knows when that will happen.
I'm Kind of a Big Deal
Joined: Aug 2003
Posts: 918
Likes: 0
From: Columbus, Ohio
Question about fitting the front lip.
I removed my front bumper last night so I could remove the oem front air dam. When I did this, I became curious what I mount the new front lip to. The oem piece attaches to the bottom of the front grill as well as the black plastic piece (skip plate?). I want to keep the front rotor accent but I'm trying to figure out how to do this.
After sitting the two pieces next to one another I had the idea of simply placing the KD lip over the oem front air dam unit and it fit perfectly. I picked up the two pieces and the KD piece didn't move from the oem piece. The grooves in the middle of the KD piece slide right around the rotor accent and the two small black pieces that help the oem piece attach to the bottom of the front grill.
This frustrated me because I spent the whole evening removing the front bumper and then removing the air dam from the bumper and the darn thing fit right over the existing front lip. Did I take the front bumper and the air dam off for no reason?
Thanks in advance for any help you all can provide.
PS - Anyone know how to get the side aero flares off? I've looked up the install directions but it isn't helping me much. I'm ready to take them off with an ax.