LS2/ D585 Coil Dwell


 12-26-2012, 08:08 AM
#28
05 RX8 Sold///05 Evo VIII
Thread Starter
iTrader: (5)
Join Date: Feb 2009
Location: New Berlin, WI
Posts: 457
Likes: 0
Received 0 Likes
on
0 Posts
**Update**
Made my first PnP harness. Im not sure if I want to explore a different wire sheathing just yet. The connectors look perfect. Right now I left the common ground out to tie all together. I just want to verify the pins on the Mazda harness before I go nuts and make em wrong. LoL
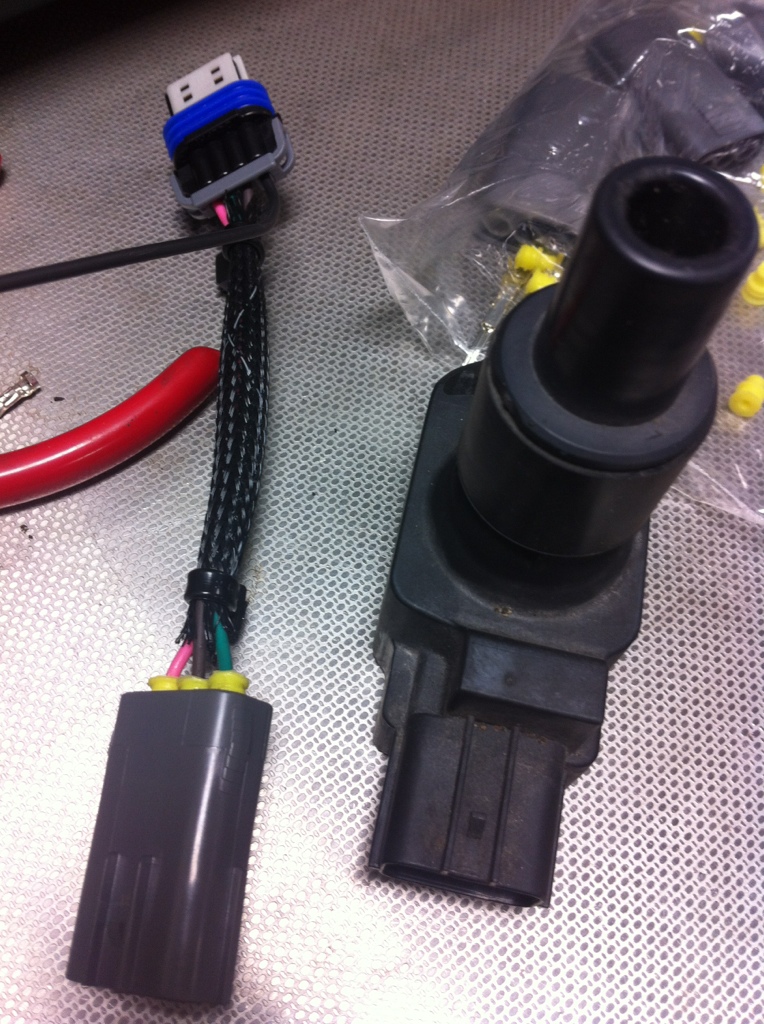
Made my first PnP harness. Im not sure if I want to explore a different wire sheathing just yet. The connectors look perfect. Right now I left the common ground out to tie all together. I just want to verify the pins on the Mazda harness before I go nuts and make em wrong. LoL
12-26-2012, 09:25 AM
#30
05 RX8 Sold///05 Evo VIII
Thread Starter
iTrader: (5)
Join Date: Feb 2009
Location: New Berlin, WI
Posts: 457
Likes: 0
Received 0 Likes
on
0 Posts
Verified the pins so I can go crazy making my harness.
I was going to wait to provide a link but here ya go.
http://www.spoolinup.com
Imagine that, we share parts with EVO's lol just kidding. They all use similar connectors for asian import manufacturers. After doing some digging I found this place, owner is super cool and ships fast with good communication.
Go to -> Products -->DIY EVO Parts, Sensors, Connectors --> Connectors.
I chose to go with the 8th one down, however the 9th will work as well.
Note: Crimping these are a bitch with a regular crimper. I soldered mine in place so I'd go with the solder ones in hind-sight. This way no wires will pull out or become loose.
A little bit of dielectric grease or silicone paste on the little yellow insulators help pull them properly into the connector. I'll upload some more pics of this when I make my next harness.
At this point I just kind of picked a length I found suitable for mounting my coils in the OE spot, while still having some wiggle room in case things were too short.
The GM pigtails I sourced from auto wiring solutions on ebay.
The wire sheathing I had gotten for free, like mentioned prior but a good business sells similar high temp stuff here. I'm sure you can find it other places, but they're local to me and ALWAYS have every fitting in stock. https://www.pegasusautoracing.com/pr...GroupID%3DWRAP
Last edited by viprez586; 12-26-2012 at 09:29 AM.
12-26-2012, 12:00 PM
#31
05 RX8 Sold///05 Evo VIII
Thread Starter
iTrader: (5)
Join Date: Feb 2009
Location: New Berlin, WI
Posts: 457
Likes: 0
Received 0 Likes
on
0 Posts
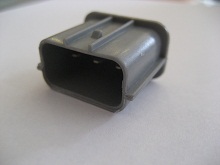
So as of right now the harness looks great. My only concern is the depth of the pins for the OE Mazda male connector. They appear to be pretty shallow but I will verify this when I can get access to an RX8(either mine or the one I'm working on).
Stay tuned for an update on the connectors.
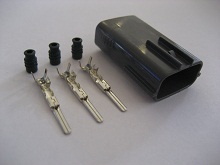
Making the pins and PnP harness is quite easy but you need to pay attention to detail.
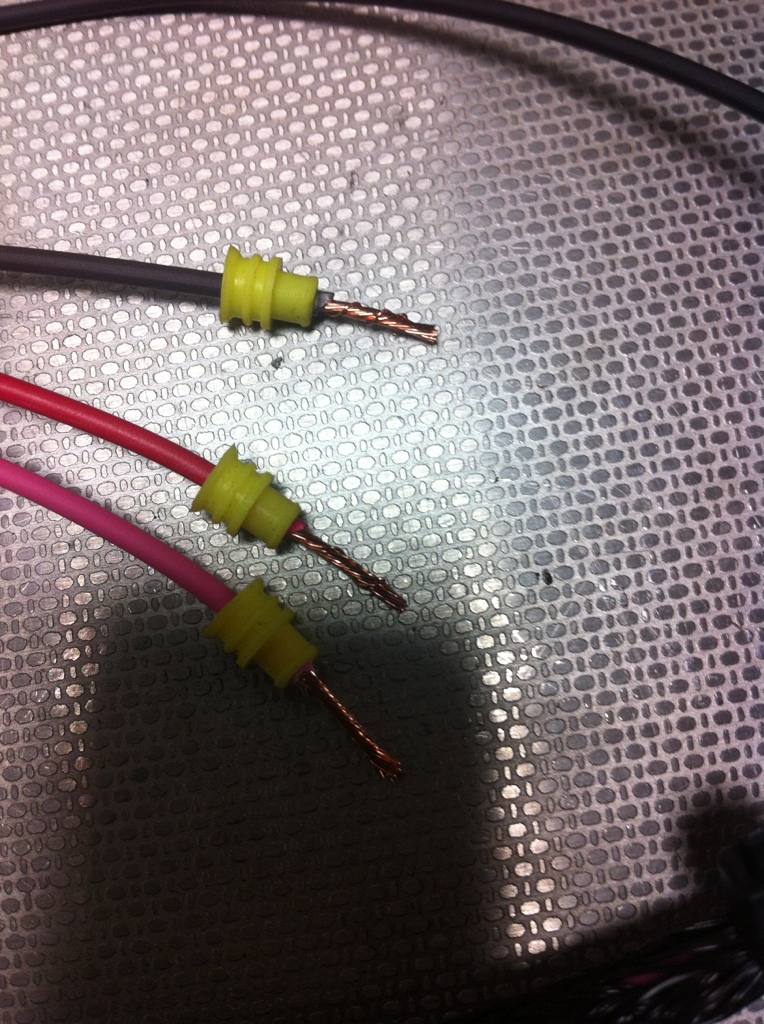
First cut the harness to desire length. BEFORE you strip the ends, put the weather insulators on the wire and run them back so they don't get damaged.
Strip approximately 1/4" of wire. (This is important because if your wire is too long it will stick past the first crimp area and block the 'lock' for the connector housing to keep the pin in place.)
Run the little yellow weather insulators to the edge of the wire insulation.
Should look like this.
Wire inserted, note the crimp locations and wire length.
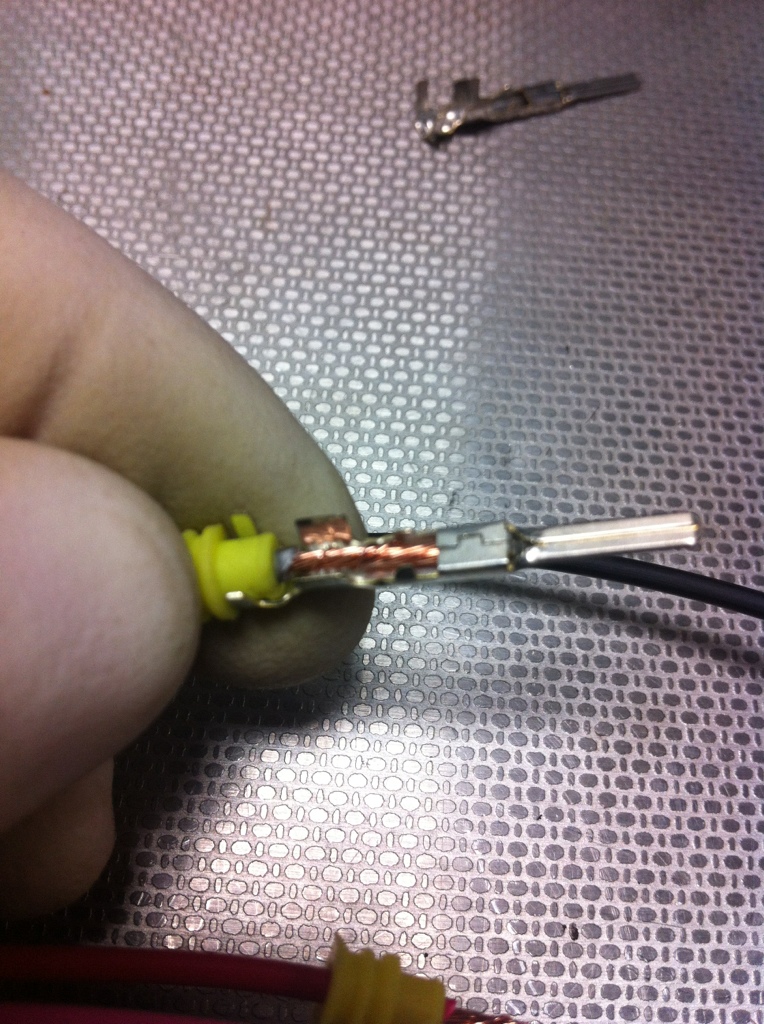
Next Crimp down the two stages. I did the forward most to the pin first to ensure the wire wouldn't block the 'lock'. Then crimp the second for added security/rigidity. I didn't like crimping these, nor do I trust the crimping tool mentioned in my previous post for doing small wiring like this. I soldered them in place. NOTE: If you're not good at soldering your going to have buggers/"slag" left over, you need to file the backside of the pin to get a smooth surface and ensure the pin slides into the connector with NO interference. Shown here is the soldered wire, note the insulator isn't crimped yet. Make sure you crimp this connection evenly since this also will not allow the pin to enter the connector.

Wire up the rest of your pins.
Next slide on your wiring sheathing/protection of your choice. Insert them into they're according pin locations. I did this by inserting them by hand and GENTLY pulling them through with a small needle nose. Once they are through take a small pick or pocket screw driver to push the lock into the locked position and GENTLY pull the wire out of the connector to lock the pin in place. Double check its locked by GENTLY pushing on the pin from the connector side to make sure its not going to back out.
Patience is the key, DON'T force anything!
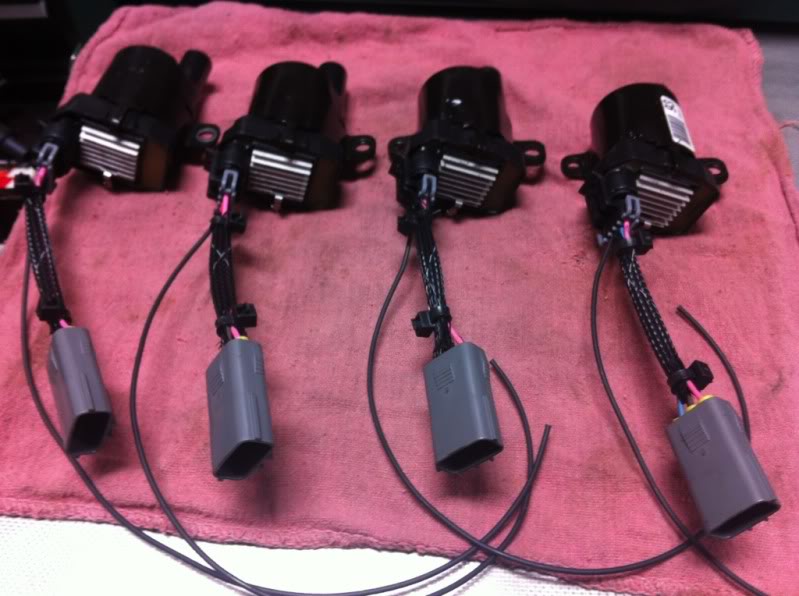
The end result is pretty PnP harnesses. My LS2 coils arrived just in time as i was completing the last harness.
Note the ground wire is left unfinished to find a ground location to my liking with the extra amount of wire left over.
Stay tuned for an update on the connectors.
Making the pins and PnP harness is quite easy but you need to pay attention to detail.
First cut the harness to desire length. BEFORE you strip the ends, put the weather insulators on the wire and run them back so they don't get damaged.
Strip approximately 1/4" of wire. (This is important because if your wire is too long it will stick past the first crimp area and block the 'lock' for the connector housing to keep the pin in place.)
Run the little yellow weather insulators to the edge of the wire insulation.
Should look like this.
Wire inserted, note the crimp locations and wire length.
Next Crimp down the two stages. I did the forward most to the pin first to ensure the wire wouldn't block the 'lock'. Then crimp the second for added security/rigidity. I didn't like crimping these, nor do I trust the crimping tool mentioned in my previous post for doing small wiring like this. I soldered them in place. NOTE: If you're not good at soldering your going to have buggers/"slag" left over, you need to file the backside of the pin to get a smooth surface and ensure the pin slides into the connector with NO interference. Shown here is the soldered wire, note the insulator isn't crimped yet. Make sure you crimp this connection evenly since this also will not allow the pin to enter the connector.
Wire up the rest of your pins.
Next slide on your wiring sheathing/protection of your choice. Insert them into they're according pin locations. I did this by inserting them by hand and GENTLY pulling them through with a small needle nose. Once they are through take a small pick or pocket screw driver to push the lock into the locked position and GENTLY pull the wire out of the connector to lock the pin in place. Double check its locked by GENTLY pushing on the pin from the connector side to make sure its not going to back out.
Patience is the key, DON'T force anything!
The end result is pretty PnP harnesses. My LS2 coils arrived just in time as i was completing the last harness.
Note the ground wire is left unfinished to find a ground location to my liking with the extra amount of wire left over.
 12-26-2012, 12:44 PM
#33
05 RX8 Sold///05 Evo VIII
Thread Starter
iTrader: (5)
Join Date: Feb 2009
Location: New Berlin, WI
Posts: 457
Likes: 0
Received 0 Likes
on
0 Posts
I did just try the Taylor crimper (which arrived after I made all my harnesses) and it does work quite well. So for those who aren't experienced with soldering still have the option of using the crimp connectors.

12-26-2012, 02:57 PM
#34
Proper crimp is better than solder ( can't believe I'm saying that  , I've been a crimp and solder guy for 20 yearrs) but it is true.
Solder joints on connectors make the joint much more susceptible to failures from vibration, and don't improve the connectivity if the crimp is good
, I've been a crimp and solder guy for 20 yearrs) but it is true. Solder joints on connectors make the joint much more susceptible to failures from vibration, and don't improve the connectivity if the crimp is good
12-26-2012, 03:15 PM
#35
05 RX8 Sold///05 Evo VIII
Thread Starter
iTrader: (5)
Join Date: Feb 2009
Location: New Berlin, WI
Posts: 457
Likes: 0
Received 0 Likes
on
0 Posts
Yep, I do agree with that statement. However I feel the difference would be negligible in terms of amperage and resistance. (At least in my application)
Most OE manufacturers went away from soldering in repairs because of that and because most people were never taught how to solder properly. They'd booger up a connection and result in high resistance, or not weather-proof it properly and it'd be overly susceptible to corrosion.
This way the joint will never come loose/ have to worry about it. If I had that Taylor crimper I probably would've just done it that way since it is much faster.
You in the auto/ wiring business too Dan?
12-28-2012, 06:45 AM
#38
05 RX8 Sold///05 Evo VIII
Thread Starter
iTrader: (5)
Join Date: Feb 2009
Location: New Berlin, WI
Posts: 457
Likes: 0
Received 0 Likes
on
0 Posts
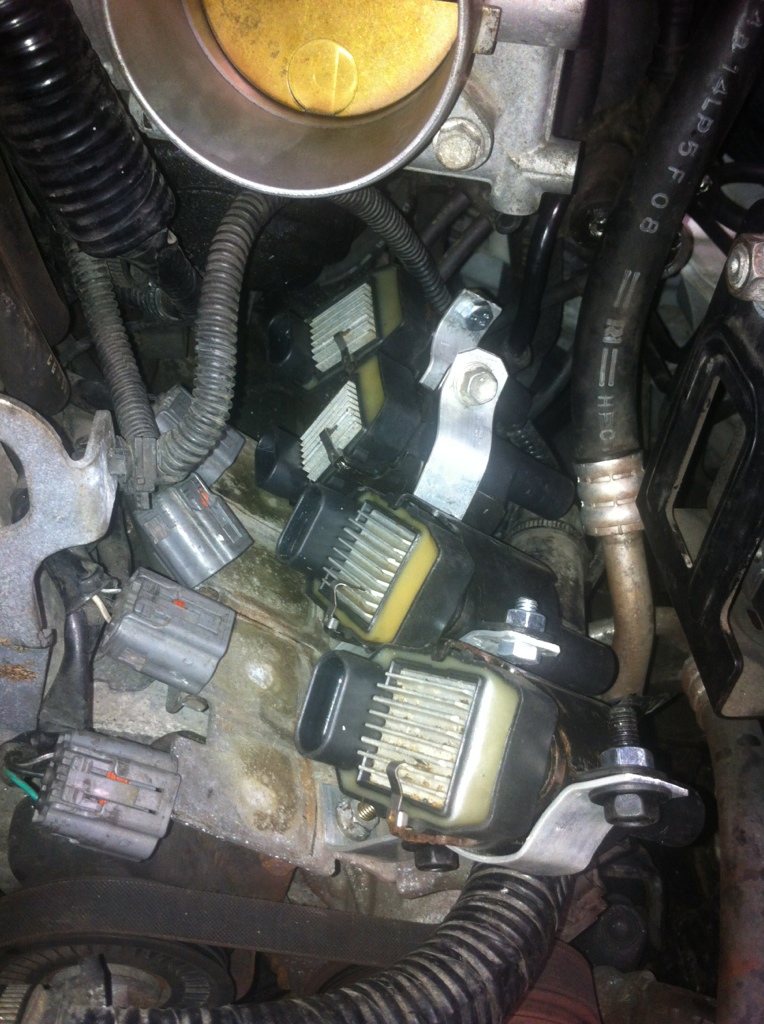
Temporary mock bracket made. I grounded the coils to the bracket to keep things simple and somewhat clean. This way there isn't random wires running everywhere. Just gotta mount it in the car yet and make adjustments.
Last edited by viprez586; 12-28-2012 at 06:48 AM.
12-31-2012, 09:21 AM
#39
05 RX8 Sold///05 Evo VIII
Thread Starter
iTrader: (5)
Join Date: Feb 2009
Location: New Berlin, WI
Posts: 457
Likes: 0
Received 0 Likes
on
0 Posts
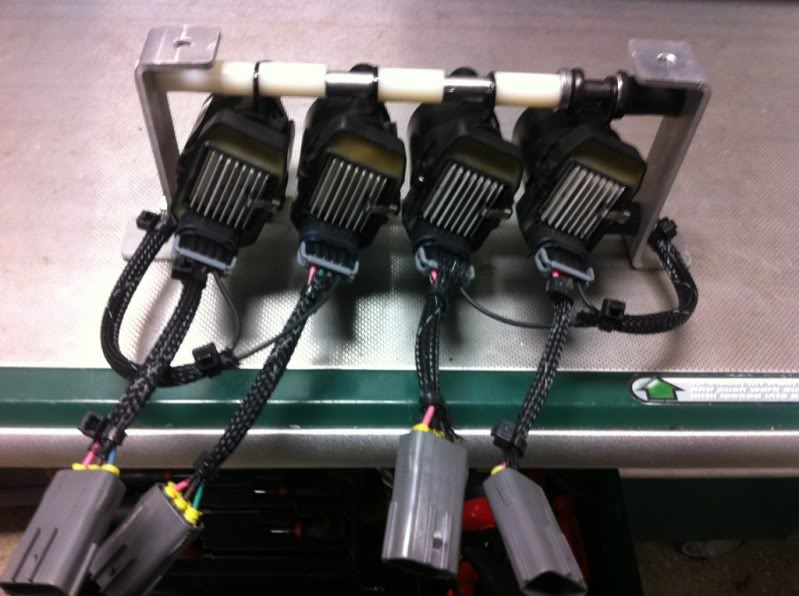
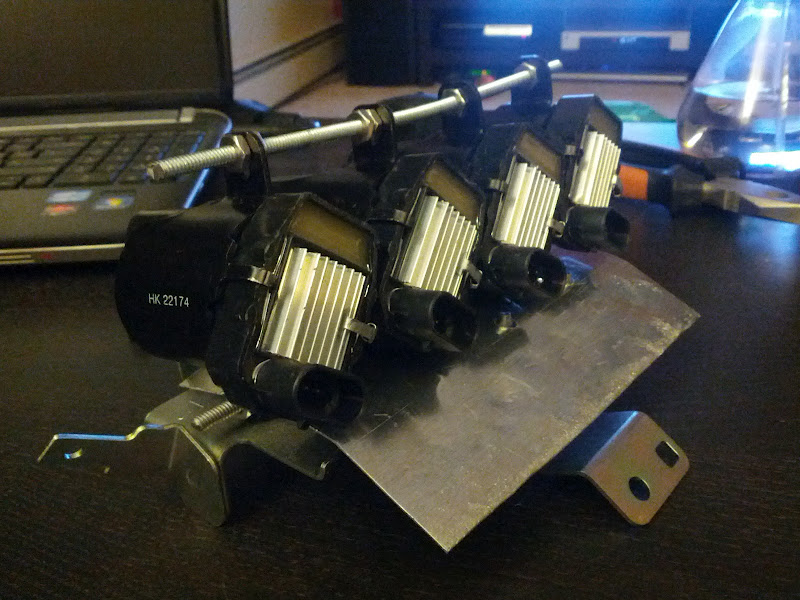
Original bracket idea is scratched. Way too big, and ugly IMO.
Got some aluminum strips bent to conform around the individual coils so each has it's own singular bracket to mount to the existing coil studs.
Probably will have an update around spring-ish since I'm in the process of buying a house so this project will likely go on the back-burner.
UPDATE on the pin depth.
The depth will work okay. I measured resistance and they're all less than 1 ohm back-pinning the GM harness to the OE harness in the car.
Last edited by viprez586; 12-31-2012 at 09:25 AM.
12-31-2012, 11:34 AM
#40

nice to have a clear brief answer about the dwell settings. should be a sticky somewhere.
at the risk of sounding like a BHR fanboy, haven't you spent a lot of time and money to recreate the wheel here..?
at the risk of sounding like a BHR fanboy, haven't you spent a lot of time and money to recreate the wheel here..?
12-31-2012, 12:05 PM
#41
05 RX8 Sold///05 Evo VIII
Thread Starter
iTrader: (5)
Join Date: Feb 2009
Location: New Berlin, WI
Posts: 457
Likes: 0
Received 0 Likes
on
0 Posts
Not really. I don't ever like paying someone for something I can do myself, especially at that high of a price. I've been fabbing stuff up in between "lulls" at work. I guess some people just want to install parts - understandable, some things like an intake, or exhaust I gladly pay for, but simple brackets, a wiring harness, and spark plug wires are not difficult to make.
Time invested: 3 hours or so give or take a half hour.
My running total:
8 Coils with separate wiring (will likely sell the other set and wiring eventually) $140.
GM pigtails $38.50
Mazda connectors $33.00
Spark plug wiring $73.18
Wire sheathing: $0 (See post above for link to similar stuff)
Brackets: $0 (Can be purchased at local hardware store for less than $8)
Total: $284.68
Sub $300 was my goal. Add in the reduced overall long-term cost by selling the (2x) sets of GM pigtails, and the 4 other coils(given all 8 coils work good), and it should easily be under $200.
Last edited by viprez586; 12-31-2012 at 12:08 PM.
01-01-2013, 01:34 AM
#42
They enjoy paying $500 + shipping to avoid reinventing the wheel and get fancy colors
I used a piece of aluminum U-channel and tie wraps to hold them together as an assembly, then a big tie wrap to hold them down on the factory mount. It's light, simple, and does the job. It sounds ghetto, but you can't really tell it is anything more than a set of four coils sitting in there.
I still hate the special GM coil-plug wire connector. If you lose a plug wire for whatever reason you can't just go to the parts store and buy a generic one to get you by. Maybe not that big of a deal for a street car, but not so great for a competition car. I made a long spare wire assembly just in case for that scenario.
 01-03-2013, 07:58 PM
#45
Registered

Join Date: Aug 2002
Location: London, Ontario, Canada
Posts: 346
Likes: 0
Received 0 Likes
on
0 Posts
I'm trying to be a bit overly analytical about this topic, I've spent hours upon hours reading/searching. My question is related to the initial question in this thread. I understand that the D585s will work with the stock ECU and that it's the most powerful of the LS2 coils and possibly the most reliable. However, if there are potential hot start issues and it's more optimal to adjust the dwell with a aftermarket solution, is there a better LS2 ignition for those running the stock ECU? All of the LS2 coils are powerful, will any of the other avoid this issue and perform like the OEM Mazda coil, only more reliably?
Here are the options:
D580 Corvette Coils (LS2)
D581 (12558693) Truck Coil
D585 (10457730-Delco, 19005218-Delphi) Truck Coil
D513A (12570616) LS2/LS7 First Design
D514A (12573190) LS2/LS7 Second Design
Megasquirt Sequencer Coils
I don't really understand the difference between the D581 and the D585. If they're applicable for the same models of vehicles, why are both still available (why hasn't the D585 superseded it)?
Comparison of LS2 d580 and D585 coils. The D580s appear to be "fine."
Brand does seem to matter: AC Delco D585 vs. generic:
Toby Lawrence - YouTube
VWVortex.com - LS2/Yukon coil conversion
Also, does anyone know if there is a difference between the "Delphi" LS2 coils and the AC Delco? Sometimes Delphi manufactures parts for AC Delco, sometimes it's someone else, I don't know which is it in these LS2 coil cases.
Last edited by Snrub; 01-03-2013 at 08:02 PM.
01-04-2013, 11:09 AM
#46
05 RX8 Sold///05 Evo VIII
Thread Starter
iTrader: (5)
Join Date: Feb 2009
Location: New Berlin, WI
Posts: 457
Likes: 0
Received 0 Likes
on
0 Posts
I'm trying to be a bit overly analytical about this topic, I've spent hours upon hours reading/searching. My question is related to the initial question in this thread. I understand that the D585s will work with the stock ECU and that it's the most powerful of the LS2 coils and possibly the most reliable. However, if there are potential hot start issues and it's more optimal to adjust the dwell with a aftermarket solution, is there a better LS2 ignition for those running the stock ECU? All of the LS2 coils are powerful, will any of the other avoid this issue and perform like the OEM Mazda coil, only more reliably?
Here are the options:
D580 Corvette Coils (LS2)
D581 (12558693) Truck Coil
D585 (10457730-Delco, 19005218-Delphi) Truck Coil
D513A (12570616) LS2/LS7 First Design
D514A (12573190) LS2/LS7 Second Design
Megasquirt Sequencer Coils
D580 Corvette Coils (LS2)
D581 (12558693) Truck Coil
D585 (10457730-Delco, 19005218-Delphi) Truck Coil
D513A (12570616) LS2/LS7 First Design
D514A (12573190) LS2/LS7 Second Design
Megasquirt Sequencer Coils
I don't really understand the difference between the D581 and the D585. If they're applicable for the same models of vehicles, why are both still available (why hasn't the D585 superseded it)?
Comparison of LS2 d580 and D585 coils. The D580s appear to be "fine."
Comparison of LS2 d580 and D585 coils. The D580s appear to be "fine."
Brand does seem to matter: AC Delco D585 vs. generic:
Also, does anyone know if there is a difference between the "Delphi" LS2 coils and the AC Delco? Sometimes Delphi manufactures parts for AC Delco, sometimes it's someone else, I don't know which is it in these LS2 coil cases.
01-04-2013, 11:13 AM
#47
05 RX8 Sold///05 Evo VIII
Thread Starter
iTrader: (5)
Join Date: Feb 2009
Location: New Berlin, WI
Posts: 457
Likes: 0
Received 0 Likes
on
0 Posts
Tried a different mounting solution. I need to trim the OE studs to get things situated better. But here's the idea anyway. Still unfinished but close - now that I got them mounted in roughly close I built my spark plug wires with only one 6' package so I have even more savings once I sell the extras off.
Pics! Again, still unfinished. The rear rotor coils had to be turned, and the fronts had to be angled due to the studs and brackets. The OE harness is very close, but can be moved so my PnP harness will take up it's current location. Again the Grounding wires will be grounded to the OE bracket.

Pics! Again, still unfinished. The rear rotor coils had to be turned, and the fronts had to be angled due to the studs and brackets. The OE harness is very close, but can be moved so my PnP harness will take up it's current location. Again the Grounding wires will be grounded to the OE bracket.
01-04-2013, 11:31 AM
#48

thats an interesting way to do it....
i opted for an easy and less expensive solution:

these pics were before i cut off the square in the bracket that was used to hold the oem mains harness, and the little tab on the right that was used for the oem wire guide.
btw, there is a reason why you want the coil output to be away from any metal ground (i.e. the engine block) .... i personally wouldn't leave my coil turned over like you do in that last pic.
i opted for an easy and less expensive solution:
these pics were before i cut off the square in the bracket that was used to hold the oem mains harness, and the little tab on the right that was used for the oem wire guide.
btw, there is a reason why you want the coil output to be away from any metal ground (i.e. the engine block) .... i personally wouldn't leave my coil turned over like you do in that last pic.
01-04-2013, 07:25 PM
#49
Registered
Join Date: Aug 2002
Location: London, Ontario, Canada
Posts: 346
Likes: 0
Received 0 Likes
on
0 Posts
Being that no one has made a solution for this other than adjusting the dwell time via mapping - I don't think so. Even so you will have a slight gain in overall performance by adjusting the dwell time. The hot start is the only issue I've heard of when running OE dwell.
It appears BHR really did the homework here on testing other coils and found the D585 to be optimal. It wouldn't be cost effective to start the project over in the mere hope of some cost savings (which would actually be the opposite in this case of trial and error/ "R&D")
01-04-2013, 08:02 PM
#50

Despite all claims from happy owners that hot starting on 585's on stock dwell is better than oem, I KNOW that (compared to good oem coils)..... it's worse !If you want a detailed account of why I'm so confident of this fact I'm happy to give it .
And BHR doesn't have to come in and defend their product here - it's still a great product and the best after-market coil kit available .
However : Forums like this should tell people the full story and it irks me immensely when things are hidden from the public domain.