Calling All Copper Red Shinkas !!
 05-02-2009, 06:58 PM
#351
is adjusting valve lash

Join Date: Sep 2007
Location: hollywooood!
Posts: 1,060
Likes: 0
Received 0 Likes
on
0 Posts
awesome color guys. always wanted that...
but also wanted the 40th interior....
ended up in a '07 VR and fell somewhere in-between with a red/blk interior.
but also wanted the 40th interior....
ended up in a '07 VR and fell somewhere in-between with a red/blk interior.
 05-25-2009, 09:54 PM
#352
S-Turns + RX8 = Zoom-Zoom
Join Date: Mar 2006
Location: somewhere in NJ
Posts: 178
Likes: 0
Received 0 Likes
on
0 Posts
 05-26-2009, 11:13 AM
#353
Geno

Join Date: Apr 2008
Location: Suffield, CT
Posts: 17
Likes: 0
Received 0 Likes
on
0 Posts
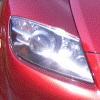
how hard was it to put in the clear corners?
05-26-2009, 11:25 AM
#354
Registered User

Join Date: Aug 2006
Posts: 797
Likes: 0
Received 0 Likes
on
0 Posts
Beautiful as usual Silvernite!
Eterone, clears are easy. The first one a bit difficult but once you know what you are doing the second one is a breeze. It took me an hour and a half to do them, and I was a complete novice to any kind of mod on any car!
Eterone, clears are easy. The first one a bit difficult but once you know what you are doing the second one is a breeze. It took me an hour and a half to do them, and I was a complete novice to any kind of mod on any car!
05-26-2009, 05:24 PM
#355
S-Turns + RX8 = Zoom-Zoom
Join Date: Mar 2006
Location: somewhere in NJ
Posts: 178
Likes: 0
Received 0 Likes
on
0 Posts
Installing the clears is not that hard. like rddragoness said its a very simple mod. The first one would take some time, but the second set should a breeze once you have done it once. Think my clears took about 25-30min. I had some difficulty pulling out one of the amber side markers and really took my time since it was probably my second or third mod to the car.
There's a DIY thread for Clear Corners in case you need instructions
There's a DIY thread for Clear Corners in case you need instructions
05-27-2009, 03:11 PM
#356
Geno
Join Date: Apr 2008
Location: Suffield, CT
Posts: 17
Likes: 0
Received 0 Likes
on
0 Posts
Installing the clears is not that hard. like rddragoness said its a very simple mod. The first one would take some time, but the second set should a breeze once you have done it once. Think my clears took about 25-30min. I had some difficulty pulling out one of the amber side markers and really took my time since it was probably my second or third mod to the car.
There's a DIY thread for Clear Corners in case you need instructions
There's a DIY thread for Clear Corners in case you need instructions
06-01-2009, 10:02 PM
#358

Thought I'd reach out and say hello. Just picked-up my Copper Red Shinka 2 weeks ago with 26k on the odometer and in near flawless condition.
The RX8 marks my 4th rotary powered ride, beginning with a 1974 RX4 coupe bought back in....gulp......1974!
Any Copper Reds here in the Hampton Roads area?
Cheers,
Bob
The RX8 marks my 4th rotary powered ride, beginning with a 1974 RX4 coupe bought back in....gulp......1974!
Any Copper Reds here in the Hampton Roads area?
Cheers,
Bob
 06-09-2009, 11:20 AM
#360
Geno
Join Date: Apr 2008
Location: Suffield, CT
Posts: 17
Likes: 0
Received 0 Likes
on
0 Posts
Thought I'd reach out and say hello. Just picked-up my Copper Red Shinka 2 weeks ago with 26k on the odometer and in near flawless condition.
The RX8 marks my 4th rotary powered ride, beginning with a 1974 RX4 coupe bought back in....gulp......1974!
Any Copper Reds here in the Hampton Roads area?
Cheers,
Bob
The RX8 marks my 4th rotary powered ride, beginning with a 1974 RX4 coupe bought back in....gulp......1974!
Any Copper Reds here in the Hampton Roads area?
Cheers,
Bob
Where are you from, not sure where Hampton road area is
06-09-2009, 11:31 AM
#361
Geno
Join Date: Apr 2008
Location: Suffield, CT
Posts: 17
Likes: 0
Received 0 Likes
on
0 Posts
well, I ordered my clears, should be in next week.
I will send some pic's.
I also received a special exterior -one of a kind- application....
I will send pictures this weekend and you will see what I mean!
I will send some pic's.
I also received a special exterior -one of a kind- application....
I will send pictures this weekend and you will see what I mean!
06-13-2009, 07:06 PM
#362
Geno
Join Date: Apr 2008
Location: Suffield, CT
Posts: 17
Likes: 0
Received 0 Likes
on
0 Posts
Well, got my clears on yesterday, like the look and the install was easy (with the help of the link)
and my special "Shinka" plate
I was suprised that it was not taken so I ordered it
and my special "Shinka" plate
I was suprised that it was not taken so I ordered it

 06-14-2009, 11:06 AM
#364
S-Turns + RX8 = Zoom-Zoom
Join Date: Mar 2006
Location: somewhere in NJ
Posts: 178
Likes: 0
Received 0 Likes
on
0 Posts
 and my gosh, ur 8 must be my 8's twin sis. with that stock appearance package + front mud guards and OEM spoiler set-up.
 rddragoness- Beautiful, one of the best Copper Red 8 out there.
06-14-2009, 08:35 PM
#365
Geno
Join Date: Apr 2008
Location: Suffield, CT
Posts: 17
Likes: 0
Received 0 Likes
on
0 Posts
do you have the front mud flaps also? iIput mine on after I purchased the car.
Becides the front flaps and the clear corners it's all orig. for now.
I am working on a mock up fabrication of some expanded metal covers to protect my oil cooler. these pieces will match my front grill but hopefully can be installed w/o removing the bumper
06-14-2009, 08:41 PM
#366
Geno
Join Date: Apr 2008
Location: Suffield, CT
Posts: 17
Likes: 0
Received 0 Likes
on
0 Posts
06-15-2009, 07:23 PM
#367
Evolved

Join Date: Jun 2007
Location: Sergeant Bluff, IA
Posts: 10
Likes: 0
Received 0 Likes
on
0 Posts
Wow... I will have to post a photo of mine as well. Looks like we'd all be triplets actually! lol.
 06-22-2009, 08:12 PM
#369
06 Copper Red Shinka

Join Date: Mar 2007
Location: Pewaukee, WI
Posts: 104
Likes: 0
Received 0 Likes
on
0 Posts
IT JUST MIGHT BE. what is your production #?
do you have the front mud flaps also? iIput mine on after I purchased the car.
Becides the front flaps and the clear corners it's all orig. for now.
I am working on a mock up fabrication of some expanded metal covers to protect my oil cooler. these pieces will match my front grill but hopefully can be installed w/o removing the bumper
-Nick

 06-29-2009, 11:26 AM
#371
Geno
Join Date: Apr 2008
Location: Suffield, CT
Posts: 17
Likes: 0
Received 0 Likes
on
0 Posts
Etorone I just did a similar little project since I had the front end off to fix up the coon damage. I'll have to post up some pictures. I recommend you take the front off to install oil cooler grills. If you do you'll see what I mean as there are some wonderful pre-existing mounting holes you can use. I'll try to get pictures up this week but it's going to be a busy one for me.
-Nick
-Nick
06-29-2009, 07:43 PM
#372
06 Copper Red Shinka
Join Date: Mar 2007
Location: Pewaukee, WI
Posts: 104
Likes: 0
Received 0 Likes
on
0 Posts
send some pic's when you can. I did "feel" the two small screw holes on the upper cutout. I was going to try to use those opngs w/o removing the bumper. my thought was to insert a slightly oversized rivit with a big enough head to grab the screen as it is inserted. nothing to loose except some of my time.
I'll try and get something up in the next day or two. Things are settling down now, between being sick and my sister getting married this past weekend things have been pretty crazy. I just need to get the card out of the camera so I can upload them.
I used some standard round head screws (careful on length that you don't go to far) and they just self tapped themselves into the urathane.
-Nick
07-01-2009, 06:15 PM
#373
http://xtreme-toyz.net/hin_tampa_2009
Latest pics of my CR taken @ Hot Import Nights - Tampa - 2009
http://xtreme-toyz.net/boti_2009
Previous latest pics of CR taken @ Battle of the Imports - Orlando - 2009
Latest pics of my CR taken @ Hot Import Nights - Tampa - 2009
http://xtreme-toyz.net/boti_2009
Previous latest pics of CR taken @ Battle of the Imports - Orlando - 2009
Last edited by m4f1050; 07-01-2009 at 06:19 PM.