
DIY: Footwell Lights (with pics/pdf/vid)


Thread Starter
Registered
Joined: Jul 2014
Posts: 22
Likes: 8
DIY: Footwell Lights (with pics/pdf/vid)
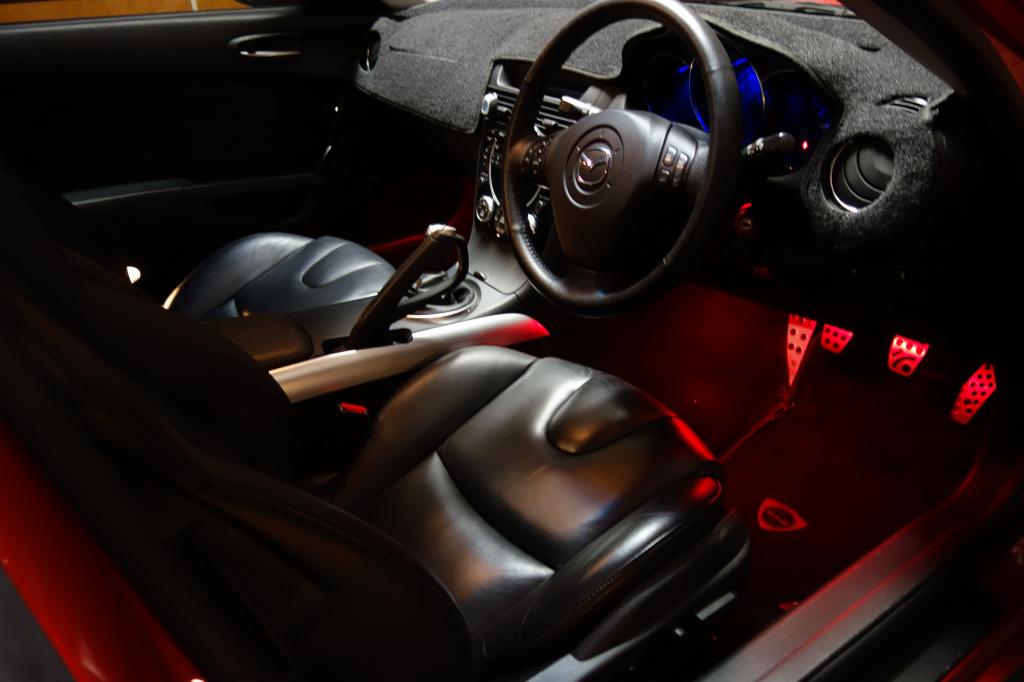
So I decided I wanted to add some foot-well lights to my RX8 and even though this has been done many times before mine has a very slight twist to it�
The idea of this was to have a small matching glow which came on with the interior/door lights but that could be also switched completely off or on independently (i.e. have it on while driving, or have it off while having doors open when cleaning the car or something and when not needed)
First of all, shout out to �staticlag� for his �DIY: Footwell Lights� thread which was very helpful: https://www.rx8club.com/series-i-do-...lights-179213/
I�ve attached some photos (there more on the .pdf) and a video of the lights working can be found here:
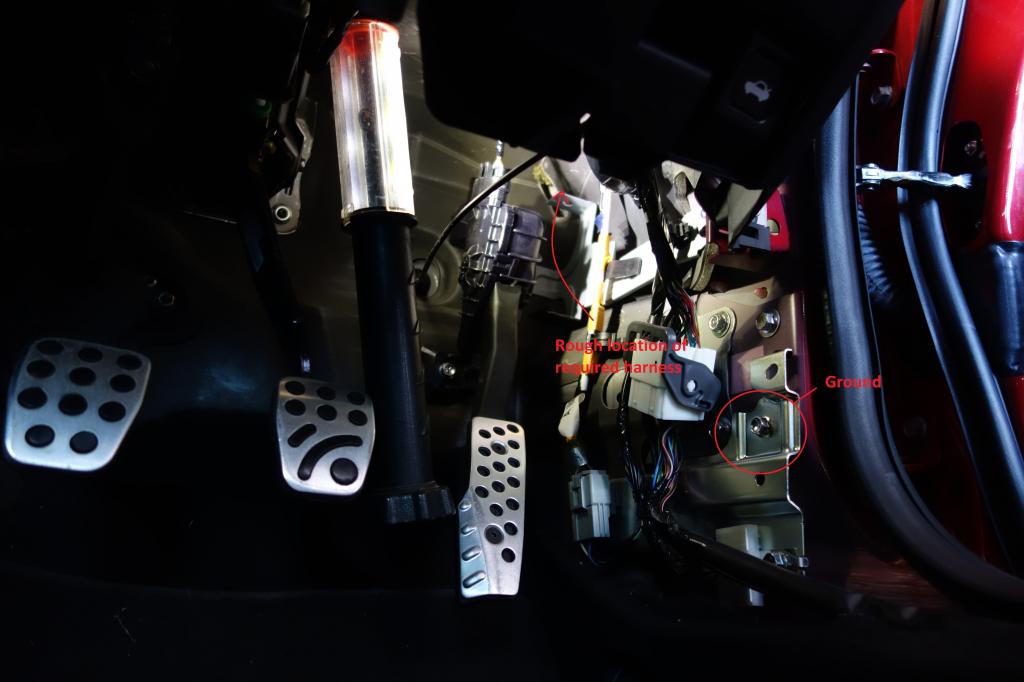
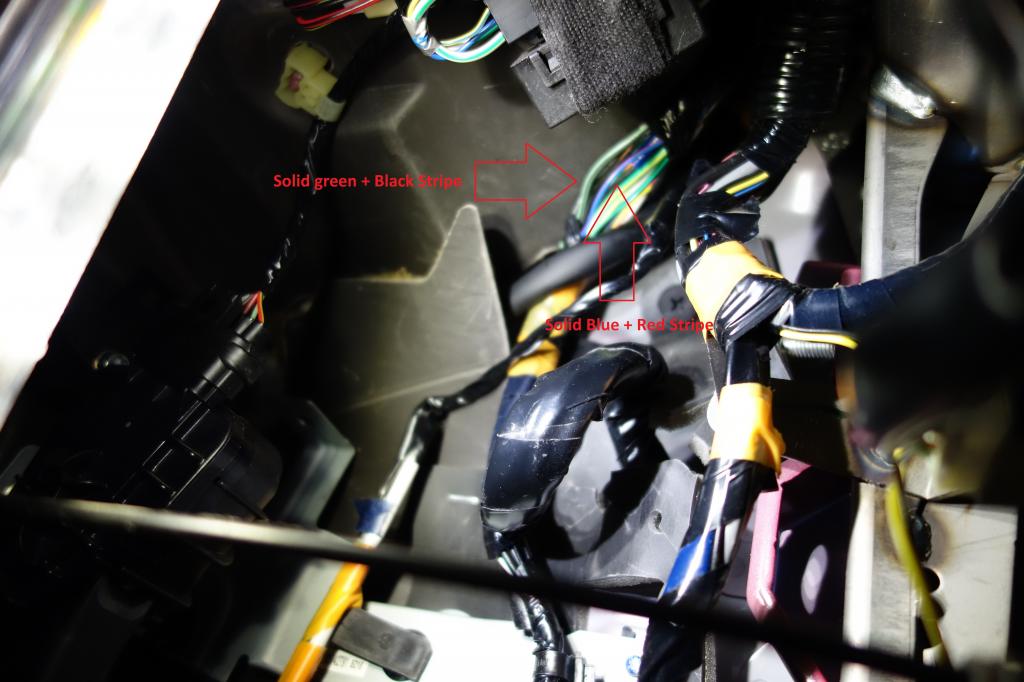
1. staticlag explained well which wires are needed to be tapped in for this install and I checked this in accordance to the RX8 electrical manual. The wires are located into the harness going into the door (I used the one on the driver�s side so that less wiring was need for my switch.
A solid blue wire with red stripe is needed as the +12V power. I used a wiretap for this.
NOTE: This wire is always live and has 12V running through it regardless of if your car has the key in, is unlocked or locked. Make sure your battery is disconnected if you want to play around with it for anything.
A solid green wire with a black stripe is needed as the ground and switch for the interior lights � when the doors are opened a relay/switch is closed which completes the circuit and lights up the interior lights. I used a wiretap for this.
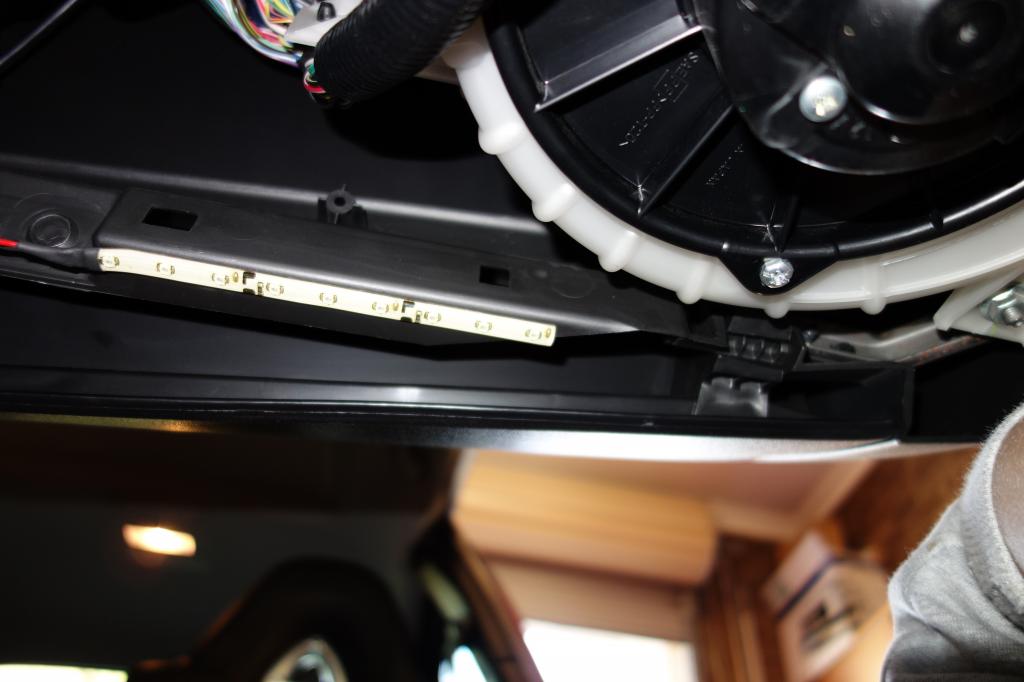
2. I wanted these foot-well lights to provide a small glow rather than to be over-bright and give a sort of OEM look. I had some red LED strips lying around (from the 5m eBay LED reels) and cut them to a length of 3 segments with 3 LEDs per segments (i.e. 9 LED in total per side, about 12ish cm long).
I also added some proper plugs so that they can be installed, changed or removed easily and individually if needed to do so (see pic).
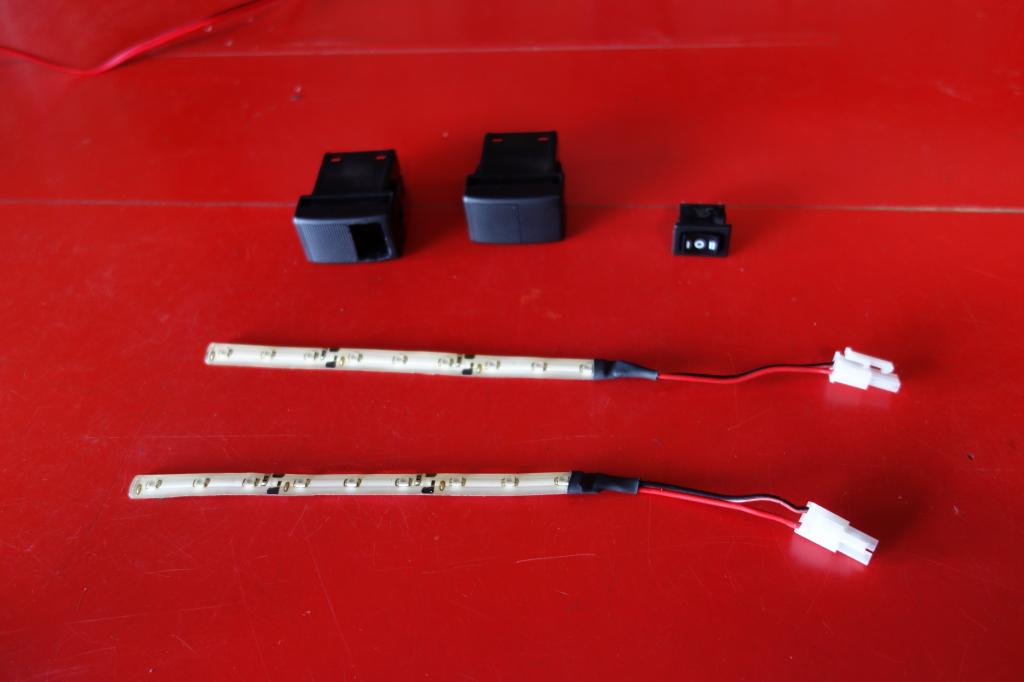
3. Since I wanted to have 3 positions (light up with doors, always lit up and off) I needed an ON-OFF-ON (or centre-off) switch. This switch click 3 ways; ON, OFF and a second but different ON position. Found a nice small one in a local electronics shop for about 3 - 4 bucks that fits perfectly on the top of the spare button cover next to the headlamps & DSC switches.
At this point I didn�t want to drill into my empty switch cover and found one at a local wreckers who actually gave it to me for free (awesome guy). Some Dremel & filing was needed here, but it�s pretty straight forward. A small switch like the one I used and placed at the top of the cover fits very well and can�t even be seen if you don�t know its there.
4. Time to wire everything up. First disconnect your battery.
I�ve attached a diagram, but basically, we need to tap into the solid blue wire with the red stripe and attach the positive of the LEDs in parallel to the other end.
Tap into the solid green wire with a black stripe and attach the other end to one of the legs of the ON positions on the switch.
At this point I used a wire I had lying around (purple) and grounded one end of it to the body of the car and attached the other to the second leg of the second ON position for the switch.
Finally, grab a third wire (I used solid black) and attach one end to the middle of leg of the switch (the one which is always connected) and the other end to the LEDs in parallel.
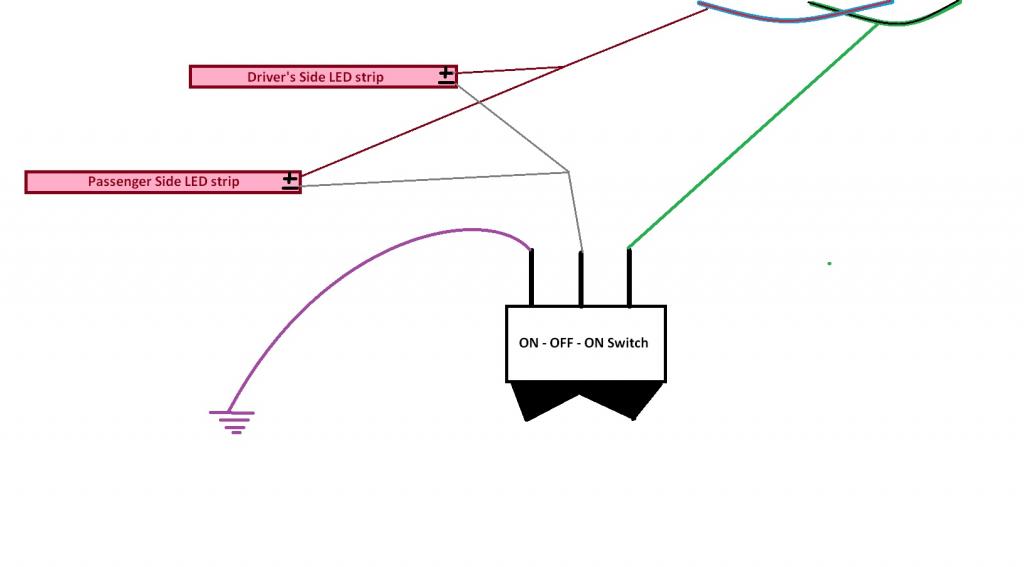
Don�t forget to feed the wires through the button and button cover hole before soldering.
5. I found that the LED strip (which had 3m tape on the back) perfectly fit under the glove box for the passenger side, while for the driver�s side I had to make a small metal strip and play around with attaching it to some spare holes under the dash and then sticking the strip onto it. Also put a couple of cable ties here and there for extra support. Connect everything back up, and try them out.
First DIY ever so I hope it was clear enough
The idea of this was to have a small matching glow which came on with the interior/door lights but that could be also switched completely off or on independently (i.e. have it on while driving, or have it off while having doors open when cleaning the car or something and when not needed)
First of all, shout out to �staticlag� for his �DIY: Footwell Lights� thread which was very helpful: https://www.rx8club.com/series-i-do-...lights-179213/
I�ve attached some photos (there more on the .pdf) and a video of the lights working can be found here:
1. staticlag explained well which wires are needed to be tapped in for this install and I checked this in accordance to the RX8 electrical manual. The wires are located into the harness going into the door (I used the one on the driver�s side so that less wiring was need for my switch.
A solid blue wire with red stripe is needed as the +12V power. I used a wiretap for this.
NOTE: This wire is always live and has 12V running through it regardless of if your car has the key in, is unlocked or locked. Make sure your battery is disconnected if you want to play around with it for anything.
A solid green wire with a black stripe is needed as the ground and switch for the interior lights � when the doors are opened a relay/switch is closed which completes the circuit and lights up the interior lights. I used a wiretap for this.
2. I wanted these foot-well lights to provide a small glow rather than to be over-bright and give a sort of OEM look. I had some red LED strips lying around (from the 5m eBay LED reels) and cut them to a length of 3 segments with 3 LEDs per segments (i.e. 9 LED in total per side, about 12ish cm long).
I also added some proper plugs so that they can be installed, changed or removed easily and individually if needed to do so (see pic).
3. Since I wanted to have 3 positions (light up with doors, always lit up and off) I needed an ON-OFF-ON (or centre-off) switch. This switch click 3 ways; ON, OFF and a second but different ON position. Found a nice small one in a local electronics shop for about 3 - 4 bucks that fits perfectly on the top of the spare button cover next to the headlamps & DSC switches.
At this point I didn�t want to drill into my empty switch cover and found one at a local wreckers who actually gave it to me for free (awesome guy). Some Dremel & filing was needed here, but it�s pretty straight forward. A small switch like the one I used and placed at the top of the cover fits very well and can�t even be seen if you don�t know its there.
4. Time to wire everything up. First disconnect your battery.
I�ve attached a diagram, but basically, we need to tap into the solid blue wire with the red stripe and attach the positive of the LEDs in parallel to the other end.
Tap into the solid green wire with a black stripe and attach the other end to one of the legs of the ON positions on the switch.
At this point I used a wire I had lying around (purple) and grounded one end of it to the body of the car and attached the other to the second leg of the second ON position for the switch.
Finally, grab a third wire (I used solid black) and attach one end to the middle of leg of the switch (the one which is always connected) and the other end to the LEDs in parallel.
Don�t forget to feed the wires through the button and button cover hole before soldering.
5. I found that the LED strip (which had 3m tape on the back) perfectly fit under the glove box for the passenger side, while for the driver�s side I had to make a small metal strip and play around with attaching it to some spare holes under the dash and then sticking the strip onto it. Also put a couple of cable ties here and there for extra support. Connect everything back up, and try them out.
First DIY ever so I hope it was clear enough


Thread Starter
Registered
Joined: Jul 2014
Posts: 22
Likes: 8
Hey catfishBill, sorry for the late reply.
As mentioned in step 1, "A solid green wire with a black stripe is needed as the ground and switch for the interior lights – when the doors are opened a relay/switch is closed which completes the circuit and lights up the interior lights. I used a wiretap for this."
So you're looking for a solid green wire with a black stripe which I tried to show on the photos but it is a little hard to see.
DAT2RTR: As for the brightness, there's definitely a way to adjust it but it will need a bit more work... I've done an install before on a different car using these LED strips and using a $1.40 ebay dimmer (can select brightness levels, pulse, etc) so you can always get one of those, adjust it to your liking and hide it behind the dash somewhere because honestly once you have them as you like them you probably won't be touching them again.. But despite how some of the photos turned out, I reckon this actually gives a really nice glow at night and its not too bright and suites the dash colors

Thread
Thread Starter
Forum
Replies
Last Post
jasonrxeight
RX-8's For Sale/Wanted
2
Sep 30, 2015 01:53 PM
Evan Gray
Series I Trouble Shooting
0
Sep 26, 2015 12:30 PM