When you click on links to various merchants on this site and make a purchase, this can result in this site earning a commission. Affiliate programs and affiliations include, but are not limited to, the eBay Partner Network.
No, he blatantly copies other company�s products. Any number of places can make those pullies here in the USA. You ought to give him back some of same.
??? UM thats what every company does!!! so how is he any different from every other performance company out there?? lmao !!! its a business at the end of the day.
That's awesome to hear! Way easier to fix. Just get this. The wider 6-rib pulley and belt will fix all of your problems. Carl Ryan will source you the belt as well if you need help finding it (I had trouble locating the proper belt; I am assuming he was referencing a different UK-based part # or something and couldn't find it so he sourced it and sent it with the pulley kit).
i ordered the pulley kit. whats the belt number on the belt you got???
i ordered the pulley kit. whats the belt number on the belt you got???
What psi did you get? I can get the gatorback belt number off mine if you are 8psi
As a side note, belt slippage is really the achilles heel of these kits. I think I have either replaced or adjusted the belt more times than I have changed the oil. I have to adjust it again this winter but its the first time with the 6 rib kit. I think its less noticeable at 8psi since mine currently only slips to 6 above 8k. On the pettit pulleys and 4 rib belt, it used to slip from 11psi to 6psi starting around 5 or 6k rpm. I swear every time I thought I had it beat, it would come lurking back. Usually once in awhile and then more and more frequently. Also the first time, I had a nasty boost leak which hid the issue.
I really don't understand why people with these kits don't convert to a toothed belt ..... "how hard can it be?"
If I understood the measurement and labeling system of belts I would look into finding a toothed equivalent for sure. Looking at the numbers on the belt I posted above, do you know how to read/translate them and how I would go about finding an equivalently sized belt with teeth? Are the numbers indicative of width, length, rigidity, type (toothed or not), etc. in the same way tire numbers describe their specifications (for instance 245/45/18 = 245mm width/45% of that is the sidewall height/18-inch diameter)?
I have no idea ..... I'm sure with a bit of time and effort .....................
These kits are pretty nice ...it really is a shame to have sub par performance for the lack of a decent drive setup.
Well you could make the same argument about SC vs Turbo
it’s all about ratio. Measure each pulley OD and compare it to the others to the drive pulley to determine the ratio. I’m sure Kenn Belle can help you try to figure out how much faster you want to turn the SC pulley for a certain boost increase.
What psi did you get? I can get the gatorback belt number off mine if you are 8psi
As a side note, belt slippage is really the achilles heel of these kits. I think I have either replaced or adjusted the belt more times than I have changed the oil. I have to adjust it again this winter but its the first time with the 6 rib kit. I think its less noticeable at 8psi since mine currently only slips to 6 above 8k. On the pettit pulleys and 4 rib belt, it used to slip from 11psi to 6psi starting around 5 or 6k rpm. I swear every time I thought I had it beat, it would come lurking back. Usually once in awhile and then more and more frequently. Also the first time, I had a nasty boost leak which hid the issue.
Someone on Reddit told me they ran the 13psi pulley with the upgraded 2.0L blower (ours are 1.7L IIRC), but he had to have his Renesis rebuilt with aftermarket seals (Goopy apex seals, I think..? Maybe RX7 seals?) and lower-compression rotors because the bigger blower combined with the 13psi pulley actually ended up pushing nearly 18psi of boost at the peak.
But even with just a regular 1.7L blower, that 13psi pulley will make our delicate high-compression Rennies sound like marbles clattering around in a tin can within about 15-20K miles, from what I hear. Personally I'm gonna stick with the 8psi pulley and see how close to 300whp I can get.
my motor is going to be built with fd rotors and seals. to handle the boost. plus oil modifications and coolant mods. street port and most likely custom lower intake no more vdi's actuators,
my motor is going to be built with fd rotors and seals. to handle the boost. plus oil modifications and coolant mods. street port and most likely custom lower intake no more vdi's actuators,
Who is building your motor? At one point Dave from Speed1 suggested that to me but that was years ago.
Do you still need belt sizes? I could check my old amazon order history for 11psi
Jim built the motor in my car. Ask him about the yellow pettit sc car. He did his version of a street port and recommended the RA super seals. I am sorta intrigued/surprised about the FD rotors suggestion since he never mentioned that. Of course my motor was not in good enough shape to rebuild it so maybe the overall cost would have been too high
Progress! My dad inherited a Mercedes, so he sent me his old Beetle last week, allowing me to begin my install yesterday (Friday afternoon)!
.
. First, a compression test; I wound up with mostly low-90's numbers, a few dipping into the 80's and a couple popping up into the low 100's. Not the ideal 110-120psi that Mazda thinks is normal, but I hear most rebuilt engines rarely ever achieve that anyway. .
.
. Next up, pulling out the basic components and pre-staging the easy stuff like spark plugs and extended wires (made by Charles at BHR).
.
.
.
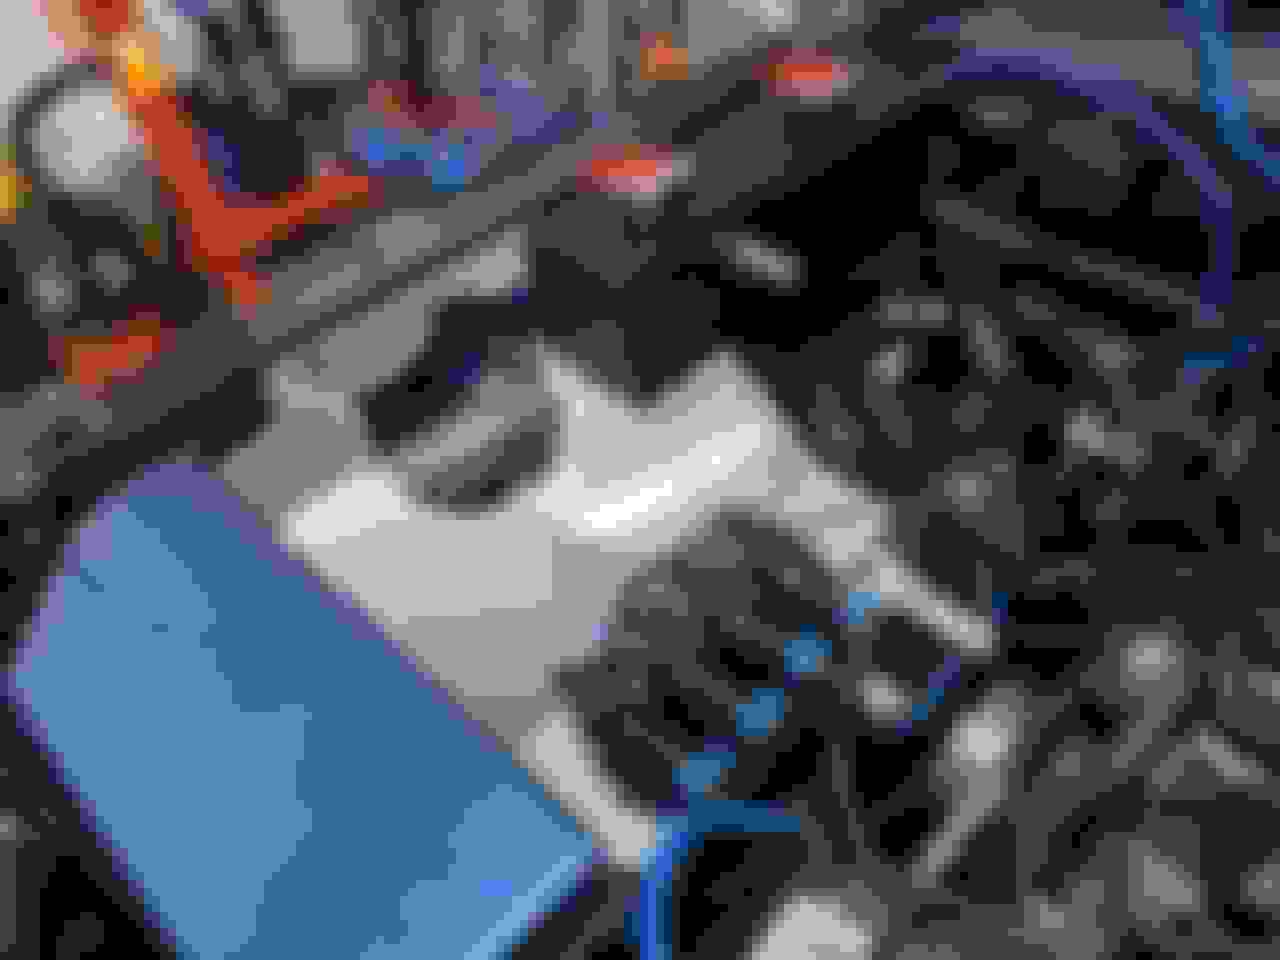
. Now it starts to get hairy; getting that upper intake manifold off with the engine in the car is a bitch and a half; I had to run to Pep Boys and buy a bunch of ratchet extensions of various lengths and several elbows in order to access those hex-bolts. You can see I also hacked apart the UIM with a hacksaw to separate the little vacuum chamber (right below the little round green check-valve that will feed into the Pettit UIM and BOV), as well as extracting the little purge-valve from the stock UIM and running a 5/32" tube over to the fuel purge line (the blue tube at the rear of the engine bay) as well as adding the short little blue tube that will connect it to the purge nipple on the rear of the compressor housing. I've also mounted the new oil neck extender, as well as relocated the ignition coils onto the newly-installed LRB Speed aluminum undertray and installed the BennettBuilt dual coolant tanks. I also relocated the grounding points for the coils and installed the little metal bridge/mounting bracket onto the engine block for the back of the compressor to sit on.
.
.
.
. Close-up of the relocated ignition coils - had to drill holes in the LRB tray, as well as add some little rubber spacers underneath.
.
.
.
. On the front intake hole on the LRB Speed tray and also the front chassis hole, I installed some black tubing that I sliced open long-ways with a hobby scalpel to serve as a buffer against the sharp edges so as to not scratch up my nice painted RX8Performance CAI tube
.
.
.
.
. Finally, I had to cut several holes into the upper area of the LRB Speed tray to accommodate the sensor bung on the front of the coolant reservoir and and the coolant output hose nipple; then I ran a short bit of tubing down to the coolant pump (which is now powered/grounded as well, soon to be mounted to the frame). I then ran some more 5/8" tubing to the input tubes for the Hayden coolers mounted to the undertray, but I screwed up tugging on the output tube while trying to re-position it and the old plastic 3-way T connector snapped (hence you see the two 5/16" hoses just sitting there open-ended) so I've already had to order a new one on Amazon Prime It's a 5/8" input that splits off to two smaller 5/16" outputs in case anyone ever needs to order one. Other than that the coolant loop is basically complete!
.
.
.
So yeah - progress! With a second car to drive I'm free to work on my 8 whenever I'm not at work, so I'll keep posting as I make more progress.
I do have a question though - how the hell do you change your oil filter once this thing is installed? It seems like there would be no room at all with the compressor in the way!
.
.
Got the UIM, compressor, most of the tubing, pulleys and SC belt installed as well as the alternator put back in. Just need to finish up the coolant loop and get the intake setup (MAF tube, CAI, etc.) installed and then it's time to start putting in fluids/oils/etc., tightening down final bolts, cleaning up this filthy bastard and getting ready for the big light-off! Super busy this week with work, so I'll probably get it all finished up in a week or so.
.
It looks like you have the return from the inter cooler connected to the front(bottom) pipe when it should be connected to the rear as the hottest water will be at the top.
Looks real good. My Renesis is still running fine with low 70's high 60's on both rotors lol. I think you'll be just fine with the numbers you've got going lol.
That LRB really cleans things up. What did you use for rubber spacers?
Some thick rubber washers I had laying around lol. They work well to keep the bolts that mount the coils to their rack (and stick down a few millimeters on the bottom of the coil rack) from touching/impacting the intake tray.
Originally Posted by ChrisHolmes2014
It looks like you have the return from the inter cooler connected to the front(bottom) pipe when it should be connected to the rear as the hottest water will be at the top.
So wait, should reverse the hoses? Is this a serious thing that will cause damage? I'll have to order more 5/8" hose to do that :/
.
.
Also, I've finished the installation, put in all the oils/coolants/etc., and started it up! Everything seems to work, aside from running like *** because it doesn't have a tune yet, but it idles fine at least. Only one major problem: Now my power steering has ceased to function... I'm almost certain I didn't touch anything below the cross-bar where the battery and intake tray mount (beneath which would be the power steering rack IIRC) since I had no reason to go down into that area; does anyone know if there are any power-steering-related relays, harnesses, connectors, fuses, etc. that might get bumped or interfered with during a supercharger installation? Freaking stuck on this now :/
 09-04-2019, 06:13 PM


 It's a 5/8" input that splits off to two smaller 5/16" outputs in case anyone ever needs to order one. Other than that the coolant loop is basically complete!