Interest in US-made Burnout KD-IV kit?
 04-03-2007, 04:08 PM
#251
Registered

Join Date: Sep 2006
Location: Madison, WI
Posts: 1,202
Likes: 0
Received 0 Likes
on
0 Posts
Originally Posted by success07
Guys,
I got my first quote from a local body shop and it was $2500+. The holes left by my appearance package need to be filled in the trunk area as well as where the side aero flares were. In addition, the cost includes all fitting and painting of the kit and the evo-r.net lip spoiler. Seems a bit high to me. Any opinions? I have a couple more shops to visit so I'm hoping for better news.
Photo,
As for my initial test fitting of the sides, I noticed that mine don't go straight down from the car body like yours do. My sides tend to angle inward toward the underneath of the car. This happens when the front and rear parts of the sides are flush to the body. It could be the angle that I'm at but initially the sides are looking like a potential problem. Any insight?
Thank you in advance.
 04-03-2007, 11:12 PM
#252
Registered User
Thread Starter

Join Date: Apr 2006
Posts: 670
Likes: 0
Received 0 Likes
on
0 Posts
Originally Posted by success07
Guys,
I got my first quote from a local body shop and it was $2500+. The holes left by my appearance package need to be filled in the trunk area as well as where the side aero flares were. In addition, the cost includes all fitting and painting of the kit and the evo-r.net lip spoiler. Seems a bit high to me. Any opinions? I have a couple more shops to visit so I'm hoping for better news.
Photo,
As for my initial test fitting of the sides, I noticed that mine don't go straight down from the car body like yours do. My sides tend to angle inward toward the underneath of the car. This happens when the front and rear parts of the sides are flush to the body. It could be the angle that I'm at but initially the sides are looking like a potential problem. Any insight?
Thank you in advance.
I got my first quote from a local body shop and it was $2500+. The holes left by my appearance package need to be filled in the trunk area as well as where the side aero flares were. In addition, the cost includes all fitting and painting of the kit and the evo-r.net lip spoiler. Seems a bit high to me. Any opinions? I have a couple more shops to visit so I'm hoping for better news.
Photo,
As for my initial test fitting of the sides, I noticed that mine don't go straight down from the car body like yours do. My sides tend to angle inward toward the underneath of the car. This happens when the front and rear parts of the sides are flush to the body. It could be the angle that I'm at but initially the sides are looking like a potential problem. Any insight?
Thank you in advance.
Personally, if the holes are out of sight behind the new skirts, I'd use something like double-sided tape to seal the holes. $2,500 sounds a WHOLE LOT high, but I'm not in the body shop business.
04-04-2007, 08:46 AM
#253
Registered
Join Date: Sep 2006
Location: Madison, WI
Posts: 1,202
Likes: 0
Received 0 Likes
on
0 Posts
OK, Well I may try to do the install on my own. If Any one can give me a step by step (pics if possible) that will be great. Keep in mind though that I have never done any type of body work. I believe I have all the tools necessary. So what do I need for installation aside from two sided tape, 3/8 tubing, and body screws? Can all this be purchased at Homedepot? I'm guessing I'll try the initial fitment on my own if that doesn't go well I can always have a shop do it.
04-04-2007, 10:59 AM
#254
Registered User
Thread Starter
Join Date: Apr 2006
Posts: 670
Likes: 0
Received 0 Likes
on
0 Posts
A good drill with sharp drill bits, and lots of patience! Measure twice, drill once! Use three screws at each front edge of the side skirts as they'll mainly be into the plastic liner there (there's a small bit of metal to hit, if you're lucky).
I'm still playing around with the perfect installation on mine. I had to stop for the Formula D event here in Long Beach though.
I'm still playing around with the perfect installation on mine. I had to stop for the Formula D event here in Long Beach though.
04-04-2007, 12:38 PM
#255
Registered
Join Date: Sep 2006
Location: Madison, WI
Posts: 1,202
Likes: 0
Received 0 Likes
on
0 Posts
Originally Posted by PhotoMunkey
A good drill with sharp drill bits, and lots of patience! Measure twice, drill once! Use three screws at each front edge of the side skirts as they'll mainly be into the plastic liner there (there's a small bit of metal to hit, if you're lucky).
I'm still playing around with the perfect installation on mine. I had to stop for the Formula D event here in Long Beach though.
I'm still playing around with the perfect installation on mine. I had to stop for the Formula D event here in Long Beach though.
04-11-2007, 10:59 PM
#256
Registered
Join Date: Sep 2006
Location: Madison, WI
Posts: 1,202
Likes: 0
Received 0 Likes
on
0 Posts
Originally Posted by success07
Guys,
I got my first quote from a local body shop and it was $2500+. The holes left by my appearance package need to be filled in the trunk area as well as where the side aero flares were. In addition, the cost includes all fitting and painting of the kit and the evo-r.net lip spoiler. Seems a bit high to me. Any opinions? I have a couple more shops to visit so I'm hoping for better news.
Photo,
As for my initial test fitting of the sides, I noticed that mine don't go straight down from the car body like yours do. My sides tend to angle inward toward the underneath of the car. This happens when the front and rear parts of the sides are flush to the body. It could be the angle that I'm at but initially the sides are looking like a potential problem. Any insight?
Thank you in advance.
I got my first quote from a local body shop and it was $2500+. The holes left by my appearance package need to be filled in the trunk area as well as where the side aero flares were. In addition, the cost includes all fitting and painting of the kit and the evo-r.net lip spoiler. Seems a bit high to me. Any opinions? I have a couple more shops to visit so I'm hoping for better news.
Photo,
As for my initial test fitting of the sides, I noticed that mine don't go straight down from the car body like yours do. My sides tend to angle inward toward the underneath of the car. This happens when the front and rear parts of the sides are flush to the body. It could be the angle that I'm at but initially the sides are looking like a potential problem. Any insight?
Thank you in advance.
04-12-2007, 10:14 AM
#257
I'm Kind of a Big Deal
Join Date: Aug 2003
Location: Columbus, Ohio
Posts: 918
Likes: 0
Received 0 Likes
on
0 Posts
Originally Posted by devildog1679
I just got mine in today and did a quick test fit. Front looks good, rear flares look fine but I'm seeing the same problem you are with the sides. Have you figured a solution yet?
I'm still looking at $2k to weld the holes left from the spoiler's removal and then fitting and painting the kit. More than I thought but there's nothing I can do about it now. I could potentially install it myself but I would hate to mess it up.
Let's keep each other informed if we come up with a solution on the sides.
PS - Eric, Did your sides at any point do what ours are doing? If so what was your remedy to get the sides to face stright down.
Thanks.
04-12-2007, 11:14 AM
#258
Registered User
Thread Starter
Join Date: Apr 2006
Posts: 670
Likes: 0
Received 0 Likes
on
0 Posts
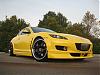
Actually, with the bottom of the side skirts completely level with the ground, the sides are not vertical. They curve inwards slightly, even on my car. This is exactly what the Burnout kit from KS-Auto did too. If you look at this 100% crop from one of the photos I took, you can see how the kit curves under just slightly. This is what it's supposed to do. If it hung straight down, you'd be kicking it constantly when getting in and out of the car!
I'm not certain why KS-Auto designed it this way, but it definitely curves with the side of the car, and curls slightly under too. The Front lip and rear pieces do this too, but it's more noticeable with the long side skirts.
I'm not certain why KS-Auto designed it this way, but it definitely curves with the side of the car, and curls slightly under too. The Front lip and rear pieces do this too, but it's more noticeable with the long side skirts.
04-12-2007, 11:16 AM
#259
Registered User
Thread Starter
Join Date: Apr 2006
Posts: 670
Likes: 0
Received 0 Likes
on
0 Posts
BTW-The Autobahn sides are exactly the same too. We thought AB simply copied the KS-Auto sides, and added a scoop to the rear of their side skirts. The overall shape is EXACTLY the same!
04-12-2007, 12:58 PM
#260
Registered
Join Date: Sep 2006
Location: Madison, WI
Posts: 1,202
Likes: 0
Received 0 Likes
on
0 Posts
Originally Posted by success07
Not yet. I visited a couple body shops and they didn't really have a solution either but said they would just work with it.
I'm still looking at $2k to weld the holes left from the spoiler's removal and then fitting and painting the kit. More than I thought but there's nothing I can do about it now. I could potentially install it myself but I would hate to mess it up.
Let's keep each other informed if we come up with a solution on the sides.
PS - Eric, Did your sides at any point do what ours are doing? If so what was your remedy to get the sides to face stright down.
Thanks.
Photo, Thnaks for the info as well.
04-25-2007, 12:28 PM
#261
Registered
Join Date: Sep 2006
Location: Madison, WI
Posts: 1,202
Likes: 0
Received 0 Likes
on
0 Posts
I just got the pieces painted and it looks great, went with car color. Instead of using the 3/8 tubing I added 2 sided 3M tape. I need to ensure these stay on there since I take it to the track often. Front and back are a cinch but the sides are a little problematic. I don't like how they curve under. Were going to try a few things to get it just right. Should be fully installed by this weekend 
04-25-2007, 04:14 PM
#262
I'm Kind of a Big Deal
Join Date: Aug 2003
Location: Columbus, Ohio
Posts: 918
Likes: 0
Received 0 Likes
on
0 Posts
Originally Posted by devildog1679
I just got the pieces painted and it looks great, went with car color. Instead of using the 3/8 tubing I added 2 sided 3M tape. I need to ensure these stay on there since I take it to the track often. Front and back are a cinch but the sides are a little problematic. I don't like how they curve under. Were going to try a few things to get it just right. Should be fully installed by this weekend
FYI - I test fitted the kit last weekend and once the sides were taped to the car they looked much better. There will definitely be some work needed w.r.t. to the sides but hopeflly all will turn out alright. I'll post some pics tonight.
04-25-2007, 08:00 PM
#263
Registered
Join Date: Sep 2006
Location: Madison, WI
Posts: 1,202
Likes: 0
Received 0 Likes
on
0 Posts
Originally Posted by success07
Are you installig the kit yourself?
FYI - I test fitted the kit last weekend and once the sides were taped to the car they looked much better. There will definitely be some work needed w.r.t. to the sides but hopeflly all will turn out alright. I'll post some pics tonight.
FYI - I test fitted the kit last weekend and once the sides were taped to the car they looked much better. There will definitely be some work needed w.r.t. to the sides but hopeflly all will turn out alright. I'll post some pics tonight.
04-26-2007, 11:25 AM
#264
Scuderia
iTrader: (6)

Join Date: Jan 2005
Location: Buckeye Country
Posts: 1,955
Likes: 0
Received 0 Likes
on
0 Posts
Originally Posted by success07
Are you installig the kit yourself?
FYI - I test fitted the kit last weekend and once the sides were taped to the car they looked much better. There will definitely be some work needed w.r.t. to the sides but hopeflly all will turn out alright. I'll post some pics tonight.
FYI - I test fitted the kit last weekend and once the sides were taped to the car they looked much better. There will definitely be some work needed w.r.t. to the sides but hopeflly all will turn out alright. I'll post some pics tonight.
Ra
04-26-2007, 07:11 PM
#265
I'm Kind of a Big Deal
Join Date: Aug 2003
Location: Columbus, Ohio
Posts: 918
Likes: 0
Received 0 Likes
on
0 Posts
Originally Posted by RA-Eight
Anthony - Did you decide on a shop yet? I pulled my goods from MD, and went to True2Form. Will be picking up the parts either today or tomorrow, but will definitely have it by this weekend. Give me a call and I'll let you know how it goes.
Ra
Ra
I'll call you soon.
04-26-2007, 07:34 PM
#266
I'm Kind of a Big Deal
Join Date: Aug 2003
Location: Columbus, Ohio
Posts: 918
Likes: 0
Received 0 Likes
on
0 Posts
Over the weekend I had the opportunity to place the kit on the car with painters tape. I wanted to see the whole kit on the car plus check for potential fitting issues. Everything looks pretty good. Pics are below. I've had this kit for over two months now and I'm just now test fitting it.  Hopefully it will be painted before '08.
Hopefully it will be painted before '08.
04-26-2007, 10:12 PM
#268
Registered
Join Date: Sep 2006
Location: Madison, WI
Posts: 1,202
Likes: 0
Received 0 Likes
on
0 Posts
If you don't mind could you post some more close ups of the side. Does it look like the two sided tape bellow the doors would make good contact and still have the skirts not hang beneath the car?
 04-27-2007, 08:40 AM
#270
I'm Kind of a Big Deal
Join Date: Aug 2003
Location: Columbus, Ohio
Posts: 918
Likes: 0
Received 0 Likes
on
0 Posts
I have heard from two different body shops that they plan on using two-sided tape or use an adhesive for an even better connection. One mentioned that over time the two-sided tape could potentially sag given sun and heat even though you will have two to three screws at either end.
04-27-2007, 09:54 PM
#271
Registered
Join Date: Sep 2006
Location: Madison, WI
Posts: 1,202
Likes: 0
Received 0 Likes
on
0 Posts
Photo,
Quick question, did you attach the front and rears to sheet metal or just the black lining? I havn't peeled back the lining but I'm not sure if I can get any sheetmetal.
Quick question, did you attach the front and rears to sheet metal or just the black lining? I havn't peeled back the lining but I'm not sure if I can get any sheetmetal.
04-27-2007, 10:08 PM
#272
Registered User
Thread Starter
Join Date: Apr 2006
Posts: 670
Likes: 0
Received 0 Likes
on
0 Posts
Originally Posted by scsi
are there any other options to mount sides?
On my car I'm using three screws at the leading edge of each side skirt, two at each rear edge (into the small sheet metal lip, I got lucky with the drill bit!), and two small sections of double-sided tape on each side skirt. I'm still fiddling with the side skirt mounting, but only because my big feet keep kicking it and when I go drifting I tend to drive over cones alot (typically while sideways). I wanted the sides to hang a little loose in order to avoid damage. They're actually pretty rigid with the 1 foot sections of tape clamping down on the side of the car.
Devildog, the side skirts are NOT supposed to be completely vertical when mounted. Just make certain the bottom flat edge is level with the ground and you'll have it right. Even the side edges of the front lip are the same way.
I hope this helps.
04-27-2007, 10:12 PM
#273
Registered User
Thread Starter
Join Date: Apr 2006
Posts: 670
Likes: 0
Received 0 Likes
on
0 Posts
Originally Posted by devildog1679
Photo,
Quick question, did you attach the front and rears to sheet metal or just the black lining? I havn't peeled back the lining but I'm not sure if I can get any sheetmetal.
Quick question, did you attach the front and rears to sheet metal or just the black lining? I havn't peeled back the lining but I'm not sure if I can get any sheetmetal.
04-27-2007, 11:41 PM
#274
Registered
Join Date: Sep 2006
Location: Madison, WI
Posts: 1,202
Likes: 0
Received 0 Likes
on
0 Posts
Originally Posted by PhotoMunkey
At the front I only hit the black lining, so I used three screws (I think I got one into some sheet metal though). At the rear, there are two in the sheet metal on each side. This takes some work.
04-28-2007, 05:50 PM
#275
Registered
Join Date: Sep 2006
Location: Madison, WI
Posts: 1,202
Likes: 0
Received 0 Likes
on
0 Posts
I just peeled back the black lining in the wheel wells to see were to fasten the kit to. In the front it looks like I can fasten the lip to the black lining and the bumper. Same for the rear flares. Since I will be tracking the car allot I need to make sure this stays on. Thinking of using body bolts with nuts on the back to ensure a tight secure fit. Same for the side skirts looks like I can definitely hit the sheet meat in the back and maybe in the front. I was going to attempt this myself but it would be easier to have the car on a lift with no tires. So i need to wait for my buddy to be available.