
DIY: Mazda Zoom Power Engine Cleaner (Engine Cleaning, Seaform)


LoL !
Hmm, Japanparts.com can help ya out lol :P
Thx for the reply Kevin,
Im wondering what is going on too. Compression numbers were a bit low(7.0 @ 288 rpm I think?) but it shouldn't stall at least. I "zoom zoom clean" it myself and it came out clean. the stalling issue can happen anytime, its soooo random, just like the other time my car gotta tow back to your dealership cuz I can't start it at the Mobil gas station down the block ... but "magically worked" when its back to your place. grrr ...
*shurgs* ...
I know it has 100 K warranty, but this thing is pissing me off
Hmm, Japanparts.com can help ya out lol :P
when you get a "misfire capable of damaging catalyst" the light will blink, generally a specific amount of time, the blink starts when the misfire is detected but doesnt have to still be occurring for the light to blink, possibly a piece of carbon flaked off and got spat out.
as for the stalling i'm still left wondering, everything checked IIRC and with the cleaner going thru clean i'm figuring your engine doesnt have anything stuck inside. wish it would store some useful code.
kevin.
as for the stalling i'm still left wondering, everything checked IIRC and with the cleaner going thru clean i'm figuring your engine doesnt have anything stuck inside. wish it would store some useful code.
kevin.
Im wondering what is going on too. Compression numbers were a bit low(7.0 @ 288 rpm I think?) but it shouldn't stall at least. I "zoom zoom clean" it myself and it came out clean. the stalling issue can happen anytime, its soooo random, just like the other time my car gotta tow back to your dealership cuz I can't start it at the Mobil gas station down the block ... but "magically worked" when its back to your place. grrr ...
*shurgs* ...
I know it has 100 K warranty, but this thing is pissing me off
Last edited by nycgps; Feb 10, 2009 at 11:22 PM.
Certified Mazda Tech
Joined: May 2003
Posts: 645
Likes: 12
From: Wayne, NJ
robrecht: thx for the welcome back, been working on lots of 8's lately so figured id come see if any knowledge i have to offer is useful. that and ive been driving/working on my FD so rotors were on the mind  .
.
kevin.
imagine how the people who have to figure it out feel, unfortunately we're limited in what we're fully allowed to do.
In all honesty i'd probably teardown your motor to just check the seals and springs on the rotors (if it was like an FD or FC, where that kinda stuff is common lol), but in mazda land thats a no-no. I still think it might be an intake problem tho somewhere in the manifold, but without codes thats like throwing darts at the board.
kevin.
.kevin.
imagine how the people who have to figure it out feel, unfortunately we're limited in what we're fully allowed to do.
In all honesty i'd probably teardown your motor to just check the seals and springs on the rotors (if it was like an FD or FC, where that kinda stuff is common lol), but in mazda land thats a no-no. I still think it might be an intake problem tho somewhere in the manifold, but without codes thats like throwing darts at the board.
kevin.
robrecht: thx for the welcome back, been working on lots of 8's lately so figured id come see if any knowledge i have to offer is useful. that and ive been driving/working on my FD so rotors were on the mind .
kevin.
imagine how the people who have to figure it out feel, unfortunately we're limited in what we're fully allowed to do.
In all honesty i'd probably teardown your motor to just check the seals and springs on the rotors (if it was like an FD or FC, where that kinda stuff is common lol), but in mazda land thats a no-no. I still think it might be an intake problem tho somewhere in the manifold, but without codes thats like throwing darts at the board.
kevin.
.kevin.
imagine how the people who have to figure it out feel, unfortunately we're limited in what we're fully allowed to do.
In all honesty i'd probably teardown your motor to just check the seals and springs on the rotors (if it was like an FD or FC, where that kinda stuff is common lol), but in mazda land thats a no-no. I still think it might be an intake problem tho somewhere in the manifold, but without codes thats like throwing darts at the board.
kevin.
maybe I should start driving like a 80 yr old granny, 10mph on local roads and 40 on highways and buy the crappiest Costco or Power UP Gas(thats the name of the station, lol). Build that carbon up every freakin' where and hope that it finally can stuck some seal springs or what-the-heck-ever until it blows up I dont care. grrrrr
B - 2 - b Warranty will run out soon
. I will come again before it runs out ... its nice to have free plugs and coils ----------------- but, hmm, so far I think I got 2 sets of coils and plugs from you Kevin, and maybe another 2 sets each from Great Neck Mazda I think. That's like couple hundred bux of parts and couple hundred bux of labor cost already. Why can't Mazda just replace the freaking motor and be done with it. grrr I didn't do anything special to damage the motor, I change oil even more than I should (every 1.5-2.5K!) and I got this "unpredictable stallin' motor" ... too much clearance on the side seals maybe ? grr .... Makes me wanna go use my Geico's Mechanical breakdown policy. Damn Mazda.
Anyway, Thanks Kevin
Last edited by nycgps; Feb 10, 2009 at 11:21 PM.
Certified Mazda Tech
Joined: May 2003
Posts: 645
Likes: 12
From: Wayne, NJ
maybe I should start driving like a 80 yr old granny, 10mph on local roads and 40 on highways and buy the crappiest Costco or Power UP Gas(thats the name of the station, lol). Build that carbon up every freakin' where and hope that it finally can stuck some seal springs or what-the-heck-ever until it blows up I dont care. grrrrr
B - 2 - b Warranty will run out soon. I will come again before it runs out ... its nice to have free plugs and coils ----------------- but, hmm, so far I think I got 2 sets of coils and plugs from you Kevin, and maybe another 2 sets each from Great Neck Mazda I think. That's like couple hundred bux of parts and couple hundred bux of labor cost already. Why can't Mazda just replace the freaking motor and be done with it. grrr I didn't do anything special to damage the motor, I change oil even more than I should (every 1.5-2.5K!) and I got this "unpredictable stallin' motor" ... too much clearance on the side seals maybe ? grr ....
Makes me wanna go use my Geico's Mechanical breakdown policy. Damn Mazda.
Anyway, Thanks Kevin
B - 2 - b Warranty will run out soon
. I will come again before it runs out ... its nice to have free plugs and coils ----------------- but, hmm, so far I think I got 2 sets of coils and plugs from you Kevin, and maybe another 2 sets each from Great Neck Mazda I think. That's like couple hundred bux of parts and couple hundred bux of labor cost already. Why can't Mazda just replace the freaking motor and be done with it. grrr I didn't do anything special to damage the motor, I change oil even more than I should (every 1.5-2.5K!) and I got this "unpredictable stallin' motor" ... too much clearance on the side seals maybe ? grr .... Makes me wanna go use my Geico's Mechanical breakdown policy. Damn Mazda.
Anyway, Thanks Kevin
kevin.
lol, i know how frustrating it can be, mazda has loosened the reins on rotary motors since opening the shop in virginia lots of red tape went away. the hard part is actually narrowing down and diag a very intermittent problem which can occur in any conditions, ya know? Plus i'm still not pegging the motor directly i've seen weirder things happen, daily.
kevin.
kevin.
*Shurgs* weather is getting better probably gonna stop by next or next next week.
Im fairly sure you guys take Geico's insurance ... hohohoho.
Thx again man

Registered User
Joined: Dec 2007
Posts: 20
Likes: 0
Carbon Attacks SSV - 38k on motor - Pics
Here's a rundown:
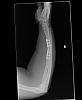
IMG_0451 - This pic was taken with the camera upside down, this is the SSV port in your lower manifold, you can see the capped off nipples in this pic so (once you flip the pic in your head) you can understand why the typical zoom engine cleaning doesn't touch the SSV port.
Just for a good reference that WHOLE interior surface, when new, is super shiny almost mirror finished metal, thats because the clearances are so tight for the ports to be successfully closed off completely when needed.
IMG_0452 & 0453 - Here's a closeup of the SSV port pre-cleaning. If you look all the way to the rear you'll see what is really the most damaging carbon. That recessed hole in the rear is where the SSV end bushing sits and moves, notice how the thickest carbon is built up there? That's what seizes/sticks up the SSV. As is the nature of carbon/gunk the part wont ALWAYS stick but with the right conditions it will, remember that ssv is being moved with simply a vac line and the actuator. Now even though the walls of the cylinder simply look dirty the clearances between the SSV and the walls of the manifold are practically nothing so every thousandth of an inch of carbon is bad.
IMG_0454 - Here we see the actual SSV. The top small part is the "bushing. This part has been redesigned specifically to try to prevent sticking, it is no longer solid it has either 1 or 2 lines cut into it and IIRC the material has also been changed. Now this SSV when new is ALSO shiny anything other then a silver shiny metal has been added on while inside the motor. The buildup on there is sticky to the touch and to get off you need to soak in zoom cleaner for 20 minutes and then scrub hard, which is why it used to be better to replace the whole manifold, but now the updated SSV is supposively better, so we'll see.
IMG_0455 & 0456 - Just additional pics of the old SSV to show how nasty the buildup is. Again the key thing to remember is all of the clearances are SUPER tight all these built up spots are whats stopping it from moving smoothly when needed. Specifically in 0456 you can see a blurry closeup of the bushing, what you should try to notice here is where the bushing meets the SSV where it meets is a dead 90 degree angle, so you can notice that the carbon has begun creeping up the bushing normally once its at that point it'll throw the code no matter how many times you clear it because the bushing will no longer move freely, ever.
Now of course me being me I forgot to take pics of the new part and the "after cleaning"
As for parts numbers, realistically all you REALLY need is the SSV, SSV gasket, and the new longer SSV bolt (you reuse one, the other one is too short and gets replaced.
SSV: N3H5-20-160F
SSV Gasket: N3H4-20-155A
SSV Bolt: 9979-60-640
Zoom Cleaner: 0000-77-A86
Specific improvements of the new SSV: Improved, Larger Vac Actuator also mounted more securely to SSV (to help make sure nothing sticks if it does get gummy again), SSV Bushing is redesigned, nothing else noticeable.
You WILL need that new bolt, new SSV mounts the actuator differently requiring a bolt about 10-15mm longer then the one that comes out.
To do this job all you really need to do is unbolt and remove ACV, remove water pump pulley, alternator bracket, thermostat (secure to front of vehicle, no need to remove hoses), unbolt thermostat housing and secure to passenger side (again no reason to remove hoses), unbolt SSV. Sliding out the old SSV will be difficult if you have a P2070 code but just keep wiggling and it will slide out.
Also if you go to a dealer and you're out of warranty they'll most likely try to sell you a manifold because the tech will be able to charge double-digit hours and the manifold isnt cheap. Show them this tsb and say youd prefer this service performed. Most likely you're looking at 3-4 hours labor and whatever the parts cost (i dont remember that stuff).
Hope this helps out, and remember, just cause you can go in and move the SSV with a vac pump or your hand doesnt mean it isnt sticking, it just isnt sticking at that time. But if you'd like to test the solenoids and stuff it's really simple, solenoid is an on/off switch with 12v and ground, not that complicated. But the plugs (black, white and blue) on the solenoids have a tendency of snapping their wires right at the connector or building up resistance right at the connector.
thats it for today.
kevin.
Here's a rundown:
IMG_0451 - This pic was taken with the camera upside down, this is the SSV port in your lower manifold, you can see the capped off nipples in this pic so (once you flip the pic in your head) you can understand why the typical zoom engine cleaning doesn't touch the SSV port.
Just for a good reference that WHOLE interior surface, when new, is super shiny almost mirror finished metal, thats because the clearances are so tight for the ports to be successfully closed off completely when needed.
IMG_0452 & 0453 - Here's a closeup of the SSV port pre-cleaning. If you look all the way to the rear you'll see what is really the most damaging carbon. That recessed hole in the rear is where the SSV end bushing sits and moves, notice how the thickest carbon is built up there? That's what seizes/sticks up the SSV. As is the nature of carbon/gunk the part wont ALWAYS stick but with the right conditions it will, remember that ssv is being moved with simply a vac line and the actuator. Now even though the walls of the cylinder simply look dirty the clearances between the SSV and the walls of the manifold are practically nothing so every thousandth of an inch of carbon is bad.
IMG_0454 - Here we see the actual SSV. The top small part is the "bushing. This part has been redesigned specifically to try to prevent sticking, it is no longer solid it has either 1 or 2 lines cut into it and IIRC the material has also been changed. Now this SSV when new is ALSO shiny anything other then a silver shiny metal has been added on while inside the motor. The buildup on there is sticky to the touch and to get off you need to soak in zoom cleaner for 20 minutes and then scrub hard, which is why it used to be better to replace the whole manifold, but now the updated SSV is supposively better, so we'll see.
IMG_0455 & 0456 - Just additional pics of the old SSV to show how nasty the buildup is. Again the key thing to remember is all of the clearances are SUPER tight all these built up spots are whats stopping it from moving smoothly when needed. Specifically in 0456 you can see a blurry closeup of the bushing, what you should try to notice here is where the bushing meets the SSV where it meets is a dead 90 degree angle, so you can notice that the carbon has begun creeping up the bushing normally once its at that point it'll throw the code no matter how many times you clear it because the bushing will no longer move freely, ever.
Now of course me being me I forgot to take pics of the new part and the "after cleaning"
As for parts numbers, realistically all you REALLY need is the SSV, SSV gasket, and the new longer SSV bolt (you reuse one, the other one is too short and gets replaced.
SSV: N3H5-20-160F
SSV Gasket: N3H4-20-155A
SSV Bolt: 9979-60-640
Zoom Cleaner: 0000-77-A86
Specific improvements of the new SSV: Improved, Larger Vac Actuator also mounted more securely to SSV (to help make sure nothing sticks if it does get gummy again), SSV Bushing is redesigned, nothing else noticeable.
You WILL need that new bolt, new SSV mounts the actuator differently requiring a bolt about 10-15mm longer then the one that comes out.
To do this job all you really need to do is unbolt and remove ACV, remove water pump pulley, alternator bracket, thermostat (secure to front of vehicle, no need to remove hoses), unbolt thermostat housing and secure to passenger side (again no reason to remove hoses), unbolt SSV. Sliding out the old SSV will be difficult if you have a P2070 code but just keep wiggling and it will slide out.
Also if you go to a dealer and you're out of warranty they'll most likely try to sell you a manifold because the tech will be able to charge double-digit hours and the manifold isnt cheap. Show them this tsb and say youd prefer this service performed. Most likely you're looking at 3-4 hours labor and whatever the parts cost (i dont remember that stuff).
Hope this helps out, and remember, just cause you can go in and move the SSV with a vac pump or your hand doesnt mean it isnt sticking, it just isnt sticking at that time. But if you'd like to test the solenoids and stuff it's really simple, solenoid is an on/off switch with 12v and ground, not that complicated. But the plugs (black, white and blue) on the solenoids have a tendency of snapping their wires right at the connector or building up resistance right at the connector.
thats it for today.
kevin.
 thank you so that you not only explain but take photos. thanks again. I am going to do this work soon after changing rear suspension strut $150.00 each
Certified Mazda Tech
Joined: May 2003
Posts: 645
Likes: 12
From: Wayne, NJ
those rear struts can be a bitch to get out, tkae your time doing them, sure there's a writeup around here somewhere.
kevin.

Nice write-up teknics!
I agree that just because you can move the valve by hand or with a vacuum pump, doesn't mean it isn't sticking.
I saw the same thing while cleaning the build-up on another RX8.
But with a vacuum pump I could tell it was sticking because the valve was slow to open/close.
It wasn't a nice and smooth travel.
Anyway.... thanks for posting your experience!

Registered Noob
Joined: Sep 2007
Posts: 808
Likes: 0
From: Long Island (Suffolk), NY
Super Moderator
Joined: Apr 2005
Posts: 10,880
Likes: 340
From: Australia

Certified Mazda Tech
Joined: May 2003
Posts: 645
Likes: 12
From: Wayne, NJ
mazda thinks they conquered the carbon problem, which they haven't. but dont worry they're all very resourceful. im sure they pre-planned a cleaning method since they were developing the changes to the 09 rx8 at the same time they developed this cleaning method.
weird side note anyone ever use the mazda brand carb cleaner, it is supposively fairly similar to the zoom engine cleaner. im guessing the engine cleaner is their carb cleaner in concentrated form. their carb cleaner foams up normally and all.
kevin.
weird side note anyone ever use the mazda brand carb cleaner, it is supposively fairly similar to the zoom engine cleaner. im guessing the engine cleaner is their carb cleaner in concentrated form. their carb cleaner foams up normally and all.
kevin.


75shot55fueljets=GOBABYGO
Joined: Dec 2007
Posts: 142
Likes: 0
From: Sebastopol, CA
Did this yesterday, no problem getting to anything, and damn so much smoke, gonna do it again today just for ***** to see if i get any more out. and throttle response is a little faster and idle is smoother. overall great product. Zoom power cleaner
75shot55fueljets=GOBABYGO
Joined: Dec 2007
Posts: 142
Likes: 0
From: Sebastopol, CA
Just cleaned it with Zoom power cleaner again got a little smoke out again, just did it to see if i missed anything its way to easy to grab all of the wires if you are tall and i do have 4 cans of it lol. so yeah i'd suggest cleaning it and then 2 days later do it again. probably pretty clean
its way to easy to grab all of the wires if you are tall and i do have 4 cans of it lol. so yeah i'd suggest cleaning it and then 2 days later do it again. probably pretty clean
Here is the video of the cleaning i did on 2/25.
http://www.youtube.com/watch?v=-CB_-BQKB08
Ever since then though my car starts as if i just put the cleaner in it when it is cold. It runs much better and idles smoother but starts as if I just did the cleaning process and am starting it for the first time after. Any ideas?
I installed my BHR ignition while the cleaner sat in the car, I changed the spark plugs a few days later.