DIY: Mazda Ignition Coils (with pics)


Registered User
Joined: Aug 2010
Posts: 125
Likes: 0
From: Milwaukee, WI
I hope I am not going to get flamed for this post.  My questions are regarding the attached picture.
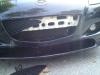
Can I unscrew the screw with red arrow to remove the box marked with blue arrow to get some room to reach coils? (what is that box)
If still I do not have enough room can I unscrew the ones marked with green arrow to remove the accordion tube?
In both cases is there a washer in between that needs to be replaced once I unscrew it and opened it? When I am putting it back how much I should tighten them?
lastly what type of tie is the one marked with orange circle? If there is a vacuum line that needs to come out and have that type of ties how can I loosen and tighten it?
Thanks.
My questions are regarding the attached picture.Can I unscrew the screw with red arrow to remove the box marked with blue arrow to get some room to reach coils? (what is that box)
If still I do not have enough room can I unscrew the ones marked with green arrow to remove the accordion tube?
In both cases is there a washer in between that needs to be replaced once I unscrew it and opened it? When I am putting it back how much I should tighten them?
lastly what type of tie is the one marked with orange circle? If there is a vacuum line that needs to come out and have that type of ties how can I loosen and tighten it?
Thanks.

the giant tastetickles
Joined: Sep 2005
Posts: 2,758
Likes: 0
From: in the basement
If i remember correctly, the blue one is just an airbox. You can disassemble any part there as long as you can put them back together but the easier thing is to remove the whole accordion tube and put it aside. The orange tie you just need pliers to loosen them but it still takes a bit of effort to pull the hoses off.

Khaf- The green arrows are pointing to the clamps for the accordion tube.
Just unscrew it a few time until the clamp is free.
The blue arrow is pointing to the resonance chamber... its used for noise reduction.
Loosening the clamp (red arrow) will allow you to take that off, but the accordion tube is still in the way from reaching the coil's electrical connection, so why bother taking the chamber off?

Registered User
Joined: Dec 2005
Posts: 120
Likes: 0
From: Bellevue, WA
Registered User
Joined: Aug 2010
Posts: 125
Likes: 0
From: Milwaukee, WI
Thank you all, Adam you have very nice pictures. One question, I see that you removed couple of vacuum lines from your accordion tube. Did you simply pull them out and at the end push them back in? It's not going to leak later?

Registered User
Joined: Nov 2008
Posts: 65
Likes: 1
From: Bangor, WA
nice pics for reference. just finished this a few minutes ago...beer of choice: Alaskan Amber. however i failed in the area of beer management for i accidentally kicked it over once in the process. it looks like you had MUCH more clearance than me, probably due to the K&N setup rather than the stock airbox which i just dismounted and pushed off to the side. also there was a wire bundle in the area i had to work around, kind of annoying but whatever. still got the job done.

Zoom Zoom Addict
Joined: May 2010
Posts: 454
Likes: 0
From: Texas Hill County
Thx ya'll I did coil swap with Oreilly BWD E1001 ($40 ea). It did have the B revision mazda part number. Runs a hell of a lot better. Looks like the original coils & plugs on it, with brand new warranty engine. Suspect former owner was told to do ignition job and sold vehilce.

Registered User
Joined: Dec 2005
Posts: 120
Likes: 0
From: Bellevue, WA
Installed the BHR coils over the weekend. Wow! It's like having my original RX8 back! No funny chirping when the car starts and it feels like it's running on 4 cylinders instead of 3. 
I replaced 3 of the 4 plugs at the same time. The front trailing plug didn't want to budge when I tried to remove it. Gave me that sick feeling like I was going to do some damage if I tried any harder to get it out. Not sure if I just had bad alignment with the plug socket or??
Might take it to the dealer or a local rotary shop and see if they have any better luck.
The car is still running GREAT with the BHR coils!!

Registered
Joined: Jun 2010
Posts: 85
Likes: 2
just swapped my coils(didnt use diy just leaving note for stock airbox owners but for my 40 of choice would have to be king cobra)
and a note for all those with stock airboxes you dont need to remove it to do this.
just remove the noise dampening box by loosening the screw that attaches it and you can easily reach the coils with a proper extension.
this does include people with big hands like me should have plenty of room .
and a note for all those with stock airboxes you dont need to remove it to do this.
just remove the noise dampening box by loosening the screw that attaches it and you can easily reach the coils with a proper extension.
this does include people with big hands like me should have plenty of room .
Registered User
Joined: Dec 2005
Posts: 120
Likes: 0
From: Bellevue, WA
So my car has been running a little "off" ever since getting it back from the dealer. There was a barely noticeable stumble at low RPMs just as the accelerator was starting to depress. I was thinking maybe they knocked a plug wire loose when they were replacing the one plug. I checked them a week ago and they were fine. So last night a gave the engine another look over and found they never tightened the clamp on the air tube from the filter box to the engine! Tightened it up last night and was pleasantly surprised this morning on the drive to work. The hesitation was gone and everything felt normal again! I was pretty surprised that this could make a noticeable difference. The rubber joint on the tube fits pretty snug even without the clamp tightened. I guess <some> air was leaking though and affecting performance??


Decclan
Joined: Jan 2011
Posts: 3
Likes: 0
From: Mississippi Gulfcoast
Nuts...just paid dealer for this!!! I could have done!
I just replaced two IG coils at dealer and it looks so simple.  Then again I didn't exactly know what was wrong when my RX-8 sounded horrible one morning so wouldn't have known what to look for. The dealer charged me $300 parts and labor. I figure this is breakdown.
(2) IG coils - $75 each ($20 - $25 price mark up)
Actual service technician pay for job done - $25
Service Manager time in berating technician, screwing job up somehow then having same technician fix manager's screw up - $200
-----------------------------------------------------------------------
Total: $300.00
Then again I didn't exactly know what was wrong when my RX-8 sounded horrible one morning so wouldn't have known what to look for. The dealer charged me $300 parts and labor. I figure this is breakdown.(2) IG coils - $75 each ($20 - $25 price mark up)
Actual service technician pay for job done - $25
Service Manager time in berating technician, screwing job up somehow then having same technician fix manager's screw up - $200
-----------------------------------------------------------------------
Total: $300.00

Thread Starter
on his 3rd rx8
iTrader: (3)
Joined: Dec 2006
Posts: 6,036
Likes: 12
From: santa ana, ca
that sounds about right...and only 2 were replaced? thats horrible, you wouldve saved your self time and money + you could've had ALL 4 replace if you did it yourself, the job only takes about 25 minutes
Decclan
Joined: Jan 2011
Posts: 3
Likes: 0
From: Mississippi Gulfcoast
Oh believe me!
I will be doing the next ones and I will also be coming to this forum for other issues. I just did the A/C temp **** fix that is posted in this forum and it worked great. Saved me $250.
Love this site
Decclan
Love this site
Decclan