When you click on links to various merchants on this site and make a purchase, this can result in this site earning a commission. Affiliate programs and affiliations include, but are not limited to, the eBay Partner Network.
One of the things I never like about the rx8 is the brake pedal feels and feedback.
The brake system is good, even better than most of the cars in the same range, however, it is very soft, and there no feed back.
I was thinking it could be caused by aging caliper seals or hoses. I did full sandblast powder coating and total overhaul on calipers with a new braided lines kit. Nothing changed :/
Purchase a brake pedal, booster, and master pump and start to do my R&D.
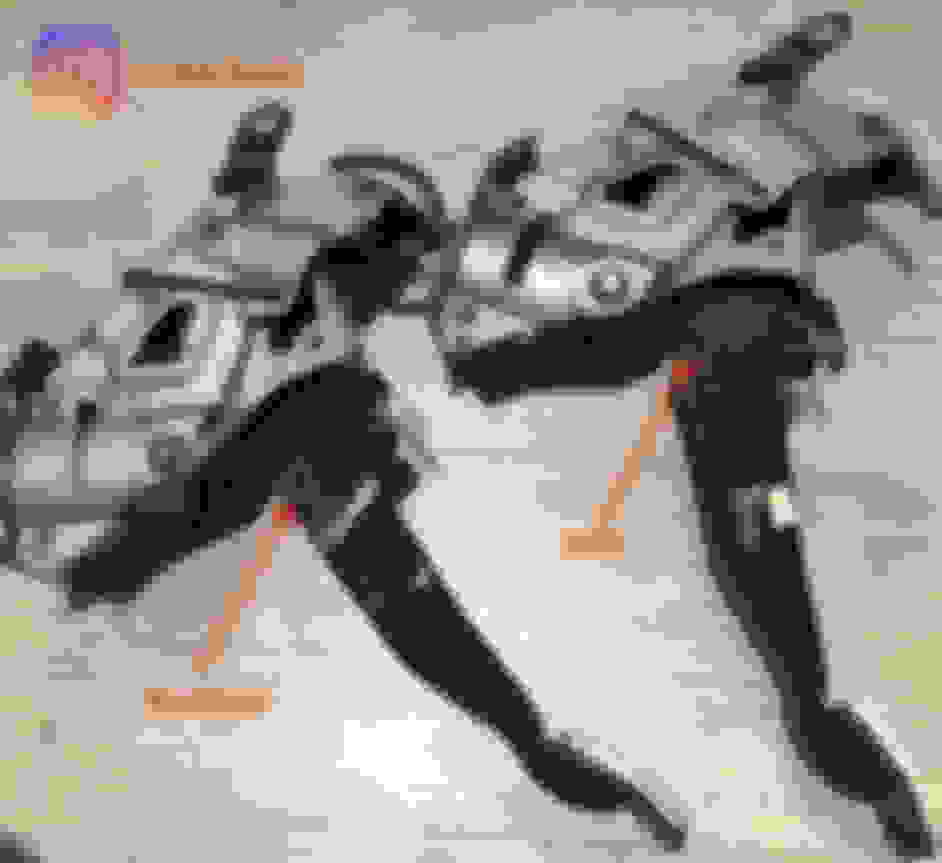
The number on the caliper is what I found to be best and even positively changes the pushrod angle when it is ad halfway through the course.
All that needs to be done is making new a new hole 14mm lower than oem.
I have this setup on my car for while and I can not mention how I like it
I post two short clips before and after form the angle change as there is the norm that someone in the future would nick picking about it.
This the part one and part two is still on R&D.
Warning loud music on clip, cant remove them.Mazda RX8 modified brake booster pushrod.
After installation, the booster pushrod needs to adjust as so the brake light switch.
The brake could be easily adjusted by pulling the white notch with a flat screwdriver as a pick on the socket side and pushing in or out on the switch pushrod.
Looks like it reduced the mechanical advantage the pedal has, making it require more force be applied on the pedal for the same amount of braking force applied to the wheels.
More force/less travel. There might be some minor advantage/disadvantage to the sideload on the pushrod due to the angle change.
One of my favorite things about the RX-8 is the brakes, the E36 setup is notoriously **** and squishy, even with all of the upgrades done to it, so the Mazda was a nice change of pace.
3rd class fulcrum lever.
To make it more feelable by reduction of the assist force of the booster, also makes the pedal heavier besides of reduction in pedal effective stroke.
All together make the brake pedal sharper, sensitive, and able to show feedback from calipers/ pads more.
Simple English: when the power steering assist becomes less to give more feedback ( to dump less of forces).
The closest thing on the market is a choke valve priced $325 made and called: SAKEBOMB GARAGE VARIABLE BRAKE BOOSTER (VBBC)
Note: that valve can not give any mechanical advantage.
Last edited by motodenta; Nov 1, 2021 at 12:08 PM.
Reason: link removed.
Not sure you potentially won't end up with an alignment problem and a possible leak longer term from the angulation change.
Obviously and definitely not sure. Better stop being a keyboard warrior and participate in others' work.
People like you are the reason I record and upload those two clips :d
Spoiler
I post two short clips before and after form the angle change as there is the norm that someone in the future would nick picking about it.
Having 500 hp or going to the moon with rx8 doesn't add or remove anything to your comprehension of this mod.
I can see from your comment that you never open or repair this type of power brake aka direct booster, which is fine, on the other hand talking about things that are beyond your understanding is not fine.
You did not even understand the clips and how I change the direction of angulation to become perpendicular at the middle of strokes and talking about "possible leak".
Why did not make it 13mm or 15mm? why I reduct 14.9 to 14?
For future reference, there is a ball joint at the end of the shaft and the place of the ball joint is deep under that spring has a self-centering position. (based on physics law, not my personal opinion)
You don't have a clue about my understanding or mechanical knowledge.
You just assume that no one else can.think outside your box... or understand your mod which may or may not improve the braking system to your liking.... but may add inherent risk to people that try and do it that don't understand what they are doing
Not sure you potentially won't end up with an alignment problem and a possible leaklonger term from the angulation change.
Definition of this comment =>>
- not sure but I have to write something because what else I can do? When not sure better to say my personal opinion as a bold fact rather than asking for details.
- end upI have to predict the future even I did not have any understanding.
- an alignment problem yes definitely did not see the clips and definitely don't know how is it set up.
- a possible leaklonger-term still I can see the future and predict it even though I did not understand clips.
-angulation change Was there any clips? to see ? can 3 degrees to zero angulation be equal to 3 degrees from another side?
I don't have ego. I have facts.
Assumptions are rubish when there is a hardcore fact.
If someone doesn't understand something they could ask rather looking at a crystal ball.
One of the difficulties of moderating forums is having to deal with people that put up DIY threads. I don't get to put up my opinion often as I try to ask questions that will result in thought
You want my opinion....
Changing the angulation in this way is stupid. It will result in negligible changes in brake feel for an unknown change in long term brake safety and reliability.
Thinking that changing the angulation the opposite way from axis and thinking that it will behave the same as OEM on the other side of chosen axis isn't a fact. All it is is an assumption that if it was designed to allow the inclination on one side it will be the same on the other. Since you aren't privy to the design parameters and why it was done off angle in the first place.... placing it double the angle in the other direction might be a bigger problem that you think.
Hopefully it will work out better than your LED brake light modification that resulted in CAN / brake system problems that threw a CEL and could have inactivated the ABS or traction control. Also in your video where you rebuild the brake calipers you used the silicone slide lubricant on the pistons. That is a huge no go... so don't put yourself out there as a expert doing dumb **** like that.
Also... for someone that is supposed to be a professional... learn to spell and try to work on your grammar. You should be held to a higher standard
End of opinion.......
Please end the personal responses when people don't agree with you on here. We aren't all stupid and just might have some valuable feedback.
Is there more information on the sensor modifications beyond the two pictures? Its a bit unclear to me exactly what is going on, but I have a use for one of these sensors for a robotics project and understanding more about what you did would be valuable.
Hello peeps, just thought I would drop in as well to give my $0.02 on this... which is kinda just a repeat of what dannobre has said.
I wont claim to be an expert in the field.. but I will say I did in fact go to school and have my degree in Mechanical Engineering/CAD Design...
Your mod has compounding issues with its execution that you fail to realize are not only huge safety concerns, but are also poorly executed and would be hard to recreate consistently. I'm not going to waste a ton of time trying to explain concepts of these principles when you have clearly demonstrated here and in other threads before this your lack of ability to accept constructive criticism or education as you must whole heartedly believe you know it all already.
Anyone reading up on this mod and others by this gentlemen, please do not attempt to emulate/adapt/apply these mods to your own vehicle.
One of the difficulties of moderating forums is having to deal with people that put up DIY threads. I don't get to put up my opinion often as I try to ask questions that will result in thought
You want my opinion....
Changing the angulation in this way is stupid. It will result in negligible changes in brake feel for an unknown change in long term brake safety and reliability.
Thinking that changing the angulation the opposite way from axis and thinking that it will behave the same as OEM on the other side of chosen axis isn't a fact. All it is is an assumption that if it was designed to allow the inclination on one side it will be the same on the other. Since you aren't privy to the design parameters and why it was done off angle in the first place.... placing it double the angle in the other direction might be a bigger problem that you think.
Hopefully it will work out better than your LED brake light modification that resulted in CAN / brake system problems that threw a CEL and could have inactivated the ABS or traction control. Also in your video where you rebuild the brake calipers you used the silicone slide lubricant on the pistons. That is a huge no go... so don't put yourself out there as a expert doing dumb **** like that.
Also... for someone that is supposed to be a professional... learn to spell and try to work on your grammar. You should be held to a higher standard
End of opinion.......
Please end the personal responses when people don't agree with you on here. We aren't all stupid and just might have some valuable feedback.
There is no change in the angulation. full stop next line.
The ball is designed to have deviation as the pivot point of the pedal is far and it will give angulation any way. ( blue line imaginary line with no angle)
1st red line the position at the middle of the stroke OEM angulation
2nd red line the position at the middle of the stroke modified angulation
Both angles are equal and there is no change.
negligible changes in brake feel
How do you know it is negligible?
Safty is the same as the as there is no change in angulation in the first place and second that ball joint deviation design could take much more angles without any changes in direction of the force.
Also, note the pivotal point of the pedal is far away on top of the box.
why it was done off angle in the first place..
law of physics, when there is a pivot pint and length is constant there is angulation, Shall I teach physics...
You should be held to a higher standard
sure that, the grammar check on my laptop indicated the same about other members' posts too.
Thanks for your time to spy on my posts, the led light mod was a success and actually if you read correctly you would notice that the R3 taillights are the cause of engine check, not my mod.
The mode fool ECU to see R3 style tail lights like s1
On my brake rebuild, the grease was in the rebuild kit. If you check the coloure they are red which are known as red rubber grease. I don't have any silicone grease and after purchasing them.
I use silicone spray mostly which is the same.
I never said someone is stupid but definitely this is red rubber grease. Silicone grease is transparent to white .
Last edited by motodenta; Nov 3, 2021 at 12:25 PM.
Reason: photos didn't uploaded.
Is there more information on the sensor modifications beyond the two pictures? Its a bit unclear to me exactly what is going on, but I have a use for one of these sensors for a robotics project and understanding more about what you did would be valuable.
No sensor is modyfied my firend.
All you need to look at is the 3rd class fulcrum lever.
Let say the OEM lever is 1.2 ( length of level divided by fulcrum point) which means it will multiple force by 1.2
By change lever, if it becomes 1 it will increase force by multiple 1
On other hand, the travel on the side of the lever will change too, as it will be divided over 1 or 1.2
Hello peeps, just thought I would drop in as well to give my $0.02 on this... which is kinda just a repeat of what dannobre has said.
I wont claim to be an expert in the field.. but I will say I did in fact go to school and have my degree in Mechanical Engineering/CAD Design...
Your mod has compounding issues with its execution that you fail to realize are not only huge safety concerns, but are also poorly executed and would be hard to recreate consistently. I'm not going to waste a ton of time trying to explain concepts of these principles when you have clearly demonstrated here and in other threads before this your lack of ability to accept constructive criticism or education as you must whole heartedly believe you know it all already.
Anyone reading up on this mod and others by this gentlemen, please do not attempt to emulate/adapt/apply these mods to your own vehicle.
That is OEM standard no safety concern. The probability that the OEM box lapse in course of the accident is higher than to cause any safety issue rather you clams based on things you can not
even explained.
The hole size and diameter are OEM size, the pin is OEM, the lock pin is the OEM.
Nothing is chnaged.
Even the angulation is OEM.
Very surprised to see such a comment without any explanation rather than full of scary clam based on nothing rather being "Mechanical Engineering/CAD Design..."
Probably you can enlighten us and save my life. I don't want to hurt my dog
" Anyone reading up on this mod and others by this gentlemen, please do not attempt to emulate/adapt/apply these mods to your own vehicle."
Where are the other mods? point them to others and save them.
Whatever a person does to his/her car is all by her/his responsibility and no one has any responsibility for it. Even a sunglass could cause lots of damages if an airbag is deployed.
If there is an unclear thing you can ask.
It could be a new concept for you but brake booster lever modification is around since 1960 when people start to put power brakes on no power brake cars.
By adding a booster the brake lever becomes off hence they need to shorten the parts...
No one dead or anything dangerous happen ever since :D
Do your read.
No sensor is modyfied my firend.
All you need to look at is the 3rd class fulcrum lever.
Let say the OEM lever is 1.2 ( length of level divided by fulcrum point) which means it will multiple force by 1.2
By change lever, if it becomes 1 it will increase force by multiple 1
On other hand, the travel on the side of the lever will change too, as it will be divided over 1 or 1.2
It looks like you are modifying the brake light switch (sensor) in the post that I am going to quote below. That is what I'm asking about.
Originally Posted by motodenta
After installation, the booster pushrod needs to adjust as so the brake light switch.
The brake could be easily adjusted by pulling the white notch with a flat screwdriver as a pick on the socket side and pushing in or out on the switch pushrod.
It looks like you are modifying the brake light switch (sensor) in the post that I am going to quote below. That is what I'm asking about.
The brake switch pushrod length could be adjusted by pulling that white part towards the sockets while you push/pull the pushrod in or out.
I learnt it while I was messing around for course control retrofitting on the UK models as there are an extra couple of pins to be connected to ECU.
So, use a small flat head screwdriver, put it in the hole and push all the way towards the socket, then push in or pull out the pushrod.
Release the screwdriver.
Done.
There is no change in the angulation. full stop next line.
The ball is designed to have deviation as the pivot point of the pedal is far and it will give angulation any way. ( blue line imaginary line with no angle)
1st red line the position at the middle of the stroke OEM angulation
2nd red line the position at the middle of the stroke modified angulation
Both angles are equal and there is no change.
How do you know it is negligible?
Safty is the same as the as there is no change in angulation in the first place and second that ball joint deviation design could take much more angles without any changes in direction of the force.
Also, note the pivotal point of the pedal is far away on top of the box.
law of physics, when there is a pivot pint and length is constant there is angulation, Shall I teach physics...
sure that, the grammar check on my laptop indicated the same about other members' posts too.
Thanks for your time to spy on my posts, the led light mod was a success and actually if you read correctly you would notice that the R3 taillights are the cause of engine check, not my mod.
The mode fool ECU to see R3 style tail lights like s1
On my brake rebuild, the grease was in the rebuild kit. If you check the coloure they are red which are known as red rubber grease. I don't have any silicone grease and after purchasing them.
I use silicone spray mostly which is the same.
I never said someone is stupid but definitely this is red rubber grease. Silicone grease is transparent to white .
Typical... double down instead of think
The red rubber grease is for the brake slides... not to lubricate the piston bore.
Using any type of silicone will contaminate the brake system and result in changes in both temperature tolerance and fluid properties and could also result in ABS system failure. First rules of brake rebuilds are spotlessly clean and not to use anything that will leave lint and only the same type of brake fluid as assembly lubricant to prevent contamination.
Your document attached to act as evidence of being able to change the angle actually refutes your premise. It tells you to find the two extremes of movement and then bisected to drill the hole in the center. Doesn't say it is OK at either extreme
As for the other goobly gook.....
Using physics and an angulation change of x degrees... what change would you expect in the work on the lever? I think you will be surprised at the change. Hence the negligible comment.
The red rubber grease is for the brake slides... not to lubricate the piston bore.
Using any type of silicone will contaminate the brake system and result in changes in both temperature tolerance and fluid properties and could also result in ABS system failure. First rules of brake rebuilds are spotlessly clean and not to use anything that will leave lint and only the same type of brake fluid as assembly lubricant to prevent contamination.
As for the other goobly gook.....
Yes typical for you. Don't you read what I type or only want to repeat yourself?
Are you real? try to push me and convince others it is not red and it is silicone grease !?
I am university qualified auto mechanic and have been around car stuff since age of 12 besides of my other mechanic degrees which I don't want to list. My last official job
was on an oil platform as head of mechanic maintenance and be sure they won't give you a position if you don't fit either by knowledge or experience.
I have to inform you that it is red rubber grease and silicon grease is not red.
Red Rubber Grease is used in the automotive industry in hydraulic and braking systems to protect & lubricate rubber bushes, seals and o-rings. It is also a good choice for use on brake caliper rebuild jobs. This grease compound is designed to preserve rubber and help prevent it deteriorating and cracking over time.
Also, inform you that on my rebuild purchase list there was no slider pin and this grease comes with Orings in the box sealed.
Silicone grease is not red and is not a good option for sliders too as it has waterproofing properties mostly and acts as a skin moisturizer for rubbers.
To prevent future confusion for those reading this I post a photo of three types of typical brake grease.
Also, note that for Dot 5.0 you can use silicone grease as Dot 5.0 is silicone-based oil however, Dot 3 Dot4 and Dot5.1 are not.
So, your accusation for using silicon grease officially needs apology.
Now to this part:
Your document attached to act as evidence of being able to change the angle actually refutes your premise. It tells you to find the two extremes of movement and then bisected to drill the hole in the center. Doesn't say it is OK at either extreme
I never based that photo as a document, I don't spoon feed, I always keep some details for myself.
What I refer to is 1-to do your reading 2- This mod has been done since 1960 3- Non of them follow the correct angulation and only eyeball it whereas I did the calculation.