
DIY: Another plugs wires coils


Thread Starter
Registered User
Joined: Oct 2009
Posts: 44
Likes: 0
From: Tampa, FL
Hey all,
I did my plugs/wires/coils and took photos so i decided to post it! I know there are other DIY's out there, mine really doesn't offer anything better (except some nice visuals of old plugs and location of them); anyhow, enjoy. Remember that the car should be nice and cool (to save burns and extra effort attempting to remove spark plugs and wires).
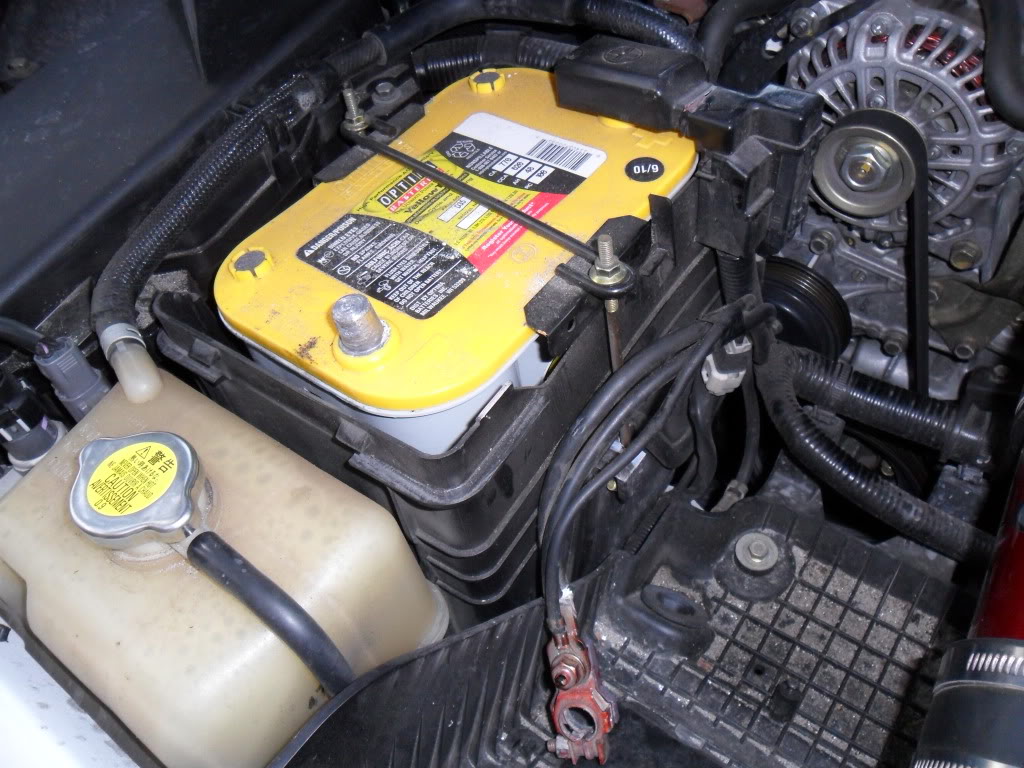
1) disconnect battery
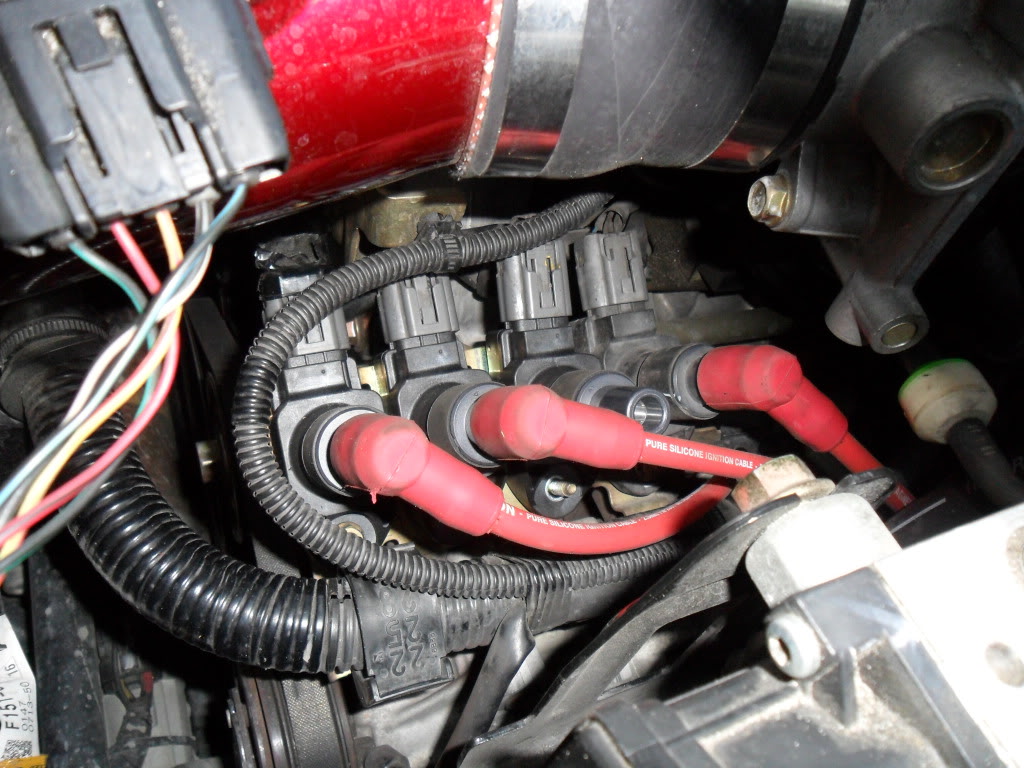
2) For each coil, focus on replacing one at a time. I highly recommend replacing in the following sub steps:
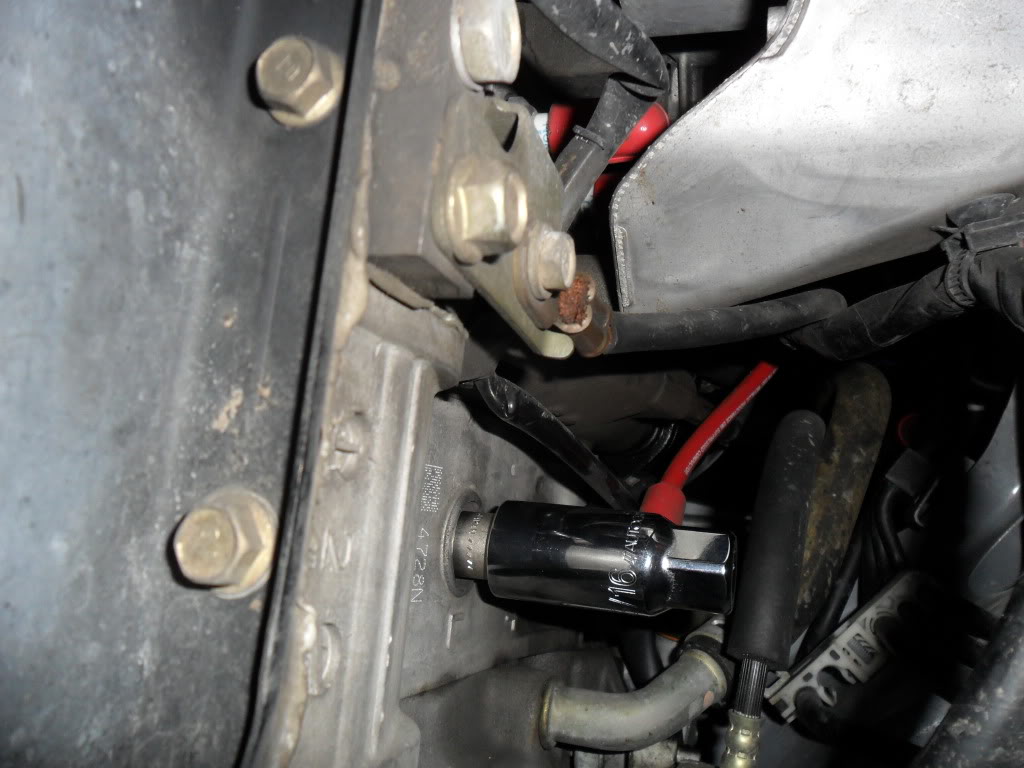
-- Gently remove spark plug wire top. Be careful, it is possible to pull apart the ignition coil...
-- Unscrew single 10mm bolt from coil
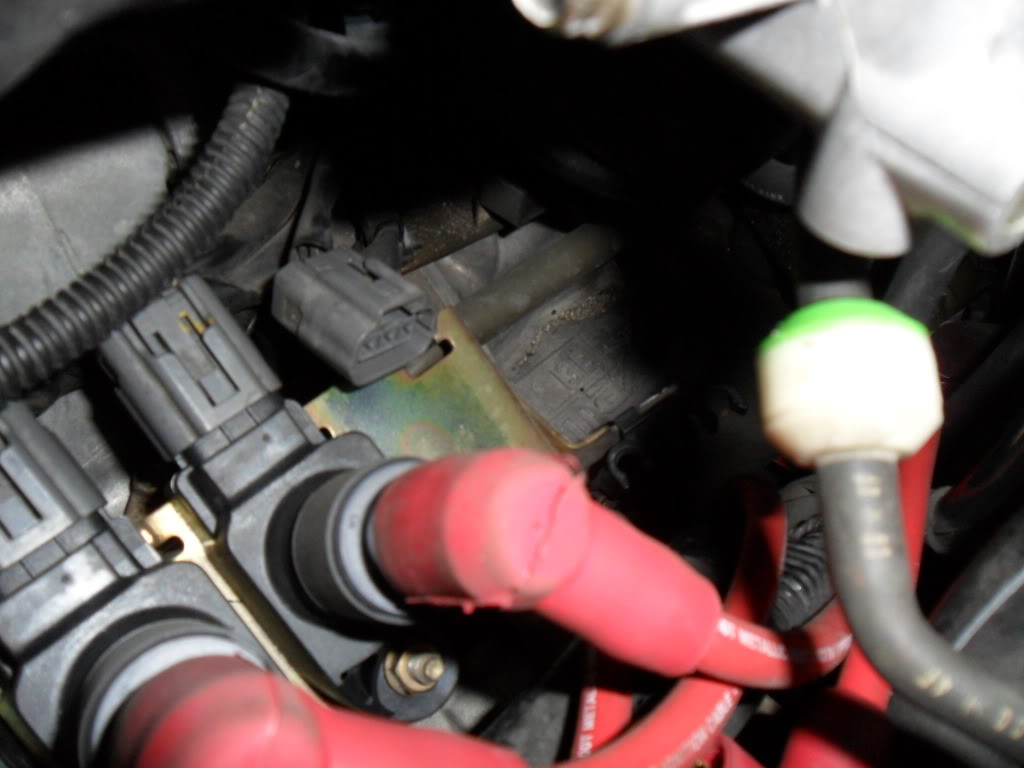
-- Now that the coil is free to move about, it is easier to disconnect the electrical plug.
-- Installation is the reverse of disassembly.
Repeat for each of the four coils. Be sure to reconnect the plug wire (even if its the old one) after each coil so you dont get confused.
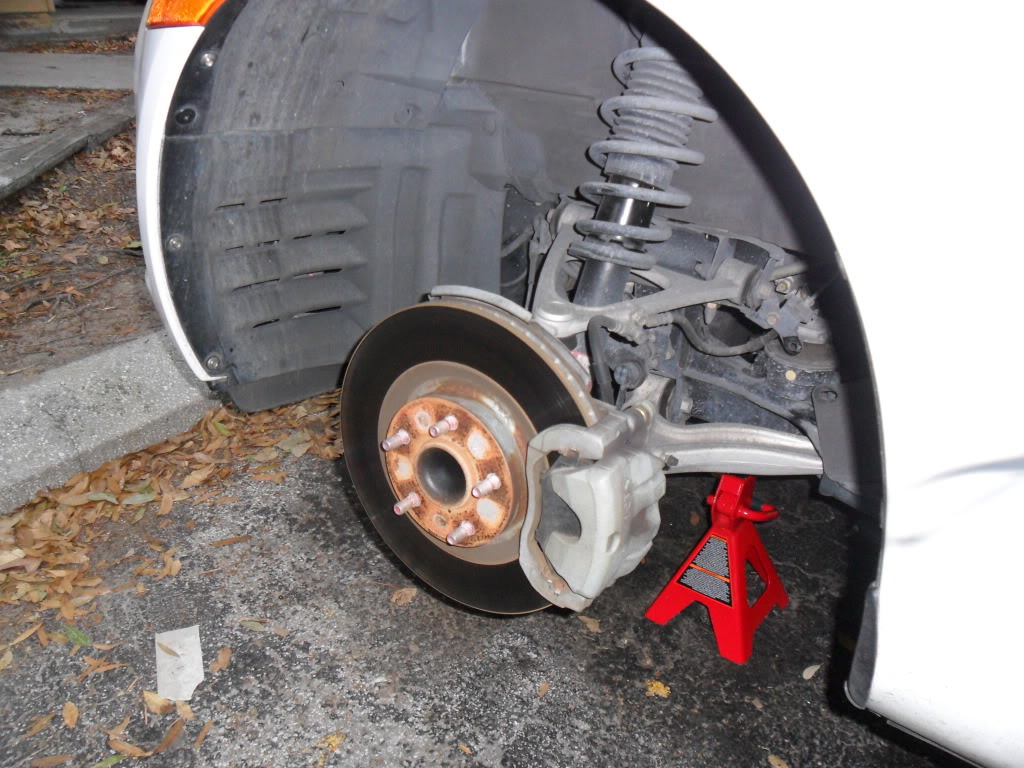
3) Now that your coils are replaced, let's tackle the plugs. Remove driver side wheel. Ok seriously, I had never used jackstands before but finally bought a pair, it is worth the investment - you don't want your car falling on you, your skull will likely be crushed...
4) Use a screwdriver to give a quarter turn to the plastic fastener on the wheel well mud flap, and let it hang to the side.
5) Going ONE spark plug at a time, you will do the following:
-- Remove spark plug boot off tip of plug.
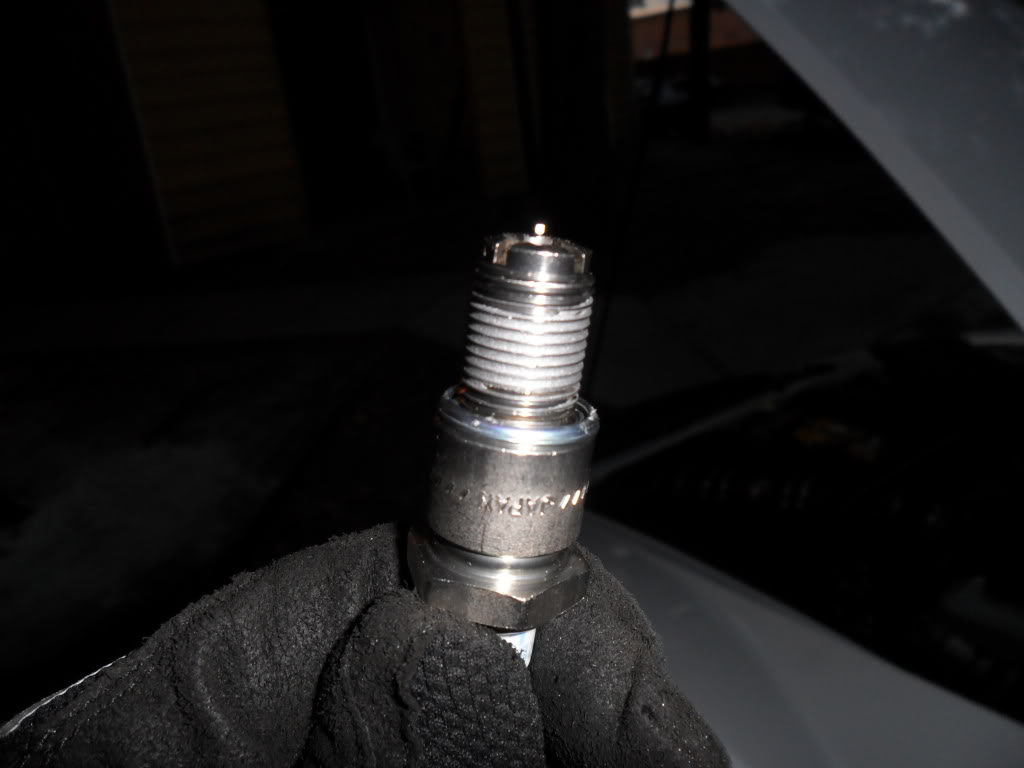
-- Using your spark plug socket from your toolkit, carefully but firmly loosen the plug until you can hand loosen it. Upside down photo lol...

-- Once the old one is removed, take the new plug (make sure you are matching trailing plug to trailing and leading to leading - the leading plug has a 'castle' shape tip and the trailing looks like any other spark plug. There are no gaps to adjust with NGK laser iridium plugs) and insert it into your spark plug socket BEFORE attaching your rachet to it. Why? Because you have to GENTLY hand tighten the plug into the engine to avoid stripping threads.
*** Be sure to add a modest amount of anti-seize to the new plug threads:
Again, HAND tighten. You should only use/need two fingers to slowly screw the new plug in. If you feel enough resistance that you cant turn with two fingers, stop, back it out, check for debris on the threads and try again.
-- Once it is hand tightened, tighten down with your ratchet. I don't know the torque setting but I tightened it with as much force as I do with my oil drain plug - nice and snug but not really trying to strip threads off the bolt.
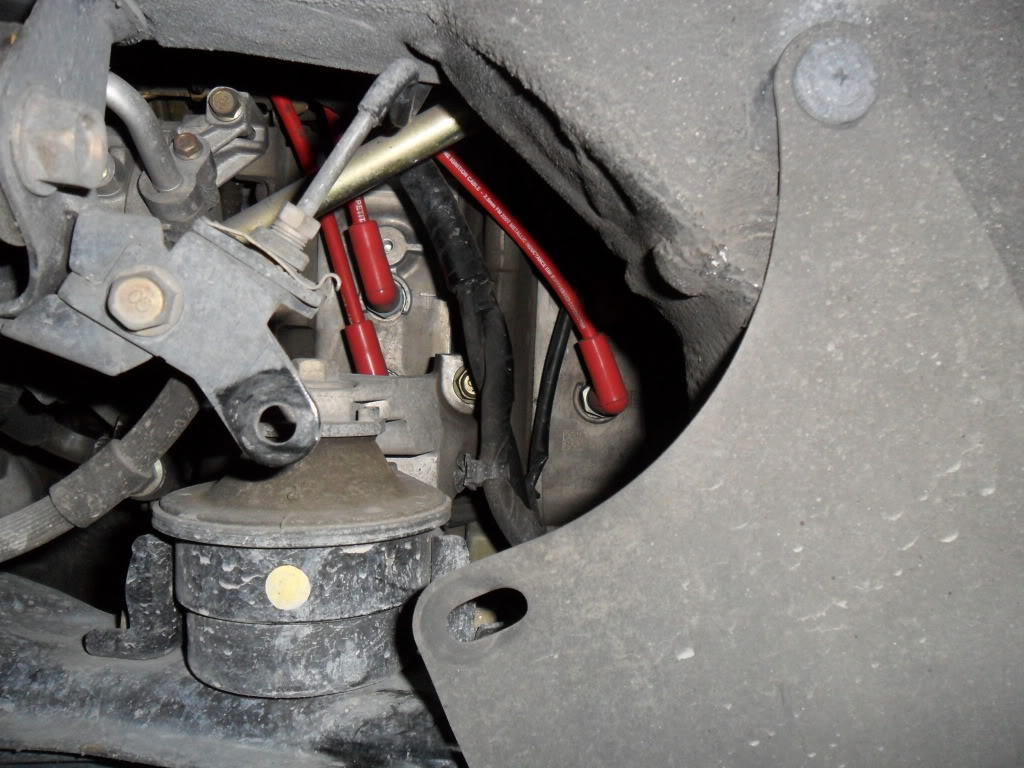
6) Reconnect the plug wire to the newly installed plug and repeat for all other plugs. Honestly, the hardest one to get to is the lower left one in this photo, staring straight at your plugs through the wheel well:
Patience - it may take a while, but you don't want a broken plug or stripped threads!
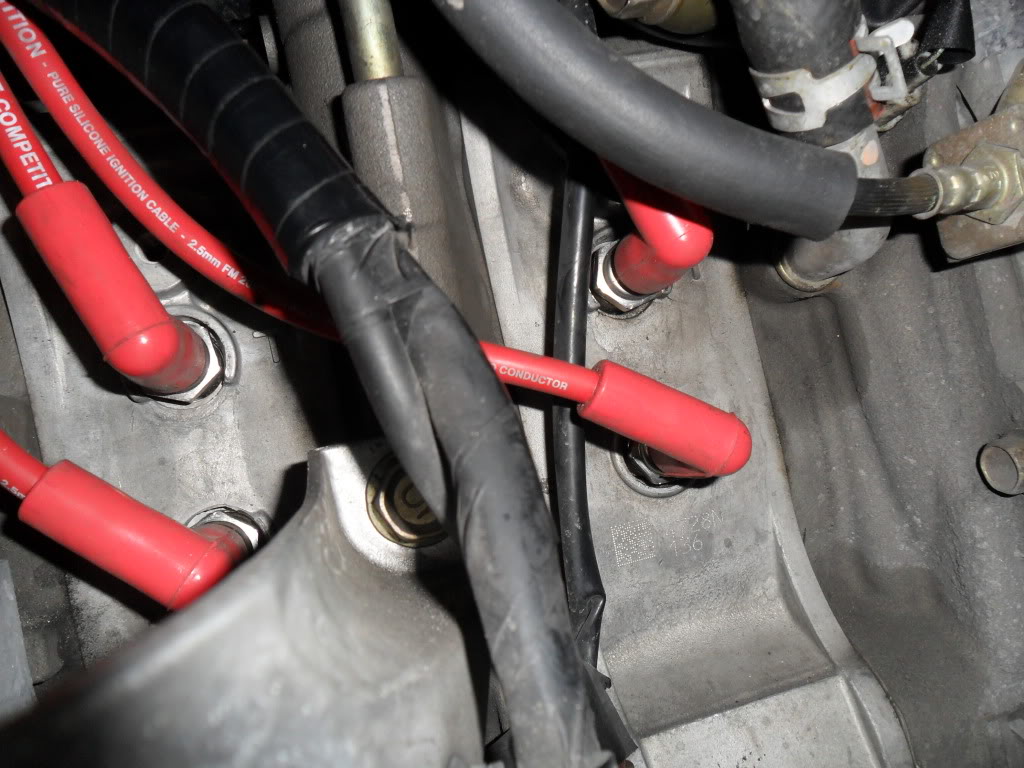
7) Once your plugs are replaced, it is a simple matter of replacing the wires. Perhaps someone here can explain which length wire goes to which plug - I very scientifically removed one wire, found the new one that matched in length, and installed it NOTE: The connection to the coils is very easy and straightforward; the plug connection can be 'tricky'. Make sure you hear or feel a click when you push it onto the tip of the plug, and that there is little or no give to the silicone at the tip of the plug once the wire is installed. Also, Magnacore wires do not fit the same 'way' as OEM - they expose a little bit of the ceramic of the plug. Look at the one with the plug still installed:
8) Once all your plug wires are installed, congrats, you're done! Put the wheel well mud flap back in place, put the wheel on, lower the car, attach the battery, start her up! Be sure to let the car completely warm up before turning off to reset the DCS.
If you have any questions about the experience, let me know. Thanks! I'll post pics of my old plugs - the difference is shocking!
I did my plugs/wires/coils and took photos so i decided to post it! I know there are other DIY's out there, mine really doesn't offer anything better (except some nice visuals of old plugs and location of them); anyhow, enjoy. Remember that the car should be nice and cool (to save burns and extra effort attempting to remove spark plugs and wires).
1) disconnect battery
2) For each coil, focus on replacing one at a time. I highly recommend replacing in the following sub steps:
-- Gently remove spark plug wire top. Be careful, it is possible to pull apart the ignition coil...
-- Unscrew single 10mm bolt from coil
-- Now that the coil is free to move about, it is easier to disconnect the electrical plug.
-- Installation is the reverse of disassembly.
Repeat for each of the four coils. Be sure to reconnect the plug wire (even if its the old one) after each coil so you dont get confused.
3) Now that your coils are replaced, let's tackle the plugs. Remove driver side wheel. Ok seriously, I had never used jackstands before but finally bought a pair, it is worth the investment - you don't want your car falling on you, your skull will likely be crushed...
4) Use a screwdriver to give a quarter turn to the plastic fastener on the wheel well mud flap, and let it hang to the side.
5) Going ONE spark plug at a time, you will do the following:
-- Remove spark plug boot off tip of plug.
-- Using your spark plug socket from your toolkit, carefully but firmly loosen the plug until you can hand loosen it. Upside down photo lol...
-- Once the old one is removed, take the new plug (make sure you are matching trailing plug to trailing and leading to leading - the leading plug has a 'castle' shape tip and the trailing looks like any other spark plug. There are no gaps to adjust with NGK laser iridium plugs) and insert it into your spark plug socket BEFORE attaching your rachet to it. Why? Because you have to GENTLY hand tighten the plug into the engine to avoid stripping threads.
*** Be sure to add a modest amount of anti-seize to the new plug threads:
Again, HAND tighten. You should only use/need two fingers to slowly screw the new plug in. If you feel enough resistance that you cant turn with two fingers, stop, back it out, check for debris on the threads and try again.
-- Once it is hand tightened, tighten down with your ratchet. I don't know the torque setting but I tightened it with as much force as I do with my oil drain plug - nice and snug but not really trying to strip threads off the bolt.
6) Reconnect the plug wire to the newly installed plug and repeat for all other plugs. Honestly, the hardest one to get to is the lower left one in this photo, staring straight at your plugs through the wheel well:
Patience - it may take a while, but you don't want a broken plug or stripped threads!
7) Once your plugs are replaced, it is a simple matter of replacing the wires. Perhaps someone here can explain which length wire goes to which plug - I very scientifically removed one wire, found the new one that matched in length, and installed it
NOTE: The connection to the coils is very easy and straightforward; the plug connection can be 'tricky'. Make sure you hear or feel a click when you push it onto the tip of the plug, and that there is little or no give to the silicone at the tip of the plug once the wire is installed. Also, Magnacore wires do not fit the same 'way' as OEM - they expose a little bit of the ceramic of the plug. Look at the one with the plug still installed:8) Once all your plug wires are installed, congrats, you're done! Put the wheel well mud flap back in place, put the wheel on, lower the car, attach the battery, start her up! Be sure to let the car completely warm up before turning off to reset the DCS.
If you have any questions about the experience, let me know. Thanks! I'll post pics of my old plugs - the difference is shocking!
Thread Starter
Registered User
Joined: Oct 2009
Posts: 44
Likes: 0
From: Tampa, FL
Here are the photos of my plugs - again, the results of the change were amazing and it looks like these plugs really needed a change, especially my leaders.

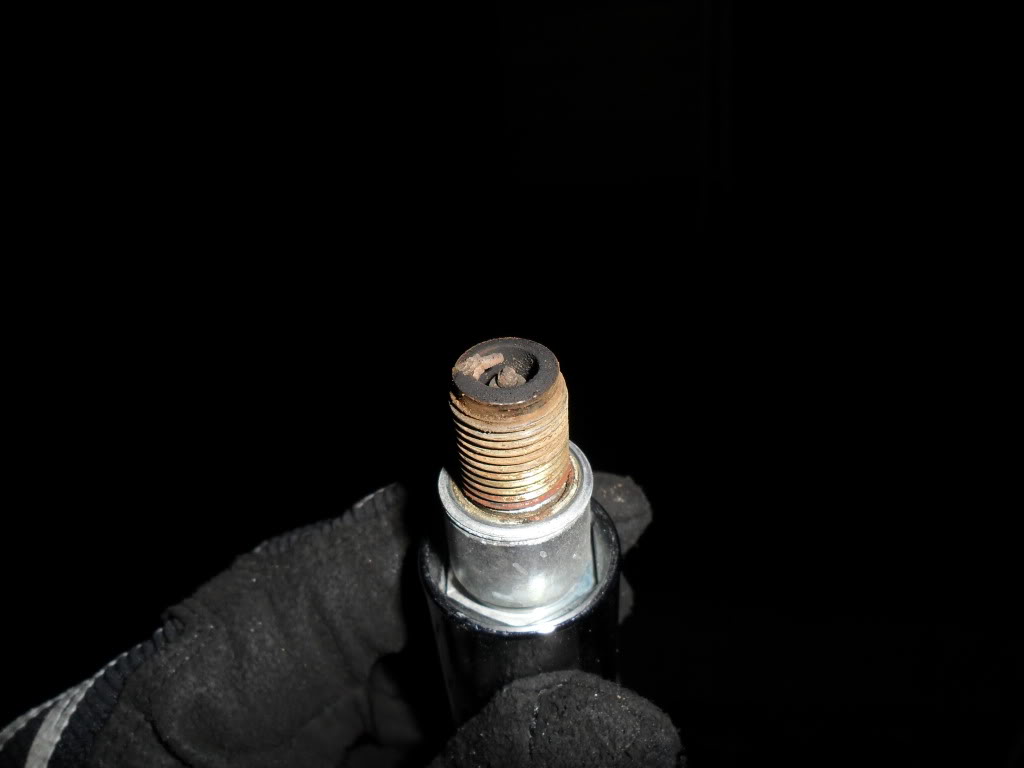
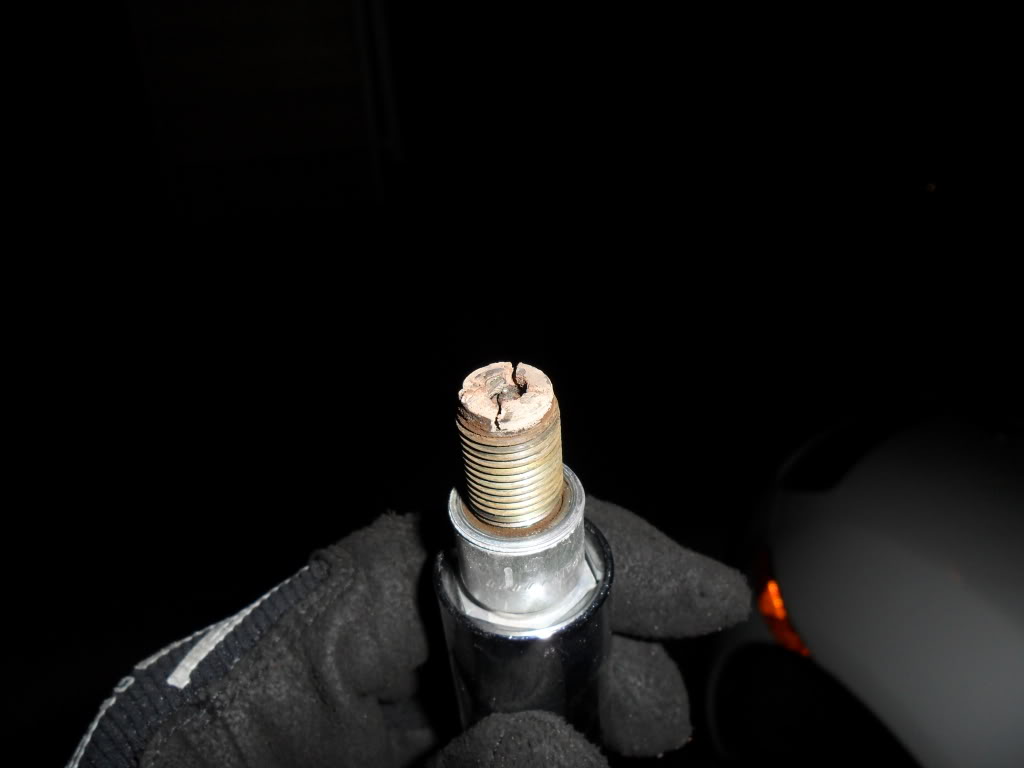
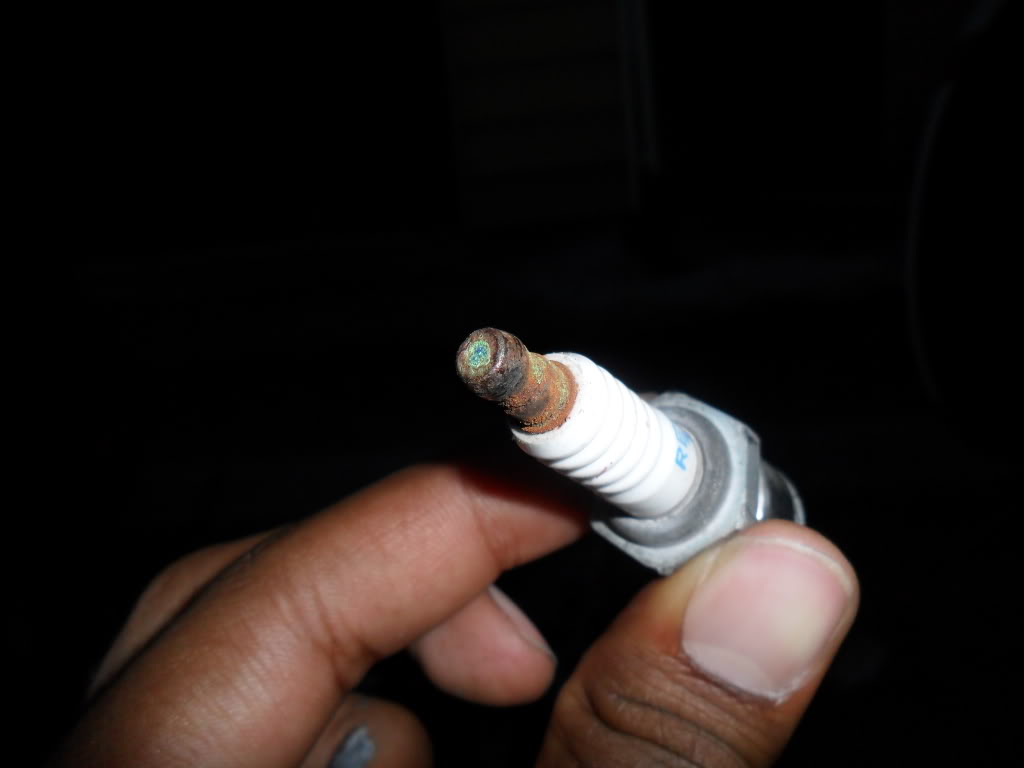
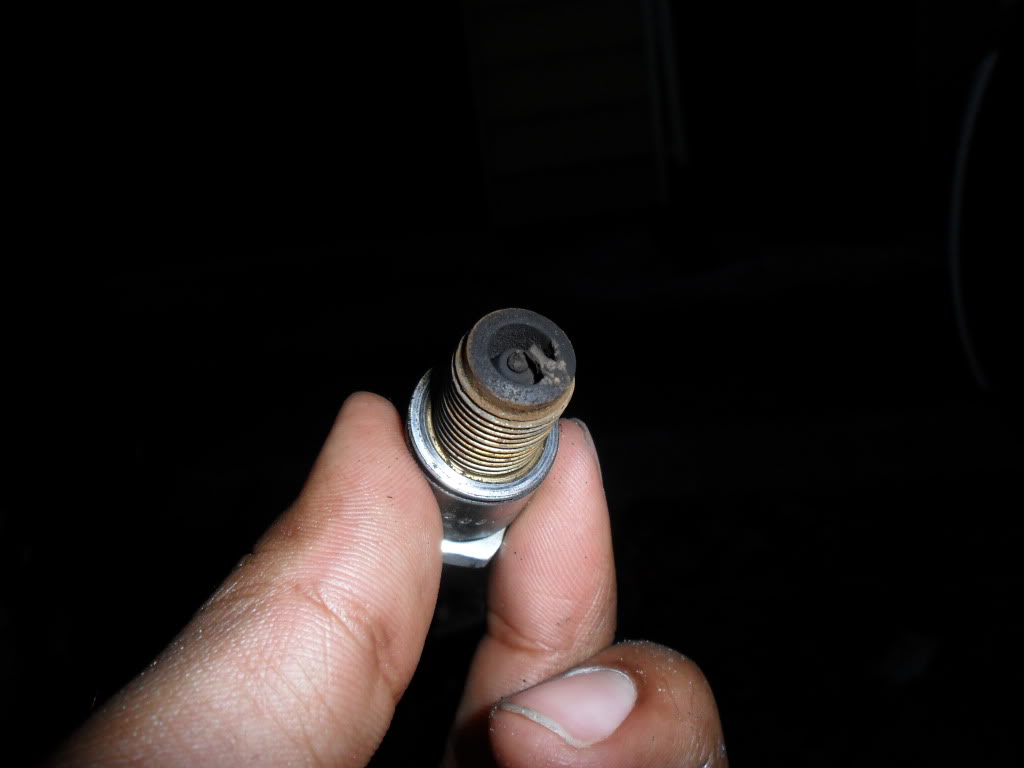
One last note: My installation was easy since I already went through the hell of replacing my OEM intake with a cold air - there are other awesome DIY's that include the proper removal of your OEM intake system to access everything for this DIY.
One last note: My installation was easy since I already went through the hell of replacing my OEM intake with a cold air - there are other awesome DIY's that include the proper removal of your OEM intake system to access everything for this DIY.


Registered Maniac
Joined: Dec 2011
Posts: 70
Likes: 0
From: Sterling, VA
Thank you for posting your version of this DIY. The pictures are awesome and leave very little guesswork. I just picked up my '8 and these three were the first on my list to do.

Registered
Joined: Nov 2008
Posts: 603
Likes: 2
From: Long Beach, CA
No anti-seize on new plugs
NGK advises against using anti-seize for new plug installation:
http://www.ngksparkplugs.com/pdf/TB-...1antisieze.pdf
http://www.ngksparkplugs.com/pdf/TB-...1antisieze.pdf

wanting another rotary
Joined: Sep 2009
Posts: 64
Likes: 0
From: Florida
NGK advises against using anti-seize for new plug installation:
http://www.ngksparkplugs.com/pdf/TB-...1antisieze.pdf
http://www.ngksparkplugs.com/pdf/TB-...1antisieze.pdf
wow thats pretty crazy, I dont think I will be trying that anytime soon though.

Registered User
Joined: Dec 2011
Posts: 20
Likes: 0
NGK advises against using anti-seize for new plug installation:
http://www.ngksparkplugs.com/pdf/TB-...1antisieze.pdf
http://www.ngksparkplugs.com/pdf/TB-...1antisieze.pdf

Registered
Joined: Dec 2009
Posts: 2,100
Likes: 7
From: Aurora, CO
NGK advises against using anti-seize for new plug installation:
http://www.ngksparkplugs.com/pdf/TB-...1antisieze.pdf
http://www.ngksparkplugs.com/pdf/TB-...1antisieze.pdf
Seems like it is a recommendation born out of people man handling their spark plugs when they are tightening them down. I had no issues with antiseize when doing my plugs, or removing one for a compression test even. I didn't go by any specific spec to tighten my plugs down, just common sense.
There are a lot of threads on this site about that one spark plug that almost gets welded into the hole because someone forgot antiseize. Just to list a few:
https://www.rx8club.com/series-i-tech-garage-22/spark-plugs-anti-seize-114665/
https://www.rx8club.com/series-i-trouble-shooting-95/spark-plug-stuck-136709/
https://www.rx8club.com/series-i-trouble-shooting-95/spark-plug-stuck-so-hard-224911/
So, if a person has common sense go ahead and use antiseize I think. If you are scared that you cant feel when something is tightened down, then go for the NGK recommendation.
Registered
Joined: Nov 2008
Posts: 603
Likes: 2
From: Long Beach, CA
I had no issues with antiseize when doing my plugs, or removing one for a compression test even. I didn't go by any specific spec to tighten my plugs down, just common sense.
There are a lot of threads on this site about that one spark plug that almost gets welded into the hole because someone forgot antiseize. Just to list a few:
https://www.rx8club.com/showthread.php?t=114665
https://www.rx8club.com/showthread.php?t=136709
https://www.rx8club.com/showthread.php?t=224911
So, if a person has common sense go ahead and use antiseize I think. If you are scared that you cant feel when something is tightened down, then go for the NGK recommendation.
"All spark plugs that have a blackened or dull appearance on the metal body offer no protection against seizing or bonding to the cylinder head and so it is with these spark plugs that anti-seize would be required. A spark plug that has a shiny silver appearance on the metal body usually indicates that the plug is manufactured with metal shell plating and therefore will not require anti-seize. "
In the threads you quoted we do not know whether these plugs were installed new or re-installed used. I would bet they were used. The plugs I removed from my motor at 31,000 miles were original, and they came out easily.
Last edited by PeteInLongBeach; Dec 10, 2011 at 09:01 PM.
Registered
Joined: Dec 2009
Posts: 2,100
Likes: 7
From: Aurora, CO
I would not say my plugs were extremely hard to get out but they were in there pretty good from the factory. Maybe the heat difference between an auto revving to 7500 and a manual going to 9000 over 30k miles made mine stick more than yours, who knows. The new plugs may not require antiseize, but I will still be using it just as an extra layer of protection against it being a pain in my *** the next time.
Registered Maniac
Joined: Dec 2011
Posts: 70
Likes: 0
From: Sterling, VA
I'm just tackling this today. I bought new ng k wires to replace the factory stock ones. There are 2 blue and 2 black wires. The blue ones are short. They're labeled 1, 2, 3, and 4. 2 blue ant to black look identical other than the number, can somebody tell me if there is a specific wire for each coil?
Registered
Joined: Dec 2009
Posts: 2,100
Likes: 7
From: Aurora, CO
Since you bought OEM wires then just change out 1 wire/coil/plug at a time and compare wire lengths, if the wire matches use it. The shorter wires should be for your Trailing plugs(Top). Its really easy doing them 1 at a time.
Registered
Joined: Nov 2008
Posts: 603
Likes: 2
From: Long Beach, CA
Yeah, I've never understood why some people disassemble all the coils and wires at the same time and risk errors in reassembly.
Registered Maniac
Joined: Dec 2011
Posts: 70
Likes: 0
From: Sterling, VA
Oops sorry I wasn't clear guys. These aren't the OEM wires (they're the NGK blue ones), and I didn't do them all at once. I took the first wire out and none of the 4 new ones were EXACTLY the same length. So I figured the 1 and 2 on each would help. I figured it out though, car runs great. Thanks again for the DIY!

New Member
Joined: Sep 2013
Posts: 6
Likes: 0
Driver's side clicking handled...
Just got an ok deal on a super clean blue 2005 - loud ticking noise from the bottom driverside.
- Turn wheels right
- Jack
- Lift plastic cover and push spark plug wires back on (yeah one we completely disengaged)
No more clicking - time for a new set of ignitionSystem() probably though.
Love this site thanks for all the great info. Wanted to thank you ahead of time will be doing this job soon.

Thread
Thread Starter
Forum
Replies
Last Post
Audio Concepts ATL
New Member Forum
21
Sep 26, 2021 01:59 PM
Sakebomb Garage
Sakebomb Garage
6
Oct 10, 2018 03:36 PM
akagc
RX-8's For Sale/Wanted
7
Aug 11, 2015 07:07 PM