SARX installs a turbocharged bridge ported renny a picture thread

Thread Starter
Lucky #33
iTrader: (4)
Joined: Feb 2009
Posts: 2,851
Likes: 5
From: San Antonio, SARX Garage
SARX installs a turbocharged bridge ported renny a picture thread
: Disclaimer, This thread is for pictures only. I would love to hear your comments but all technical discussion can be directed at:
https://www.rx8club.com/major-horsep...thread-210754/
I have personally been working towards this for about two years now. I have only been stateside for about 4 months and have had to update my install timeline by about a month so not all is exactly where I would like it to be and some compromises were made.
I hope you enjoy my thread I could not have done this without out the help of: 9krpmrx8, Hector Castillo, shadycrew31, cornholio135, houstonrx8er, Grungepup, Kane
Thank you guys for all the support and hard work to make this happen.
Thread Starter
Lucky #33
iTrader: (4)
Joined: Feb 2009
Posts: 2,851
Likes: 5
From: San Antonio, SARX Garage
Would like to kick off the thread with a bit of info about the build.
2005 RX8 72K miles.
Bridge ported renny with a ton of extra work done by: BDC Motorsports
Low Mount turbo kit with some extra work built by: Turblown Modded by Hoss -05
Lots of extras from BHR, the only Carbonitic carbon clutch and diff i know about in the US.
Other stuff as well but lets save that for the Tech discussion thread.
This is what I see when I wake up in the morning. - a few cars.

The bridge port Renny.

Check the 50mm dump tube... yikes!

Here you can see the heat shields turblown made for me. They did a Great job.

Another picture in this one you can my broke wast-gate. "the nipples are broke alone with the bent adjuster" this a a 50mm unit and will take heat like no other. Its sad it got messed up so bad.

Another view... look at all the idmitsu in the back... :P

2005 RX8 72K miles.
Bridge ported renny with a ton of extra work done by: BDC Motorsports
Low Mount turbo kit with some extra work built by: Turblown Modded by Hoss -05
Lots of extras from BHR, the only Carbonitic carbon clutch and diff i know about in the US.
Other stuff as well but lets save that for the Tech discussion thread.
This is what I see when I wake up in the morning. - a few cars.
The bridge port Renny.
Check the 50mm dump tube... yikes!
Here you can see the heat shields turblown made for me. They did a Great job.
Another picture in this one you can my broke wast-gate. "the nipples are broke alone with the bent adjuster" this a a 50mm unit and will take heat like no other. Its sad it got messed up so bad.
Another view... look at all the idmitsu in the back... :P
Last edited by hoss -05; Sep 3, 2012 at 02:02 AM.
Thread Starter
Lucky #33
iTrader: (4)
Joined: Feb 2009
Posts: 2,851
Likes: 5
From: San Antonio, SARX Garage
Rad pack out.

engine out.... thanks guys... you know who you are.

Old pilot .... wow this think looks crazy.. not sure what to think.

With S1 tranny.

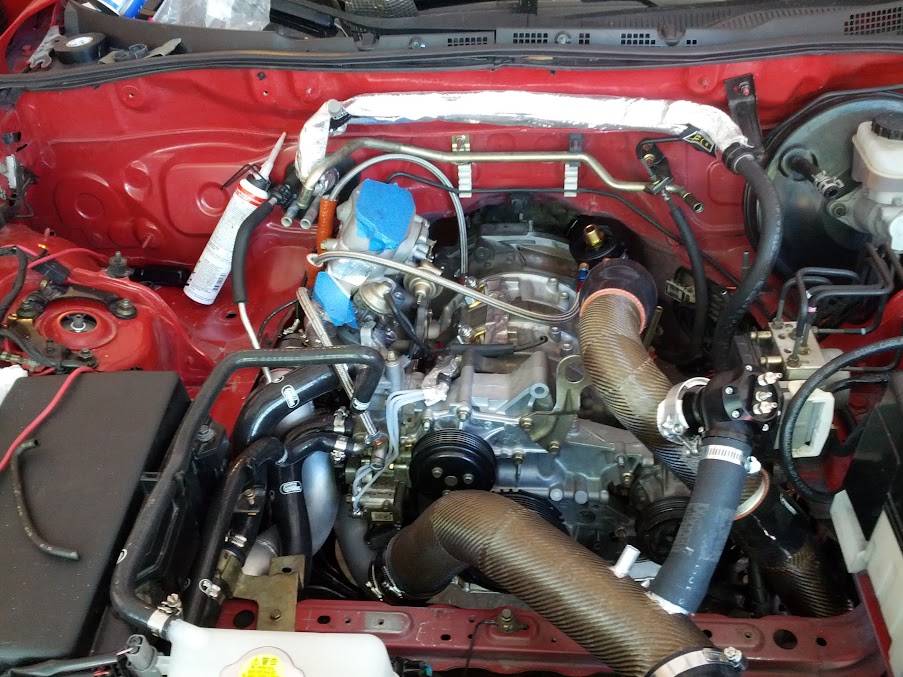
So for this install I decided to go heat shield crazy. This is my quick and simply s2 heat shield. It was left over from other parts.

This is the Lower intake manni custom ported by BDC Motorsports and covered by a bit of heat shield by Cornholio135.... I swear corn/Mike is the king of wrapping. Can only imagine what his C-mas presents look like.

Here is another pick of my engine by half way through my heat shield install. Its all custom installed by me. with my big turbo i banged the crap out of my fire wall and put in all this heat shielding stuff.

My friend cornholio also wrapped all post IC piping inside the engine bay.... in amazing carbon lava matt weave... this is lava mat and has the claimed ability to reflect heat up to 2k*. It look a bit ricer but is 100% functional.

I also had my header and DP custom coated with a Super high temp coating that is suppose to help keep heat from radiating from the piping into my engine bay. Both my Exhaust Mani and my DP have the same coating.

9krpmrx8 holding the fan pack. This set up pulls alot more air through the rad pac then the stock set up. The wiring on the fans is not larger then the OEM. It may draw a few more AMP's then normal but I am willing accept that. All connectors that have been cut or have redone to done to mil speck and hard soldered.

The last one for the night. So much work to do tomorrow. Not sure what to think but will drive on. I need to make the tuning date.

engine out.... thanks guys... you know who you are.
Old pilot .... wow this think looks crazy.. not sure what to think.
With S1 tranny.
So for this install I decided to go heat shield crazy. This is my quick and simply s2 heat shield. It was left over from other parts.
This is the Lower intake manni custom ported by BDC Motorsports and covered by a bit of heat shield by Cornholio135.... I swear corn/Mike is the king of wrapping. Can only imagine what his C-mas presents look like.
Here is another pick of my engine by half way through my heat shield install. Its all custom installed by me. with my big turbo i banged the crap out of my fire wall and put in all this heat shielding stuff.
My friend cornholio also wrapped all post IC piping inside the engine bay.... in amazing carbon lava matt weave... this is lava mat and has the claimed ability to reflect heat up to 2k*. It look a bit ricer but is 100% functional.
I also had my header and DP custom coated with a Super high temp coating that is suppose to help keep heat from radiating from the piping into my engine bay. Both my Exhaust Mani and my DP have the same coating.
9krpmrx8 holding the fan pack. This set up pulls alot more air through the rad pac then the stock set up. The wiring on the fans is not larger then the OEM. It may draw a few more AMP's then normal but I am willing accept that. All connectors that have been cut or have redone to done to mil speck and hard soldered.
The last one for the night. So much work to do tomorrow. Not sure what to think but will drive on. I need to make the tuning date.
Last edited by hoss -05; Sep 3, 2012 at 03:07 AM.
Thread Starter
Lucky #33
iTrader: (4)
Joined: Feb 2009
Posts: 2,851
Likes: 5
From: San Antonio, SARX Garage
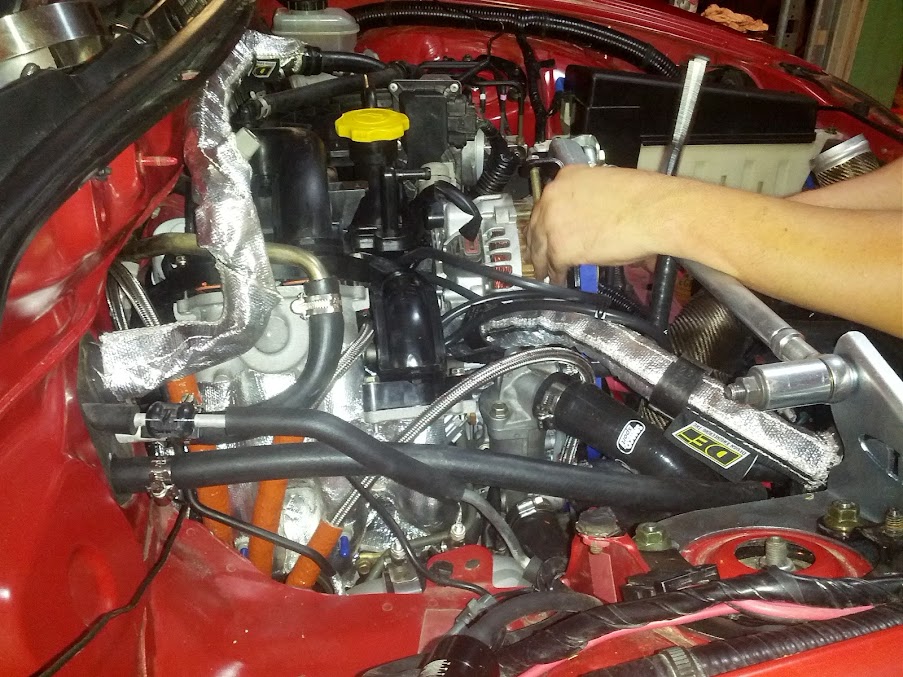
That mani and engine mount bracket are not easy to install. You can see the coating on the manifold fairly well in this pic.

Up on chains! Check out the sexy carbonetic carbon clutch and flywheel set up.

It was not going in with both the engine bracket and kicked out oil pan. one had to be removed.

Where we stopped. We tried to a good 40 mins trying to get these bad boys mated up with no luck.

Up on chains! Check out the sexy carbonetic carbon clutch and flywheel set up.
It was not going in with both the engine bracket and kicked out oil pan. one had to be removed.
Where we stopped. We tried to a good 40 mins trying to get these bad boys mated up with no luck.
Last edited by hoss -05; Sep 3, 2012 at 10:36 PM.
Thread Starter
Lucky #33
iTrader: (4)
Joined: Feb 2009
Posts: 2,851
Likes: 5
From: San Antonio, SARX Garage
Only one picture from today but its a big one! Finally got the engine and tranny mated. Ended up having to pull them together with the bolts.

Both seats are in!

Here is Shadycrew AKA DC mother truckers working on the turbo

Here is the billet wheel.

9krpmrx8 holding one of the housings for the turbo. We could not squeeze the turbo in place with it on.

this is what we did to protect the wheel while installing the turbo.

Finally!

Here you can see some of the piping in place.

Where I ended. Need to re-do the drain today somehow.

Both seats are in!
Here is Shadycrew AKA DC mother truckers working on the turbo
Here is the billet wheel.
9krpmrx8 holding one of the housings for the turbo. We could not squeeze the turbo in place with it on.
this is what we did to protect the wheel while installing the turbo.
Finally!
Here you can see some of the piping in place.
Where I ended. Need to re-do the drain today somehow.
Last edited by hoss -05; Sep 6, 2012 at 09:06 AM.
Thread Starter
Lucky #33
iTrader: (4)
Joined: Feb 2009
Posts: 2,851
Likes: 5
From: San Antonio, SARX Garage
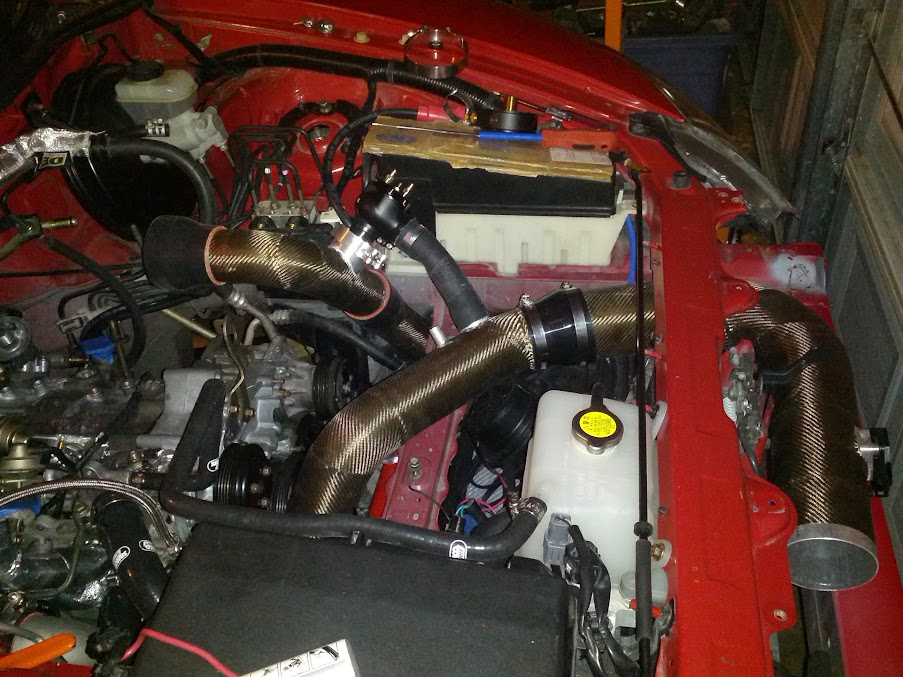
All the turbo lines in place... other then the drain.
Here is the wiring going into place. What really dose not come out in these pictures is all the small stuff being done. Like the RB oil lines and rad pack set up.

Here you can see some of the methods I took to try and combat heat around the turbo.

Even my waste gate has its own exhaust!

Last edited by hoss -05; Sep 12, 2012 at 08:38 AM.


Yes, but there are exceptions... I had a black 8.
The build is looking good! It's awesome that you're getting good pictures of everything as you go. It's clear that all that time really helped you think about how to pull it all together.
The build is looking good! It's awesome that you're getting good pictures of everything as you go. It's clear that all that time really helped you think about how to pull it all together.


Looks good so far, What oil filter sandwich plate is that? Looks like the Golden Eagle one, I was looking at that one cause it would feed filtered oil to the turbo, but I wasn't sure if it would fit the 8.


Thread Starter
Lucky #33
iTrader: (4)
Joined: Feb 2009
Posts: 2,851
Likes: 5
From: San Antonio, SARX Garage