
New member, new owner, first car.


Thread Starter
Registered
Joined: Sep 2014
Posts: 18
Likes: 0
From: Moreno Valley, CA
I just purchased my Rx-8, used. It is a 2004.
I just have some general questions about the vehicle, and yes I've read through a lot of text on maintaining my vehicle but have yet to find solutions to certain things. I just have two questions for now...
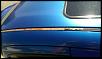
1) How can I fix/cover this up...
2) My Rx didn't come programmed to my key-less entry "remote". It has a fresh new battery but when I try to program it (I've seen videos and read the manual on it) it doesn't work. Could it be a faulty remote (Key fob? Is that what it's called?) or some faulty electronics?
Thank you very much for any help you post or informative links to information you provide to aid me. I am just now learning about cars and I know this vehicle needs maintenance so I'm trying to inform myself on all of the more important issues via reading the "New to Mazda Rx-8" type forums you guys already have.
I just have some general questions about the vehicle, and yes I've read through a lot of text on maintaining my vehicle but have yet to find solutions to certain things. I just have two questions for now...
1) How can I fix/cover this up...

2) My Rx didn't come programmed to my key-less entry "remote". It has a fresh new battery but when I try to program it (I've seen videos and read the manual on it) it doesn't work. Could it be a faulty remote (Key fob? Is that what it's called?) or some faulty electronics?
Thank you very much for any help you post or informative links to information you provide to aid me. I am just now learning about cars and I know this vehicle needs maintenance so I'm trying to inform myself on all of the more important issues via reading the "New to Mazda Rx-8" type forums you guys already have.

you can replace the part on the roof. as for the fob mine didnt come with one either. i bought one from here that didnt work, the second one i bought programmed fine tho
Thread Starter
Registered
Joined: Sep 2014
Posts: 18
Likes: 0
From: Moreno Valley, CA


Thread Starter
Registered
Joined: Sep 2014
Posts: 18
Likes: 0
From: Moreno Valley, CA
Issue:
This is the key fob I have it it claims that it works with the vehicle. Id on't want to end up paying extra money to find that I wasted it so I wanted to know if anything else could possibly be the issue, something I could inspect.

The Blue Blur
iTrader: (3)
Joined: Apr 2010
Posts: 1,959
Likes: 4,812
From: Green Hill Zone Running in Loops
1st, welcome to the club
2nd, use the search bar and/or google most of your questions have been answered here already
3rd, check the fcc id on the fob the remote might look the same but the frequencies can be different
4th, how many keys and fobs do you have? you may need to have the dealer program them if you only have one
5th, winning blue is the fastest colour
Issue:
This is the key fob I have it it claims that it works with the vehicle. Id on't want to end up paying extra money to find that I wasted it so I wanted to know if anything else could possibly be the issue, something I could inspect.
Still.
Thread Starter
Registered
Joined: Sep 2014
Posts: 18
Likes: 0
From: Moreno Valley, CA
1st, welcome to the club
2nd, use the search bar and/or google most of your questions have been answered here already
3rd, check the fcc id on the fob the remote might look the same but the frequencies can be different
4th, how many keys and fobs do you have? you may need to have the dealer program them if you only have one
5th, winning blue is the fastest colour
2) Understood.
3) KPU41805 running 313.8mhz. What does the Rx-8 run? (2004)
3) I have one

5) Yeaaaah!

ドラゴンチェイサー
Joined: Jul 2014
Posts: 257
Likes: 0
From: Burlington, Ontario
Materials you will need are:
1) sand paper - 120 grit and 220 grit
2) Masking tape - 2" wide would be good and fairly heavy paper to cover what you are not fixing.
3) sandable primer
4) Plastikote trim paint
Mask off along the trim piece(s) you want to fix and extend the making to cover all painted and glass surfaces around the repair area. Next, sand the surface rust and flaking paint off using the 120 grit. Once you have clean bare metal, re-sand with 220 grit to smooth it a bit more. Next wipe clean and spray the repair area(s) with sandable primer laying it on in multiple thin coats to avoid runs. Once fully dry ( wait at least a couple of hours to make sure it has dried through the multiple coats), inspect it for dust, scratches or other imperfections and LIGHTLY sand them out with the finer sandpaper. When you are satisfied that the repair(s) are smooth, wipe clean again. Then you are ready for paint. This part should go really slow in order to avoid screw-ups. Lay the Plastikote trim paint on in light mist coats allowing each to tack up before the next mist coat is applied. Like I said, go slowly and don't even think about rushing because a screw-up here means starting over. Lay on about 4 mist coats then carefully inspect your work for flaws. If there are none, let the paint dry at least several hours, then remove the masking materials and you are done.

Registered
Joined: Feb 2014
Posts: 19
Likes: 0
Materials you will need are:
1) sand paper - 120 grit and 220 grit
2) Masking tape - 2" wide would be good and fairly heavy paper to cover what you are not fixing.
3) sandable primer
4) Plastikote trim paint
Mask off along the trim piece(s) you want to fix and extend the making to cover all painted and glass surfaces around the repair area. Next, sand the surface rust and flaking paint off using the 120 grit. Once you have clean bare metal, re-sand with 220 grit to smooth it a bit more. Next wipe clean and spray the repair area(s) with sandable primer laying it on in multiple thin coats to avoid runs. Once fully dry ( wait at least a couple of hours to make sure it has dried through the multiple coats), inspect it for dust, scratches or other imperfections and LIGHTLY sand them out with the finer sandpaper. When you are satisfied that the repair(s) are smooth, wipe clean again. Then you are ready for paint. This part should go really slow in order to avoid screw-ups. Lay the Plastikote trim paint on in light mist coats allowing each to tack up before the next mist coat is applied. Like I said, go slowly and don't even think about rushing because a screw-up here means starting over. Lay on about 4 mist coats then carefully inspect your work for flaws. If there are none, let the paint dry at least several hours, then remove the masking materials and you are done.
1) sand paper - 120 grit and 220 grit
2) Masking tape - 2" wide would be good and fairly heavy paper to cover what you are not fixing.
3) sandable primer
4) Plastikote trim paint
Mask off along the trim piece(s) you want to fix and extend the making to cover all painted and glass surfaces around the repair area. Next, sand the surface rust and flaking paint off using the 120 grit. Once you have clean bare metal, re-sand with 220 grit to smooth it a bit more. Next wipe clean and spray the repair area(s) with sandable primer laying it on in multiple thin coats to avoid runs. Once fully dry ( wait at least a couple of hours to make sure it has dried through the multiple coats), inspect it for dust, scratches or other imperfections and LIGHTLY sand them out with the finer sandpaper. When you are satisfied that the repair(s) are smooth, wipe clean again. Then you are ready for paint. This part should go really slow in order to avoid screw-ups. Lay the Plastikote trim paint on in light mist coats allowing each to tack up before the next mist coat is applied. Like I said, go slowly and don't even think about rushing because a screw-up here means starting over. Lay on about 4 mist coats then carefully inspect your work for flaws. If there are none, let the paint dry at least several hours, then remove the masking materials and you are done.
ドラゴンチェイサー
Joined: Jul 2014
Posts: 257
Likes: 0
From: Burlington, Ontario
Precisely why I said to paper over all painted and glass surfaces. The way car manufacturers build cars these days, the trim pieces will most likely be held on with plastic clips. With the age of the car, those clips would most assuredly be brittle with age and would probablt break making the job a pain in the a**.
Issue:
This is the key fob I have it it claims that it works with the vehicle. Id on't want to end up paying extra money to find that I wasted it so I wanted to know if anything else could possibly be the issue, something I could inspect.
Common with '04s.
Putting away spoon now.

Life After 8K RPM....
Joined: Aug 2013
Posts: 617
Likes: 1
From: Toronto
I agree with Mysterion, don't bother removing the plastic trims from the roof.
Just sand the entire unit. If your not comfortable with spray painting them, then i suggest use vinyl wrap. go for glossy black vinyl, and wrap them.
Just sand the entire unit. If your not comfortable with spray painting them, then i suggest use vinyl wrap. go for glossy black vinyl, and wrap them.

Thread
Thread Starter
Forum
Replies
Last Post
thedragonrotar
New Member Forum
1
Jul 22, 2015 08:46 PM