Collapsed Motor Mount/Vibration


Guest
Posts: n/a
Originally Posted by Easy_E1
I have an 05 AT and they changed left and right side engine mounts and the trans mount ,a couple of weeks ago. Had a rattle. Don't have it anymore.
SMOOOOTH
SMOOOOTH

FN GR8
Joined: Apr 2005
Posts: 423
Likes: 1
From: Miami
i don't think there's a lack of mounts anymore. i went for my 15k service today & my service manager offered to put them in w/out me mentioning it at all.
started it up & noticed the vibration himself... said he'd take care of it...
started it up & noticed the vibration himself... said he'd take care of it...


You don't inject really, you pour.
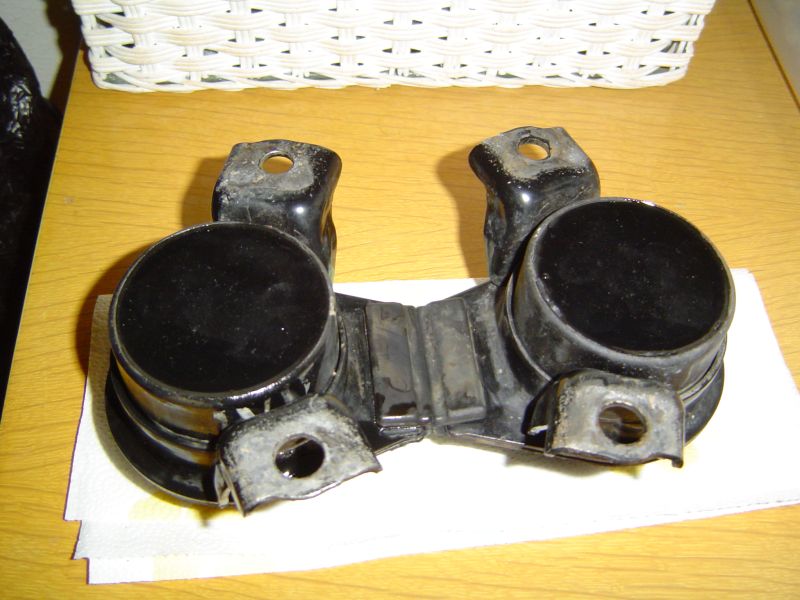
Take the old motor mount and cut the bottom cap off (it looks like a rubber dart board). When you do so, a few ounces of mineral oil will come out.
Dry it up and rinse with a solvent. Then mix up some flexible urethane with an 80 shore rating (go to http://www.mcmaster.com/ and search for product 8644K11). Set the motor mount on its top on a level surface and fill the cavity with the above mentioned urethane.
Let it sit for two days and then re-install it.
It will never collapse again. However, there will be a slight vibration penalty. If your car has a particularly rough idle, I wouldn't recommend this. But if it is smooth like mine, then there is no noticable difference.
This is actually way simpler to accomplish with a high degree of positive results in a way that I haven't seen discussed here yet.
First, if you observe the driver side (LH) mount the obviousness of this procedure will be apparent. Start by cutting the outer rubber membrane off with a sharp knife etc. This will allow some fluid to escape and drain off, but there is much more inside an upper chamber that is beneath the rubber plug in the center. This rubber plug also exists on the passenger side (RH) mount, but it is not exposed like the LH mount. In order to get to it you must use 1-1/4" hole saw to cut through the upper plastic shroud. A nice center point is already provided to align the hole saw bit and get it centered well.
Once you cut through the top plate on the RH mount using the 1-1/4" hole saw you can see the rubber plug, which is then easy to pry out with a stout screwdriver and some needle nose pliers. While the plug on the LH mount is exposed it cannot be easy pried out because the sealing edge is back under the plastic area.
However, the indentation area around it just happens to be 1-1/4" ID so it is easy to drop the same hole saw in there and cut through to expose it. Once you cut through the shrouded area the rubber plug practically falls out. With both center plugs out you can drain most of the fluid. Some solvent helps wash it out, but you are not done yet.

Next take a 1/4" drill bit and set a depth marker on the bit using some masking tape as shown. We are going to use this drill bit to drill some access/drain holes through the internal plastic shrouds in the mount. This will allow you to clean everything out thoroughly, as well as allow the liquid urethane to penetrate all the cavities and also allow air to escape as the urethane is poured in.
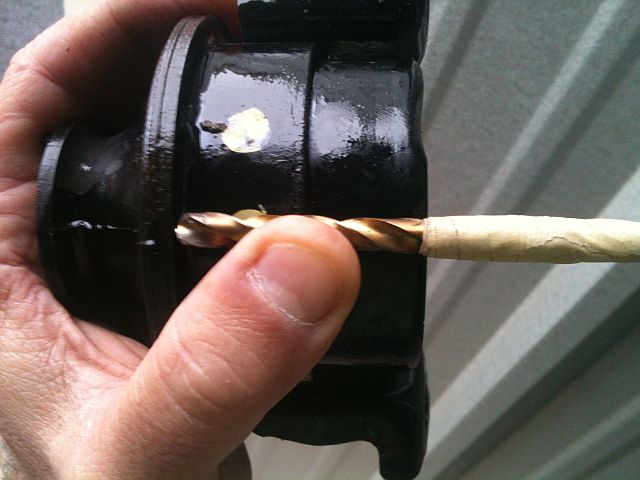
I just approximated six holes around the perimeter, using the depth marker to make sure the bit does not penetrate through the rubber top section of the mounts. Note that I set the tape marker to the top of the mount edge and not to the first internal plastic plate, which is about 1/4" lower. If you are not too boneheaded you will feel when the drill bit hits the rubber, but the taped depth marker on the drill bit is a nice precaution for the average DIY person.
Once the holes are drilled you can shake, bang, and/or used compressed air to get all the plastic shavings out of the interior. I did a combination of slapping them down on the concrete floor and blowing them out. It seems to do a good enough job. Now they are ready to be washed out *thoroughly* with solvent. A strong solvent such as MEK, lacquer thinner, acetone, etc. is preferred. Once they have been cleaned and allowed to dry properly to evaporate all of the solvent out the mounts are ready to be filled with the liquid urethane.
The key here is to remove the second smaller diameter rubber membrane from the center of the mount, which provides you clear access to clean and fill the main cavity. Drilling the six holes ensures cleaning and filling between the various plated sections in the mount. Be careful not to drill through the rubber portion on top of the mount. By doing both you will have the most solid and completely filled mount possible IMO. The filling procedure is described in my next post below. It takes me about an hour to get to this point just taking my time.
In summary, what I used to do this:
- An electric hand drill
- A bench vice to hold the engine mounts while drilling/cutting
- A 1-1/4" hole saw
- A 1/4" drill bit
- 1 Quart of strong solvent; MEK, lacquer thinner, or acetone (approx. $7 - $10 Home Depot, Lowes, etc.)
- A container to pour & hold the mount oil/solvent in (please dispose of properly and do not contaminate the environment!)
- Shop towels or rags for wiping/clean up.
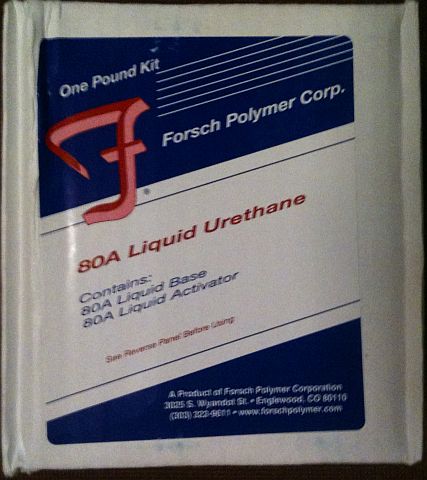
- 1 lb. of Shore 80A black liquid urethane, McMaster-Carr Part# 8644K11 (approx. $31 + shipping 12/20/2011)
.
Last edited by TeamRX8; Dec 30, 2011 at 09:10 AM.


Urethane filled motor mounts
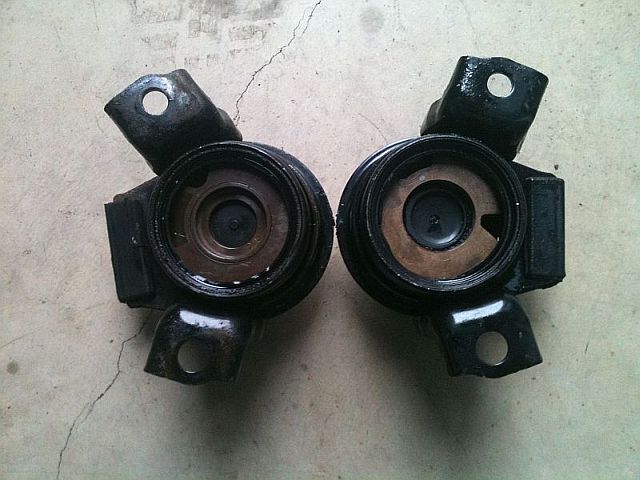
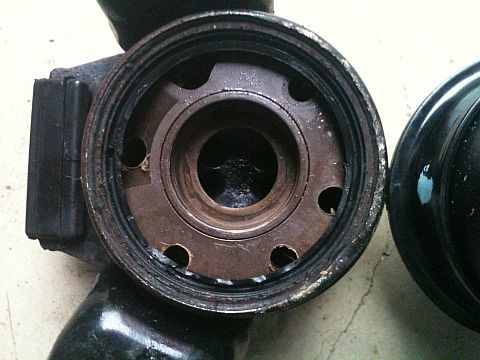
Here is the driver side (LH) mount prepared as per the post above
and the prepared passenger side (RH) mount
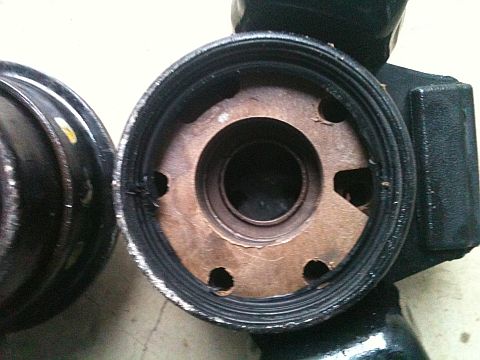
Once you clean the cavity out with solvent you will see that the underside of the rubber top portion of the mount has honeycomb type openings from the main cavity into it. This will all get filled with urethane.
You need to make sure to put the mounts on a level surface where they will not be disturbed or knocked over before the liquid urethane sets. Be sure to have a piece of cardboard or card stock underneath them as you may overfill the top and it will drip down the side of the mount onto the surface where you are doing this. When you are filling the mount with the liquid urethane proceed by slowly filling the main cavity in the center hole. You want to go easy and allow the air to escape by filling in a slow steady pour rather than just dumping it all in at once. Once the main cavity is filled and the urethane is starting to overflow the main middle hole proceed to each drilled hole again drizzle the liquid urethane in until it begins to overflow the hole and then proceed to the next hole until all six are filled. You can then top off the mount until it is filled in total. Here are the filled mounts.
In an hour or two the urethane will take a set, but according to the paperwork it takes two days @ 77 degF for the urethane to reach 85% - 90% of it's final strength and 7 days total for them to be at 100% strength. I'd recommend waiting the full 7 days before re-installing them. If your RX8 is a daily driver you will want to find another set of mounts to fill and cure first rather than have your car down for a week. The threads in the top center of the mount where the engine bracket bolt on top of them tends to get boogered up. It would be best to run a tap through the threads to clean them up and then smear or work some anti-seize on them before re-installing the mounts on the car. You may also want to clean up the threads where the mounts are bolted to the subframe and use anti-seize there as well. I think the factory may use self-locking hardware on these mounting points, which is rough on the threads when everything is unbolted.
good luck.
.
and the prepared passenger side (RH) mount
Once you clean the cavity out with solvent you will see that the underside of the rubber top portion of the mount has honeycomb type openings from the main cavity into it. This will all get filled with urethane.
You need to make sure to put the mounts on a level surface where they will not be disturbed or knocked over before the liquid urethane sets. Be sure to have a piece of cardboard or card stock underneath them as you may overfill the top and it will drip down the side of the mount onto the surface where you are doing this. When you are filling the mount with the liquid urethane proceed by slowly filling the main cavity in the center hole. You want to go easy and allow the air to escape by filling in a slow steady pour rather than just dumping it all in at once. Once the main cavity is filled and the urethane is starting to overflow the main middle hole proceed to each drilled hole again drizzle the liquid urethane in until it begins to overflow the hole and then proceed to the next hole until all six are filled. You can then top off the mount until it is filled in total. Here are the filled mounts.
In an hour or two the urethane will take a set, but according to the paperwork it takes two days @ 77 degF for the urethane to reach 85% - 90% of it's final strength and 7 days total for them to be at 100% strength. I'd recommend waiting the full 7 days before re-installing them. If your RX8 is a daily driver you will want to find another set of mounts to fill and cure first rather than have your car down for a week. The threads in the top center of the mount where the engine bracket bolt on top of them tends to get boogered up. It would be best to run a tap through the threads to clean them up and then smear or work some anti-seize on them before re-installing the mounts on the car. You may also want to clean up the threads where the mounts are bolted to the subframe and use anti-seize there as well. I think the factory may use self-locking hardware on these mounting points, which is rough on the threads when everything is unbolted.
good luck.
.
Last edited by TeamRX8; Dec 27, 2011 at 02:36 AM.


Registered
Joined: Oct 2009
Posts: 125
Likes: 2
If you have a rough idle and bad engine mounts, how do you know if the rough idle is due to the bad engine mounts?

Registered
Joined: Oct 2009
Posts: 125
Likes: 2
Ok, that's what I get for believing the Mazda tech blindly..... he said both mounts were leaking but not torn open.
I ordered and received the urethane (ordered one night this week and got next day before lunch- damn).
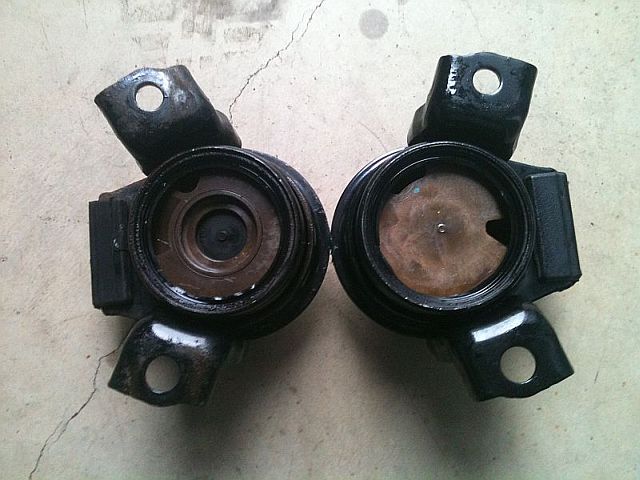
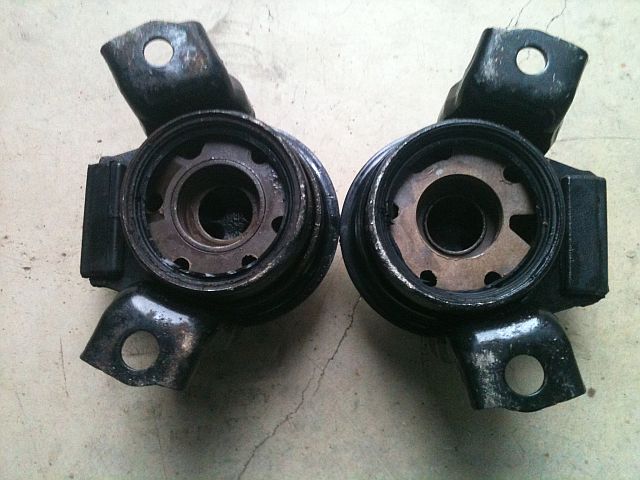
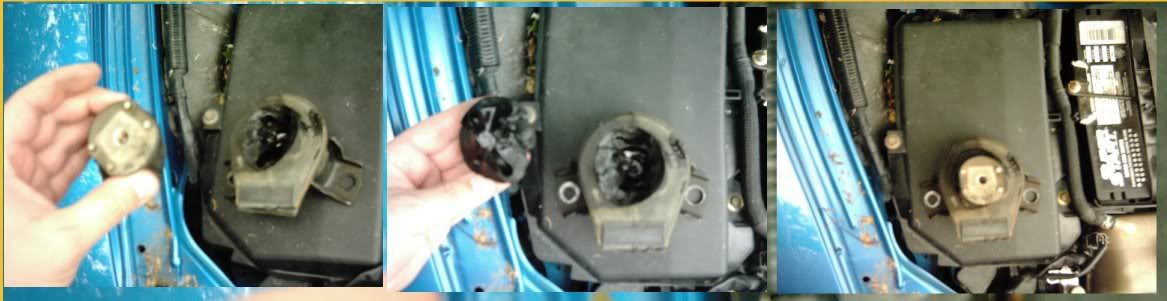
I just pulled the motor mounts and the drivers side is fine- not a leak, while the passenger side had the top tore out in a circle and had just a few ounces of liquid in it. (explains odd rattle noise from that side when pulling out in 1st)
My question- do I buy a new original passenger side and just put it and the original drivers side back in, or can I put the rubber top back together (it tore out in a circle about halfway down from the center mount location) in a way that will keep the urethane from leaking out when I fill it from the back, and use it that way? Or is once the top is torn, this fix won't work. The rubber doesn't seem that strong, so I assume the urethane would hold everything together. Or maybe not. Maybe some type of high heat rubber glue?
And should I cut open the drivers side and fill it with urethane even though it seems fine (no leaks)? With 42k miles on it (early 04 model), it will fail eventually.
Any replies are appreciated since I need to figure out what to do fairly quickly.
I have to have this car back on the road later this week for a trip.
edit- image added.
I ordered and received the urethane (ordered one night this week and got next day before lunch- damn).
I just pulled the motor mounts and the drivers side is fine- not a leak, while the passenger side had the top tore out in a circle and had just a few ounces of liquid in it. (explains odd rattle noise from that side when pulling out in 1st)
My question- do I buy a new original passenger side and just put it and the original drivers side back in, or can I put the rubber top back together (it tore out in a circle about halfway down from the center mount location) in a way that will keep the urethane from leaking out when I fill it from the back, and use it that way? Or is once the top is torn, this fix won't work. The rubber doesn't seem that strong, so I assume the urethane would hold everything together. Or maybe not. Maybe some type of high heat rubber glue?
And should I cut open the drivers side and fill it with urethane even though it seems fine (no leaks)? With 42k miles on it (early 04 model), it will fail eventually.
Any replies are appreciated since I need to figure out what to do fairly quickly.
I have to have this car back on the road later this week for a trip.
edit- image added.
Last edited by BReal-10EC; May 1, 2011 at 01:14 PM. Reason: added image

Registered
Joined: Jul 2009
Posts: 425
Likes: 4
From: Whangarei, New Zealand
Hi There
I was wondering if someone could help me out.
I would like to buy some of this Flexible Urethane ( part 8644K11 ) from Mcmaster.com, but I found after contacting the company that they do not ship out of the US.
So I'm hoping someone would be prepared to help me out by purchasing the Urethane for me and shipping it to New Zealand.
I have a paypal account, so can transfer money into your paypal account.
Any help will be much appreciated.
Please PM me or email me if you can help. Email - miura@ihug.co.nz
Regards
Roger Jones
Rotaman
Registered
Joined: Oct 2009
Posts: 125
Likes: 2
Hi There
I was wondering if someone could help me out.
I would like to buy some of this Flexible Urethane ( part 8644K11 ) from Mcmaster.com, but I found after contacting the company that they do not ship out of the US.
So I'm hoping someone would be prepared to help me out by purchasing the Urethane for me and shipping it to New Zealand.
I have a paypal account, so can transfer money into your paypal account.
Any help will be much appreciated.
Please PM me or email me if you can help. Email - miura@ihug.co.nz
Regards
Roger Jones
Rotaman
I was wondering if someone could help me out.
I would like to buy some of this Flexible Urethane ( part 8644K11 ) from Mcmaster.com, but I found after contacting the company that they do not ship out of the US.
So I'm hoping someone would be prepared to help me out by purchasing the Urethane for me and shipping it to New Zealand.
I have a paypal account, so can transfer money into your paypal account.
Any help will be much appreciated.
Please PM me or email me if you can help. Email - miura@ihug.co.nz
Regards
Roger Jones
Rotaman
Registered
Joined: Jul 2009
Posts: 425
Likes: 4
From: Whangarei, New Zealand
Hi There
Thanks for that offer, but ideally I would like to go with the 80A rather then the 60A, as my car is going to be turbo charged and the 80A looks like it has a higher tensile strength.
Regards
Rotaman
Thanks for that offer, but ideally I would like to go with the 80A rather then the 60A, as my car is going to be turbo charged and the 80A looks like it has a higher tensile strength.
Regards
Rotaman
Registered
Joined: Oct 2009
Posts: 125
Likes: 2
I actually wondered if I should get the 80A myself.
I'd rather deal with some extra engine vibration than have excessive drivetrain slop.
OTOH- I've been in some modified front wheel drive economy cars with solid metal mounts that could shake your fillings out in normal driving.

lol.

Neither USPS nor UPS will transport a private shipment of a "dangerous substance", which the catalyst component in the urethane kit is for the most part.
I suppose you could take the risk and send it without declaring the contents, but the consequence could range from it not arriving to the sender being charged with a crime.
I don't know if FedEX has the same policy, but I imagine it is going to be an expensive proposition to ship this stuff from a private shipper to a private recipient in NZ.
That is only the v4 motor mounts. The previous mounts (sold until 2009, ie - those I was talking about in 2006 above)) didn't have the disk or the second chamber.
That said, the other thing that should be done is to extend the shank of the bolt boss all the way down into the mount, rather than just the upper inch or so that is present on the OE setup. This will decrease the likelihood of the upper pedestal from cracking off.
I suppose you could take the risk and send it without declaring the contents, but the consequence could range from it not arriving to the sender being charged with a crime.
I don't know if FedEX has the same policy, but I imagine it is going to be an expensive proposition to ship this stuff from a private shipper to a private recipient in NZ.
That said, the other thing that should be done is to extend the shank of the bolt boss all the way down into the mount, rather than just the upper inch or so that is present on the OE setup. This will decrease the likelihood of the upper pedestal from cracking off.
Last edited by MazdaManiac; May 1, 2011 at 07:02 PM.
Registered
Joined: Oct 2009
Posts: 125
Likes: 2
Is the revised engine mount bracket just the same exact thing with an extra threaded hole on the side?
I ordered the passenger/right side mount and bracket from finish line/rosenthal mazda, and the new mount works with my 04 RX8 bracket.
So I am sending the "new" bracket back since the only difference I see is that extra threaded hole. I guess the hole is for mounting a heat shield?
I ordered the passenger/right side mount and bracket from finish line/rosenthal mazda, and the new mount works with my 04 RX8 bracket.
So I am sending the "new" bracket back since the only difference I see is that extra threaded hole. I guess the hole is for mounting a heat shield?
http://www.finishlineperformance.com...21-06-1559.pdf