When you click on links to various merchants on this site and make a purchase, this can result in this site earning a commission. Affiliate programs and affiliations include, but are not limited to, the eBay Partner Network.
Where does the hose coming off of your oil feed tube go to? In the previous version mine went from the feed tube to a T fitting that had a filter on the top and another tube that went to the compressor right under the A/W coolant line going into the intercooler. I am actually in the process of changing this hoping to come up with a better solution.
As far as the Kenne Bell blower goes I believe Rote8 has mounted one to his system. I thought I have seen him mention that. Whoever it was said that there was modification needed but I believe it worked out, Let me know how it goes if you do it. Id like a spare compressor someday.
The KB 2.1 is sweet. I am using the big pulley set for 12 psi, I can hit 14 to 16 psi easily, I can hit 18 psi by letting it wind up then adding throttle. (nope, not testing that load level again; but it did not die at 18 psi)
There is no "vent" on the side of the KB 2.1 gear case; you should use the KB vented SC pulley bolt, a hollow bolt. I just leave the dipstick/lid loose....
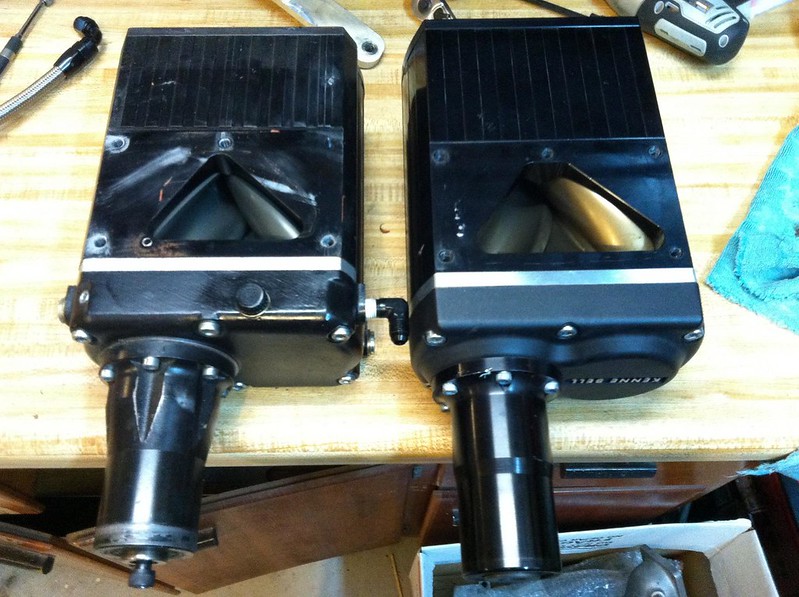
The plate that holds the front of the blower was cut at the "Z" right under the blower to add a half inch height to the plate as the KB blower is taller, longer and wider.
Make sure to re-temper the steel plate after extending it....
The ABS box (with the brake lines still connected) next to the blower was mover closer to the frame by removing the bracket spacer it was on; this made about an inch of space for the wider blower.
The clutch hydraulic line connector on the car's firewall was "massaged" to miss the rear of the blower intake.
The bottom bolt center hole "through hole" of the blower intake, needs about 1/8 inch dremel work to align with the KB 2.1 blower intake threaded center bottom bolt. (or if you want to fill the aluminum of the intake and drill a new hole, mine is working fine with the hole widened slightly)
The braces on the front of the blower, holding the intake and throttle body to the intercooler need to be ground to accept the longer blower.
Update: almost forgot; the Pettit intake sits lower than the IC output for the KB blower, I used white (plastic) 1/2 inch phenolic spacers as it also isolated the heat of the lower intake from the blower side
The hood just about touches the top of the Pettit IC.
My 5 rib SC belf life is measured.....
The Kenne Bell logo is upside down....
The KB 2.1 is sweet. I am using the big pulley set for 12 psi, I can hit 14 to 16 psi easily, I can hit 18 psi by letting it wind up then adding throttle. (nope, not testing that load level again; but it did not die at 18 psi)
There is no "vent" on the side of the KB 2.1 gear case; you should use the KB vented SC pulley bolt, a hollow bolt. I just leave the dipstick/lid loose....
The plate that holds the front of the blower was cut at the "Z" right under the blower to add a half inch height to the plate as the KB blower is taller, longer and wider.
Make sure to re-temper the steel plate after extending it....
The ABS box (with the brake lines still connected) next to the blower was mover closer to the frame by removing the bracket spacer it was on; this made about an inch of space for the wider blower.
The clutch hydraulic line connector on the car's firewall was "massaged" to miss the rear of the blower intake.
The bottom bolt center hole "through hole" of the blower intake, needs about 1/8 inch dremel work to align with the KB 2.1 blower intake threaded center bottom bolt. (or if you want to fill the aluminum of the intake and drill a new hole, mine is working fine with the hole widened slightly)
The braces on the front of the blower, holding the intake and throttle body to the intercooler need to be ground to accept the longer blower.
Update: almost forgot; the Pettit intake sits lower than the IC output for the KB blower, I used white (plastic) 1/2 inch phenolic spacers as it also isolated the heat of the lower intake from the blower side
The hood just about touches the top of the Pettit IC.
My 5 rib SC belf life is measured.....
The Kenne Bell logo is upside down....
My 8 really likes the 2.1 liter blower.
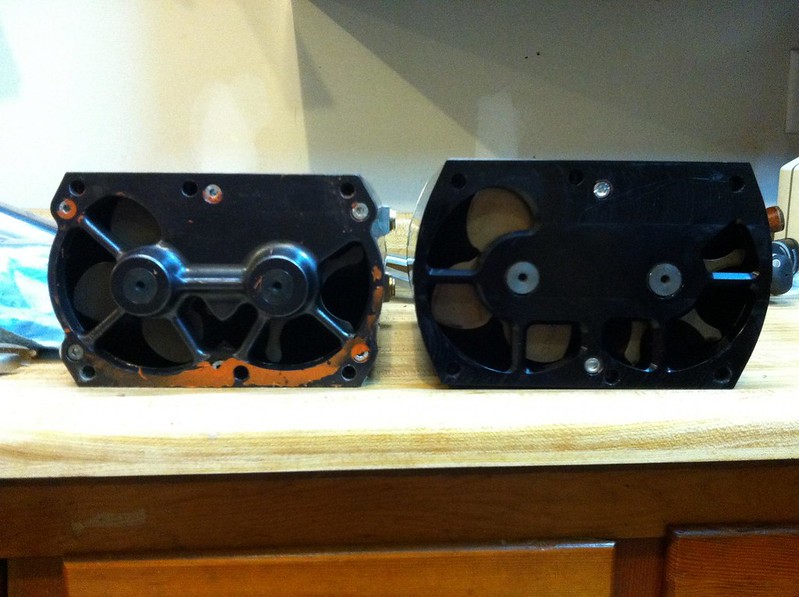
Thanks for all the info on the swap. I bet the 2.1 is a nice power boost. Maybe one day I will make that switch but for now my 1.7 is running really well. What is with all the oil in the first picture?
Has anyone run a catch can from their blower vent? I cant see how oil pushes all the way through the tube since there is not much suction from the outlet but I think I will be adding a catch can with a vent on it so I dont get gear oil coming out under high load.
EDIT: While looking at your picture I noticed I have been running my belt on the opposite side of the tensioner pulley. I can see how your way/how it is in Pettit's instructions is much better. I have not had much belt slippage but I do feel like mine is set a little too tight. I am anxious to see if switching this will lower the force required as the pressure on the e shaft is something I worry about some.
I have a leak on my oil cooler line banjo bolt near the blower, in the front of the block; I will be adding an oil pressure/temp sensor there soon and replace the copper gaskets.
Thanks for all the information there guys, pictures were very useful!
with regards to my leak through the filter I currently have the charger breather going to a connector just behind the filter as per the Pettit fitting instructions.
I think its just the vacuum pulling the oil through at WOT.
Thanks for all the information there guys, pictures were very useful!
with regards to my leak through the filter I currently have the charger breather going to a connector just behind the filter as per the Pettit fitting instructions.
I think its just the vacuum pulling the oil through at WOT.
With it hooked up in that manner I can see it pulling a lot of gear oil through. Where does the hose coming from your oil fill tube go to? The other connector on the Pettit MAF housing?
From what I read these compressors do not need suction but just a vent. I have just a filter on it now. I plan to add a catch can because gear oil still comes up through the filter.
Looking good. Look forward to seeing you the 2.1L supercharger goes. My Hymee kit came with a 2.1 as well. Now in the rebuild process and I will also overhaul the supercharger and make much needed modifications to oiling issues and leaks
Looking good. Look forward to seeing you the 2.1L supercharger goes. My Hymee kit came with a 2.1 as well. Now in the rebuild process and I will also overhaul the supercharger and make much needed modifications to oiling issues and leaks
I will probably hold off on a 2.1 for a while. I have just really started modifying the engine after the SC. My current goal is to get 300whp on the low boost set-up.
The oil spray is one of the first things im working on. I am going to run a dual catch can set up. One for the oil and one for the SC with just a filter attached to the SC can.
This will keep the oil fill how it is from factory and let the SC still breath without oil spray. At least this is what makes sense to me.
I am planning on supercharging my 8. Can anyone please tell me the necessary upgrades and other stuff to be done before installing the supercharger.
BORLA Cat-less Exhaust
MEGAN-RACING Cat-less Mid-pipe
RACINGBEAT Header
NGK Spark Plugs
BHR Spark Wires
BHR Ignition Coils
CPC Long Ram Cold Air Intake
Ralco Racing Pulleys
My mods so far
^agreed, I've spend almost a week of evenings researching spark plugs alone. Seeing ones that fit, the differances between restrictor and non, inductive or CDI ignitions work with them. Heat ranges space out in the housings.
It takes a lot of time and reading to get there. Start by reading this whole thread and you'll just have a decent start. I'm only on page 85 of 213.
I will probably hold off on a 2.1 for a while. I have just really started modifying the engine after the SC. My current goal is to get 300whp on the low boost set-up.
The oil spray is one of the first things im working on. I am going to run a dual catch can set up. One for the oil and one for the SC with just a filter attached to the SC can.
This will keep the oil fill how it is from factory and let the SC still breath without oil spray. At least this is what makes sense to me.
CAI and Larger A/W radiator are next.
RX8inSTL,
What how is your water cooling system setup? Intake temps? Do you monitor temps post cooler, or maybe radiator temps? If you do how much air are you flowing also?
What how is your water cooling system setup? Intake temps? Do you monitor temps post cooler, or maybe radiator temps? If you do how much air are you flowing also?
Right now the only gauges that I am running are my GOODBox gauges. At some point I would like to put a temp gauge on my A/W coolant but just haven't. At the moment my system is stock with regards to the location of the tank and the running of the hose. Soon hopefully I will get my brackets dont for my larger radiator.
Intake temps from my GOODBox are reading 10 degrees above ambient usually.
So you're still pulling temp fromthe MAF? Why are you upgrading the radiator?
Yes. I am upgrading it because for one it should cool better and second I will be moving it up in the area where the OEM crash bar is which should free up some air flow back to the engine coolant radiator. I have the MS bodykit and have removed the crash bar plastic cover. Also I had some money to burn and wanted to try something different.
Checking in on the thread, I'm in the process of installing a "one-off" Pettit kit into my vehicle. Since my -8 is a 2004, and has unfortunately seen some salt in the course of its lifetime, I've got a few maintenance issues to chase while I'm that far into the engine bay. For instance, I have to get after the surface rust / paint blistering on the crossbeam under the battery box / air filter insulator plate. No easy task in the weird weather we're having on the East Coast.
Couple quick questions for all, since this isn't an out of the box Pettit, and I'm working off the original PDF:
1. I've noticed that recent cars in the thread (RX8inSTL, Rote8) have the OEM coolant line hooked up to the throttle body, vs. the Pettit document mod of joining the rear iron outlet to the thermostat housing, bypassing the TB. Any pros / cons to be thrown out?
2. Just verifying the TB doesn't care which way it is 'clocked' on the inlet tube. This inlet clocks the TB with the electrical connector at roughly 2 o'clock, vs 9 o'clock in OEM position.
3. I'll be checking in the DIYs again for the answer, but any tips on getting the coil connector wires out for the harness mod would be appreciated. The photos in the PDF are too grainy to see where the 'tool' (hammered paper clip) get inserted.
This kit has a Kenne Bell 1.7L blower, modified intercooler and modified inlet tube, all of which make it seem low enough that the OEM engine cover might fit once everything is installed. The rest of the goodies that came with this will keep me occupied for awhile (fuel pump upgrade, Ingalls "Stiffy"), might as well change out engine mounts and possibly the oil coolers. The latter appear to be on their way out from impact damage to the cooler fins, and some serious looking corrosion on the piping / connections.
Wiring bundle mod completed (narrow jeweler's screwdrivers FTW), test fit of the SC revealed several fitment problems to be worked around (clutch hose / tube bracket interference, rear inlet mount lug placement / QA issue), working through the vacuum line and coolant reroute. The Pettit PDF contradicts itself in several ways, which led to retries on a couple spots so far. I can see where the owner in C. America got led astray trying to follow the instructions, in regard to the jet air / oil metering pump interconnection. For my own rework, reading "cap unused coolant ports on TB", then seeing in a routing diagram where the 'unused' ports are actually used as a 90 degree air source elbow around the MAF tube... Yeah, I'm having issues.
Ten days of rain and a full-time job haven't helped any, either.
1. I've noticed that recent cars in the thread (RX8inSTL, Rote8) have the OEM coolant line hooked up to the throttle body, vs. the Pettit document mod of joining the rear iron outlet to the thermostat housing, bypassing the TB. Any pros / cons to be thrown out?
The line that is going through my throttle body is no longer a coolant line but is a vacuum source. It can also be hooked directly to the intake tube.
2. Just verifying the TB doesn't care which way it is 'clocked' on the inlet tube. This inlet clocks the TB with the electrical connector at roughly 2 o'clock, vs 9 o'clock in OEM position.
I haven't noticed anything. My kit was already installed when I got it though so that was a big help.
3. I'll be checking in the DIYs again for the answer, but any tips on getting the coil connector wires out for the harness mod would be appreciated. The photos in the PDF are too grainy to see where the 'tool' (hammered paper clip) get inserted.
No help here from me but I hope you get it.
I can try helping more but I am not the most knowledgeable on these forums about this kit. Mine car however is running very well and I have really enjoyed the SC. I have the low boost pulley with the Pettit flash.
No worries! I've spent the past week rereading this hot mess of a thread from beginning to here, and I've got a few ideas on how to get through the rest of the install. Ordered some of the missing hardware from McMaster-Carr (Thanks for the tip, Greg "Rotr8"), now to adjust and adapt.
This kit has been through a couple of hands, but it originated in Moon Assad's 2009 build (see pic below). Based on the photos, the discussions and what I've seen of interference in the engine compartment, I'm starting to suspect this is a larger SC than 1.7L. Having to dismount the clutch line bracket directly behind the intake charge tube, in order to get the SC onto the front plate bolts, that may be a clue.
I suspect when this thing lights up, I'll be in for a ride.
Quick note for those like me, who were unaware that Continental bought out Goodyear's rubber parts (belts, hoses) division, the Gatorback brand is now Continental Elite Poly-V.
The belt part #s mimic Goodyear's, so a 4050330 (like mine) is the same style.
Summit Racing shows a 2-week lead on these, your mileage may vary.
Well, that was stupid, and a bit of a learning experience. First off, don't push your luck on a startup with multiple updates. Second, ALWAYS check connections.
Since technology marches on, what is the preferred method to seal joints along the intake path of the Pettit kit? Permatex #2 and paper cut gaskets didn't hold up to the assault from the first paragraph, so this round might be Form-A-Gasket Grey and forego the paper.
My install adventure has been plugging along, mostly fits and starts due to being in a shade tree mudhole at times. The results are a cross between pro and ghetto. This, I hope is more the former
The intercooler pump is hidden behind the windshield fluid tank to the right side, the plumbing collection to the left is the air/fluid separator, holding about 28 oz of water. Remains to be seen if it can stand the rigors of the job, but it fits the area. I couldn't locate anything off the shelf that had the required outlet size(s), so I threw this together.
RE gasket issue, it's hard to tell from your small description, but if the top of your Pettit unit comes into contact with your tower brace, that could be the cause of your gasket issue. From your pic a few posts up it looks like they're sitting pretty close.
RE gasket issue, it's hard to tell from your small description, but if the top of your Pettit unit comes into contact with your tower brace, that could be the cause of your gasket issue. From your pic a few posts up it looks like they're sitting pretty close.
Thanks, but nothing mechanical caused the issue, it was pure stupidity on my part. Over the course of four months or so of intermittent work trying to get this kit installed, I managed to swap the evap return and fuel pump connections (both 7.5mm and side-by-side). Let's just say I took 'flooded start' to an entirely new level The gaskets were exposed to raw fuel and broke down. The intercooler, intake duct and throttle body have been cleaned up and reassembled using a different sealant.
Yes, the fuel line has been suitably marked.
The earlier photo was from the previous owner's install, I've gone more with the Pettit style of intake tract versus the modified OEM airbox seen there.


 The photos in the PDF are too grainy to see where the 'tool' (hammered paper clip) get inserted.