
DIY: Remove SSV (beta/teaser video)


Rotory4Ever
Joined: Mar 2012
Posts: 3
Likes: 0
From: Jimtown area (Indiana)
Solved my own problem, little embarrassing I must say...but incase anyone else has this happen (see post 275) the solution is quite simple...make sure it's CLEAN, and I mean spotless. I had a small amount of the black buildup along the back seam/corner, just enough to make it very difficult to rotate when bolts were tight. The amount was questionable whether to bother with but as soon as I figured out how to get it all out...smooth as silk.

New Member
Joined: Mar 2012
Posts: 5
Likes: 0
Background- Received the mil for stuck ssv. I used vacuum pump to check the actuator, and it is good. I tried to move the valve by hand and sure enough it was stuck open. I am at a complete loss however after cleaning. Every time I bolt the valve back into the manifold, it won't move. I read the entire thread and have tried everything that I can think of.
I Removed the SSV per the instructions in the video, installed new gasket and then installed clean valve into clean manifold and verified with a snake camera that the manifold was clean.
As soon as I tighten the bolts, the valve is rock solid, and will not budge.
I can loosen the top bolt about a turn or two out and i can start to move it. I can loosen the bottom bolt about a turn or two out and it is smooth as silk. I have verified that the gasket isn't causing the issue.
For testing purposes, I have even added grease to the end of the valve and the same thing happens. There are no burrs or knicks in either the valve or manifold that would be causing issues. I am fairly positive that the shaft isnt bent. Is there something I am missing? Any Ideas?
Thanks
Rotory4Ever
Joined: Mar 2012
Posts: 3
Likes: 0
From: Jimtown area (Indiana)
SSV Issue
Hey mod812, know the feeling...the only thing I can say is what your doing solved my issue. I put a small dab of oil on the very back face and around the post that sticks out. Once all was completely clean, I put it back in carefully and tightened each bolt a little at a time, then rotate the valve by hand, tighten some more, etc. That may be the way you get it, good luck to you! 

long live rotary!
Joined: Jun 2012
Posts: 115
Likes: 1
From: Lake Charles, Louisiana
I am 100% sure that I am the first person to do this. I shot myself in the foot BIG TIME today. I wanted to see if my ssv needed cleaning, so I figured I could loosen the 2 bolts that hold it in and pull out what I could without removing the water pump and thermostat assembly. BIG MISTAKE! the ssv came out a quarter of an inch which was enough to spray some carb cleaner on it. I go to put the thing back in tighten the bolts down and it is STUCK! good. Whats funny is that it actuated before I took a look at it. Guess I am going to have to go the whole cleaning process next go round.
long live rotary!
Joined: Jun 2012
Posts: 115
Likes: 1
From: Lake Charles, Louisiana
I went through with cleaning mine, what I did when I went to put mine back in is put a little bit of new 5w-20 engine oil directly on the valve. When I got the valve in place and tighten the bolts it moved smooth as BUTTER lol.

long live rotary!
Joined: Jun 2012
Posts: 115
Likes: 1
From: Lake Charles, Louisiana
you can get to it with your hand, it is just going to be a tight squeeze. When I go to move mine by hand, I use a really long screwdriver to move it.

New Member
Joined: Oct 2013
Posts: 1
Likes: 0
From: Ft. Campbell , KY
Thank you for the detailed diy. Much appreciated.
However, i didnt do something right. Ever since, my RX8 has been overheating at idle; but only if it idles..
I now have to replace the flywheel, so I was considering just redoing this procedure while it is up and out of commision. Any ideas?
Cant find the clutch/flywheel replacement link i found when i did my clutch replacement 4 monthes ago so a link for that would be appreciated as well..

Registered
Joined: Nov 2011
Posts: 42
Likes: 8
Hi,
First, I have to say that I found the video and the test procedure very helpful.
Last fall, I experienced a SSV CEL code and it disappeared. I stored the car for the winter, until two weeks ago and the CEL came back again, so I decided to do the vacuum test procedure. Under test, the valve seems to have some hesitation but not that much. I decided to do also the solenoid test procedure (I had to remove the upper intake manifold with the funny bolts at the rear). The solenoid works as it should be. I tested the 3 solenoids. So, after reassembled the UIM, I decided to go ahead with the SSV removal/cleaning procedure. I managed to follow the video procedure up to 2:31. I can�t remove the thermostat unless I bend the hard pipe a lot. I removed the front passenger wheel and I can see the hard pipe bolt but they are very rusty. I have not tried to remove it yet because I am afraid of breaking it. Do you recommend using the impact wrench? Is it safer to bend the hard pipe or to remove it? Should I replace the thermostat too at the same time? My car has 60K miles, but the engine was replaced at 35K.

Your already ripping it apart might as well replace it. spray the area with wd40 wait about an hour and remove the hard pipe. Dont bend it out of the way. If you use the impact wrench 1 of 2 things will happen. 1- the nuts come off no problem. 2- you snap it immediately. Personally i use the impact gun seeing as i've had a WHOLE lot of good luck with it. Your choice.
Registered
Joined: Nov 2011
Posts: 42
Likes: 8
I managed to remove the hard pipe without any troubles. I sprayed �loose nut� and I waited 1 hour.
After removing the thermostat housing, I tried the SSV valve and it move very freely. But when I looked at the switch connector, it looked suspicious, see the picture. The connector has electric tape around it. My engine was replaced in the past, so I thing that the mechanic does had a hard time with this connector. I will not remove the SSV since it appears to be in very good shape. However, I will repair the electrical connector and test it in place.
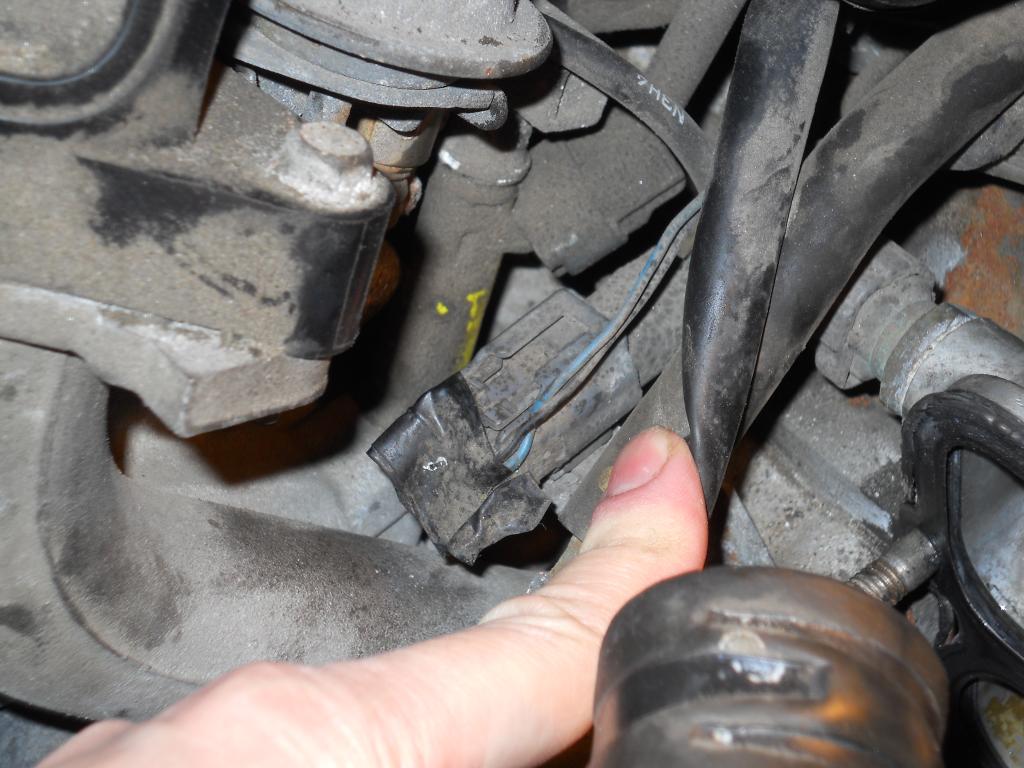
After removing the thermostat housing, I tried the SSV valve and it move very freely. But when I looked at the switch connector, it looked suspicious, see the picture. The connector has electric tape around it. My engine was replaced in the past, so I thing that the mechanic does had a hard time with this connector. I will not remove the SSV since it appears to be in very good shape. However, I will repair the electrical connector and test it in place.

Registered
Joined: Nov 2011
Posts: 42
Likes: 8
Since I had done 99% of the job, I decided to remove the SSV. Here the pictures before and after:
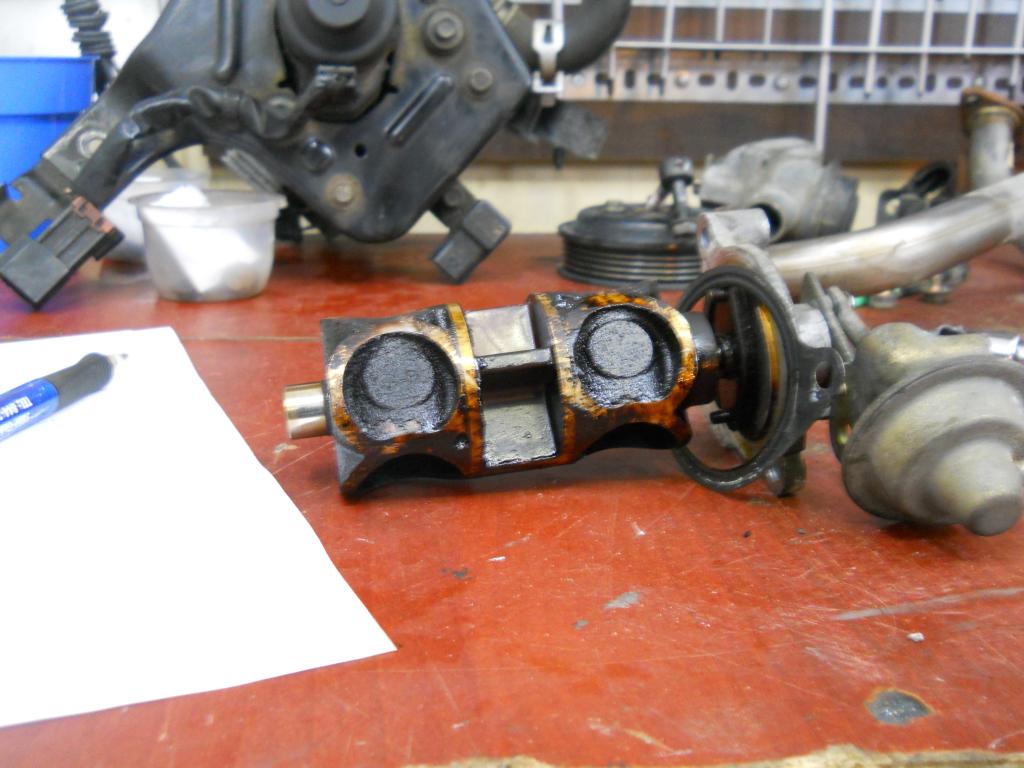
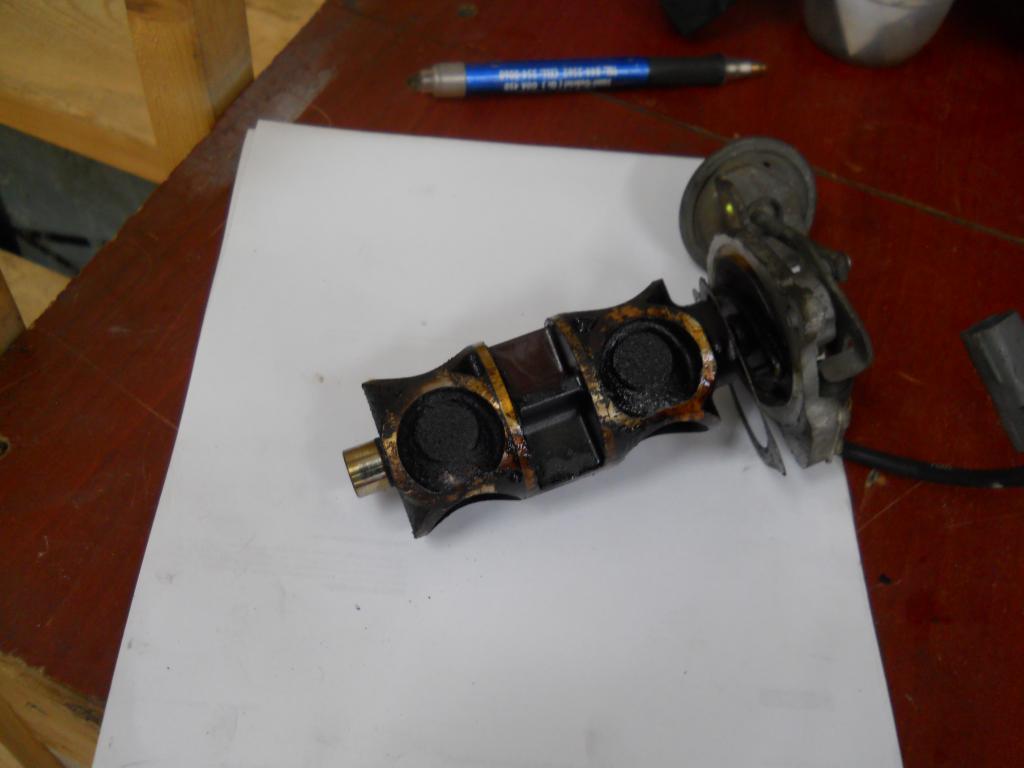
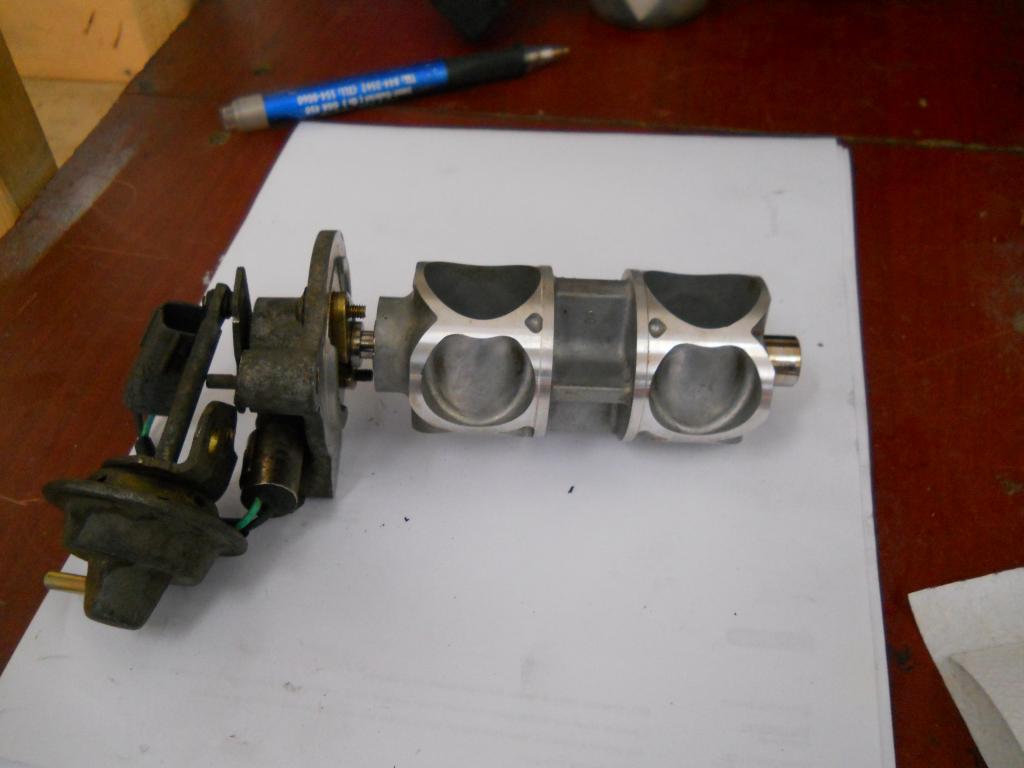
I had to spray a small amount of carb cleaner into the housing to clean everything. I am hoping that my in engine is not flooded.


I had to spray a small amount of carb cleaner into the housing to clean everything. I am hoping that my in engine is not flooded.
long live rotary!
Joined: Jun 2012
Posts: 115
Likes: 1
From: Lake Charles, Louisiana
when I had cleaned mine, that's all I did was spray carb cleaner in the intake where the ssv goes. I did put some shop towels in the holes leading into the housings to soak it up though. Mine started up just fine.

Retired and bored
Joined: Mar 2011
Posts: 56
Likes: 1
From: Pensacola FL
well i was replacing the Tsat and water pump with remedy upgrade, and since I was there i figure it was as good a time as any to go ahead and pull the UIM and runners and SSV for a good cleaning. It wasn't the hardest jobs I've done but holy **** was there a lot to remove. Background on the SSV 2005 MT with right at 81k on the OD man was it cruddy. Here are a few pics, the fun stuff starts tomarrow..... Putting it all back together.
Background on the SSV 2005 MT with right at 81k on the OD man was it cruddy. Here are a few pics, the fun stuff starts tomarrow..... Putting it all back together.
long live rotary!
Joined: Jun 2012
Posts: 115
Likes: 1
From: Lake Charles, Louisiana
yep that was about what mine looked like, my 8 was at 60k miles 2007 AT. I did not take off the UIM but when I went to clean my ssv it took about 5 hours for the whole project for me, really an hour of that was cleaning the ssv and the socket it goes in.
Retired and bored
Joined: Mar 2011
Posts: 56
Likes: 1
From: Pensacola FL
Well I got mine all back together last night, takes me a little longer than most I would say. I am a wounded vet with bad knees and a bad back, so being hunched over really did a number on me. I broke it down into a 3 day job. UIM, runner, front bumper and air filter one day. Day 2 was disassembly. Day 3 was reassembly. And as soon as I get my new air filter in from K&N in the next day or two will be the rad flush and reinstall of the front bumper. Glad I am retired and I don't drive my car much anymore. Lol. Oh and yeah the SSV socket was the worst part of cleaning this thing since I have huge monkey hands. Not being racist but damn I wish I had little Asian hands sometimes. Not these big polish mitts.
long live rotary!
Joined: Jun 2012
Posts: 115
Likes: 1
From: Lake Charles, Louisiana
I say you did it more right then me really, I had 1 day before my college semester started. As my 8 for a daily driver I had to fix what I messed up with the ssv the day before :/. So I was a bit of on a time crunch, and the K&N drop in filter is ok. I notice a small difference in my AT with it. lol on another note though that's what I want to be doing later on in life is to just work on and fix up cars ha.
Also thanks for your service, it is much appreciated!
Retired and bored
Joined: Mar 2011
Posts: 56
Likes: 1
From: Pensacola FL
I say you did it more right then me really, I had 1 day before my college semester started. As my 8 for a daily driver I had to fix what I messed up with the ssv the day before :/. So I was a bit of on a time crunch, and the K&N drop in filter is ok. I notice a small difference in my AT with it. lol on another note though that's what I want to be doing later on in life is to just work on and fix up cars ha.
Also thanks for your service, it is much appreciated!
Also thanks for your service, it is much appreciated!
And you are more than welcome, and thank you for saying so. We don't get it much any more, and to be honest that's all we really need some time it just a thank you.

This is an extremely helpful post, props to the OP.
I just had this CEL when taking my 8 out of storage for the summer. After some driving it went away and hasn't come back on, but I know it's only a matter of time now until I need to rip out half of the engine bay and fix this.
I just had this CEL when taking my 8 out of storage for the summer. After some driving it went away and hasn't come back on, but I know it's only a matter of time now until I need to rip out half of the engine bay and fix this.
If your actually mechanically inclined and you take a step back and look at the whole procedure. It really ISN"T a whole lot that you have to remove. Think about it, 80% of us DO NOT have the air pump. Therefore the hard line, the pump and all the other little bits that go with it are already removed. Yea it's a whole lot of coolant lines but really thats it. Is it time consuming, yes but do you enjoy what your doing? If so then shut up sit back drink a beer and continue. If not, then mabye you shouldn't be doing it in the first place. Just sayin

Registered
Joined: Jun 2013
Posts: 321
Likes: 0
SSV Ticking
This video is awesome. I'm about to do this but I thought I'd ask here before I start.
I have a 2007 AT and my SSV ticks only when the engine is warm, AC on and in Drive or Reverse. In other words, it only ticks loudly when the RPM drops, say around 810 RPM. When in Park or Neutral (900RPM) it doesn't tick loudly. It's there, but you can't hear it unless you listen to it carefully. The lower the RPM, the louder it gets. Rev it and it goes away. Comes back when it idles.
Would cleaning this really make it go way? I've read that people who have cleaned their SSVs that doesn't tick, start ticking AFTER they've cleaned it


The reason they tick is because the actuation arm becomes loose on the assembly shaft and the valve fluctuating back & forth causes the shaft to do the same thing. The noise is the shaft slapping back and forth in the loose arm hole.