
DIY: No Heat? Repair the Heater Control


Registered User
Joined: Dec 2007
Posts: 1
Likes: 0
From: Milpitas
diagnostic inputs through radio
I was wondering if it is posible to do those checks with an after market radio. I'd hate to go though the trouble of installing the factory radio just to do some tests.
tests
RX-8 Diagnostic Inputs / Outputs
radio i have
JVC Mobile Entertainment \ KW-NT300 - KW-NT300 \ Introduction
tests
RX-8 Diagnostic Inputs / Outputs
radio i have
JVC Mobile Entertainment \ KW-NT300 - KW-NT300 \ Introduction


Registered User
Joined: Feb 2008
Posts: 3
Likes: 0
Thanks, Had the exact same issue
Took about 3 hours for me. Like everyone says, the bolt under the steering colum was the hardest to find. I actually had to search youtube and found a video of someone showing where the bolt was. Other than that, just be careful not to scratch anything.
This was very informative and very helpful. Even know texas only has like 1 cold month per year, it was worth the 3 hours to fix the problem.
Not even sure if the OP has an rx8 anymore, but 2013 says thanx!
This was very informative and very helpful. Even know texas only has like 1 cold month per year, it was worth the 3 hours to fix the problem.
Not even sure if the OP has an rx8 anymore, but 2013 says thanx!

Sucks Gas and Hauls Ass!
Joined: Apr 2010
Posts: 98
Likes: 0
From: SD
I have been trying at the simple diagnostic for about 20 min and cannot for the life of me get the "A/C/TEMP" to pop up. Yes i am holding down the power and scan up button. the one on right side, no not the seek button on the left side. Can someone please help me in any way possible.
Saving Up to Be Broke
Joined: Jul 2011
Posts: 120
Likes: 0
From: Tampa,FL
Turn the radio on first, then press the button again leaving your finger on it and after press up in the scanner. It should tell you right away and twist the **** to know if it works. I hope I was able to help you. Good luck.


Registered User
Joined: Jan 2012
Posts: 5
Likes: 0
From: Johnson City, TN
RadioShack has a nice $10 soldering kit. It comes with everything you will need including a little bit of solder. Yes, I would recommend adding solder to it cause my terminals were almost bare. I think mine was missed from factory. GL

Registered User
Joined: Mar 2013
Posts: 1
Likes: 0
Thank you Wingnut!
Thank you. I had no idea there were people like you out there in the world. Your post saved me so much time and money. The man in my life I talked into fixing my car said your instructions were spot on. There is no way we would ever have found the screw on the side of the radio without you.
You are the best!
You are the best!

Registered User
Joined: Nov 2012
Posts: 1
Likes: 0
My father-in-law and myself followed the steps and was able to get the heat working just before it got cold. And then, I moved to south Florida only to find that apparently the cold air doesn't work now. I have a general idea of how to do it, because of last time, hopefully I can figure it out this time. I'm not mechanically inclined in regard to vehicles though.

Registered
Joined: Aug 2011
Posts: 33
Likes: 0
i need to go out and buy a soldering kit for this lol. few quick questions. For one my **** for controlling the temp can completely spin all the way around which i know isnt right lol. I used to have increments of heat where it would kick in for a few minutes and go out again. I also tried holding the power and scan button and nothing would come up. If someone could please help me out i would greatly appreciate it. I would prefer a PM if you can help! Thanks Justin. Living in NJ and driving to work everyday in a freezing car SUCKS!
 .
.

New Member
Joined: Apr 2013
Posts: 4
Likes: 0
I did this earlier today, but it did not fix my heater control 
The steps cycle between 13 and 16, sometimes taking 3-4 clicks to increment the number. Is it possible the pot itself is failed? Anyone know what the Ohm range is on this pot?
The steps cycle between 13 and 16, sometimes taking 3-4 clicks to increment the number. Is it possible the pot itself is failed? Anyone know what the Ohm range is on this pot?

Registered
Joined: Dec 2006
Posts: 14
Likes: 1
Did not work for me...
I did everything as posted but still getting only cold air. Let me tell the story though.
My 8 is a 07 base manual and it only has 32,000 miles. I was stationed in Japan for 4 years and the car was in storage, that's why the low mileage. I have an aftermarket radio with the metra kit installed by a professional. The kit is version 2.0 so everything works flawlessly (the kit was installed over 4 months ago and never had an issue). I just picked the car up from the body shop. The body shop only disconnected the negative terminal as far as I know. Driving from San Antonio to Killeen (about 2 hours) I tried to adjust the climate to a comfort temperature when eventually I noticed that the heater was not working at all.
Like I said before, I did all the steps as described but to be honest I don't know if I applied too much solder. Or if is even right. I will probably try it again next weekend. Any suggestions, I will appreciate the help??? I cant do the diagnose because I don't have the stock radio.
My 8 is a 07 base manual and it only has 32,000 miles. I was stationed in Japan for 4 years and the car was in storage, that's why the low mileage. I have an aftermarket radio with the metra kit installed by a professional. The kit is version 2.0 so everything works flawlessly (the kit was installed over 4 months ago and never had an issue). I just picked the car up from the body shop. The body shop only disconnected the negative terminal as far as I know. Driving from San Antonio to Killeen (about 2 hours) I tried to adjust the climate to a comfort temperature when eventually I noticed that the heater was not working at all.
Like I said before, I did all the steps as described but to be honest I don't know if I applied too much solder. Or if is even right. I will probably try it again next weekend. Any suggestions, I will appreciate the help???
I cant do the diagnose because I don't have the stock radio.

Crystal
Joined: Nov 2011
Posts: 15
Likes: 0
From: Virginia Beach
Thanks to all!
Cannot thank y'all enough for these handy posts! I am another unfortunate victim of the infamous ac unit. Mine blows hot and sporadic cold. Naturally the AC control unit was not covered on my warranty and the Mazda dealer wanted $700+ to fix it....right 
Anyway, very thankful for y'all and hope to fix this soon!
Anyway, very thankful for y'all and hope to fix this soon!

learning
Joined: Apr 2007
Posts: 56
Likes: 0
From: Jacksonville, FL
jesus this forum is awesome...this DIY took most of my afternoon, but wasn't hard to do and now i finally can control my temperature again...i feel like i just bought a new car
also did the MP3 input mod since I was taking the radio out, now I can plug in my ipod
also did the MP3 input mod since I was taking the radio out, now I can plug in my ipod

New Member
Joined: Apr 2012
Posts: 1
Likes: 0
No heat and only cooling, or only heat and no cooling, or erratic temperature control?
The temperature control **** seems to have quite a bit of issues for early RX8 owners where the system will cool only, and not provide heat despite the position of the control ****. This can also work in the opposite way, only heating and no cooling. After living with it for a season, I finally pulled the heater control unit out and repaired the circuit board. It was simple to repair and because I was going to have to pull the unit out anyway to replace it, it was not much extra work. The replacement unit (part FE01-61-190) retails for $350, some vendors on this site sell it for $240ish, and I hear there are some that sell used parts for $125ish. It is definitely covered under warranty for those lucky enough to be under warranty.
If you do not have heat, or only have heat, IMHO it is most likey the AC/heater control unit. This is the part which has the AC/heat control buttons and *****.
Easy Diagnosis:
The easiest way to verify this is to turn on the radio, press and hold the power on/off button and press and hold the scan-up button for a second (full second). The word "A/C TEMP" should appear on the left of the display and a number from 0 to 16 on the right. I suspect yours will have the number 0 (or 16 if heating only problem) displayed no matter where you turn the temperature control ****. If this is the case you could turn the temp. **** to full heat and see if it goes to 16 after pushing down or to the right on the ****.
In a working system, the number moves evenly in increments of 1, from 0 to 16 as you turn the temperature ****.
Easy Fix:
I was able to take mine out and solder 3 loose connections to fix it.
The beginning steps are the same as for any radio removal procedure. Instead of reinventing the wheel I would like to direct anyone to John Masone�s excellent DIY for radio removal at this DIY:
DIY: Radio Removal / Add an AUX Input - RX8Club.com
or directly linked here:
WhatsMyIP.org | iPod RX-8 | Overview
The procedure is basically the same until page 7, second frame. Here is the modified step at that phase:

Removal of Heater Control Unit
I did not take pictures of the next step which is basically removing the cover on the temperature **** side of the control which requires a small screwdriver to three plastic clips on the perimeter of the cover. This will be evident when you get it in front of you. I stripped the circuit board down further than you may need to because I was also repairing cracked defrost (windshield and rear) buttons with superglue.
Then re-solder the 3 joints indicated in the next photos. A little bit of heat and just a little extra solder and they should be good to go.

Front of Heater Control Circuit Board

Front of Temperature Control **** (3 connections noted)
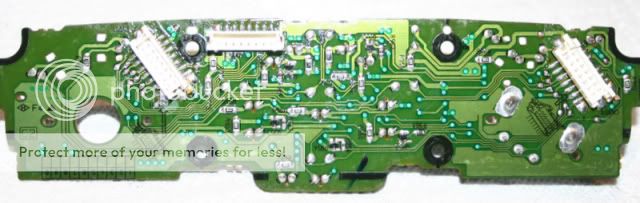
Back of Heater Control Circuit Board

Back of Heater Control ****

3 Bad Solder Joints (Note cracks) Prior to Re-soldering
I did the power-button/up scan combination to get the head unit to display the dial position and it now travels even increments from 0 to 16, instead of jumping from 0 to 16 when pushed like before. And the temperature control works perfectly.
Good luck.
The temperature control **** seems to have quite a bit of issues for early RX8 owners where the system will cool only, and not provide heat despite the position of the control ****. This can also work in the opposite way, only heating and no cooling. After living with it for a season, I finally pulled the heater control unit out and repaired the circuit board. It was simple to repair and because I was going to have to pull the unit out anyway to replace it, it was not much extra work. The replacement unit (part FE01-61-190) retails for $350, some vendors on this site sell it for $240ish, and I hear there are some that sell used parts for $125ish. It is definitely covered under warranty for those lucky enough to be under warranty.
If you do not have heat, or only have heat, IMHO it is most likey the AC/heater control unit. This is the part which has the AC/heat control buttons and *****.
Easy Diagnosis:
The easiest way to verify this is to turn on the radio, press and hold the power on/off button and press and hold the scan-up button for a second (full second). The word "A/C TEMP" should appear on the left of the display and a number from 0 to 16 on the right. I suspect yours will have the number 0 (or 16 if heating only problem) displayed no matter where you turn the temperature control ****. If this is the case you could turn the temp. **** to full heat and see if it goes to 16 after pushing down or to the right on the ****.
In a working system, the number moves evenly in increments of 1, from 0 to 16 as you turn the temperature ****.
Easy Fix:
I was able to take mine out and solder 3 loose connections to fix it.
The beginning steps are the same as for any radio removal procedure. Instead of reinventing the wheel I would like to direct anyone to John Masone�s excellent DIY for radio removal at this DIY:
DIY: Radio Removal / Add an AUX Input - RX8Club.com
or directly linked here:
WhatsMyIP.org | iPod RX-8 | Overview
The procedure is basically the same until page 7, second frame. Here is the modified step at that phase:
Removal of Heater Control Unit
I did not take pictures of the next step which is basically removing the cover on the temperature **** side of the control which requires a small screwdriver to three plastic clips on the perimeter of the cover. This will be evident when you get it in front of you. I stripped the circuit board down further than you may need to because I was also repairing cracked defrost (windshield and rear) buttons with superglue.
Then re-solder the 3 joints indicated in the next photos. A little bit of heat and just a little extra solder and they should be good to go.
Front of Heater Control Circuit Board
Front of Temperature Control **** (3 connections noted)
Back of Heater Control Circuit Board
Back of Heater Control ****
3 Bad Solder Joints (Note cracks) Prior to Re-soldering
I did the power-button/up scan combination to get the head unit to display the dial position and it now travels even increments from 0 to 16, instead of jumping from 0 to 16 when pushed like before. And the temperature control works perfectly.
Good luck.
So all I do is add solder to those 3 joints?

Registered
iTrader: (4)
Joined: Aug 2004
Posts: 12,255
Likes: 8
From: Buddhist Monastery, High Himalaya Mtns. of Tibet

New Member
Joined: May 2009
Posts: 5
Likes: 0
From: Westlake Village, CA
Major problem after this DIY--Need help!
So I did this resolder on my 2004 (58,000 miles) and was very optimistic that it would fix the problem with my temperature control, but after I put everything back together the only thing that still works is the fan control and the hazard light switch...no radio, no A/C, no heat, no display. I took everything apart a second time and double-checked all the connections, but still got the same result. I checked all the fuzes inside and the appropriate ones in the engine compartment, but all the fuzes were fine. I disconnected the battery for a few minutes, but that didn't help either. I suspect that one of the connectors that plugs into the back of the radio got damaged somehow during removal. I think the one next to the antenna cable was the most difficult to remove, so I think it might be the culprit. I need to figure out what that connector is supposed to do to determine if the symptoms make sense. Then I need to figure out how to test it and repair it. I have a multimeter. Obviously I'm not anxious to pay the dealer $1,000 or more to fix this. Any help would be greatly appreciated.
Scott
Scott
New Member
Joined: May 2009
Posts: 5
Likes: 0
From: Westlake Village, CA
Whoo! I got it fixed, thanks to this post in the troubleshooting forum: https://www.rx8club.com/series-i-tro...utions-209383/
Here's what happened...When I removed the head unit, I saw an empty hole where I thought the hidden bolt should be, so I assumed that I had not replaced that bolt years ago when I installed a GROM AUX input for my MP3 player. On that assumption I proceeded to try to pry the head unit out. Eventually I realized my mistake, found and removed the hidden bolt, and out popped the head unit. But I didn't realize that I had bent the brackets on the left side of the radio where the face plate bolts on.
So the solution was to remove the face plate, straighten the bent brackets on the left side only with vice grip pliers, then make certain to place the face plate back on carefully so that the two built-in connectors seat properly onto the radio, and tighten the four bolts down firmly. I was able to do all that without unplugging any connectors from the back of the radio or from the ashtray, which saved a lot of time and pain and suffering. The only connector I had to remove was the one on the driver's side that attaches to the face plate.
Oh, and the temperature control now works like new again.

I did this today and a friend did the soldering (THANK GOD!). The removal of head unit is a pain but well worth the hassle to avoid spending $$$. It works great! Awesome DIY, thanks so much!
Crystal
Joined: Nov 2011
Posts: 15
Likes: 0
From: Virginia Beach
Ruizmc,
The key to determining the success or failure of the original unit, repaired unit, or refurbished is the Power-On/Up-Scan diagnosis at the beginning of the thread. If the unit passes this test then the problem is most likely elsewhere. I would recheck every connector first. I would suggest looking into the blend door actuator. I have read elsewhere on the forum that it is under the center console and can be observed from under the driver side and should move with the control ****. Good luck.
The key to determining the success or failure of the original unit, repaired unit, or refurbished is the Power-On/Up-Scan diagnosis at the beginning of the thread. If the unit passes this test then the problem is most likely elsewhere. I would recheck every connector first. I would suggest looking into the blend door actuator. I have read elsewhere on the forum that it is under the center console and can be observed from under the driver side and should move with the control ****. Good luck.
 I've read a lot of threads on this problem. Took mine to the dealer at first because I do have a warranty, naturally it is like the one thing not covered on mine.
If this is possible, how do you do this diagnostics check with an aftermarket radio? It was installed when I bought it. I'm getting ready to dig into my dash tomorrow. I'm sure it's the same problem as everyone else's I've read about. Mine blows hot typically....which sucks when you live in Virginia Beach and its almost 100 degrees. I've read a lot of threads on this problem. Took mine to the dealer at first because I do have a warranty, naturally it is like the one thing not covered on mine.
I've read a lot of threads on this problem. Took mine to the dealer at first because I do have a warranty, naturally it is like the one thing not covered on mine. 