
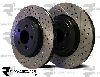
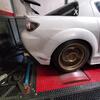
DIY: How to change your rear brake pads.


The only thing I will add is that you'll probably find the two Phillips head screws on each of the front rotors to be very difficult to remove. But an inexpensive hand impact driver will handle them in short order. When replacing, use some anti-seize paste on their threads (but of course Not on the wheel lugs).
Impact driver: http://www.harborfreight.com/cpi/cta...emnumber=37530
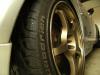
The rear rotors are just held on by the wheel lugs.
Impact driver: http://www.harborfreight.com/cpi/cta...emnumber=37530
The rear rotors are just held on by the wheel lugs.


Just did my rear brakes today and had a bit of trouble in lining up the +, eventually i got it on but the top caliper was really snug and i had to use some force to get it on.
Is it possible to have everything reassembled and the nipple in the correct location and it be too tight? as in not enough clearance...? Ive only driven it a few miles and i ddnt really notice any problems but my rotor is starting to turn a bit brown...
Is it possible to have everything reassembled and the nipple in the correct location and it be too tight? as in not enough clearance...? Ive only driven it a few miles and i ddnt really notice any problems but my rotor is starting to turn a bit brown...

If your not experiencing any issues that might be just the transfer material from the brake pad during your initial break in or "bedding in" time. Have you heard of the procedure? The brake bedding in procedure is somewhere on this site I'm sure you'll find it if you search.
The pads drag a minor amount when properly assembled and do require a bit of caliper force. After all, they're new, full thickness, pads.
btw: Did you bed-in your new pads?
btw: Did you bed-in your new pads?

Pew Pew
Joined: Apr 2008
Posts: 74
Likes: 0
From: New Hope MN,
i am in the middle of doing my rear pads..... and for the life of me the piston will not turn in.... Ive been turning it clockwise for about a hour with some needle nose pliers. please help for i am about out of ideas. thanks in advance

Loosen the brake fluid reservoir cap. Push the piston inwards as you're turning it clockwise. If you're having this much difficulty by now, you may as well spend the ~$10 for the piston key tool (assuming you have an alternate mode of transportation).
Pew Pew
Joined: Apr 2008
Posts: 74
Likes: 0
From: New Hope MN,
yes brake fluid cap is open. i am giving up until tomorrow to go get a tool... thanks for the quick response.


Alright, I'm on my driver's rear side doing the pad change, and I'm turning the piston, maybe 60 1/4th rotations so far, or ~15 full rotations, and I swear the piston hasn't gotten any farther back. Does it just have insanely tight thread pitch?
Ok, they are farther back than they were, I put the old pads on just to check to see if I made any progress, and I have. But when compared with the new pads, it is still just to the edge of the backing, not past it yet, and it's not going back any further. Rotating plenty, but not going back. Even with pressure. Brake fluid cap is off (well, off, then I set it back on top, not threaded or anything, just to keep junk from floating in).
Can't figure out why. Still maybe 1/4th of an inch to go before it's flush with the caliper. OEM pads from Mazmart....
Can't figure out why. Still maybe 1/4th of an inch to go before it's flush with the caliper. OEM pads from Mazmart....


Registered User
Joined: Sep 2010
Posts: 31
Likes: 0
I just did this tonight. When I put the new pads in place, I could not get the caliper to fit when the anti-rattle clips in place. I had to leave them out for now and I'll put them in after about 5,000 miles when the brakes have worn down a little to give extra room.
The rear driver's brake piston would not compress past a certain point. I had to loosen it all the way and then start over with the clockwise/compress to get it all the way down.
The rear driver's brake piston would not compress past a certain point. I had to loosen it all the way and then start over with the clockwise/compress to get it all the way down.
Also remember, your initial step should be extracting at least 15 cc's of the brake fluid from the reservoir to prevent overflow before installing new brake pads. As we all know, brake fluid is damaging to paint.
Last edited by Grace_Excel; Oct 19, 2010 at 02:24 PM.
Super Moderator
Joined: Apr 2005
Posts: 10,880
Likes: 339
From: Australia
Wouldn't is be much "easier" if one cracks off (opens) the Bleeder Nipple on Caliper?..
Yes, you have to catch Brake Fluid at Caliper.
Yes, you have to bleed system at finish.
BTW: this side of the world we call them G Clamps, not C.
Yes, you have to catch Brake Fluid at Caliper.
Yes, you have to bleed system at finish.
BTW: this side of the world we call them G Clamps, not C.
That would have been my initial, but I went ahead and tried using the "G-Clamp", as you would say. Eventually, when it loosed, I could turn the piston itself with both of my index and thumb fingers to clear the new pads.
Do any of you know how to adjust the lines for the E-brake? I parked my car on our inclined driveway, pulled the E-brake (gear's in neutral) as I normally have; came out half-an-hour later and my car's on the street! For some odd reason, I have to really pull the E-brake back.
Do any of you know how to adjust the lines for the E-brake? I parked my car on our inclined driveway, pulled the E-brake (gear's in neutral) as I normally have; came out half-an-hour later and my car's on the street! For some odd reason, I have to really pull the E-brake back.
Last edited by Grace_Excel; Oct 19, 2010 at 09:27 PM.
^ oh come on now; installing new pads is not really very difficult at all.
Contorting/inverting oneself to install the clutch pedal with reinforcing bracket is a major league PITA tho'.
Contorting/inverting oneself to install the clutch pedal with reinforcing bracket is a major league PITA tho'.
True, specially removing the top nut on the bracket. You'd have to use an extended 12mm socket, swivel head, and possibly an extension.
just changed my break pads as my rear pads were worn down. i might say great DIY! i must note though (im not sure if it has already been noted), some breaks with shims/spacers/backplates already on they might make fitment too tight, its best to remove them or you could damage your breaks/rotor.