
My RX8 Build/Progress Thread


Thread Starter
Registered
Joined: Sep 2011
Posts: 81
Likes: 3
From: Lackawanna NY
Actually, I paid for most of this by selling off the huge collection of Fiero and VW parts that I have been amassing for the past decade. I've probably sold around $2500-$3000 in parts and all that was turned directly into RX8 parts.
As an added bonus, I once again have a clean and spacious garage haha.

Thread Starter
Registered
Joined: Sep 2011
Posts: 81
Likes: 3
From: Lackawanna NY
So I have been up to a bunch of work on my RX8 over the past couple of weeks.
First off, I installed my Corksport LED lighting kit. All the interior, trunk, and rear license plate lights installed nice and east with no issues. The running lights located in the headlights were another story.
First off, unless you have the hands of a 5-year-old, you are not going to get to the passenger side running light without taking a bunch of stuff apart. I was able to get to the driver's side light, but I didn't install the light hard enough and it popped out into the lense.
At this point I conceded defeat and decided to pull of the front cover off so I could just pull out the headlight assemblies to install the LED's.
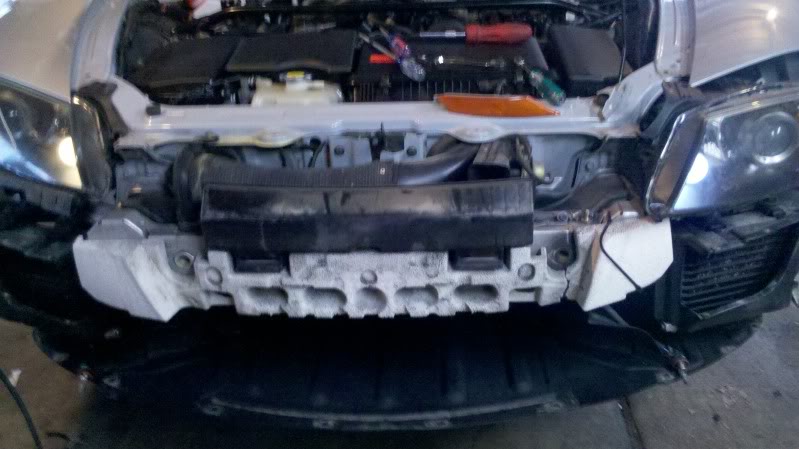
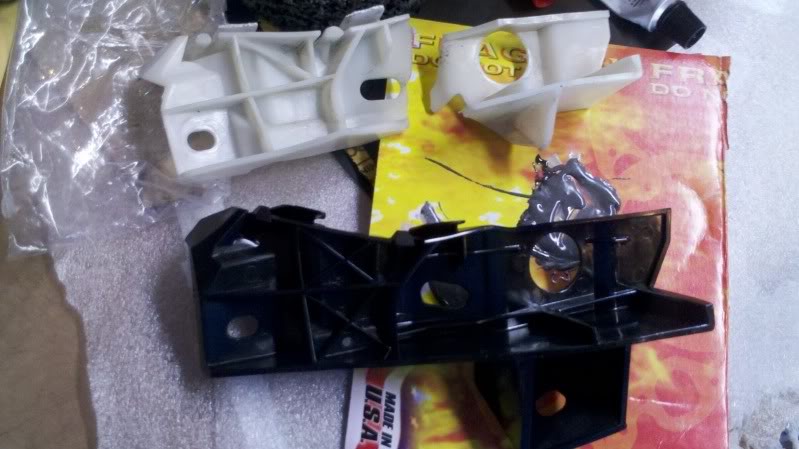
While pulling the front cover, I also found out the extent of the damage to the driver's side of the front bumper. I knew that some things were broken there as my side indicator didn't work and shook around and also the lower-lip wasn't securely attached. None of this was major, but I found it quite annoying.
So besides the new LED's, here's some other things I had to fix:
-The side-lamp bulb socket and connector were so corroded that I had to cut off the whole thing and I installed a new connector and socket from some parts pulled out of the junkyard
-The front cover was broken into 3 pieces at the upper fender mounting point. With the help of some JB Weld, I managed to piece it all back together.
-The lower lip was broken and missing some screws. With some junkyard-sourced hardware and some more JB Weld, I was able to re-secure the lower lip to the cover
-The plastic mounting piece where the upper part of the bumper snaps into was destroyed beyond repair and I had to buy a new part from the dealer ($23)
-I also had to secure a piece of the foam impact material back together with a ziptie, haha.
Pics:
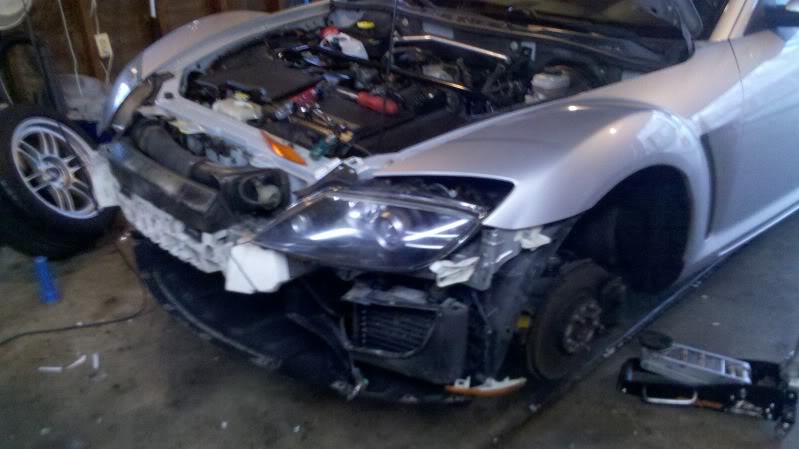
The JB-Welded bumper corner:
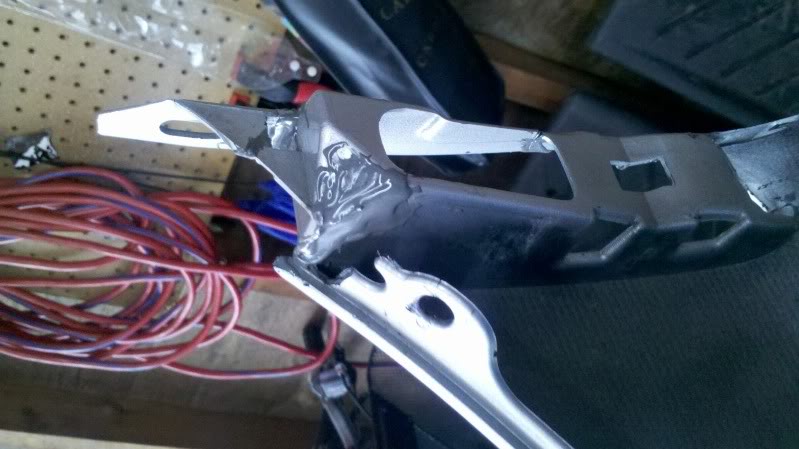
The busted mounting piece:
Everything went back together quite nicely and my front end is much more secure now. I am glad I took the time to fix all the broken pieces and replace all of the missing hardware.
First off, I installed my Corksport LED lighting kit. All the interior, trunk, and rear license plate lights installed nice and east with no issues. The running lights located in the headlights were another story.
First off, unless you have the hands of a 5-year-old, you are not going to get to the passenger side running light without taking a bunch of stuff apart. I was able to get to the driver's side light, but I didn't install the light hard enough and it popped out into the lense.
At this point I conceded defeat and decided to pull of the front cover off so I could just pull out the headlight assemblies to install the LED's.
While pulling the front cover, I also found out the extent of the damage to the driver's side of the front bumper. I knew that some things were broken there as my side indicator didn't work and shook around and also the lower-lip wasn't securely attached. None of this was major, but I found it quite annoying.
So besides the new LED's, here's some other things I had to fix:
-The side-lamp bulb socket and connector were so corroded that I had to cut off the whole thing and I installed a new connector and socket from some parts pulled out of the junkyard
-The front cover was broken into 3 pieces at the upper fender mounting point. With the help of some JB Weld, I managed to piece it all back together.
-The lower lip was broken and missing some screws. With some junkyard-sourced hardware and some more JB Weld, I was able to re-secure the lower lip to the cover
-The plastic mounting piece where the upper part of the bumper snaps into was destroyed beyond repair and I had to buy a new part from the dealer ($23)
-I also had to secure a piece of the foam impact material back together with a ziptie, haha.
Pics:
The JB-Welded bumper corner:
The busted mounting piece:
Everything went back together quite nicely and my front end is much more secure now. I am glad I took the time to fix all the broken pieces and replace all of the missing hardware.
Thread Starter
Registered
Joined: Sep 2011
Posts: 81
Likes: 3
From: Lackawanna NY
I have made a bunch of small exterior changes recently that I am really pleased with.
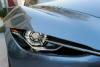
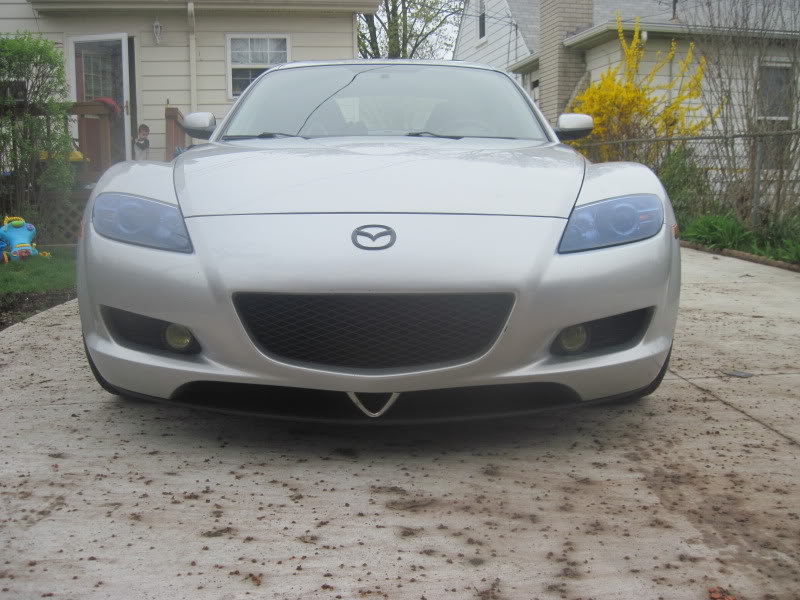
In the lighting department, I installed the Corksport LED running light and rear license plate light which resulted in a much cleaner and whiter light. I also installed my yellow foglights.
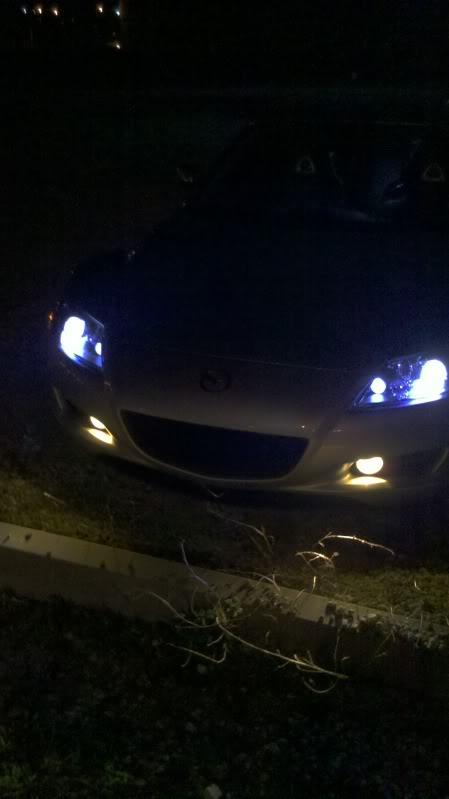
Along with that, I installed Lamin-X covers on both my foglights and headlights. The foglights have a yellow tint and the headlights have a blue tint. Installation didn't go as easy as I had hoped, but it was due to my own fault. The spray bottle I used to wet the lense must not have been totally clean of soap and I got a bunch of small bubble underneath the lense. I had to use a pin to put holes in the lense to get the air out and then reseal it with a heat gun. I am just about finished with this process and I am pretty pleased with the results.
I was worried a bit about how dark the blue is on the headlight lenses, but after driving it at night, it doesn't seem to have had much of an effect on light output.
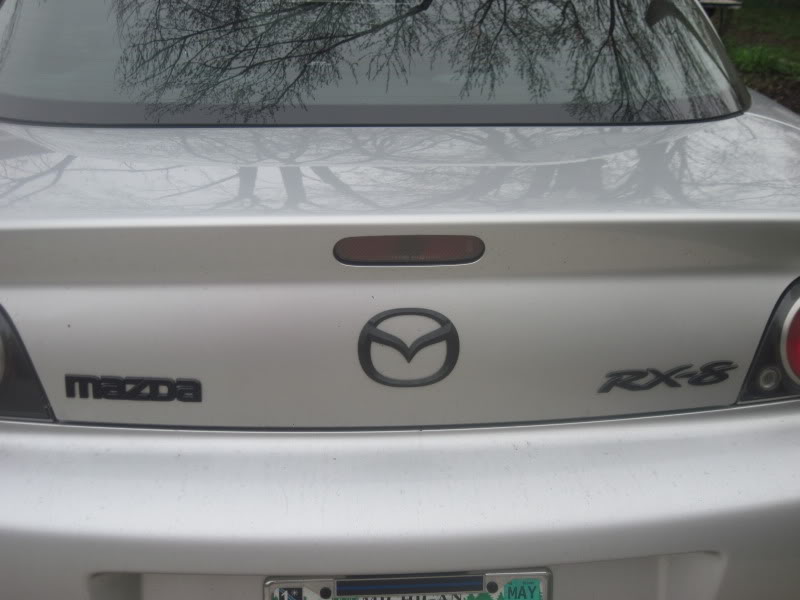
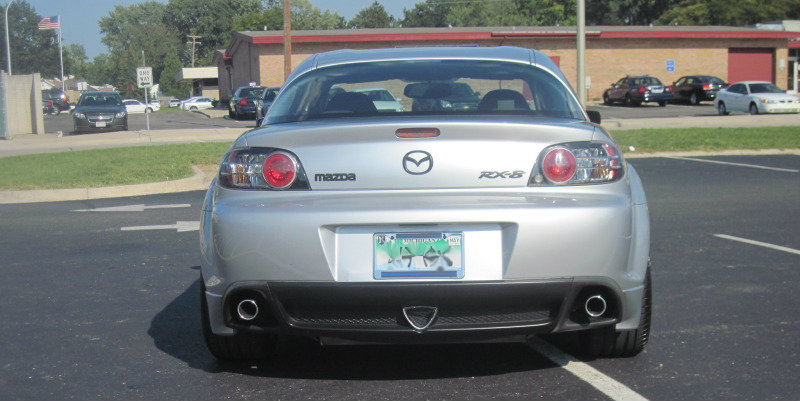
I have also plasti-dipped my front and rear emblems black. I think I am going to take off the 'MAZDA' on the back of the car though as the rear trunk seems too busy to me now.
I also installed the stainless-steel front a rear lower valence rotor emblems.
I also think I need to change to some clear sidemarkers on the front. But other then that, I am pretty pleased with the transformation so far.
Pics:
Nighttime pic:
In the lighting department, I installed the Corksport LED running light and rear license plate light which resulted in a much cleaner and whiter light. I also installed my yellow foglights.
Along with that, I installed Lamin-X covers on both my foglights and headlights. The foglights have a yellow tint and the headlights have a blue tint. Installation didn't go as easy as I had hoped, but it was due to my own fault. The spray bottle I used to wet the lense must not have been totally clean of soap and I got a bunch of small bubble underneath the lense. I had to use a pin to put holes in the lense to get the air out and then reseal it with a heat gun. I am just about finished with this process and I am pretty pleased with the results.
I was worried a bit about how dark the blue is on the headlight lenses, but after driving it at night, it doesn't seem to have had much of an effect on light output.
I have also plasti-dipped my front and rear emblems black. I think I am going to take off the 'MAZDA' on the back of the car though as the rear trunk seems too busy to me now.
I also installed the stainless-steel front a rear lower valence rotor emblems.
I also think I need to change to some clear sidemarkers on the front. But other then that, I am pretty pleased with the transformation so far.
Pics:
Nighttime pic:
Thread Starter
Registered
Joined: Sep 2011
Posts: 81
Likes: 3
From: Lackawanna NY
I installed my Corksport single-resonated midpipe.
Installation was super-easy. Fortunately the usually-stuck header bolts were replaced recently so it was a cinch to get the stock pipe out. the rear blts and O2 sensor also came out nice and easy.
Installation was simple too as Corksport provides new hardware and nice instructions.
I forgot to get a weight on both parts, but the new midpipe is easily a 10-15lb savings over stock.
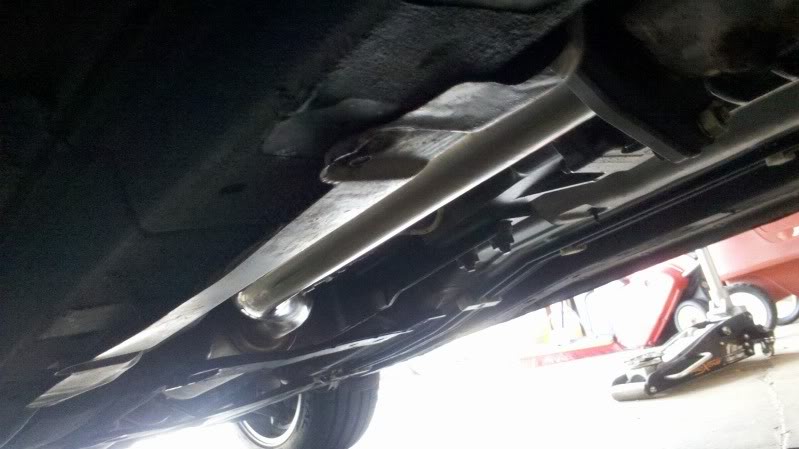
The only bad part was that the exhaust hanger was hitting the rear underbody brace. I had to bend part of the brace down and slot it forward just a bit to ensure that it wouldn't vibrate against it when it was running.
As far as driving experiences, I really don't feel any gains on the butt-dyno. As for sound, it's BARELY louder than stock and virtually no drone. It's actually so quiet that I will probably pick up a cat-back exhaust eventually.
Here's a crappy pic of it installed:
And here's a video out the sound. Don't mind to water and smoke as I only had the car running a couple of minutes before I shot the video:
On another front. I once again am having issues with my power steering. Three times in the past few days after letting the car sit for more than 6 hours, the power steering would fail at startup. Each time I drove about half a mile, turned the car off, cleared the B2278 error code and restarted it and it worked just fine. But today after letting it sit, I had no problems with it. So I am going to re-inspect and clean all of the power steering harness connections and then zip-tie them together so they will hold tight. If that doesn't do it, the next step will be to buy a new harness.
Installation was super-easy. Fortunately the usually-stuck header bolts were replaced recently so it was a cinch to get the stock pipe out. the rear blts and O2 sensor also came out nice and easy.
Installation was simple too as Corksport provides new hardware and nice instructions.
I forgot to get a weight on both parts, but the new midpipe is easily a 10-15lb savings over stock.
The only bad part was that the exhaust hanger was hitting the rear underbody brace. I had to bend part of the brace down and slot it forward just a bit to ensure that it wouldn't vibrate against it when it was running.
As far as driving experiences, I really don't feel any gains on the butt-dyno. As for sound, it's BARELY louder than stock and virtually no drone. It's actually so quiet that I will probably pick up a cat-back exhaust eventually.
Here's a crappy pic of it installed:
And here's a video out the sound. Don't mind to water and smoke as I only had the car running a couple of minutes before I shot the video:
On another front. I once again am having issues with my power steering. Three times in the past few days after letting the car sit for more than 6 hours, the power steering would fail at startup. Each time I drove about half a mile, turned the car off, cleared the B2278 error code and restarted it and it worked just fine. But today after letting it sit, I had no problems with it. So I am going to re-inspect and clean all of the power steering harness connections and then zip-tie them together so they will hold tight. If that doesn't do it, the next step will be to buy a new harness.
Thread Starter
Registered
Joined: Sep 2011
Posts: 81
Likes: 3
From: Lackawanna NY
About a month ago, I started losing my power steering again intermittantly. What was strange is that I could drive about a 1/4 mile, turn the car off, turn it back on, and my power steering would come back to life. I also noted that the car would have to sit more than 8-hours for it to happen. Things like large temperature changes and high humidity days also seemed to exacerbate the problem.
One cool night about 1.5 weeks ago I was driving home from work and hit a small bump and it set the power-steering warning light on. I then decided I was going to tackle this issue once and for all (hopefully).
The day after this happened, I was going to pull out the battery and intake box and clean and regrease all of the connectors again to see if it would help. As I went to get started, I noticed that the positive battery cable had worked itself loose which I figure was the reason I satrted losing my power steering while driving. I decided to just tighten the connector and see what would happen. The good news is that I didn't loose my power steering while driving anymore, but I was still having the problems at startup.
Last week I went to the dealer and spent the $130 and ordered a new power steering harness. I installed it today. It was a pretty easy job. The hardest part was getting a ziptie around the steering rack to hold down the torque sensor wiring in place. So far, so good, but I do have a feeling that I am still going to have a problem.
I am starting to feel that a weak battery might be part of the reason I am losing the power steering. I noticed that my battery was manufactured in 3/2005. I'm wondering if it's losing too much juice from sitting and the power steering isn't getting enough power at startup causing it to throw a code. I will get my battery tested shortly and I have a feeling that it's not going to be good. I should note that the car fires right up within the 1st crank, but I don't know. I really do hope that this new harness will resolve my power steering woes though. It's quite annoying.
On a brighter note, I managed to be home for a Mazdamaniac tuning session and I was able to get my 1st tune back and installed. I will say that I'm rather impressed with how spot-on he got the MAF in one session. My LTFT went from +12.64 to 0 in nearly every area except for a +2 at idle. I have done my fair share of tuning (on GM cars) and getting a MAF dialed in that quick and that accurate is pretty darn good. I'm looking forward to the next tuning session and to see what he will do for my WOT tuning.
Also, my Centric Cryo-treated rear rotors have FINALLY showed up so I will start installing all of my new brake bits this weekend. I'll have some pics of that process.


Thread Starter
Registered
Joined: Sep 2011
Posts: 81
Likes: 3
From: Lackawanna NY
I have actually been driving my RX8 a lot more than I have been working on it over the past 2 months, but I finally decided that this week I was going to get some work done on it.
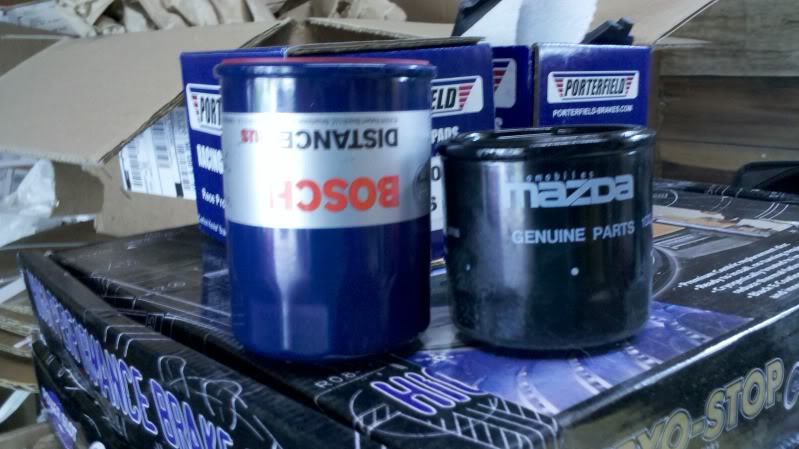
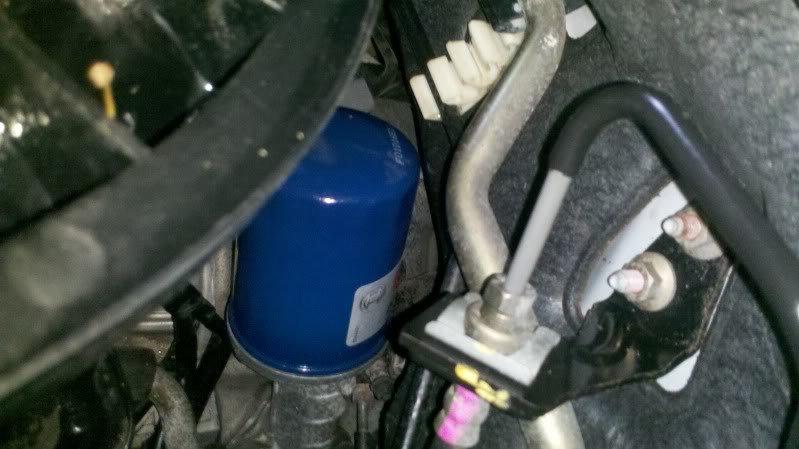
The first thing I did was change the oil. After reading all 78-pages of this thread, I decided on using Royal Purple 0w40 synthetic oil. I also 'upgraded' to the 2nd generation oil filter as it's a bit larger. A paltry 4qts drained out replaced with some fresh oil and a new filter and I should be good for the summer.
Here's a side-by-side of the 1st gen filter vs the 2nd gen:
And an installed pic of the new filter:
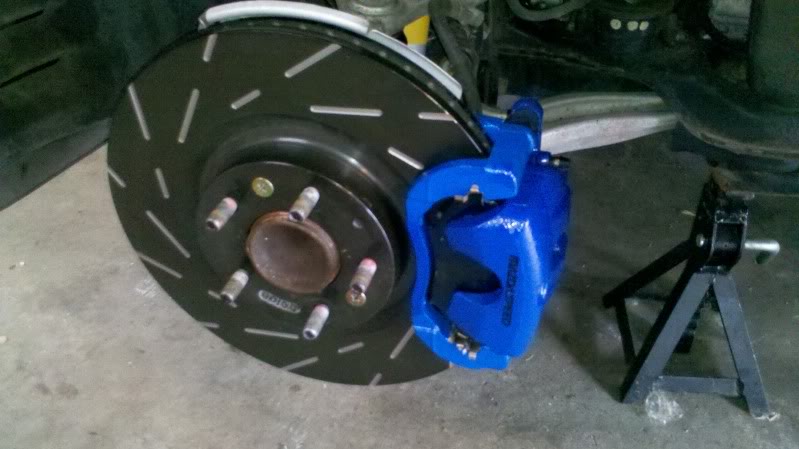
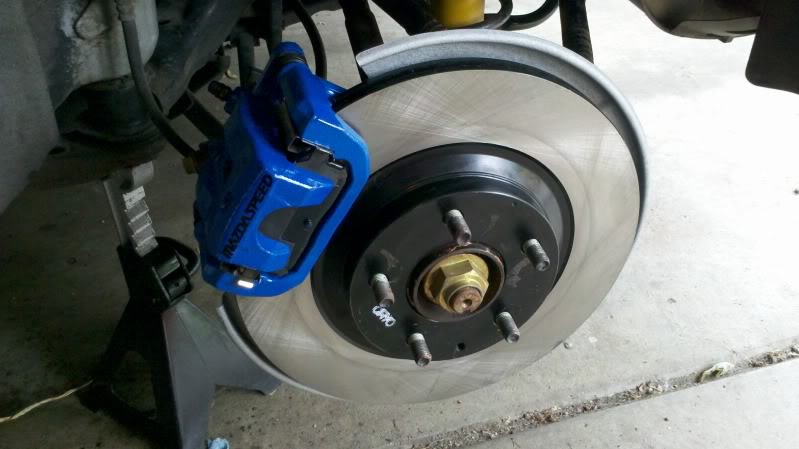
I also finally got around to upgrading my brakes! Everything went pretty well and straightforward. Even the rear calipers spun back in with little difficulty. All the slider pins were still free and greased. This makes doing brake-work much easier, haha.
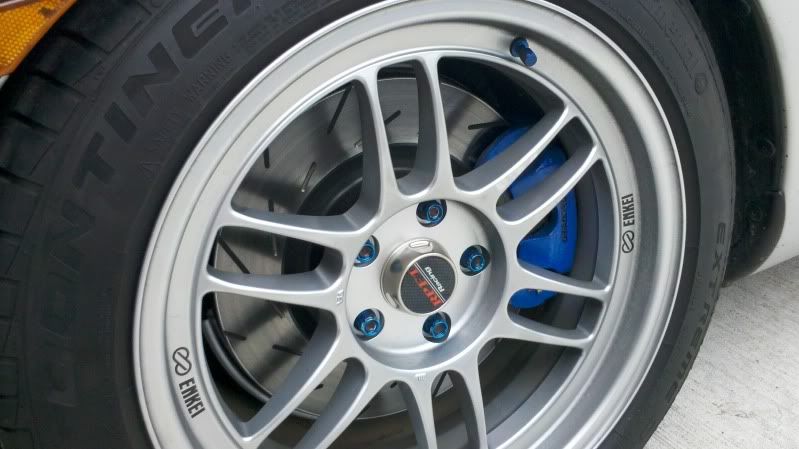
While I had everything apart, I painted the calipers and dust-shields. I also applied some 'Mazdaspeed' stickers from Polak Graphics to the rotors. The calipers were done with a blue-caliper-paint-kit from the parts store and the dust shields were painted with some high temp engine paint.
The pads are Porterfield RS4's all around. I bought them from www.lpiracing.com as they were the best price I could find. They shipped out real quick and I had them within 4 days. The front rotors are EBC USR (From Summit Racing) slotted rotors and the rear are Centric Cryo-treated rotors (www.tirerack.com)
I have done no other driving other than bedding the pads in, but I am happy with how everything is working right now. The pads definitely grip strong.
Pics:
New front:
New rear:
The color-changing fronts after I bedded the pads:
Up next, I think I am going to add an aux. jack to the radio, and I think I'm going to pick up a stock spoiler or possibly a GTO spoiler and install that.
The first thing I did was change the oil. After reading all 78-pages of this thread, I decided on using Royal Purple 0w40 synthetic oil. I also 'upgraded' to the 2nd generation oil filter as it's a bit larger. A paltry 4qts drained out replaced with some fresh oil and a new filter and I should be good for the summer.
Here's a side-by-side of the 1st gen filter vs the 2nd gen:
And an installed pic of the new filter:
I also finally got around to upgrading my brakes! Everything went pretty well and straightforward. Even the rear calipers spun back in with little difficulty. All the slider pins were still free and greased. This makes doing brake-work much easier, haha.
While I had everything apart, I painted the calipers and dust-shields. I also applied some 'Mazdaspeed' stickers from Polak Graphics to the rotors. The calipers were done with a blue-caliper-paint-kit from the parts store and the dust shields were painted with some high temp engine paint.
The pads are Porterfield RS4's all around. I bought them from www.lpiracing.com as they were the best price I could find. They shipped out real quick and I had them within 4 days. The front rotors are EBC USR (From Summit Racing) slotted rotors and the rear are Centric Cryo-treated rotors (www.tirerack.com)
I have done no other driving other than bedding the pads in, but I am happy with how everything is working right now. The pads definitely grip strong.
Pics:
New front:
New rear:
The color-changing fronts after I bedded the pads:
Up next, I think I am going to add an aux. jack to the radio, and I think I'm going to pick up a stock spoiler or possibly a GTO spoiler and install that.
Thread Starter
Registered
Joined: Sep 2011
Posts: 81
Likes: 3
From: Lackawanna NY
Well I haven't updated this in awhile so I think it's about time I put something up.
Exhaust Problems:
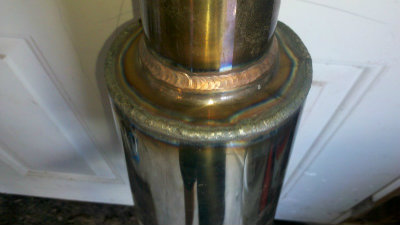
See THIS thread for more detailed info. Basically my Corksport midpipe has proved to be a PITA. The aforementioned thread covered the 1st problem. Once again, I would like to give Bryan of BTEK Fabrication props for re-welding the resonator for me.
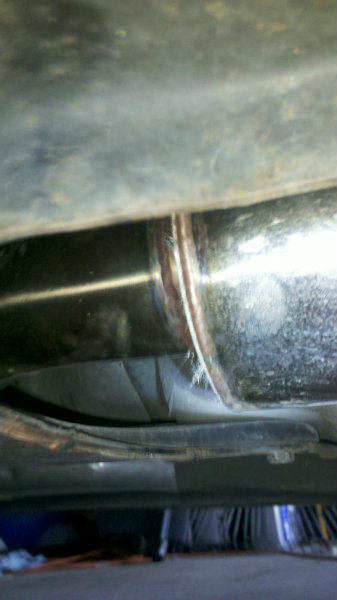
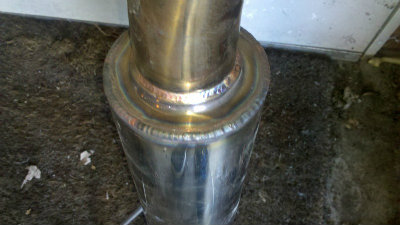
After the conclusion of that thread, the midpipe lasted about 1.5 weeks until the opposite side of the resonator burst open and cracked all around. I had Speed Industry in Troy weld up the other end for a few bucks. I will be reinstalling it today. If something else breaks on it, I'm throwing it in the garbage. Needless to say, I wish I would have gone with a different mid-pipe.
This pic shows the 1st break of the resonator. You can see some of the fiber packing sticking out:
Here's the BTEK-welded side:
And here's the Speed Industry side:
Drag Strip
Last week (8/4), I had some free-time and headed off to Lapeer Dragway to see what kind of times and MPH I could get out this car. I went up there not expecting much as it was over 90* by noon. With the rediculous heat, there were only 20 cars at the strip. To get an idea of the loss of power, there was a stock C6 Z06 there that was only running low 12's and didn't trap over 120mph.
Anyways, I made 4 passes. My best E.T. was 15.44 (Worst was 15.9xx) and my best MPH was 95.20MPH (Worst was 91.88MPH after banging off the rev limiter in 3rd).
I can't say I was happy with the e.t.'s, but I was happy with the MPH. Considering my IAT's were anywhere from 111* up to 130*, I was happy to trap above 95.
Observations:
-I can't launch this car to save my life. My 60ft's were anywhere from 2.48 to 2.81. I tried a few different RPM's and tried to feather the clutch, but man it's tricky. Plus RX8's seem to wheel-hop a TON. After reading other threads about RX8's at the strip, I realize that I'm not the only one who suffers this ailment.
Also, I have made over 60 1/4 mile passes, but they have all been with an automatic. This was my 1st time taking a manual car to the track. Although I think that my only other manual car (A Mustang SVO) was easier to launch.
-The 3rd-to-4th shift is quite notchy. You really have to *bang* it into 4th. And you really need to make that 4th gear shift although it's almost near the end of the track.
-I found that shifting right around 9000 on the tach (about 8800 according to the AccessPORT) yielded better results than running up to 9500. This makes sense when you look at the RX8's powerband on a dyno-sheet.
I hope to make it to the strip before the end of the season. I hope to do the Poly Engine Mount DIY which should hopefully help with some of the wheel-hop. With some cooler weather, the mounts, a tire pressure drop (I didn't bother dropping it this trip), and most importantly, more practice launching, I might be able to crack a mid-14 and get closer to 100MPH.
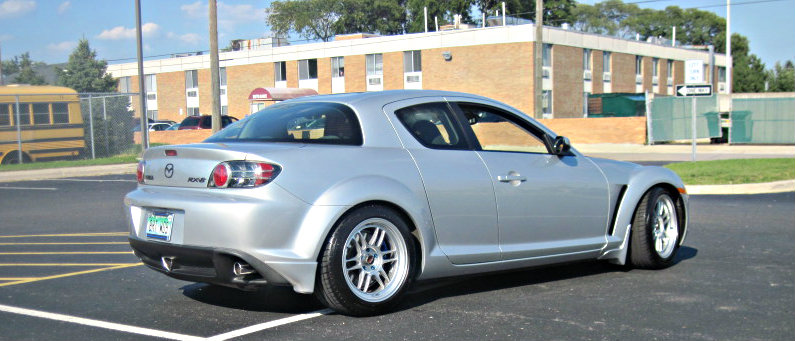
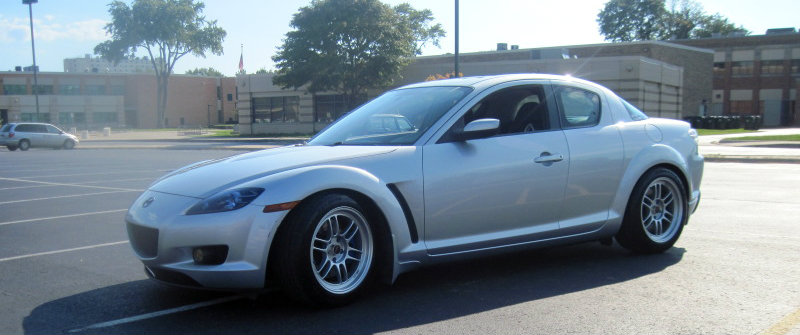
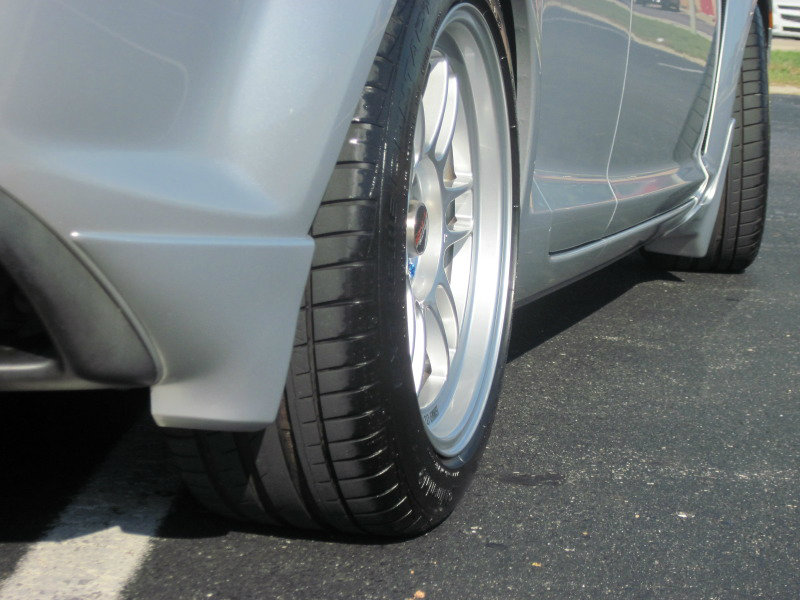
Body Mods
Rx8club's forum member Rzoops is my inspiration for the look I wanted for my RX8. I have already purchased the same RPF1's and now it was time to change some body parts. I ordered front splashguards through my friend Hank at Ralph Thayer Automotive. He's the Mazda Parts Manager and will give 15% off to enthusiasts (Mention 'Joe with the RX8') and he should hook you up.
I then ordered Rear Aero Flares from ebay member AZPartsExpress. They were $118 shipped through them (A price that no one else could come close to. Most places were over $225). They took about 3 weeks to get to me, but they were genuine Mazda parts so I have no complaints.
Installation of the splash guards went pretty easy and took about a 1/2 hour. Installation of the rear aero flares took a fair bit longer as I had to remove the whole rear bumper. Some of the fasteners were a PITA to get off. The two bolts that are held by square-nuts molded into the bumper both stripped and I had to use vise-grips to hold the square nuts to get them undone. I then replaced those parts with a stainless bolt, nut, and washer.
One nice thing about installing the rear aero flares was that the bumper had punch-marks in it to indicate where to drill. This took virtually all the guesswork out of the alignment.
I am very happy with the turnout of my work and in my opinion, it has really enhanced the look of the car. I still think I am going to add either a stock rear-wing or a GTO rear wing.
Exhaust Problems:
See THIS thread for more detailed info. Basically my Corksport midpipe has proved to be a PITA. The aforementioned thread covered the 1st problem. Once again, I would like to give Bryan of BTEK Fabrication props for re-welding the resonator for me.
After the conclusion of that thread, the midpipe lasted about 1.5 weeks until the opposite side of the resonator burst open and cracked all around. I had Speed Industry in Troy weld up the other end for a few bucks. I will be reinstalling it today. If something else breaks on it, I'm throwing it in the garbage. Needless to say, I wish I would have gone with a different mid-pipe.
This pic shows the 1st break of the resonator. You can see some of the fiber packing sticking out:
Here's the BTEK-welded side:
And here's the Speed Industry side:
Drag Strip
Last week (8/4), I had some free-time and headed off to Lapeer Dragway to see what kind of times and MPH I could get out this car. I went up there not expecting much as it was over 90* by noon. With the rediculous heat, there were only 20 cars at the strip. To get an idea of the loss of power, there was a stock C6 Z06 there that was only running low 12's and didn't trap over 120mph.
Anyways, I made 4 passes. My best E.T. was 15.44 (Worst was 15.9xx) and my best MPH was 95.20MPH (Worst was 91.88MPH after banging off the rev limiter in 3rd).
I can't say I was happy with the e.t.'s, but I was happy with the MPH. Considering my IAT's were anywhere from 111* up to 130*, I was happy to trap above 95.
Observations:
-I can't launch this car to save my life. My 60ft's were anywhere from 2.48 to 2.81. I tried a few different RPM's and tried to feather the clutch, but man it's tricky. Plus RX8's seem to wheel-hop a TON. After reading other threads about RX8's at the strip, I realize that I'm not the only one who suffers this ailment.
Also, I have made over 60 1/4 mile passes, but they have all been with an automatic. This was my 1st time taking a manual car to the track. Although I think that my only other manual car (A Mustang SVO) was easier to launch.
-The 3rd-to-4th shift is quite notchy. You really have to *bang* it into 4th. And you really need to make that 4th gear shift although it's almost near the end of the track.
-I found that shifting right around 9000 on the tach (about 8800 according to the AccessPORT) yielded better results than running up to 9500. This makes sense when you look at the RX8's powerband on a dyno-sheet.
I hope to make it to the strip before the end of the season. I hope to do the Poly Engine Mount DIY which should hopefully help with some of the wheel-hop. With some cooler weather, the mounts, a tire pressure drop (I didn't bother dropping it this trip), and most importantly, more practice launching, I might be able to crack a mid-14 and get closer to 100MPH.
Body Mods
Rx8club's forum member Rzoops is my inspiration for the look I wanted for my RX8. I have already purchased the same RPF1's and now it was time to change some body parts. I ordered front splashguards through my friend Hank at Ralph Thayer Automotive. He's the Mazda Parts Manager and will give 15% off to enthusiasts (Mention 'Joe with the RX8') and he should hook you up.
I then ordered Rear Aero Flares from ebay member AZPartsExpress. They were $118 shipped through them (A price that no one else could come close to. Most places were over $225). They took about 3 weeks to get to me, but they were genuine Mazda parts so I have no complaints.
Installation of the splash guards went pretty easy and took about a 1/2 hour. Installation of the rear aero flares took a fair bit longer as I had to remove the whole rear bumper. Some of the fasteners were a PITA to get off. The two bolts that are held by square-nuts molded into the bumper both stripped and I had to use vise-grips to hold the square nuts to get them undone. I then replaced those parts with a stainless bolt, nut, and washer.
One nice thing about installing the rear aero flares was that the bumper had punch-marks in it to indicate where to drill. This took virtually all the guesswork out of the alignment.
I am very happy with the turnout of my work and in my opinion, it has really enhanced the look of the car. I still think I am going to add either a stock rear-wing or a GTO rear wing.
Last edited by AkursedX; Aug 22, 2012 at 07:03 PM.

Thread
Thread Starter
Forum
Replies
Last Post
Pelleilee
New Member Forum
6
Sep 29, 2019 10:07 AM
akagc
RX-8's For Sale/Wanted
7
Aug 11, 2015 07:07 PM