

Saga: My car Log


Saga: My car Log
Well, I thought it might be a good thing to have about everything I'm doing/have done to my Rx8 while it's still new.
Well, it's best to start at the beginning. This was my old car.
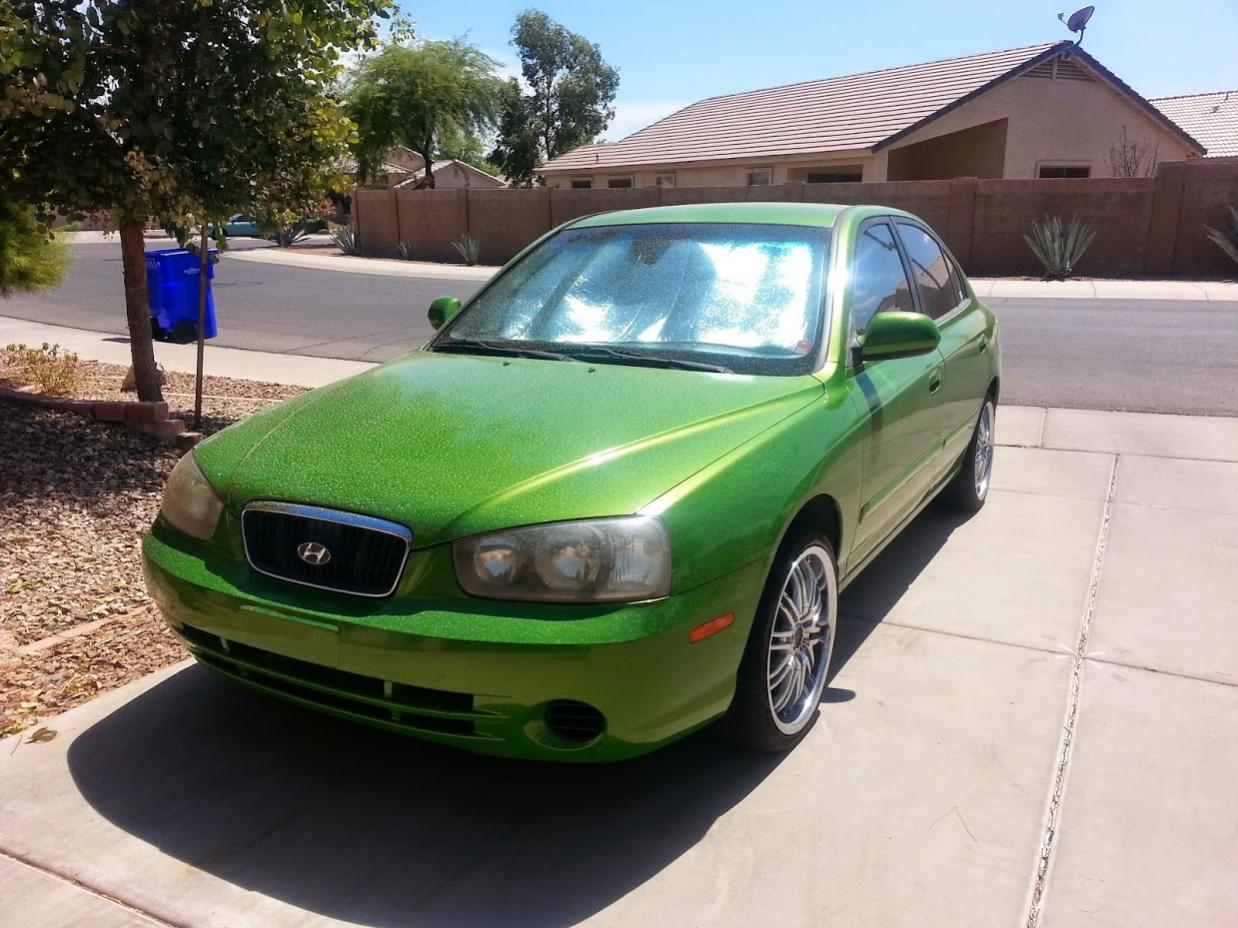
I called it "The Green Car," because that's all it is, but other people call it the Green Lantern. It's a 2003 Hyundai Elantra, not very fast, or very safe, but it worked (and was a good first car. I drove it for two years, and other than maintenance and replacing the rear suspension (it was locked when we bought it), there were no issues. In May, it was due for emissions, but couldn't pass due what seem to be cat issues (It has dual cats, and both seem to be out) so we let the registration expire and the search for a new car began...
Now, fair gas milage was one of the goals, so there were a number of options. We got kind of close to buying a Tiburon, but it wasn't very nice to drive, and a tC would have been nice, but it seemed like no-one was actually willing to sell one, so I got an Rx8.
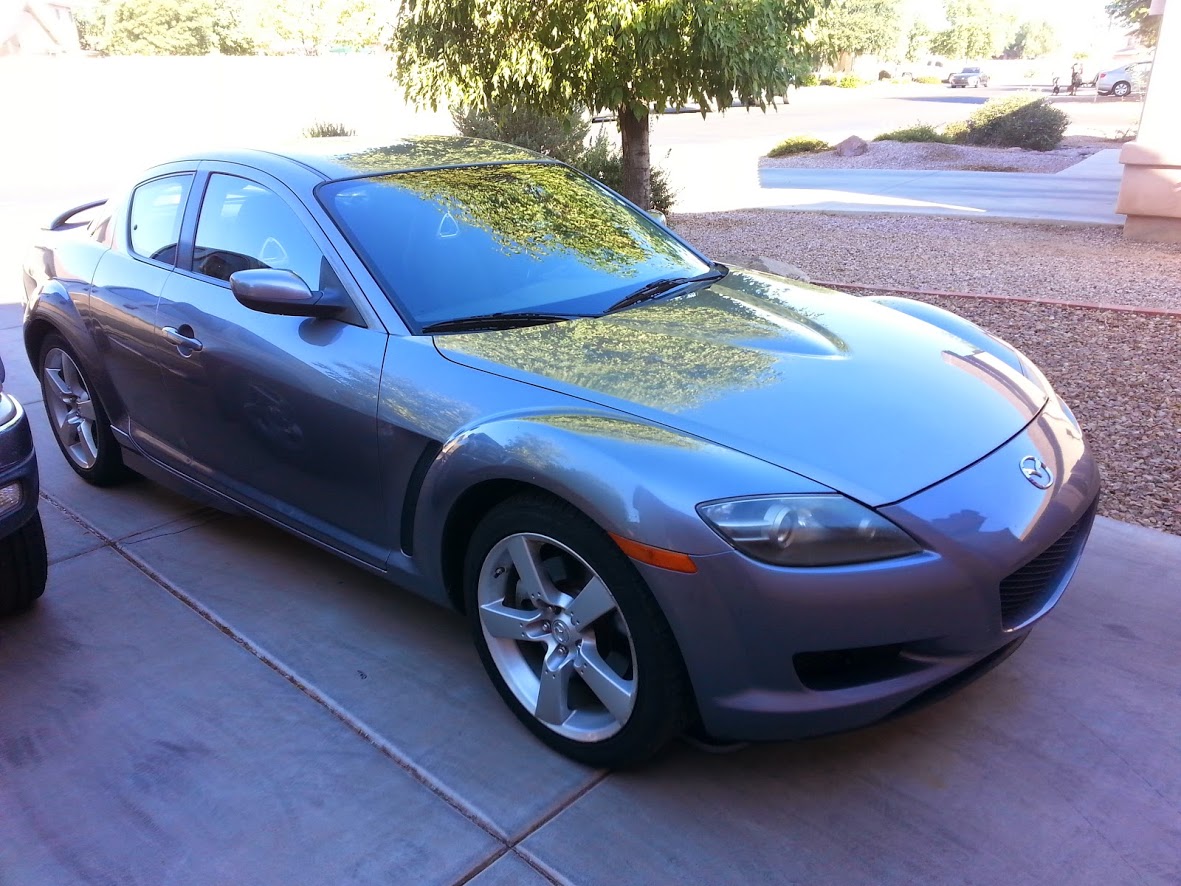
I call it "The Privateer," and it's a 2005 6MT GT. Before we bought it, the compression was ok, not stellar but completely acceptable. It drove well aside from the minor grinding when shifting into 4th. It was missing the plastic undertray and a few other things, but it was in good shape and I loved it.
Well, it's best to start at the beginning. This was my old car.
I called it "The Green Car," because that's all it is, but other people call it the Green Lantern. It's a 2003 Hyundai Elantra, not very fast, or very safe, but it worked (and was a good first car. I drove it for two years, and other than maintenance and replacing the rear suspension (it was locked when we bought it), there were no issues. In May, it was due for emissions, but couldn't pass due what seem to be cat issues (It has dual cats, and both seem to be out) so we let the registration expire and the search for a new car began...
Now, fair gas milage was one of the goals, so there were a number of options. We got kind of close to buying a Tiburon, but it wasn't very nice to drive, and a tC would have been nice, but it seemed like no-one was actually willing to sell one, so I got an Rx8.
I call it "The Privateer," and it's a 2005 6MT GT. Before we bought it, the compression was ok, not stellar but completely acceptable. It drove well aside from the minor grinding when shifting into 4th. It was missing the plastic undertray and a few other things, but it was in good shape and I loved it.
Last edited by Legot; Aug 4, 2014 at 05:00 PM.
Leaking Radiator
Being a used car, there were some things that needed fixing. The first was the leaky radiator. I was planning on going with an aluminum tanked radiator, but shortly after ordering it I was notified that it was recalled for major fitment issues.
I ended up getting a stock type radiator from CSF (because it was cheap). When it arrived, it turned out that it was for an AT car, and had super long ports for a transmission fluid cooler. Even with those ports, it went in more easily than the old one came out, and works perfectly.
I ended up getting a stock type radiator from CSF (because it was cheap). When it arrived, it turned out that it was for an AT car, and had super long ports for a transmission fluid cooler. Even with those ports, it went in more easily than the old one came out, and works perfectly.
Transmission Damage
After a few days, we noticed a small leak coming out of the trasmission housing near one of the switches. One of the RTV seals near the end of the transmission was putting out a drip about every other day. We took it to a transmission shop to look at, and they said that when they pulled it apart there were bits of damaged bearing tearing stuff up in there, and that that was a likely cause of any shifting issues.
We decided to fix it all then, rather than having to take it back in a few months due to a properly destroyed transmission. The total bill came up to around $1500, but there was some discounting done due to the fact that they took over a week (much longer than they had told us before), and that they actually ended up removing it, shipping it to somewhere else to be fixed, then reinstalling it.
The good news is that it shifts beautifully now. I had never driven a manual car with no shifting issues up to that point, and this was just the most amazing feeling.
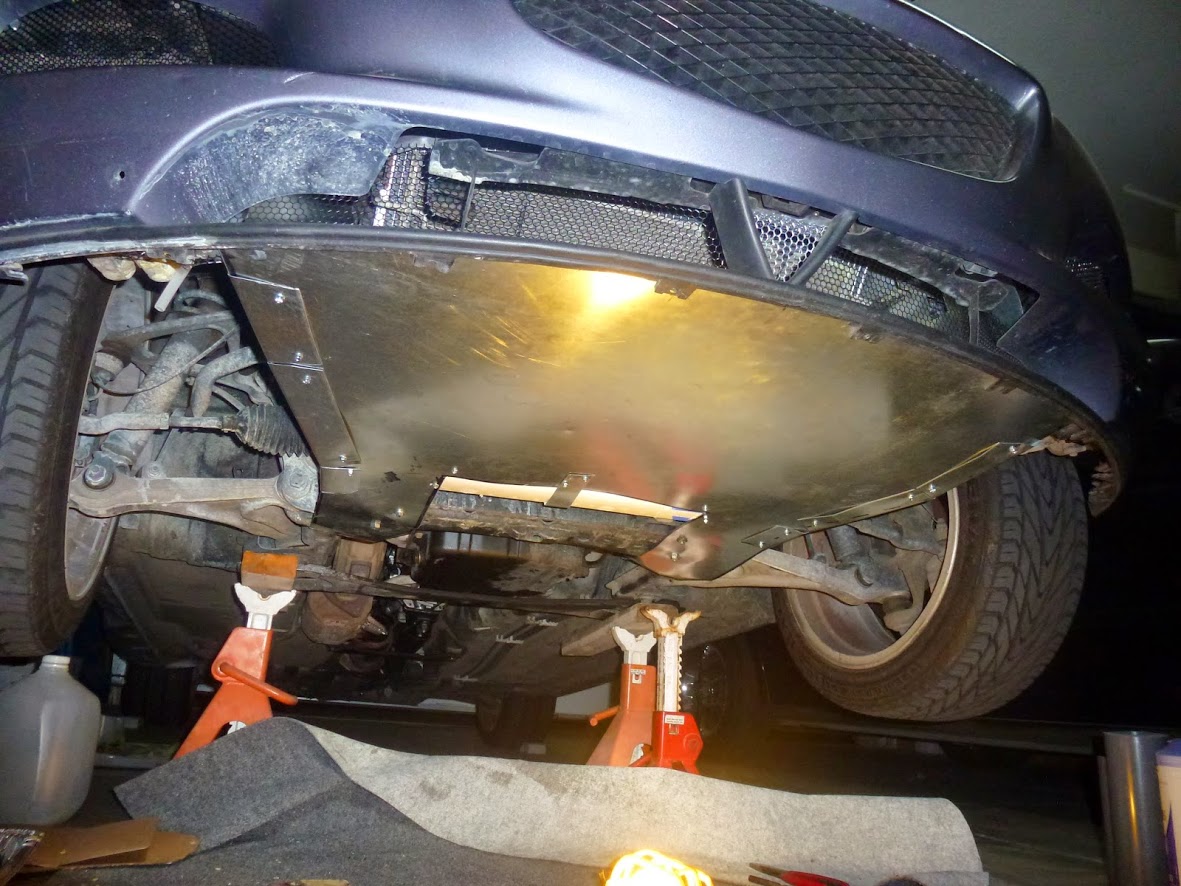
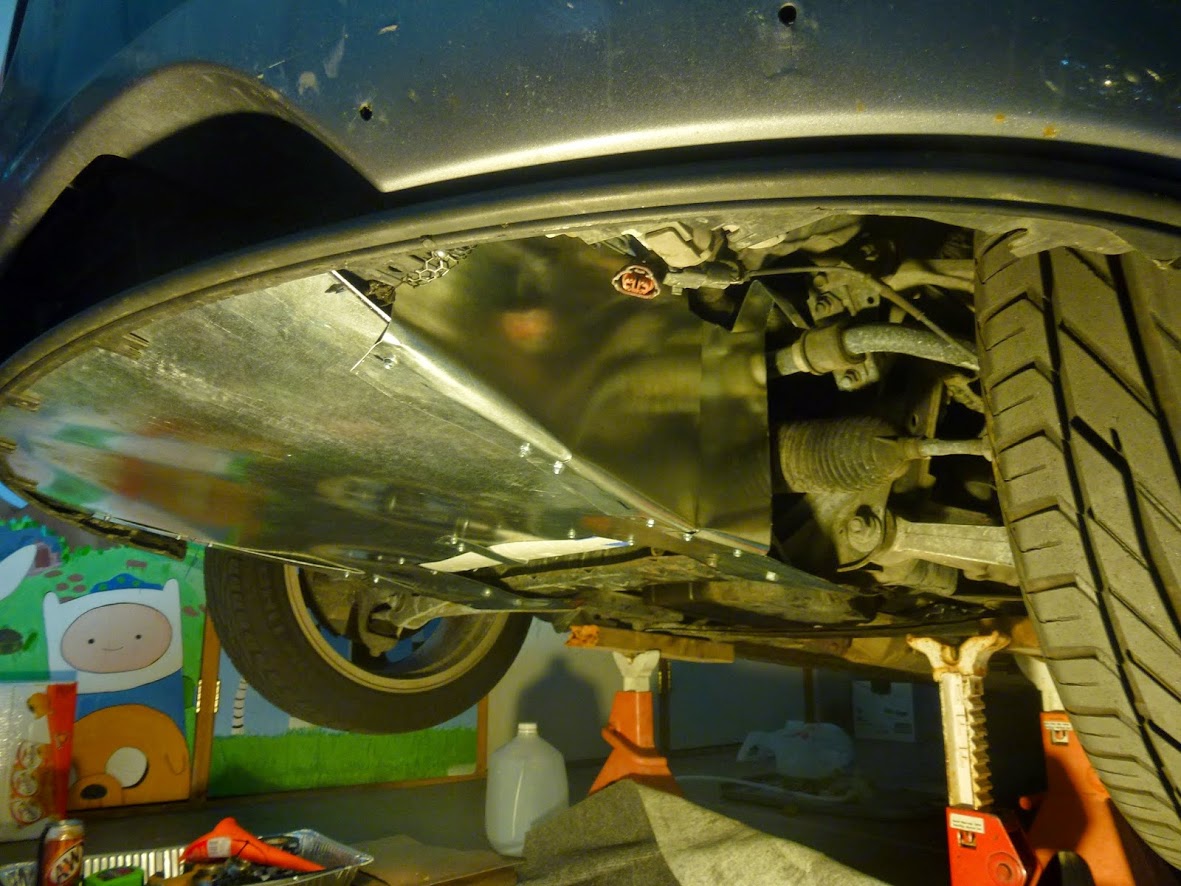
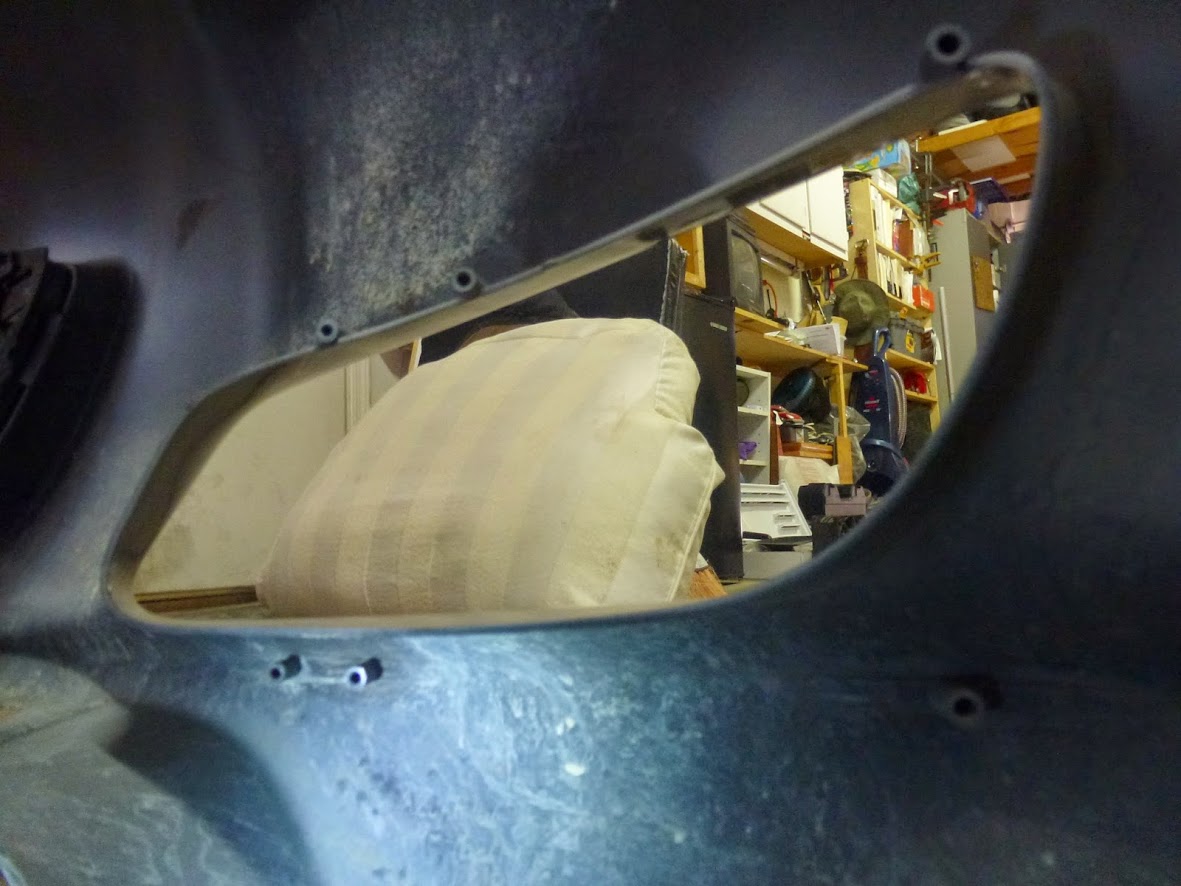
Overheating and Undertray
Now, each of those last things happened in pretty quick succession, so I was never given the time to build an undertray. I had a singular overheating event, and It freaked me the **** out. It got to 240F before the needle moved, and I shut it down immediately (I know that's super dangerous territory to be in). I ended up going to a 2 hour movie, and driving the 10 miles home with the heater on full blast in 110F weather. I then refused to drive the car anywhere else until I had an air duct under there.
It's really less of an undertray, and more of a radiator duct. My 8 was missing both the undertray and the plastic uprights to support it, so I fabbed the entire assembly out of galvanized steel. I used galvanized sheet metal screws because I have no experience with rivets, and I could only find aluminum rivets (Yep, I took galvanic corrosion into account). I think I'll end up redoing it at some point out of a better material, but this works for now.
It anchors to 4 points in the upper chassis, and isn't connected to the bumper.
I can share the original drawing from my notebook if anyone wants to see it, if not I just won't.
I'm missing a piece of foam for the sides right now, but it cools very effectively compared to not having anything in there. The peak temp I got without the foam in place was 220F in 110F weather.
Last edited by Legot; Aug 4, 2014 at 07:04 PM.
Bumper Screen Gaurds
There aren't any screens or grills protecting the oil coolers on the stock bumper, The radiator and AC condenser have one that covers their lower portion, and that seemed to be working pretty well even without an undertray (my AC condenser is in near-perfect condition).
Luckily, RacingBeat sells wonderful screens for the oil cooler! Unfortunately they're $27 each, and if you have an MT Rx8 you need two.
Also, they look terrible.
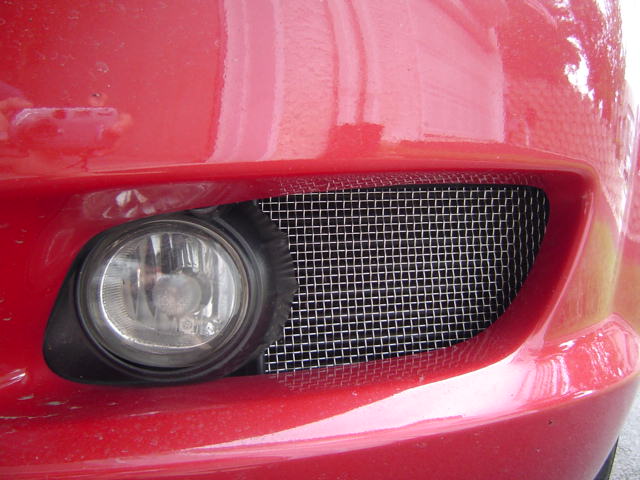
(my apologies to Shaun, it was the only picture I could find that shows it clearly). What adds to this is that I don't have fog lights, so it would just be a hole half covered in mesh.
Instead of adding the mesh to the oil cooler, I added it to the bumper so that it fills the entire hole, rather than just the part with the oil cooler. There are actually really convenient holes to screw the mesh to the backside of the bumper, where I'd assume that these are where the fogs would screw on.
I made a cardboard template (which I can scan and share if anyone wants it) that fit over the hole and lined up with the screw holes, and I cut out the mesh to match that template.
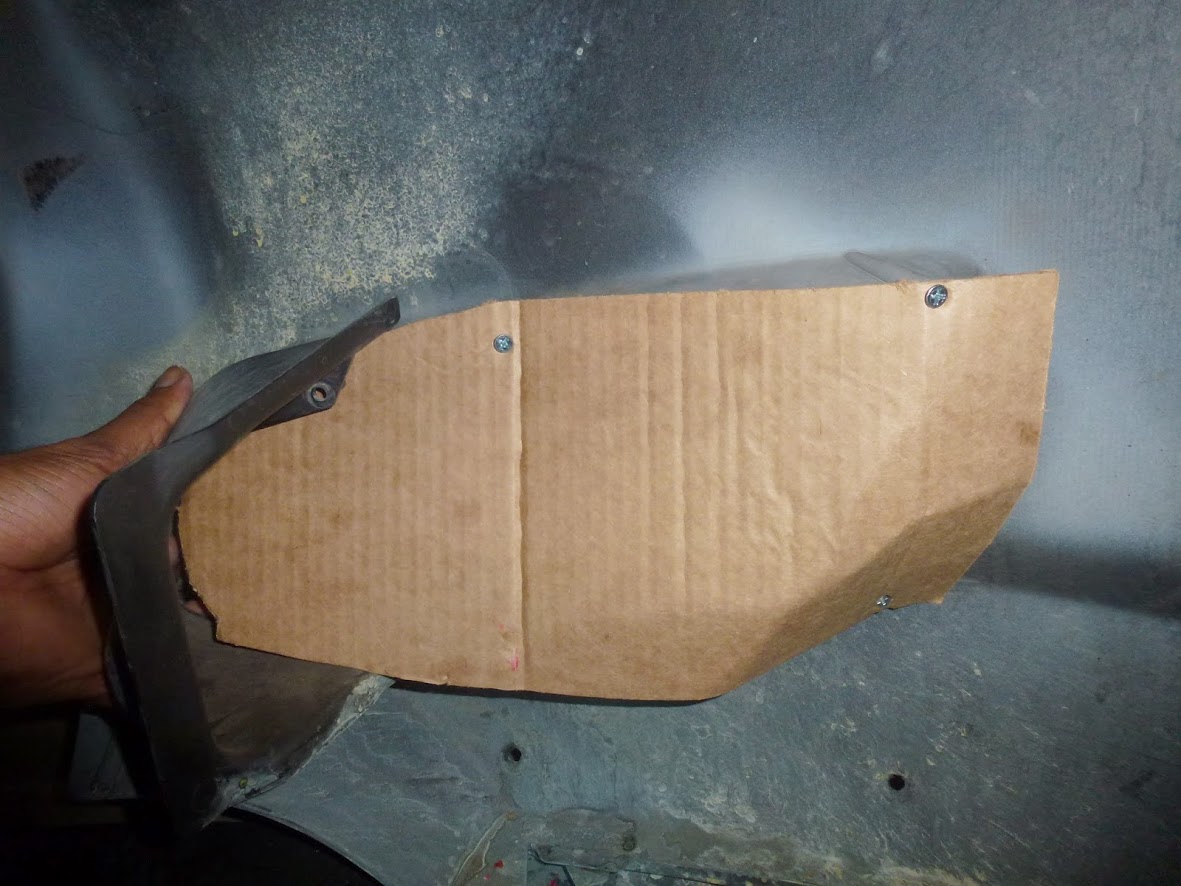
There was some trimming and bending involved to get it to sit correctly, but it all fits really nicely over the hole, and no awkward half covered coolers. All that was left was to paint it black and install.
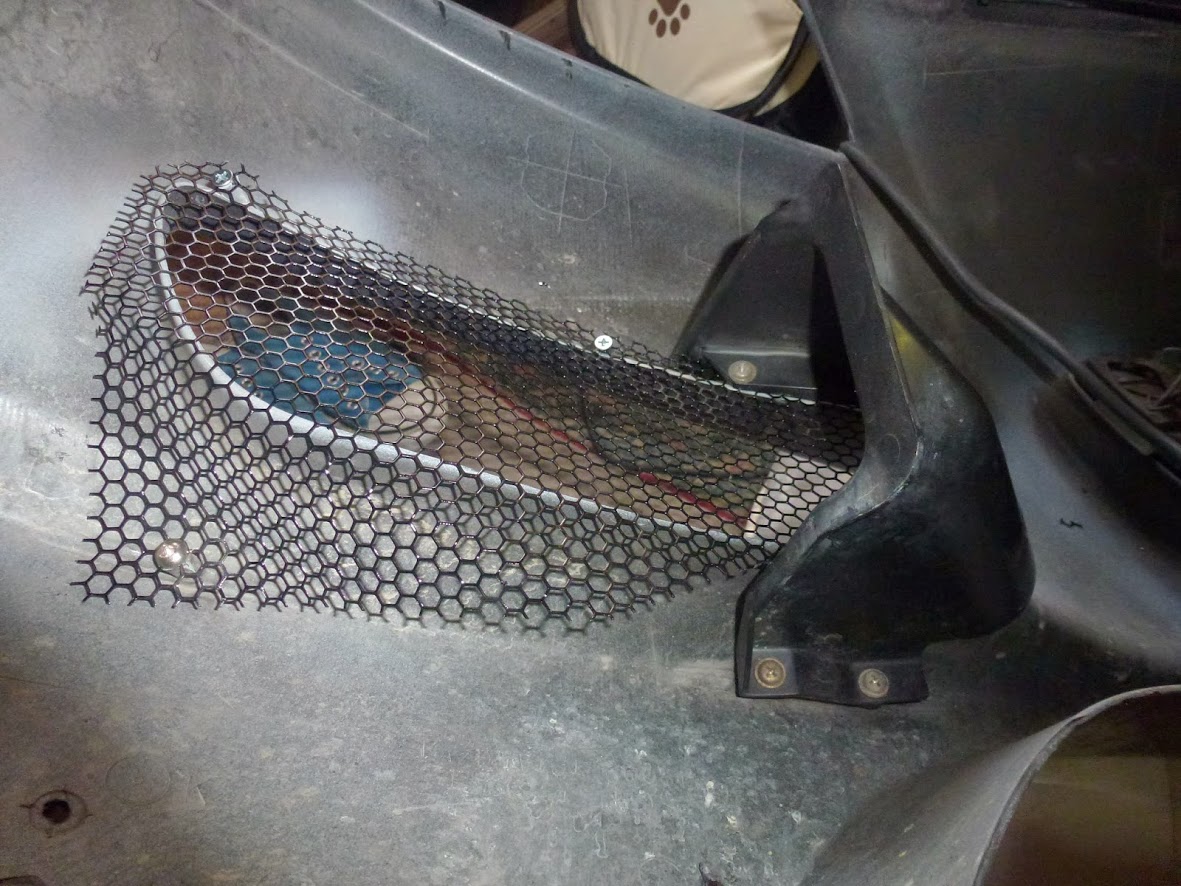
I also cleaned up the oil coolers. They had taken some serious damage, so I took the time to clean them out and straighten some of the heavily damaged fins. At some point, I'd like to replace them with a single cooler mounted in the center, but this will work for now.
As I mentioned before, the AC condenser doesn't really need a screen, but I figured I'd do one anyway just so that the bumper has a uniform style. For the center hole, it took 3 pieces of the same steel mesh. Two for the sides, and one for the central rotor emblem. The upper part is bolted on the support structure for the opening (one hole was drilled), and they are folded and siliconed over the ridges at the bottom bumper. I hate the rotary accents that most people do with that center emblem, so I just painted that section of the mesh silver, and it gives it a much nicer look than painting the emblem itself IMO)
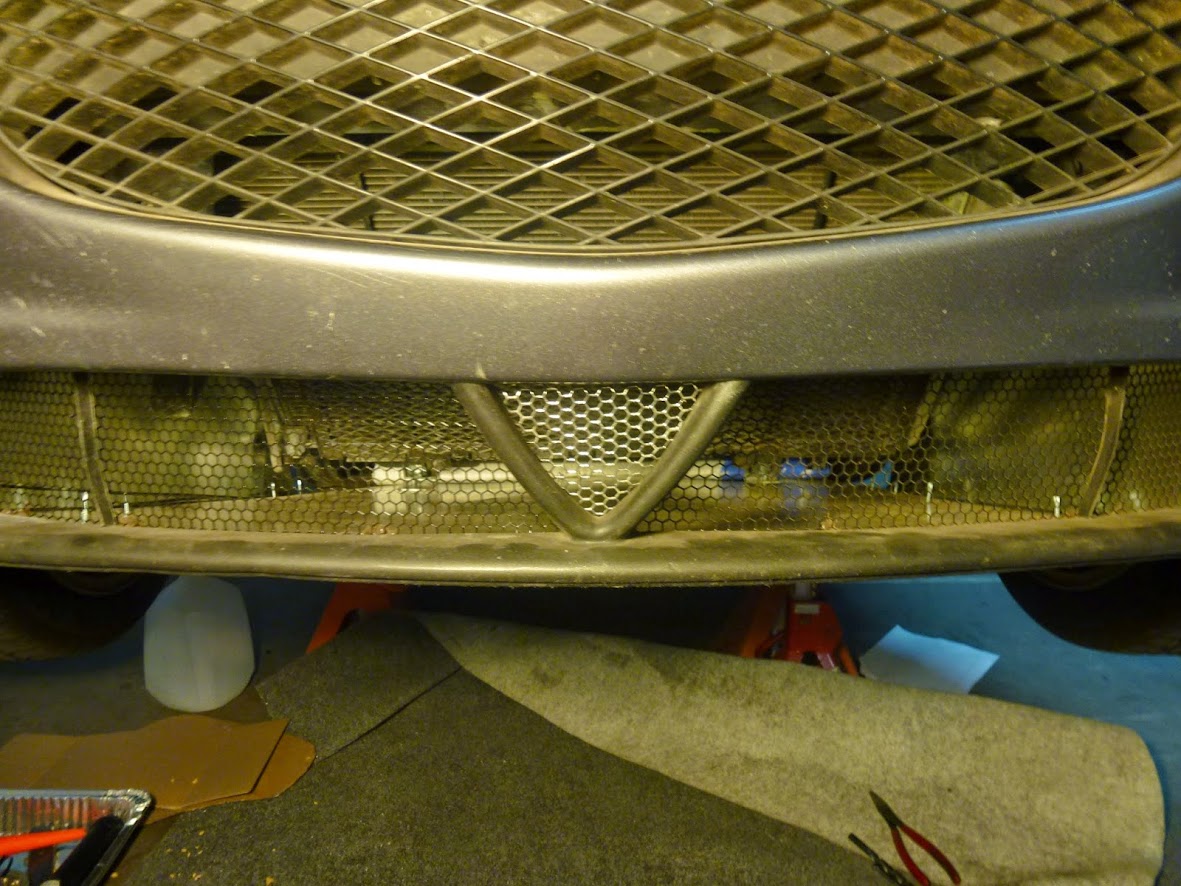
A little warning for anyone who's doing this.
NEVER DRIVE WITH THESE SCREENS IN PLACE UNLESS YOU HAVE A FUNCTIONING UNDERTRAY; YOU WILL OVERHEAT AT ANYTHING ABOVE 40MPH!
That is all.
Luckily, RacingBeat sells wonderful screens for the oil cooler! Unfortunately they're $27 each, and if you have an MT Rx8 you need two.
Also, they look terrible.
(my apologies to Shaun, it was the only picture I could find that shows it clearly). What adds to this is that I don't have fog lights, so it would just be a hole half covered in mesh.
Instead of adding the mesh to the oil cooler, I added it to the bumper so that it fills the entire hole, rather than just the part with the oil cooler. There are actually really convenient holes to screw the mesh to the backside of the bumper, where I'd assume that these are where the fogs would screw on.
I made a cardboard template (which I can scan and share if anyone wants it) that fit over the hole and lined up with the screw holes, and I cut out the mesh to match that template.
There was some trimming and bending involved to get it to sit correctly, but it all fits really nicely over the hole, and no awkward half covered coolers. All that was left was to paint it black and install.
I also cleaned up the oil coolers. They had taken some serious damage, so I took the time to clean them out and straighten some of the heavily damaged fins. At some point, I'd like to replace them with a single cooler mounted in the center, but this will work for now.
As I mentioned before, the AC condenser doesn't really need a screen, but I figured I'd do one anyway just so that the bumper has a uniform style. For the center hole, it took 3 pieces of the same steel mesh. Two for the sides, and one for the central rotor emblem. The upper part is bolted on the support structure for the opening (one hole was drilled), and they are folded and siliconed over the ridges at the bottom bumper. I hate the rotary accents that most people do with that center emblem, so I just painted that section of the mesh silver, and it gives it a much nicer look than painting the emblem itself IMO)
A little warning for anyone who's doing this.
NEVER DRIVE WITH THESE SCREENS IN PLACE UNLESS YOU HAVE A FUNCTIONING UNDERTRAY; YOU WILL OVERHEAT AT ANYTHING ABOVE 40MPH!
That is all.
Last edited by Legot; Aug 4, 2014 at 07:02 PM.
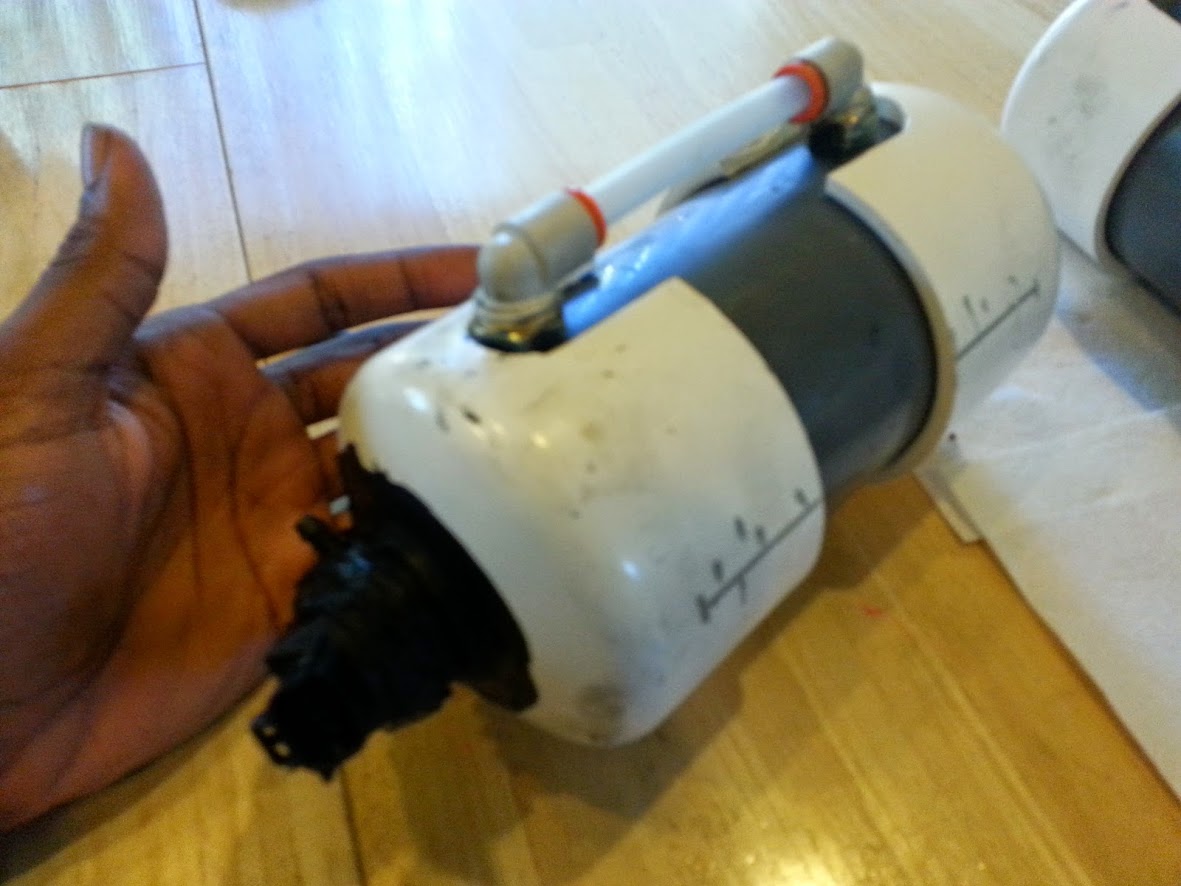
Fluid Tanks
Another thing I don't like about the 8 is that it has way too much washer fluid. Seriously, there's like 2 liters in there. My not completely original solution is to replace the washer fluid bottle with a smaller washer reservoir, a 2 stroke oil tank (for when I get an OMP adapter), and a catch can.
The reason I'm doing a catch can is because when we first changed the filters/oil in the car, it had some oil in the intake accordian tube, as well as some splattered on the air filter. There was also alot of gunk on the throttle body butterfly valve.
They're each really simple and cheap. None of them have many pieces, but the Catch can is slightly more complicated than the others. They are all made of 3 Inch PVC, with two caps each. They all use 3/8" push to connect fittings as level meters (so you can keep track of how full they are without opening them).
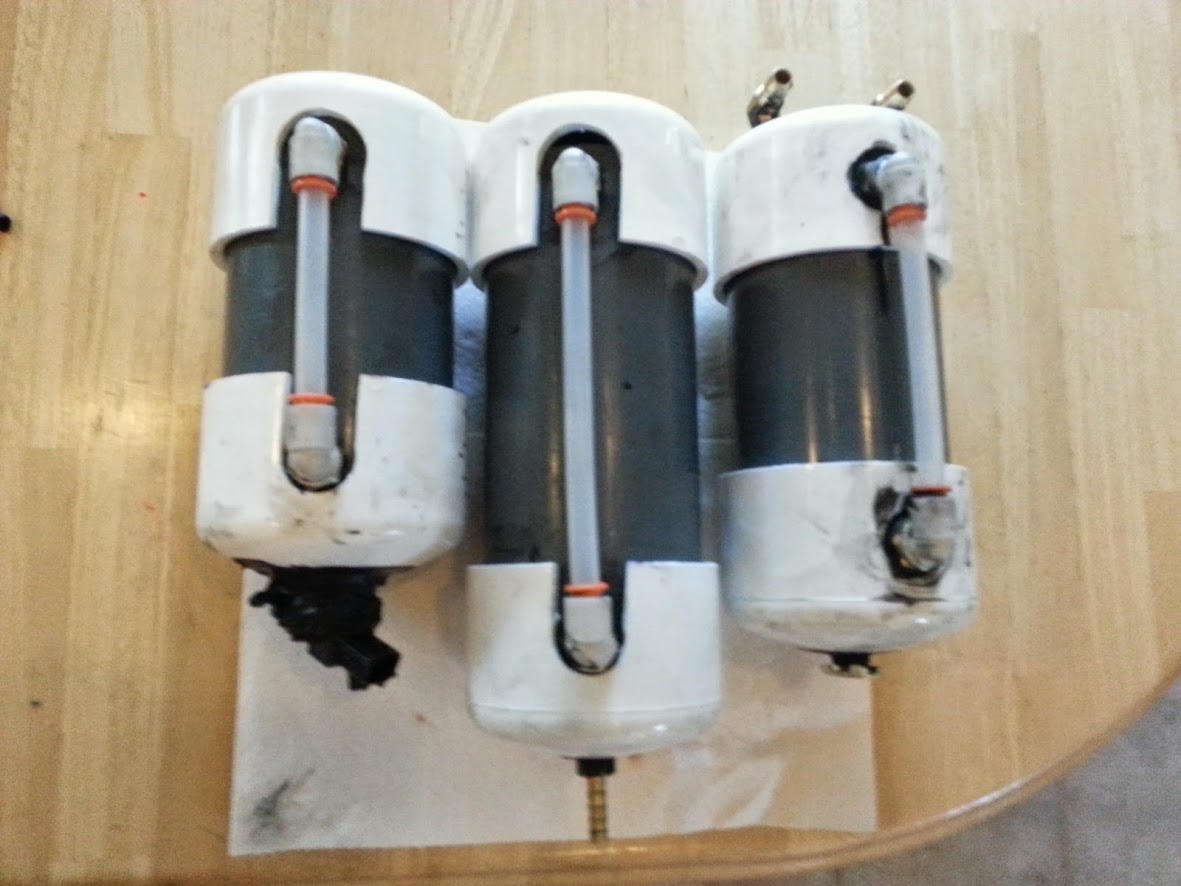
The OMP Reservoir is the simplest. It's just a canister with a 1/4" Barb at the bottom. The lower end is sealed, and the top cap is unsealed and vented. It's built to hold just over 1L of oil. The barb that comes with the RotaryAviation OMP adapter is a 1/8 NPT fitting to 1/4" Hose ID.
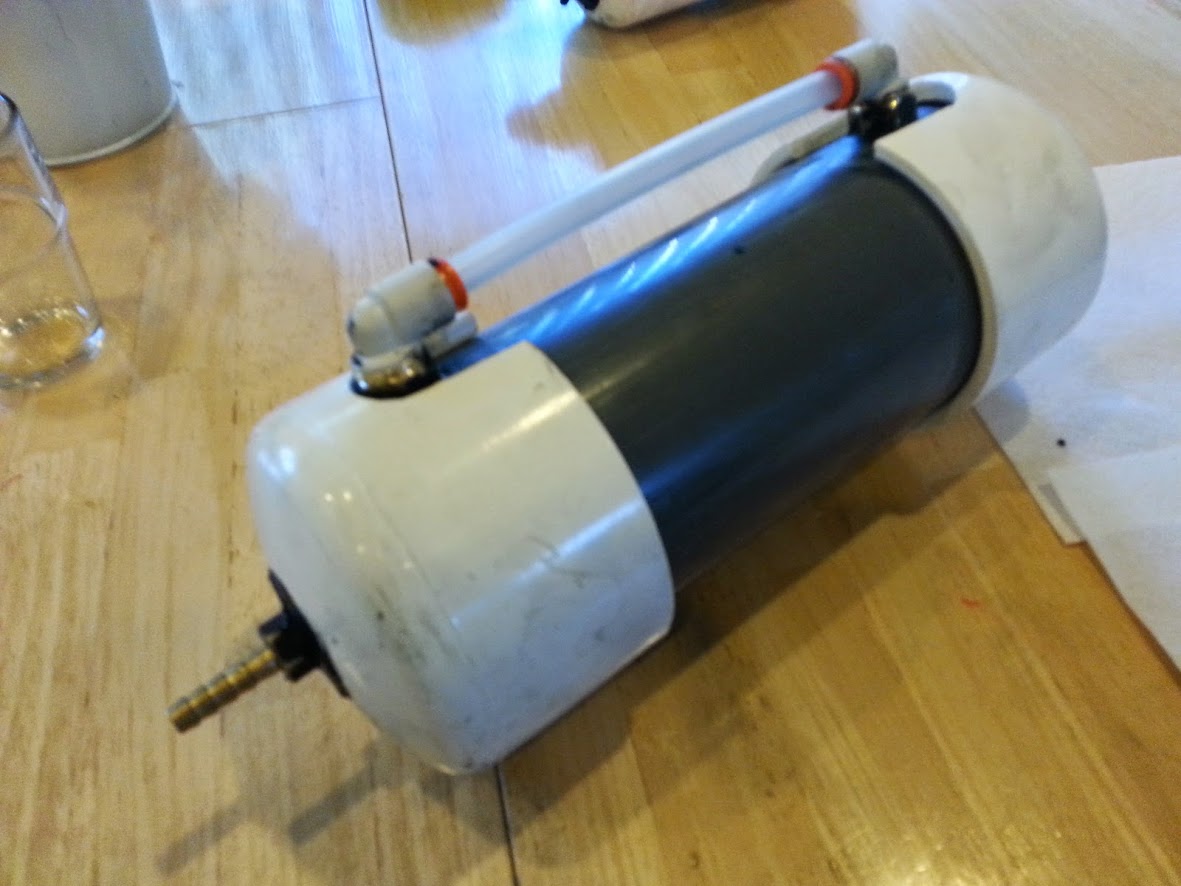
The Washer Fluid Reservoir is still pretty simple. The lower end is sealed, and the top is unsealed and vented. The stock washer pump is mounted vertically on the bottom instead of horizontally. I have a crap ton of silicone to seal this one, because the hole I drilled for the stock grommet was too big. If you want to get away without siliconing the leaks, the hole has to be exactly 34.80mm in diameter. It holds about 0.5L of fluid.
The PCV Catch Can is a little more complicated. I didn't want to go with a vented one, because I'd like to maintain the negative pressure on the oil filler neck. Because of this, the top and bottom need to be sealed. Inside, there is a vertical baffle separating the inlet and outlet connections. On both sides of this baffle, there are stainless steel pot scrubbers (from the dollar store) to help condense some of the oil blowby. At the bottom of the can, there is a stopcock to allow for draining. Since both the top and bottom need to be sealed on this one, I couldn't install the level meter elbows until after they were glued on, so I drilled holes in the sides of both caps before gluing them down. This one can hold about 0.75L.
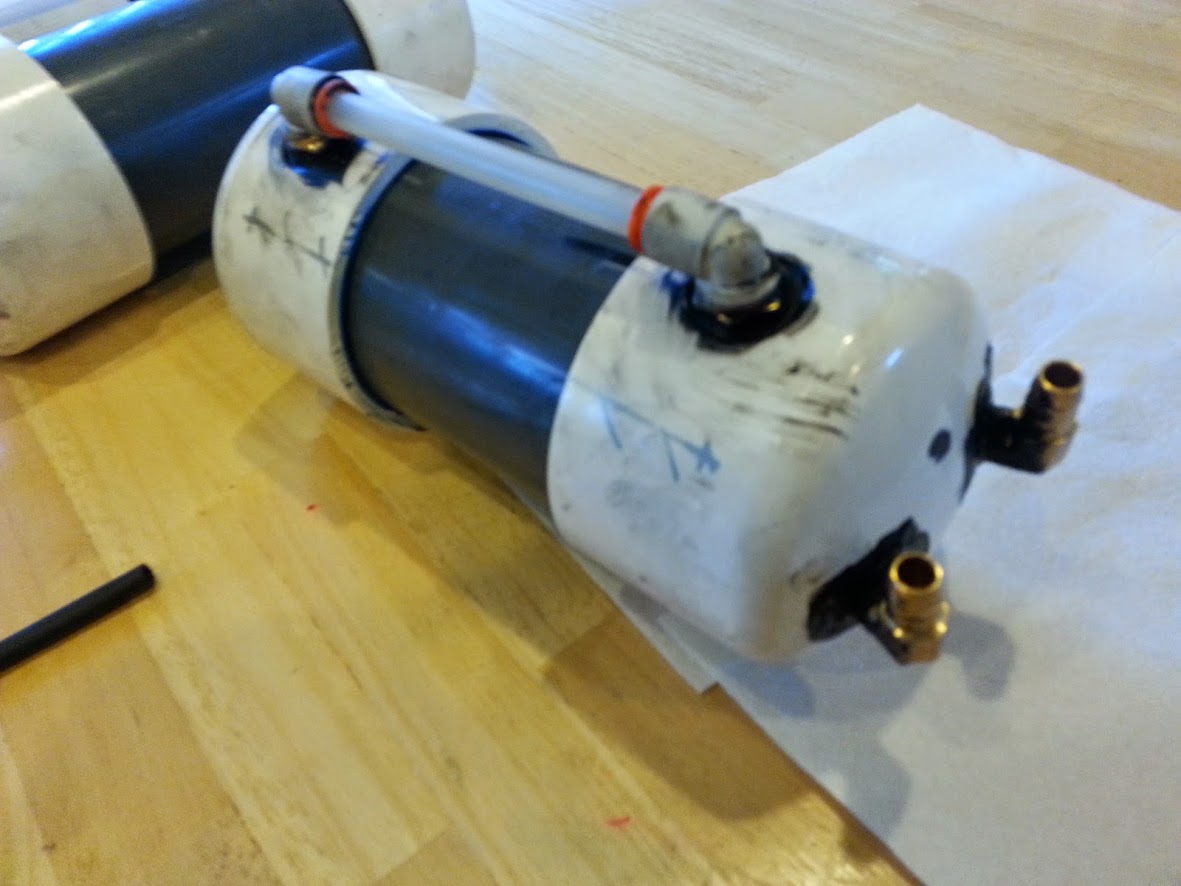
I don't have any of these installed yet, but the stock wash bottle is gone. Sorry for the awful pictures, it was dark.
The reason I'm doing a catch can is because when we first changed the filters/oil in the car, it had some oil in the intake accordian tube, as well as some splattered on the air filter. There was also alot of gunk on the throttle body butterfly valve.
They're each really simple and cheap. None of them have many pieces, but the Catch can is slightly more complicated than the others. They are all made of 3 Inch PVC, with two caps each. They all use 3/8" push to connect fittings as level meters (so you can keep track of how full they are without opening them).
The OMP Reservoir is the simplest. It's just a canister with a 1/4" Barb at the bottom. The lower end is sealed, and the top cap is unsealed and vented. It's built to hold just over 1L of oil. The barb that comes with the RotaryAviation OMP adapter is a 1/8 NPT fitting to 1/4" Hose ID.
The Washer Fluid Reservoir is still pretty simple. The lower end is sealed, and the top is unsealed and vented. The stock washer pump is mounted vertically on the bottom instead of horizontally. I have a crap ton of silicone to seal this one, because the hole I drilled for the stock grommet was too big. If you want to get away without siliconing the leaks, the hole has to be exactly 34.80mm in diameter. It holds about 0.5L of fluid.
The PCV Catch Can is a little more complicated. I didn't want to go with a vented one, because I'd like to maintain the negative pressure on the oil filler neck. Because of this, the top and bottom need to be sealed. Inside, there is a vertical baffle separating the inlet and outlet connections. On both sides of this baffle, there are stainless steel pot scrubbers (from the dollar store) to help condense some of the oil blowby. At the bottom of the can, there is a stopcock to allow for draining. Since both the top and bottom need to be sealed on this one, I couldn't install the level meter elbows until after they were glued on, so I drilled holes in the sides of both caps before gluing them down. This one can hold about 0.75L.
I don't have any of these installed yet, but the stock wash bottle is gone. Sorry for the awful pictures, it was dark.
Last edited by Legot; Aug 4, 2014 at 07:07 PM.
Fuel Leak!
After getting it back from the Transmission place, there was a distinct fuel smell. I had no idea why, but it was definitely there. After some investigation, we found that the fuel pump was leaking at the outlet. Fortunately, it wasn't the actual pump housing leaking, it was just the quick disconnect elbow.
When the car was set to ON, the fuel line would pressurize, causing the leak to start dripping. I can only assume that the same thing was happening as the car was driving along, Thankfully there were no fires.
I ended up cutting off the plastic fuel line where it meets the metal fuel line underneath the drivers side rear seat, and replacing it. The elbow that you see in the picture below serves as both an elbow and an adapter to connect the 5/16" fuel injection hose (used for the metal line connection) to the 3/8" hose (used for the pump housing connection).
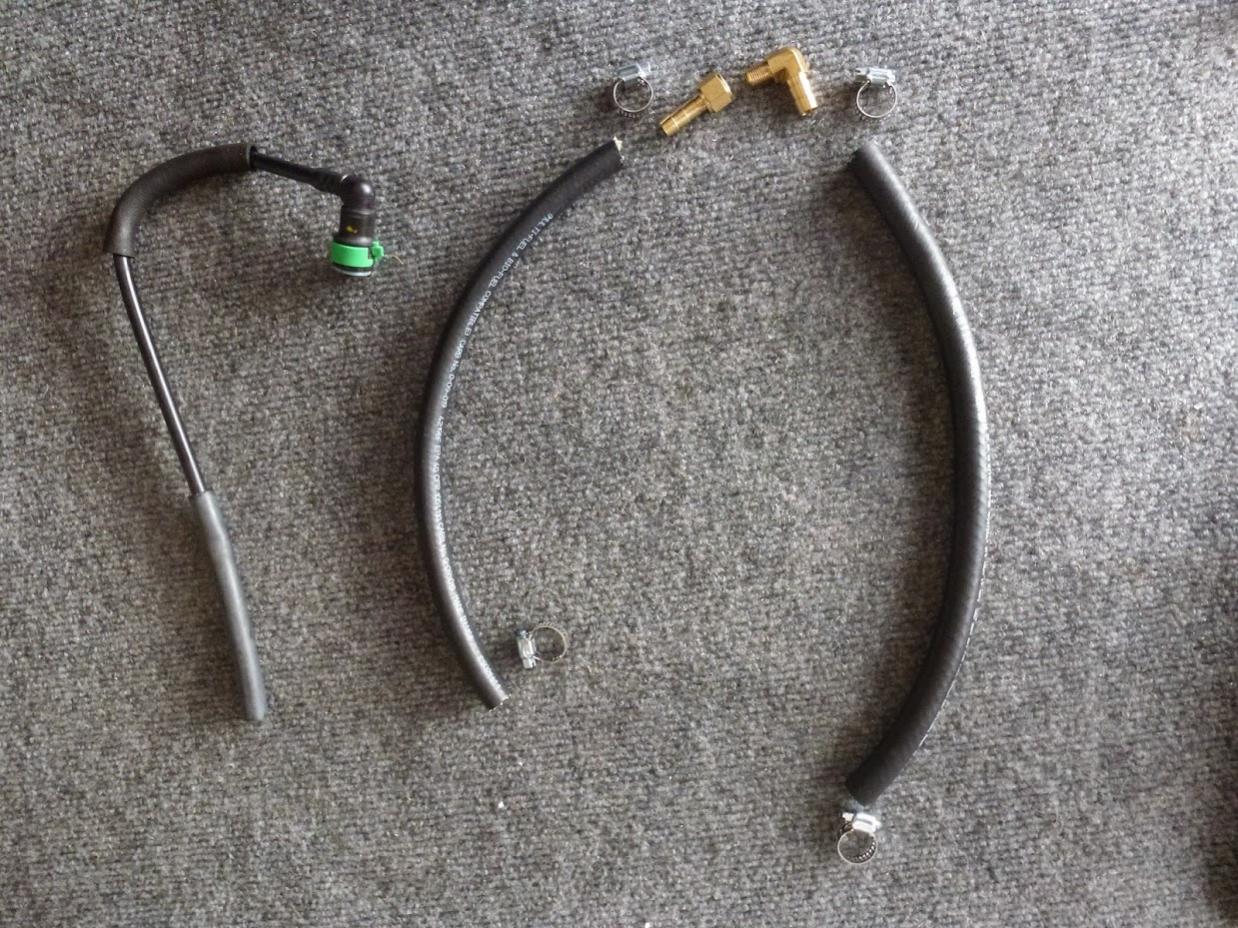
Here's the factory connection compared to my new one.
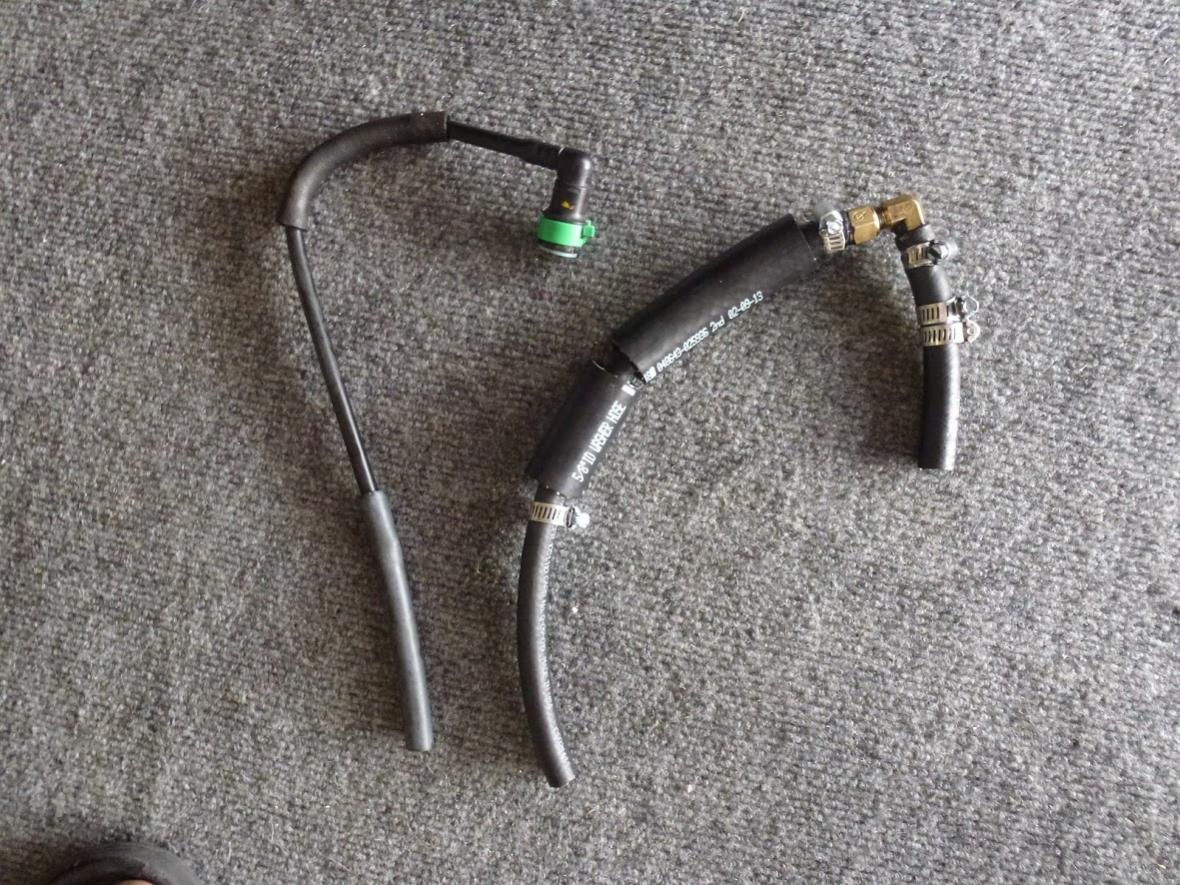
No leaks anymore!
When the car was set to ON, the fuel line would pressurize, causing the leak to start dripping. I can only assume that the same thing was happening as the car was driving along, Thankfully there were no fires.
I ended up cutting off the plastic fuel line where it meets the metal fuel line underneath the drivers side rear seat, and replacing it. The elbow that you see in the picture below serves as both an elbow and an adapter to connect the 5/16" fuel injection hose (used for the metal line connection) to the 3/8" hose (used for the pump housing connection).
Here's the factory connection compared to my new one.
No leaks anymore!
Ignition Failure!
The fuel leak stuff was sorted out and done on Saturday, I didn't get to drive it that night, but I did yesterday and it was great!
About 15 minutes into the drive, after doing a very small amount of hooning, I got a flashing CEL, battery light came on, and the engine died. I managed to coast into a parking lot about a 1.5 miles from home, and I called my dad to come get me.
After a few hours of research, I figured that it must be the coils (it was only a hunch until then). We were going to have it towed home, but low and behold it started and was able to make it back on a single firing rotor (not something I would recommend). When I pulled the coils, this is what I saw.
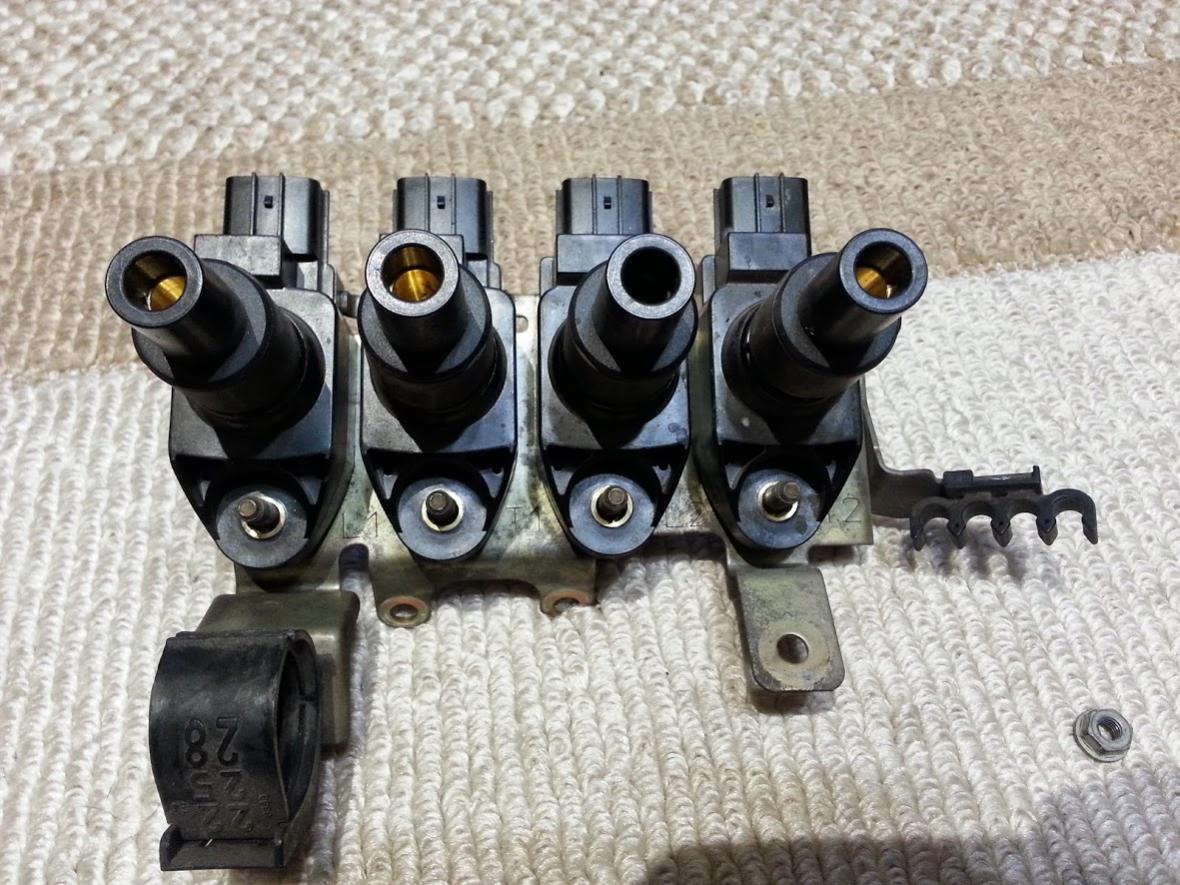
Everything looks ok, right? No! Check out the 3rd coil (L2)!
Here's a closer look at a "good" coil (T2)
Here's how the bad coil looks (L2)
Other than that mess inside, there's nothing saying that these coils aren't all identical and functioning properly. The fact that it's coil L2 lines up perfectly with the Cylinder 2 misfire code I'm getting.
Now, there are three options here. Replace the single bad coil and wait for the others to fail, and replace them as they go (the worst idea ever for our useless coils). Replace all coils/wires/plugs with a new stock set (I really don't feel like going through this again). Or, replace all the coils with those from a massive American truck so that I never have to think about them for the life of the car (#Winning)!
So, I have LS2 coils (D585), wires, and pigtails on the way, as well as new plugs. I'm hoping to get coils/wires installed by Friday night, and plugs in by next Monday. It's all been done before, and it should be straightforward.
Stay tuned.
About 15 minutes into the drive, after doing a very small amount of hooning, I got a flashing CEL, battery light came on, and the engine died. I managed to coast into a parking lot about a 1.5 miles from home, and I called my dad to come get me.
After a few hours of research, I figured that it must be the coils (it was only a hunch until then). We were going to have it towed home, but low and behold it started and was able to make it back on a single firing rotor (not something I would recommend). When I pulled the coils, this is what I saw.
Everything looks ok, right? No! Check out the 3rd coil (L2)!
Here's a closer look at a "good" coil (T2)
Here's how the bad coil looks (L2)
Other than that mess inside, there's nothing saying that these coils aren't all identical and functioning properly. The fact that it's coil L2 lines up perfectly with the Cylinder 2 misfire code I'm getting.
Now, there are three options here. Replace the single bad coil and wait for the others to fail, and replace them as they go (the worst idea ever for our useless coils). Replace all coils/wires/plugs with a new stock set (I really don't feel like going through this again). Or, replace all the coils with those from a massive American truck so that I never have to think about them for the life of the car (#Winning)!
So, I have LS2 coils (D585), wires, and pigtails on the way, as well as new plugs. I'm hoping to get coils/wires installed by Friday night, and plugs in by next Monday. It's all been done before, and it should be straightforward.
Stay tuned.


Thanks guys!
There's a catless midpipe for sale on Craigslist for cheap. Can anyone identify the brand? I think it's Race Roots, but I can't be sure...
http://phoenix.craigslist.org/evl/pts/4569602813.html
There's a catless midpipe for sale on Craigslist for cheap. Can anyone identify the brand? I think it's Race Roots, but I can't be sure...
http://phoenix.craigslist.org/evl/pts/4569602813.html
Last edited by Legot; Aug 6, 2014 at 01:26 AM.


40th anniversary Edition
Joined: May 2008
Posts: 2,951
Likes: 142
From: Grapevine, Texas
did you read RIWWP's stickie about coils and the warnings about the compatibility of LS coils. They are not a perfect match with the proper ignition for a rotary engine. You would have done much better to get the BHR kit, coils and wires. They are fully compatible with the RX8 and the Renesis engine , and they will last the lifetime of your car. Really a much better choice than the LS which were NEVER designed for a rotary engine's unique ignition requirements. here is a copy of that info and recommendations about coils. (note the bold type below). Best to you.
Importance of Ignition Health: (review)
************************ READ THIS!!!! ************************
One of the most often overlooked or ignored parts of RX-8 ownership is the health of the ignition system. This includes the ignition coils, spark plug wires, and spark plugs. They fail. Often. So often as to be critical parts of regular maintenance.
Before I detail why, check out the first post of this thread here: The impact of old coils, wires, & plugs (owner's post here: [FEELER] Spring 2012 MM Tuning / Dyno Day @ Speed1 Allentown (formerly KDRotary))
The owner's power dropped from 199whp to 172whp JUST from failing ignition. That's a 13.5% power loss!
Do I have your attention now? Good.
Mazda officially lists the plug wires and plugs as part of regular maintenance, but not the coils. Many dealers STILL don't know how easily the coils can fail. And they fail about the same time as the wires and plugs, which is about every 30,000 miles. Some can last longer, some shorter, and it's more related to your total RPMs than it is to your mileage. Highway cruising is easier on the coils than spending a day pounding around a race track.
When coils fail, they don't suddenly shut off. They start producing weaker pulses scattered among strong ones. The rate of weak pulses slowly increases and pulses start getting dropped entirely, which is where misfires start. All of this means that you aren't burning all the fuel and aren't using all the air that the engine pulled in for that combustion, and it unburnt fuel and air gets dumped into the exhaust, where it happily ignites with the presence of plenty of heat. This saturates the cat in both fuel and heat, and will rapidly kill the cat (A $1,300 USD replacement). Continuing to drive on a failing cat will add other problems such as engine damage and vehicle fires. I am not exaggerating, this can happen with just a single cat failure!
Example: RX8 Engine responce HELP!
Plug fouling and wire failure is largely the same result, since all 3 pieces are needed for a complete spark. Foul the plug and it doesn't matter if the coil and wire are good. Break down the wire and it doesn't matter if the coil and plug are good.
Symptoms of ignition failure include: Power Loss, mileage drop, unstable idle, bad idle, inability to idle, shaking at idle, unstable high rpm, misfiring, flashing CEL, coughing engine, glowing cat, flooding, inability to start, inability to pass an emissions sniffer test, and just about anything you can think of where a weak or missing spark causes problems.
And if one fails, it will cascade to the other trio on the same rotor. A plug that can't fire will start fouling the other. A coil that can't fire a plug starts wearing out rapidly (if you want to test this, just unplug a wire from a plug and run the engine for a while. The coil will rapidly fail. Not unique to rotary engines)
Why do coils fail so easily?
This is largely because Mazda opted for cheap coils because of RX-7 owner complaints about how expensive their coils were. The RX-7 coils lasted much longer though. So Mazda went cheap, and so we have to replace regularly. And you can't compare to piston engine coils. A piston engine with the same setup of 1 coil for 1 plug has an average RPM of about 2,500rpm and the coil is firing every other revolution, so the coil is firing about 1,250 pulses per minute. Our rotary has an average RPM of more like 4,000rpm, and each coil fires every revolution, so about 4,000 pulses per minute. That's a bit over 3 times more. Even a piston max RPM of about 6,000rpm vs our 9,000rpm makes the difference 3,000 pulses per minute vs 9,000 pulses per minute, or 3 times as fast.
If our coils would last about 3 times longer, you are talking an average of 90,000 miles.
So keep your ignition healthy!
Where can I buy new ignition coils?
You have a number of options for coils:
- The Cheapest option: BWD/Intermotor coils from auto parts stores like Advance Auto. These ARE OEM coils, just being sold to auto parts stores directly from the original manufacturer. This is common for virtually every OEM part for any car older than about 5 years old. 4 coils, 4 plugs, and 4 wires can be had for around $190-220 total based on whatever promotion is running at the time, shipped to your door for free. They are considered to be the first coil revision and you should expect to need to replace them around 20,000 miles, 30,000 miles max. They often come with a "lifetime warranty" by the auto parts store, which could potentially be leveraged for perpetually new coils.
- The Best Upgrade: The BHR ignition coil upgrade can be had for around $500, which eliminates the need to continue replacing coils periodically, as well as deliverying a significantly stronger spark for minor mileage and power gains. It is a proven kit with top notch customer service supporting it. It includes the wires, you still need to add plugs ($80)
- The For-Sure OEM: Mazmart sells all 4 coils of the latest OEM coil revision (C) for around $250, (just the coils, you still need to add plugs and wires) Supported by top notch customer service. They will likely last longer than 30,000 miles, but we don't have much solid data on how long the latest coil revision will last. If you are having trouble getting other coil options where you live, or are wary about purchasing coils from other sources, then this is your cheapest option for coils straight out of the Mazda dealer parts network.
- The Most Expensive option: Buying from a dealer will run you around $300+ for the coils, $500+ for coils, wires and plugs, and if you have them do the install, expect to get a bill for anywhere from $700 to $1,800. You may not get the latest coil revision, and it is unlikely that the dealer or techs will be able to tell you what coil revision you have. Yes, you are getting shafted if you take this option, so bring lube.
- The Highest Risk option: Ebay coils continue to pop up as counterfeit, mislabeled, dead on arrival, and have zero post-purchase support largely. They are the "cheapest" listed price, but when you add that $92 or whatever to the price of anything in the list above from having to do it over again, you can see that they are no longer the cheapest option. Do it right the first time. "Motor King" coils are popping up at an attractive price on Ebay, but are being proven as ineffective, to the point of being unable to get the engine fired. "Mazda" branded coils on ebay are almost always counterfeit. Check the seller's name though, since some of our vendors sell legitimate coils there. The price will be $200+ though. Anything sold as "Mazda OEM" under ~$26 per coil should really be considered as suspect and probably counterfeit.
Plugs
Always go with OEM plugs. The only reason to go with anything else is if you are turbocharged or supercharged, have researched ALL the options, and decide to go with something different. Even most FI setups use OEM plugs.
NGK brand, two each of:
RE9B-T <- (trailing / top plugs)
RE7C-L <- (leading / lower plugs)
You can get them from most vendors, Amazon, and autoparts stores easily. The price range is $18-$20 for each plug typically, $72-$80 + shipping total.
Note:
Be wary of "LSx D585 coil upgrades", as not all D585 coils are created the same, and the standard generic D585 coil is not properly designed internally for the RX-8's ignition needs. They generally "work", but there are anomalies and performance issues that have to be solved, if they can be solved. Definitely NOT a plug and play option, even if it is advertised as "plug and play". There is a lot more on the subject to understand, so it would be to your benefit if you learned about the needs prior to making a purchase.
Like
__________________
New and Potential Owners START HERE!
Dumb Question Thread - no flaming or sarcasm allowed
Newbie's Guide to Modding the RX-8
RX-8 Symptoms and Causes
Last edited by gwilliams6; Aug 6, 2014 at 08:59 AM.
I've read alot on the subject, and I've read the above post, but I can't imagine that there are any significant design differences from the OEM coils and other coils in the industry (there are several non-rotary cars that use our coils too).
Honestly, nothing is going to be a perfect match for our engines except for maybe the stock RX7 coils (do not quote me on that), and a fair number of those guys use LSx coils as well. Since the D585 is a more reliable coil, it's reasonable to assume that it will out preform an OEM coil. I really doubt that the BHR ignition is anything more than a plug and play LSx or some unknown marine coil swap, even if it isn't I haven't read of any new problems coming up with a D585 swap when done correctly. I know that it isn't the absolute best solution, but it will meet my needs better than the stock system.
Honestly, nothing is going to be a perfect match for our engines except for maybe the stock RX7 coils (do not quote me on that), and a fair number of those guys use LSx coils as well. Since the D585 is a more reliable coil, it's reasonable to assume that it will out preform an OEM coil. I really doubt that the BHR ignition is anything more than a plug and play LSx or some unknown marine coil swap, even if it isn't I haven't read of any new problems coming up with a D585 swap when done correctly. I know that it isn't the absolute best solution, but it will meet my needs better than the stock system.
Last edited by Legot; Aug 6, 2014 at 05:56 PM.
40th anniversary Edition
Joined: May 2008
Posts: 2,951
Likes: 142
From: Grapevine, Texas
Hi Legot, You are wrong about what you think you know about BHR coils and what coils work with what rotary engines. I have owned seven rotaries with different OEM and race-designed coils over my 40 years of rotary driving on street and track. Owned all three generations of RX7s and none of those OEM coils are a good fit for an RX8. The BHR coils are made for the RX8 Renesis engine which has different exhaust ports and compression ratio and different combustion characteristics and ignition requirements than any RX7 or LS2 application.
Charles of BHR took a lot of time and effort and testing to make a rock solid coil kit just for the RX8 that delivers a hotter and higher voltage spark than the OEM Mazda coils. It gives you a slight hp and mpg bump with your RX8. And the BHR kits is made to be extremely durable and will last you the lifetime of your RX8, no need to change them out every 30,000 miles or so like others.
Hey if you want to absorb the advice of our verbose moderator RIWWP and others here and still try your luck with the LS2 coils that is your choice, and the results are on you if you have any issues. All we can do in this forum is offer you information and advice from a group of folks that have thousands of total collective years of experience with rotaries and RX8s . LS2 coils are designed for piston engines, not for the Renesis rotary engine. They may work ok, and then again you may have issues and wind up hurting your engine and/or cat in the long run and then costing yourself much more money than if you invested in something better suited for a Renesis engine. There are certainly differing opinions among our members, so I wish you good luck and hope you don't have issues down the road.
Last edited by gwilliams6; Aug 6, 2014 at 11:16 PM.
I hear what your saying, and I recognize that you know more than I do. Assuming I don't have any completely unexpected issues (which I might) I really don't care whether or not this works better than the stock ignition system, and I absolutely do not expect it to be as good as the BHR system.
This solution has been proven to a degree that I see fit for my own car, so I'm going with it.
This solution has been proven to a degree that I see fit for my own car, so I'm going with it.
Everything has arrived. I switched spark plugs and installed the harnesses for each coil. Started on a mounting bracket for the coils but it's kind of a pain, so I'll get that done tomorrow.

Registered
Joined: Aug 2006
Posts: 5,027
Likes: 5
From: Northern Virginia
Looking at the cool things you fabbed - undertray, screens, reservoirs - it's pretty clear that buying an off-the-shelf bolt-on fix just isn't your style. Much of owning a car like this is style. 
When your ignition system is finished, can you post how much you spent on parts and how much time you spent building the bracket and stuff? Not that I'd build one myself, but I tend to be curious about things like this.
Ken
When your ignition system is finished, can you post how much you spent on parts and how much time you spent building the bracket and stuff? Not that I'd build one myself, but I tend to be curious about things like this.
Ken
LS2 Ignition
Hey guys, thanks for your support so far! I only got the new coils in Saturday so no thorough testing yet, but I've driven about 30 miles on them so far, and they seem great!
Since the total existence failure of coil L2 last weekend I decided to change the ignition to D585 coil pack, as opposed to the stock coil pack, which tends to fail at anything beyond 30,000 miles. In my case, the coil failure was completely unexpected and very sudden (which I'm assuming is atypical), there was no prior misfire or startup lag.
There is a slightly unclear argument against using LS type coils in rotaries, so here's an attempt at trying to bring that out. It's reasonable, so I'm not going to take a side, I'm using this system because it has been proven to function at least as good as the stock coils.
A) They are not designed to continuously be fired at very high rates. In standard 4 stroke engines each coil is fired once for every two rotations of the crankshaft. In a rotary a coil is fired once for every rotation of the crankshaft. Obviously, our engines rev higher than most traditional engines used in cars, so that adds to the potential problem.
E.g.
A standard engine @ 5000rpm fires any single coil at 41.667Hz
A Rotary engine @ 5000rpm fires any single coil at 83.33Hz
B) Firing at such a high rate will reduce coil life. Obviously this is true. Higher rates produce more heat, so naturally they will wear out faster than they would in a standard engine. Fortunately for us the system that they replace is far more vulnerable to wear from high rate operation, so longevity should be increased by comparison.
C) Dwell settings for LS type coils do not match the dwell tables present in the stock ECUs of any rotary vehicle, which can cause issues with misfiring and/or not firing. I'm not 100% confident on this, but I have read that the stock dwell time for our cars is set to 3.5ms, which is a moderately shorter time than most cars using LS coils (~5ms). There can be issues with the auto discharge feature of the coils if certain situations arise, but that kind of situation could only be caused by faulty signaling to the coil or a very high overvoltage.
This one seems kind of unfounded as an issue, specifically for the D585. It makes a spark at the 3.5ms dwell, and since it is a coil that allows for about 3x higher secondary output current at a recommended 5.5ms dwell than stock coils (120mA vs 40mA) it is expected to produce a stronger spark than stock. The shorter dwell will also allow for less heating of the coil (for a given rate of fire), and extended coil life (for a given rate of fire).
Here's a little bit of reading on dwells:
RX8 Dwell Thread
Shoptalkforums.com ? View topic - Spark Plug Wires?
Problems Concerning Long Dwell Times [PDF Warning]
Ok, now that that's over with here's what I did. It's really quite simple. All you're doing is replacing a part with the same part in a slightly different form factor. I modified the orignal bracket so that the mounting tabs on the coils can pop through the bottom, as well as adding a flat plate on the top. Hopefully you know what the stock bracket looks like, if not you need to change your coils immediately!
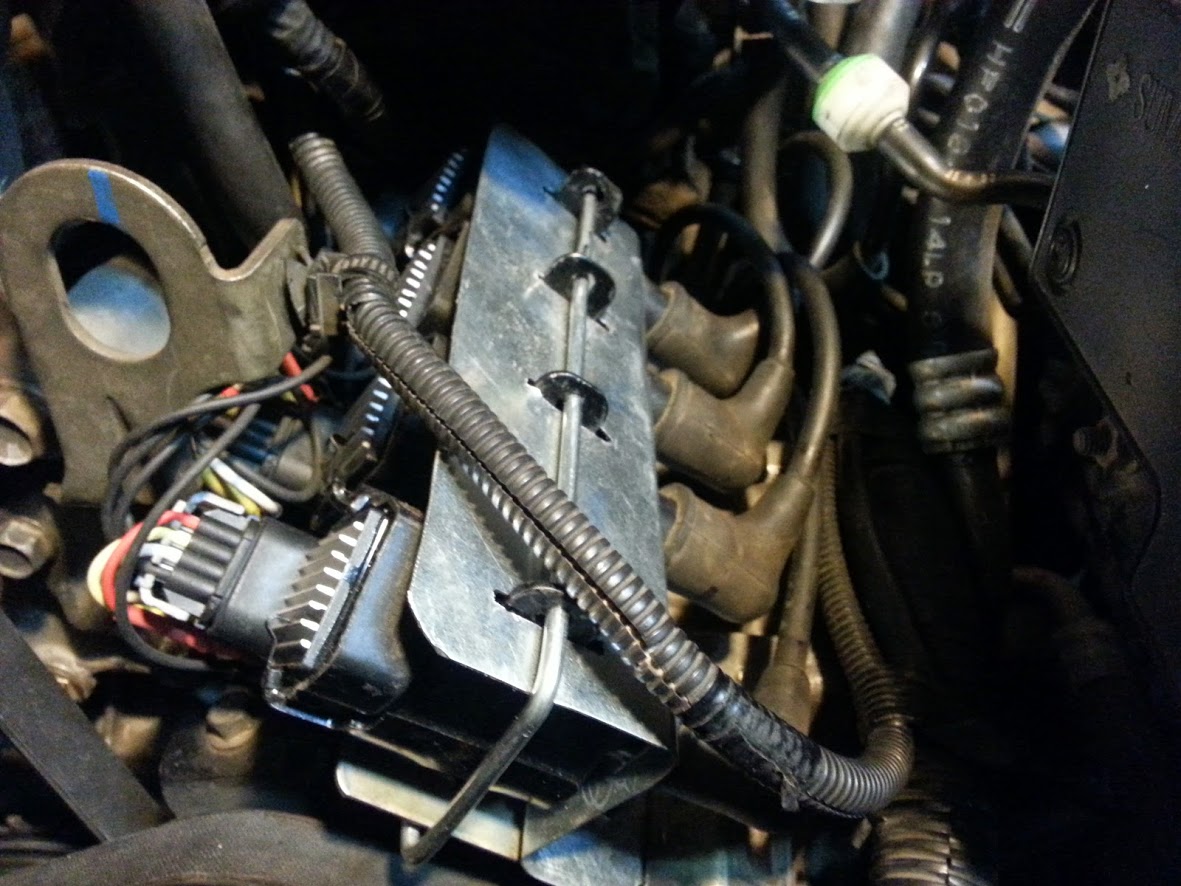
This is the complete modified bracket. It's a galvanized steel plate with 4 holes drilled for the original coil mounting screws, 4 holes for the coil-wire connection, and 4 slots cut for the upper mounting points. I used a piece of hard wire bent into a U shape to keep the coils from rattling around. They stay in place in their new bracket without it, but the added security is nice (I didn't have any small allthread on hand).
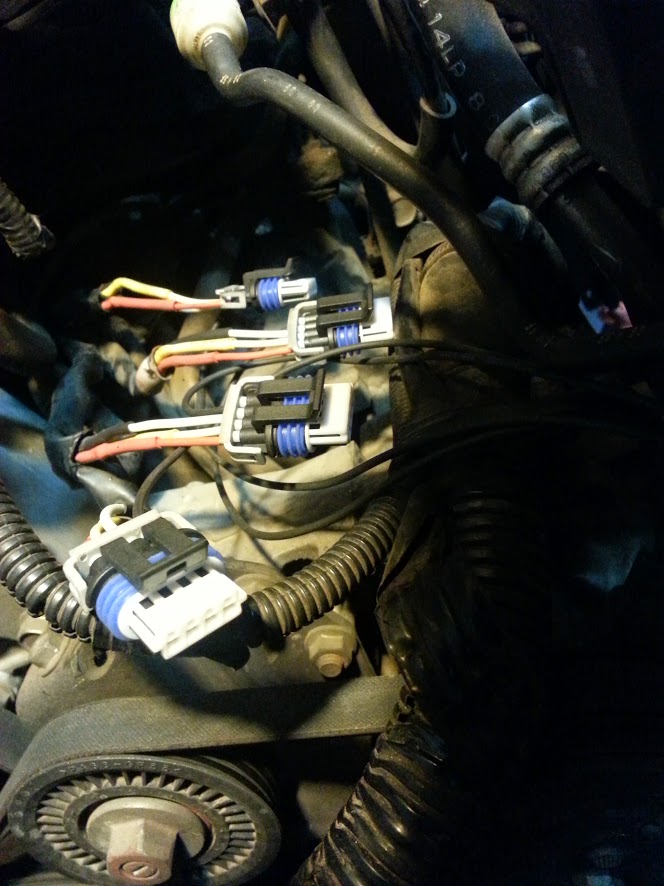
These are the plugs. Rather than buying the connector, I just bought some LS coil pigtails and soldered them on. The stock coils only use a 3 pin connection, and I'm assuming that the brass plated mounting hole that each has is an engine block ground connection. The D585 coils do not have this connection, so it is routed to a 4th pin on the connector plug. I simply connected all four of these grounds together and bolted them to the engine using one of the bolts on the water pump.
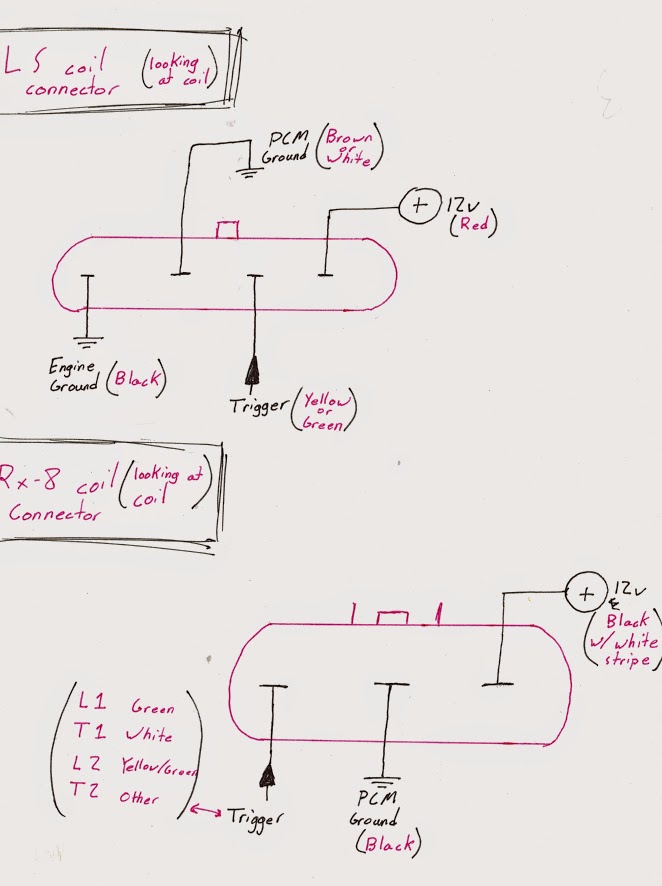
This is a little drawing I drew of the connections that are on each pin of both connectors. I couldn't find a clear one elsewhere.
And finally, here's a picture of everything installed.
Overall, making the bracket took 2-3 hours (the zinc plated steel stock bracket is really freaking difficult to work with), and soldering up the wires took about 30 minutes. Changing plugs with my undertray took about 30 minutes as well, there's nothing to get in the way of taking them all out from beneath the car (the wheel didn't even have to come off).
So it's not a difficult thing to do, nor is it very time consuming or expensive. Prices for things were as follows.
4 pack of ACdelco D585 coils - $125
"Universal" Accel wire pack - $25
2x 2 pack MSD coil Boots - $15
4 pack of LS connector Pigtails - $30
BennetBuilt LS2 Spark Plug Wires - $85
Total Cost - $235 (if I had gone with high quality wires to begin with)
After the NVRAM and KAM reset, I tried starting it and it wouldn't start. A second try got it started, but it smelled like a lawnmower. After letting it idle for a while, the awful smell went away and everything was smooth. The ECU needs a chance to figure out spark timings and things before it can run properly, so it's good to do the resets and let it idle for a bit before driving. At this point, it's running flawlessly, start up is really quick, and there's no hesitation on throttle.
So that's a success!
Since the total existence failure of coil L2 last weekend I decided to change the ignition to D585 coil pack, as opposed to the stock coil pack, which tends to fail at anything beyond 30,000 miles. In my case, the coil failure was completely unexpected and very sudden (which I'm assuming is atypical), there was no prior misfire or startup lag.
There is a slightly unclear argument against using LS type coils in rotaries, so here's an attempt at trying to bring that out. It's reasonable, so I'm not going to take a side, I'm using this system because it has been proven to function at least as good as the stock coils.
A) They are not designed to continuously be fired at very high rates. In standard 4 stroke engines each coil is fired once for every two rotations of the crankshaft. In a rotary a coil is fired once for every rotation of the crankshaft. Obviously, our engines rev higher than most traditional engines used in cars, so that adds to the potential problem.
E.g.
A standard engine @ 5000rpm fires any single coil at 41.667Hz
A Rotary engine @ 5000rpm fires any single coil at 83.33Hz
B) Firing at such a high rate will reduce coil life. Obviously this is true. Higher rates produce more heat, so naturally they will wear out faster than they would in a standard engine. Fortunately for us the system that they replace is far more vulnerable to wear from high rate operation, so longevity should be increased by comparison.
C) Dwell settings for LS type coils do not match the dwell tables present in the stock ECUs of any rotary vehicle, which can cause issues with misfiring and/or not firing. I'm not 100% confident on this, but I have read that the stock dwell time for our cars is set to 3.5ms, which is a moderately shorter time than most cars using LS coils (~5ms). There can be issues with the auto discharge feature of the coils if certain situations arise, but that kind of situation could only be caused by faulty signaling to the coil or a very high overvoltage.
This one seems kind of unfounded as an issue, specifically for the D585. It makes a spark at the 3.5ms dwell, and since it is a coil that allows for about 3x higher secondary output current at a recommended 5.5ms dwell than stock coils (120mA vs 40mA) it is expected to produce a stronger spark than stock. The shorter dwell will also allow for less heating of the coil (for a given rate of fire), and extended coil life (for a given rate of fire).
Here's a little bit of reading on dwells:
RX8 Dwell Thread
Shoptalkforums.com ? View topic - Spark Plug Wires?
Problems Concerning Long Dwell Times [PDF Warning]
Ok, now that that's over with here's what I did. It's really quite simple. All you're doing is replacing a part with the same part in a slightly different form factor. I modified the orignal bracket so that the mounting tabs on the coils can pop through the bottom, as well as adding a flat plate on the top. Hopefully you know what the stock bracket looks like, if not you need to change your coils immediately!
This is the complete modified bracket. It's a galvanized steel plate with 4 holes drilled for the original coil mounting screws, 4 holes for the coil-wire connection, and 4 slots cut for the upper mounting points. I used a piece of hard wire bent into a U shape to keep the coils from rattling around. They stay in place in their new bracket without it, but the added security is nice (I didn't have any small allthread on hand).
These are the plugs. Rather than buying the connector, I just bought some LS coil pigtails and soldered them on. The stock coils only use a 3 pin connection, and I'm assuming that the brass plated mounting hole that each has is an engine block ground connection. The D585 coils do not have this connection, so it is routed to a 4th pin on the connector plug. I simply connected all four of these grounds together and bolted them to the engine using one of the bolts on the water pump.
This is a little drawing I drew of the connections that are on each pin of both connectors. I couldn't find a clear one elsewhere.
And finally, here's a picture of everything installed.
Overall, making the bracket took 2-3 hours (the zinc plated steel stock bracket is really freaking difficult to work with), and soldering up the wires took about 30 minutes. Changing plugs with my undertray took about 30 minutes as well, there's nothing to get in the way of taking them all out from beneath the car (the wheel didn't even have to come off).
So it's not a difficult thing to do, nor is it very time consuming or expensive. Prices for things were as follows.
4 pack of ACdelco D585 coils - $125
"Universal" Accel wire pack - $25
2x 2 pack MSD coil Boots - $15
4 pack of LS connector Pigtails - $30
BennetBuilt LS2 Spark Plug Wires - $85
Total Cost - $235 (if I had gone with high quality wires to begin with)
After the NVRAM and KAM reset, I tried starting it and it wouldn't start. A second try got it started, but it smelled like a lawnmower. After letting it idle for a while, the awful smell went away and everything was smooth. The ECU needs a chance to figure out spark timings and things before it can run properly, so it's good to do the resets and let it idle for a bit before driving. At this point, it's running flawlessly, start up is really quick, and there's no hesitation on throttle.
So that's a success!
Last edited by Legot; Aug 28, 2014 at 08:12 PM.

Driving my unreliable rx8
Joined: Oct 2012
Posts: 2,051
Likes: 7
From: Alvarado, Tx
Id get rid of that plate on top it will hold in heat and stop airflow. It also runs right by the spark output and could be a place to develop arcing.
Cutting off the stock bolts and making holes is the exact way i mounted mine.
I used allthread across the bottom and top. Then ss tubbing to make spacers between the coils then bolted them together.
Cutting off the stock bolts and making holes is the exact way i mounted mine.
I used allthread across the bottom and top. Then ss tubbing to make spacers between the coils then bolted them together.
I thought about the plate and potential arcing, but I don't think it will effect anything. There's virtually no airflow to that part of the engine bay, and the mounting tabs (on mine at least) are actually grounded steel jackets. I don't think removing/venting the plate will help anything.
Gentlemen, I have yet another problem!
I'm still getting occational missfires. It can start up, but the idle is substantialy more rough than it should be. And my P0302 CEL keeps popping up. Since it will start properly and rev to the redline without any issues I've ruled out the coils themselves. I'm fairly confident that the problem lies within the wires. Either they're too high resistance, or I just did a really crappy job putting on the terminals (a fairly possible possibility).
The reason I'm pointing at the wires is that I acctualy managed to run the stock wires for a day or so (gasp!) after crimping down the coil-side contact, and everything ran fine. When I switched to the new wires with the proper LS1 coil boots is when the issue came up.
The stock wires are all between 2.14k ohms and 2.8k ohms, while my new wires are each ~10.2k ohms. For comparison, I'm estimating the BHR wires at 75 Ohms (not k Ohms).
I'm trying to source some BHR wires from their ignition system. Wish me luck on that. On a side note, the BHR system does in fact use the D585 coils. There's nothing special about them (not to discount it as a great product, I'm sure I'd be having fewer problems if I had bought that kit).
Last edited by Legot; Aug 14, 2014 at 10:52 PM.
Ok kids, no real updates yet, but I am getting pretty frustrated with sourcing these wires. I've sent a couple emails to BHR (through Charles and their site), but I haven't gotten any word back from them. That's incredibly inconvenient since school starts on Thursday and it would be really useful to have a way to get there, but alas, there's another local company not coming through for me.
I'm about to buy a Super Conductor LS1 V8 truck set from MSD, MSD-32829. I can only hope that the wire lengths are long enough, and that they fix the issue ... Wish me luck...
I'm about to buy a Super Conductor LS1 V8 truck set from MSD, MSD-32829. I can only hope that the wire lengths are long enough, and that they fix the issue ... Wish me luck...
The wires came today about 2 days after they were expected, but once they were in it works much better than the other ones. Resistance on these is 30-70 Ohms each, and I can't hear any radio noise. Misfiring hasn't come back, but power has dropped ever so slightly (or it would seem, I haven't driven it in a couple weeks). I have serious doubts that that's anything real, but if it is I'll attribute it to the PCM learning the new trims and such.
With these new wires, power application and the exhaust note is noticeably smoother than with the higher resistance set (before it was misfiring). They are based on the MSD SuperConductor wires (Just like the BHR wires and Paimon's DIY), and they are wire-wound rather than carbon sheathed. The resistance is much lower, and the wound wire acts as an electromagnetic choke to seriously cut down on RF noise.
With these new wires, power application and the exhaust note is noticeably smoother than with the higher resistance set (before it was misfiring). They are based on the MSD SuperConductor wires (Just like the BHR wires and Paimon's DIY), and they are wire-wound rather than carbon sheathed. The resistance is much lower, and the wound wire acts as an electromagnetic choke to seriously cut down on RF noise.
Last edited by Legot; Aug 28, 2014 at 08:25 PM.
40th anniversary Edition
Joined: May 2008
Posts: 2,951
Likes: 142
From: Grapevine, Texas
Either you are having fun with all this or you are a real gluton for punishment. I have known Charles of BHR to be a stand up guy who responds to any reasonable requests and emails. You would have saved yourself countless hours of time and trouble if you had bought the BHR kit from the beginning, but I guess that is NOT your style. To each his own then. Good luck with all your modifications and fabrications ! Maybe we can all learn something valuable here from your experiences, failures and successes. But most folks here will not be joining you in any lifetime bans of BHR products.