2005 RX8 - LS1/T56 Swap
 12-03-2015, 09:56 AM
#226
Pistons Please
Thread Starter

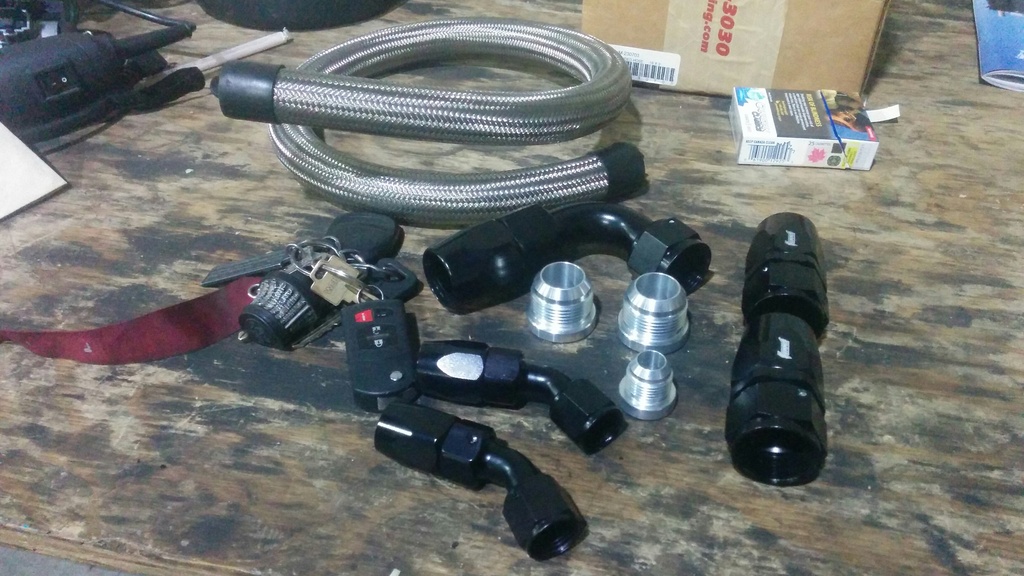
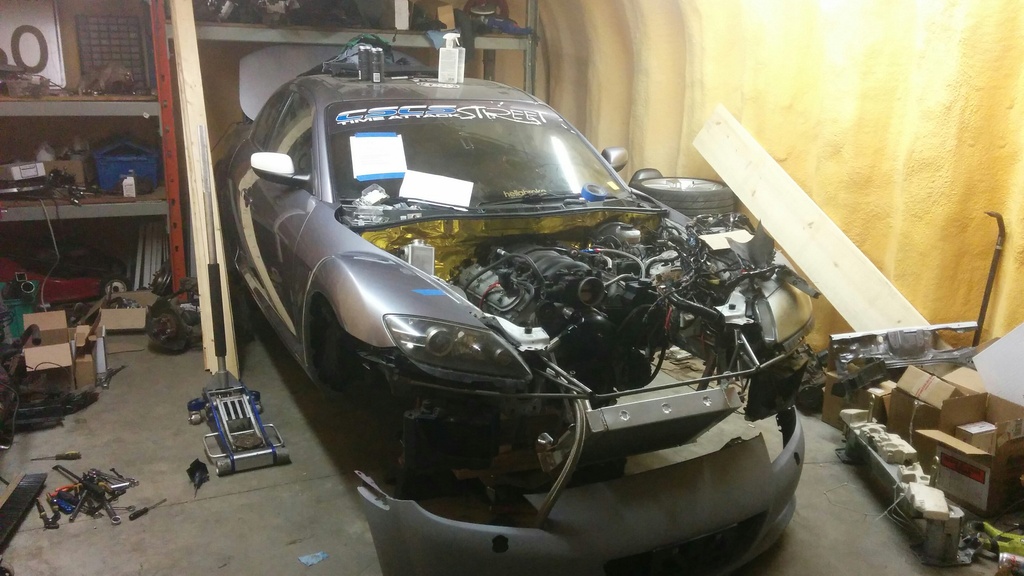
Yay! More parts arrivals! 
In today:
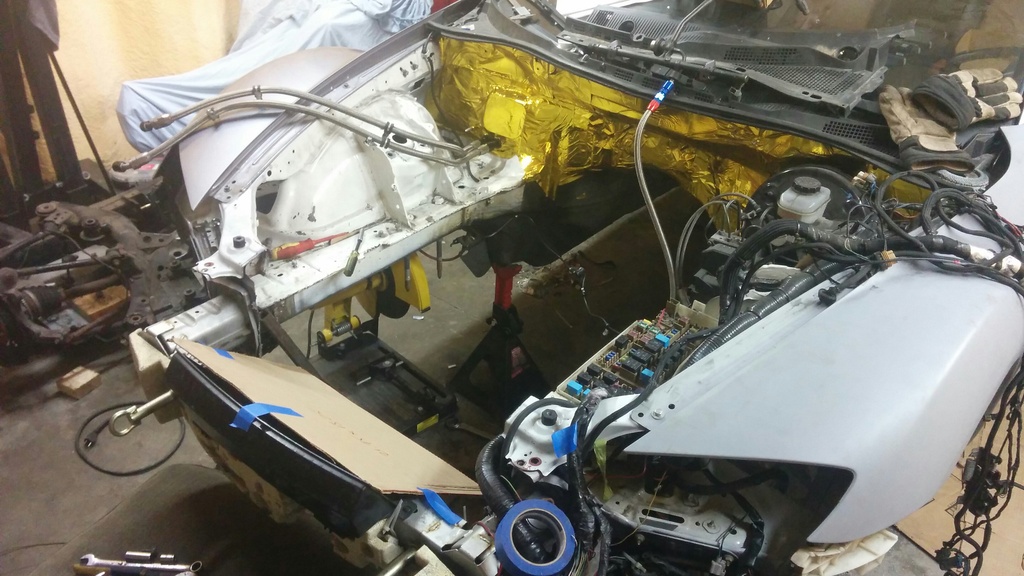
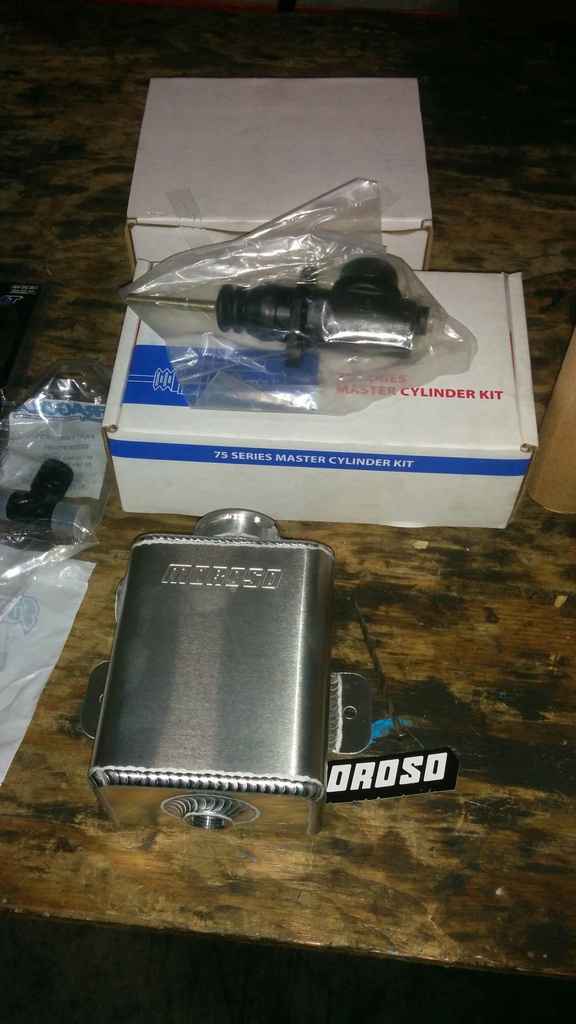
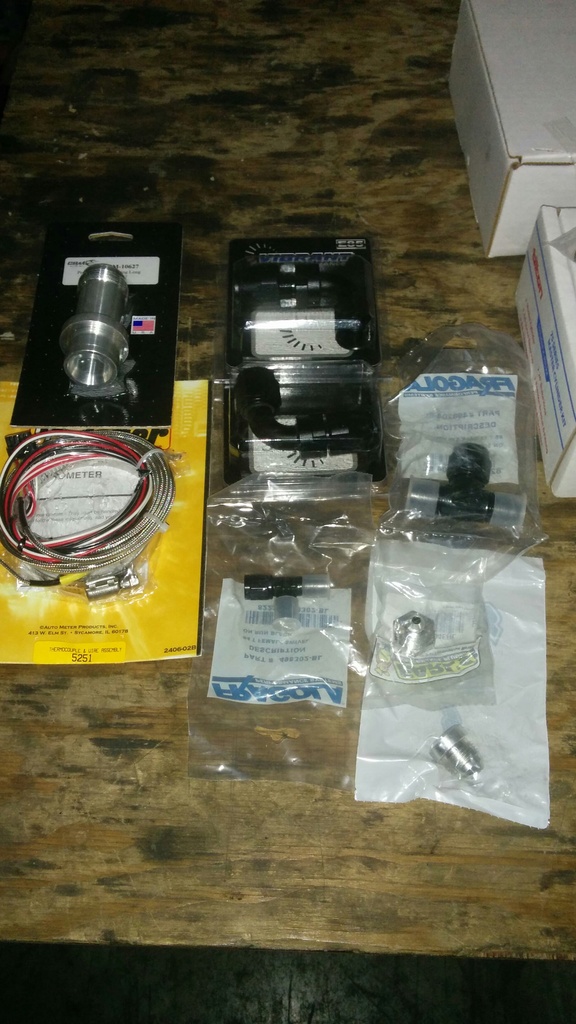
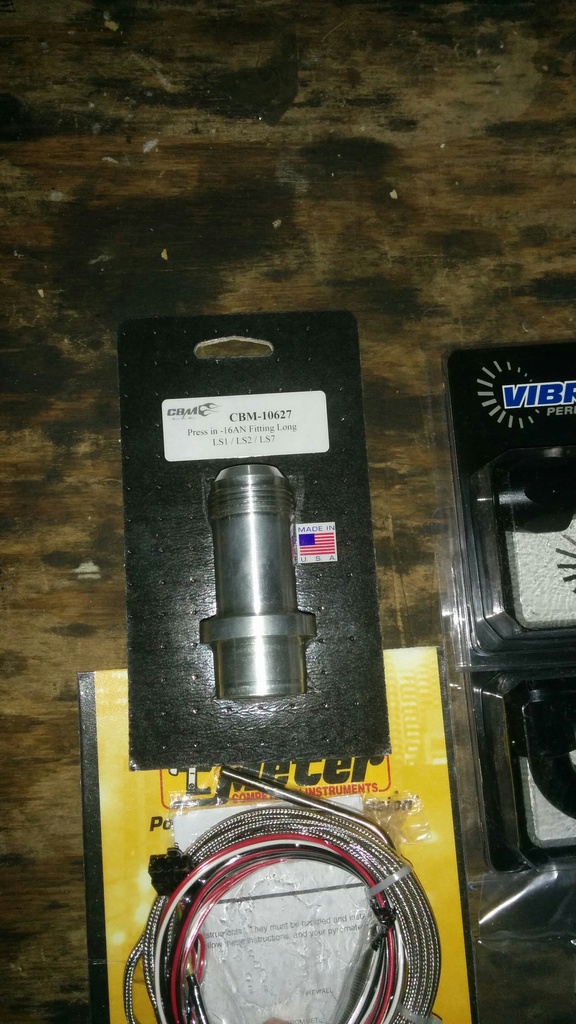
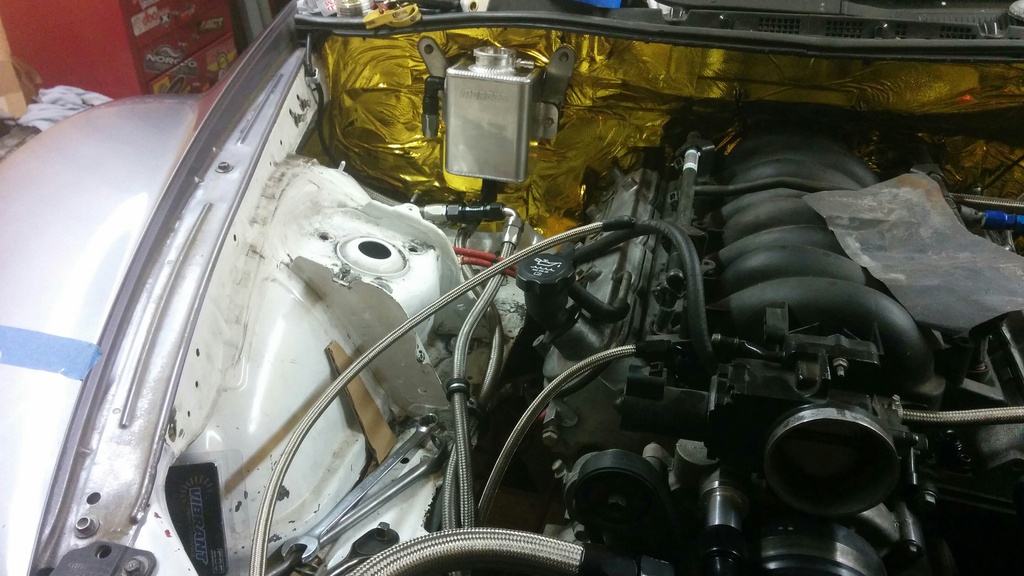
Parts for the rad hoses, 16AN Weld bungs that will get welded to the rad, and the fittings for it. Still waiting for the 16AN adapters I ordered that will press into the waterpump, planning to have just about every fluid line be AN Braided, mostly due to simplicity of service, and its easier to make a AN hose section to match my needs then sift through bins of rad hoses trying to find something close. Have a 10AN bung in there for the hose that will run to the coolant bottle.
Got in some 10AN fittings for the oil cooler system, already have my 18mm-10AN adapters for the cooler itself. Continuing my setup of passenger side cooler being for engine oil, and drivers side for power steering oil.
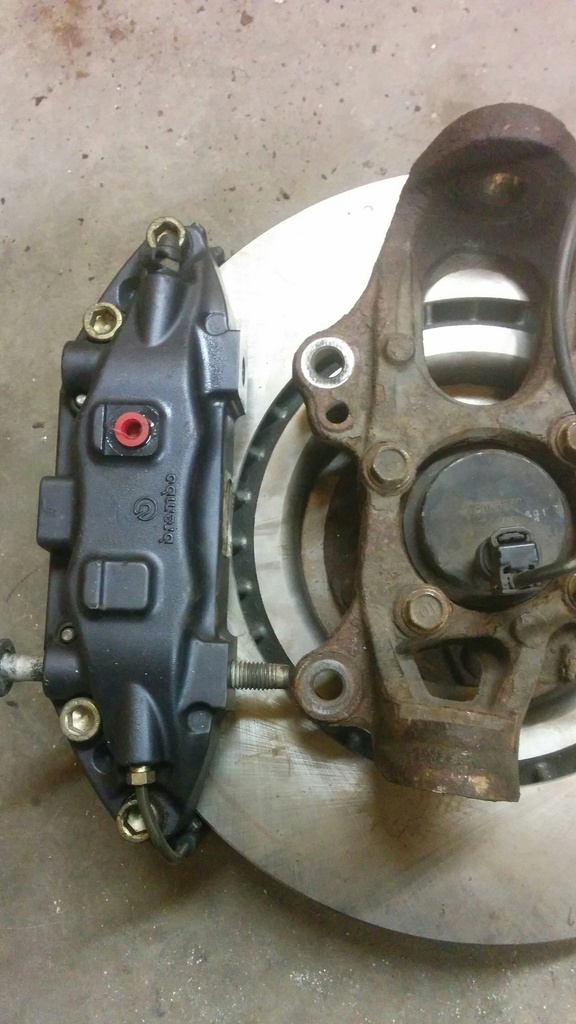
Lastly, I finally have a caliper that will work without question, just need to design a bracket for it. I may play with these a bit over the weekend, but I want to focus on fabricating my new engine mounts and trans X member, and start work on fitting the 8.8 differential.
As always, updates to follow Getting super ******* excited to see how this thing is going to turn out!
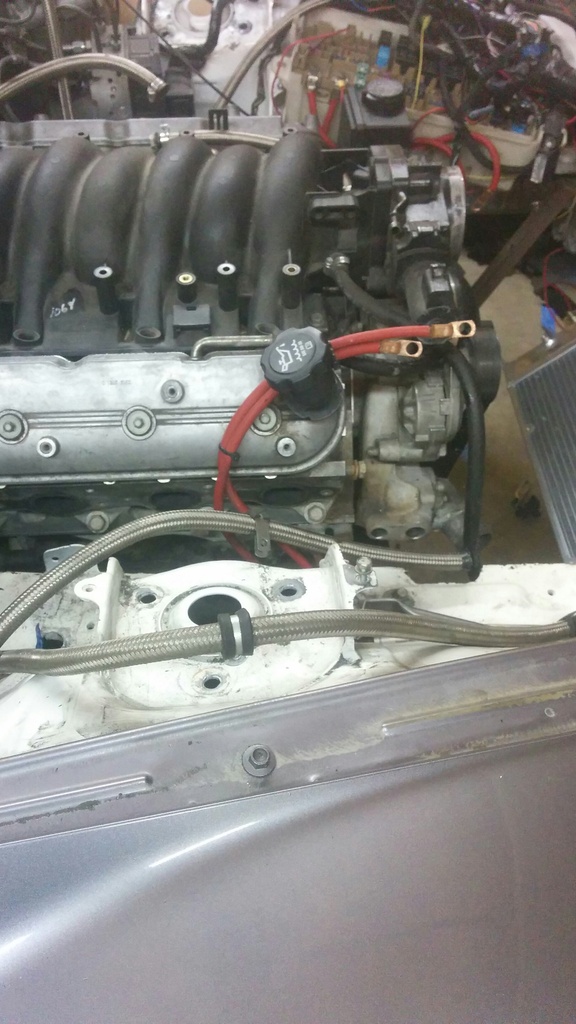
I havent worked with 16AN hose size before, this **** is ******* huge! (Which is what she said of course)
Yummy
Anyone need a CTS-V or Porsche Cayenne 17Z Caliper? I have new ones I dont need LOL
In today:
Parts for the rad hoses, 16AN Weld bungs that will get welded to the rad, and the fittings for it. Still waiting for the 16AN adapters I ordered that will press into the waterpump, planning to have just about every fluid line be AN Braided, mostly due to simplicity of service, and its easier to make a AN hose section to match my needs then sift through bins of rad hoses trying to find something close. Have a 10AN bung in there for the hose that will run to the coolant bottle.
Got in some 10AN fittings for the oil cooler system, already have my 18mm-10AN adapters for the cooler itself. Continuing my setup of passenger side cooler being for engine oil, and drivers side for power steering oil.
Lastly, I finally have a caliper that will work without question, just need to design a bracket for it. I may play with these a bit over the weekend, but I want to focus on fabricating my new engine mounts and trans X member, and start work on fitting the 8.8 differential.
As always, updates to follow
Getting super ******* excited to see how this thing is going to turn out! I havent worked with 16AN hose size before, this **** is ******* huge! (Which is what she said of course)
Yummy
Anyone need a CTS-V or Porsche Cayenne 17Z Caliper? I have new ones I dont need LOL

 12-04-2015, 08:56 AM
#228
Pistons Please
Thread Starter
I am hoping so!! I have always had a strange love for stainless braid fluid systems, so excited to see how it all looks after!!
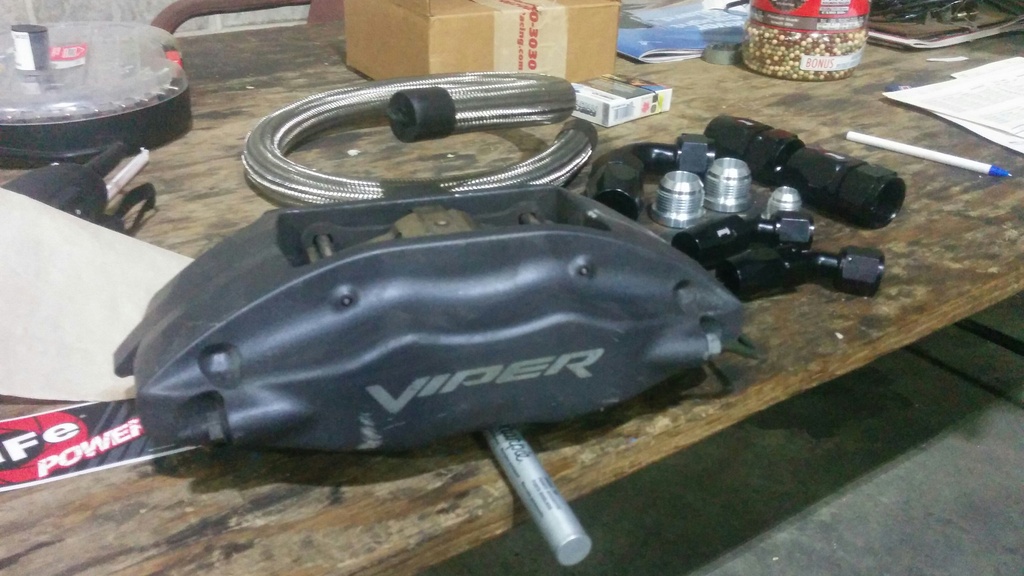
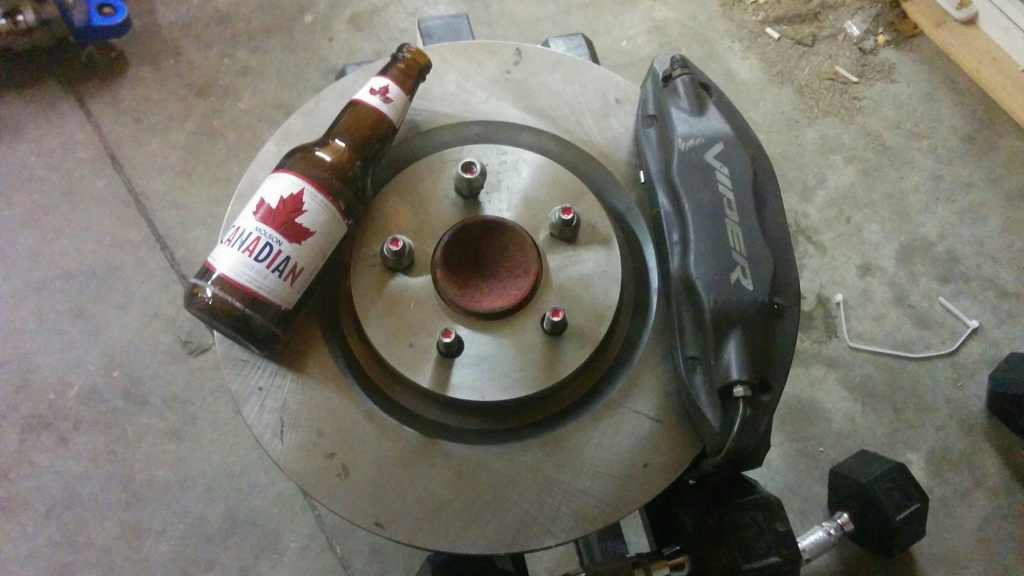
Little update on the brakes, the Viper calipers are definitely go and will be fairly simple to develop a adapter bracket to fit them. Wish I went with these in the first place, but oh well, live and learn lol. Had too much thought/time/money invested into it to give up, very happy I have found a solution!
Sucks the rear brakes are still a mystery on how to do anything for them. The only thing I can see fitting in the rear would be twin piston calipers similar to Evo's and STi's , but their rear calipers are all axial mount, and no axial mount brembo caliper that I know of, will work. The radial mounted rear calipers are all 4 pots and there just isnt space to make it happen unfortunately
Lots of updates to come over the weekend!
12-08-2015, 08:56 AM
#229
Pistons Please
Thread Starter
So, not as big of an update as I would like as I didnt spend quite as much time as planned with the car this weekend, and also these frame notches are taking me significantly longer then I would like lol.
Seemed much simpler in my head, but in too deep now. At least it will be worth it in the end. Passenger side notch is 95% complete, drivers side only 10% so far, but I am going to get to work on it tonight.
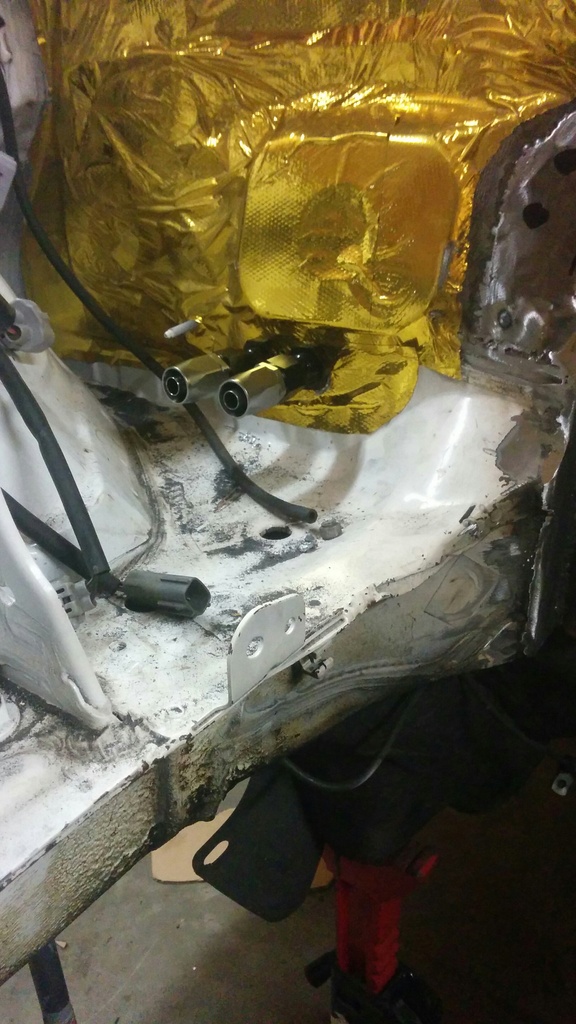
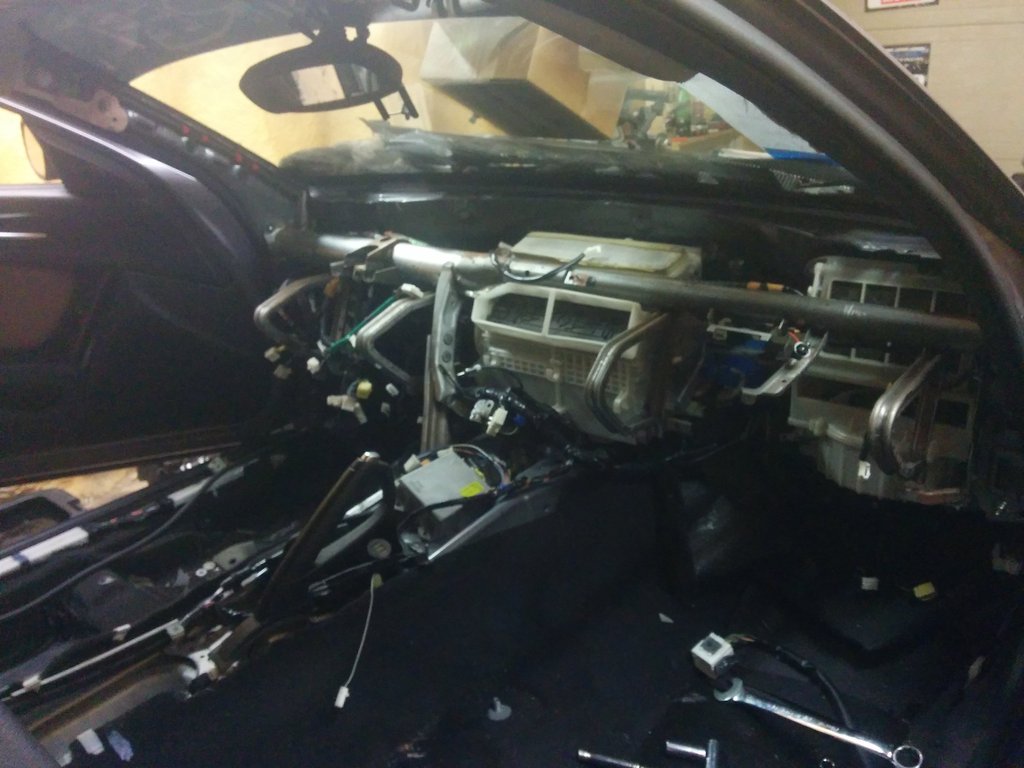
Got the heater hose bulk heads through the firewall though! I am excited to see how they look after, gonna be kickass!
Ill show more of the notches once I clean them up and it doesn't look like hellen keller's best effort's LOL
Seemed much simpler in my head, but in too deep now. At least it will be worth it in the end. Passenger side notch is 95% complete, drivers side only 10% so far, but I am going to get to work on it tonight.
Got the heater hose bulk heads through the firewall though! I am excited to see how they look after, gonna be kickass!
Ill show more of the notches once I clean them up and it doesn't look like hellen keller's best effort's LOL
 12-10-2015, 10:18 AM
#231
Pistons Please
Thread Starter
Quick update:
Finally got my firewall notches completed last night! Definitely turned out to be much more work then anticipated, and probably not worth the effort (As a few parts of Phase 2 have turned out LOL), but at least their done.
Progress hasnt been as quick as I would like, trying to get a few hours in ever night after work. Finally can start on the rear subframe work!
Last edited by Chezmanbespoke; 12-10-2015 at 04:23 PM.
12-15-2015, 04:25 PM
#232
Pistons Please
Thread Starter
Managed to get 26 hours into the car over the weekend! Most of it isnt that exciting to look at in pictures, but progress none the less.
I had more pictures of some details before I disassembled the rear subframe but my phone committed suicide and I lost it all
Basically, everything broke lol. The damage was caused by braking in gear at the track, as there is an insane amount of load on the nose of the differential under those conditions, and the 4.444 ratio just adds to that. Lessons learned about how heavy the differential mounting needs to be. The aluminum upper mount bar is also an issue on these when more power is being applied, as that bar clean snapped in half, and I am not the first to do so. Previous were primarily caused by a lack of twin mounting points on the nose to counteract the nose rotating, mine had proper mounting at the front, but once it sheared a mounting bolt, the upper dog bone break was inevitable.
I will say that the damage to the differential mounting was due to me beating the **** out of it on the track, I monitored the mounting for the first 10,000miles of street driving and there was absolutely no sign of anything to worry about. I guess I got confident in the parts and they bit me in the ***. Oh well, now it will have a 8.8 diff and I dont need to worry anymore!
Sub frame out:
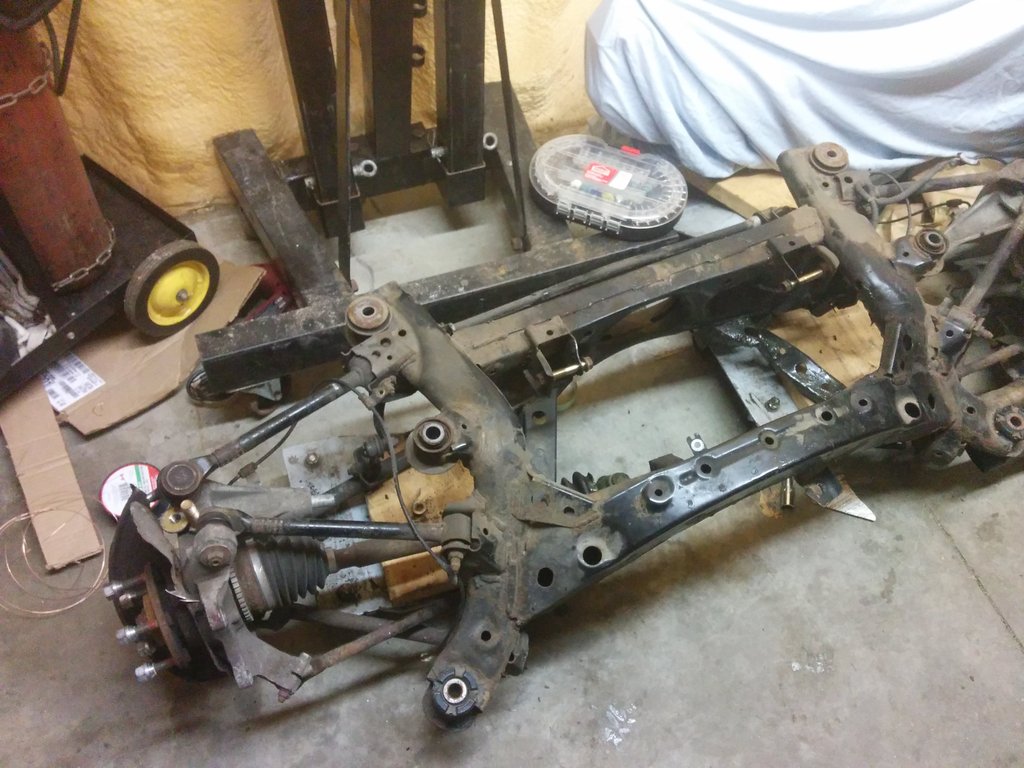
As you can see with the one cross brace took a bit of a pounding when the diff fell from its mounts, and tore the CV axle apart.
I am going to work a bunch with the rear subframe to stiffen it, found some great info on a V8R forum on how to beef it up! Hat tip to Perryracing on there!
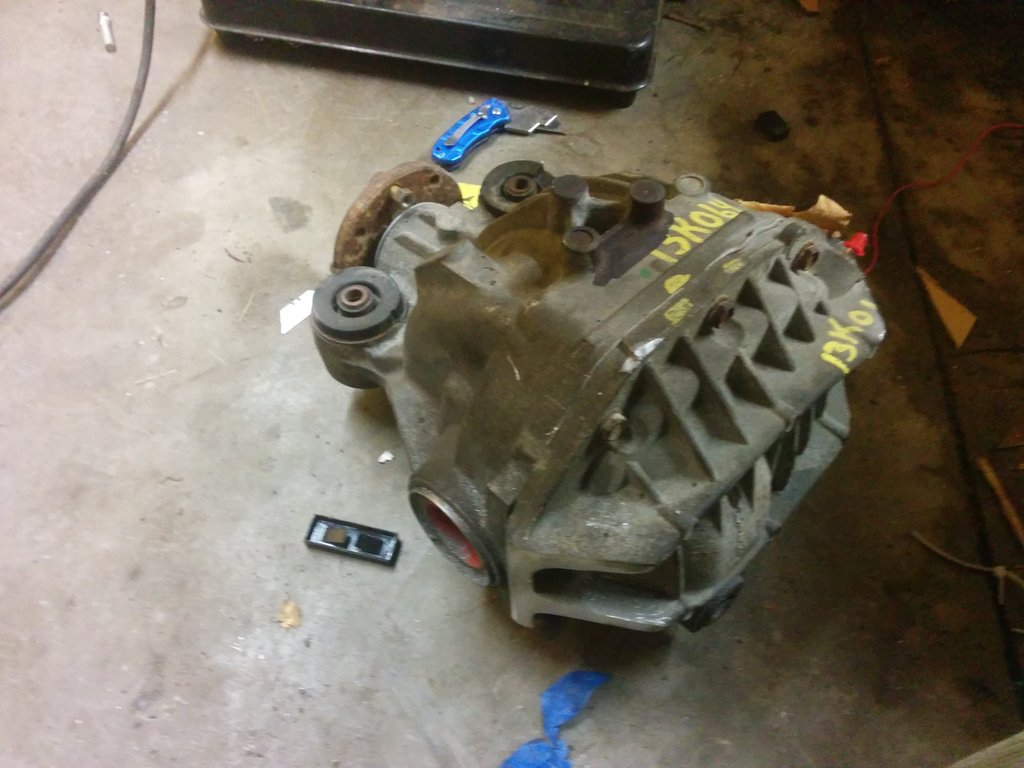
Got the ears cut off of the expolorer differential. I am going to mount it very similar to the V8R kit, but I will produce the kit myself.
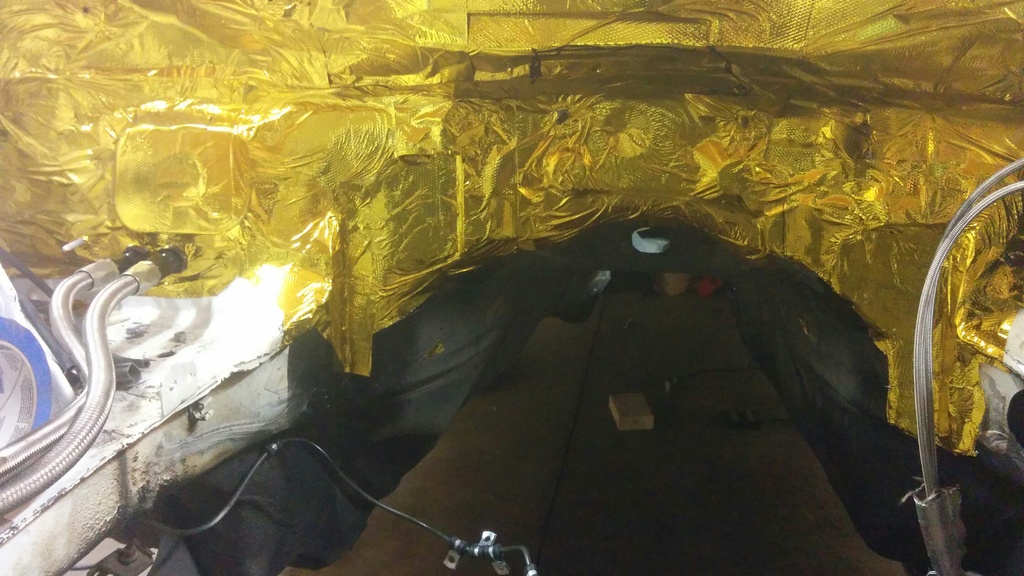
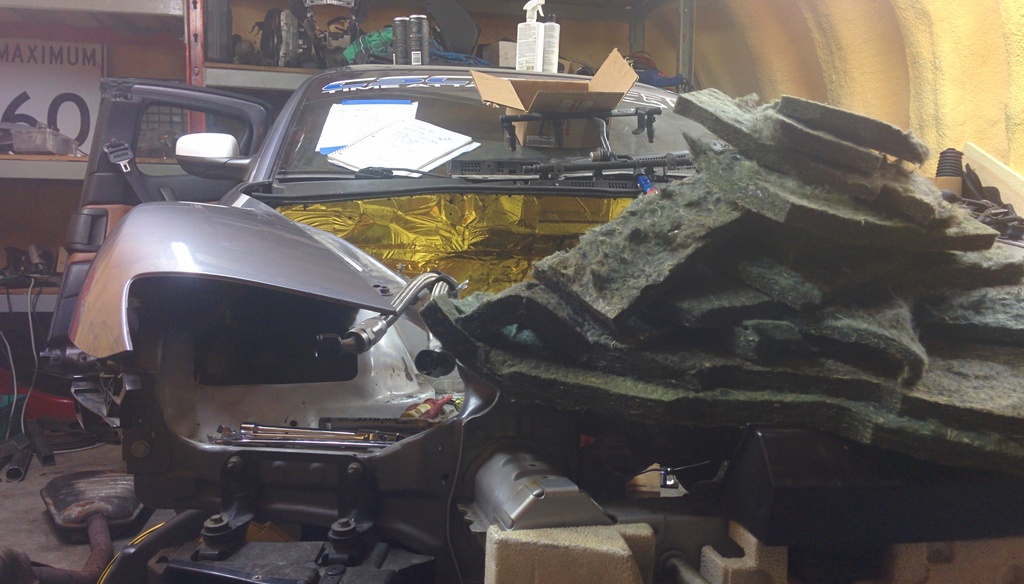
Finally finished getting all the sound deadener out of the car. This is maybe 1/3 of it lol
Alright so this is another project I am embarking onto for creativity with the front end of the car to optimize rad positioning, intake positioning and I have a few idea's in mind for air flow systems. I am not going to get too deep into this yet, as I have already shot myself in the foot like 50 times getting excited for something I think I can do, just to find out its not possible/not worth it.
Realistically, 90% of what I have done to this car so far hasnt been worth it LOL , so I am just shooting to make it possible hahaha
Core of the dash is back in the car, clears the notches fine and heater lines are connected!! Finally something that just came together without too much swearing or desire to burn the car down!
Currently waiting for the mail man to bring me a Radiator I have ordered, some taps to tap the side of the waterpump and some 4an steam line adapters as if I have come this far with braided line, theres no point stopping now. Planning to make every damn fluid line I can be a braided Thankfully I have bin's of fittings laying around from 10 years of builds and dad's extra stock from when he owned a race shop, and have primarily needed hose only!
I had more pictures of some details before I disassembled the rear subframe but my phone committed suicide and I lost it all
Basically, everything broke lol. The damage was caused by braking in gear at the track, as there is an insane amount of load on the nose of the differential under those conditions, and the 4.444 ratio just adds to that. Lessons learned about how heavy the differential mounting needs to be. The aluminum upper mount bar is also an issue on these when more power is being applied, as that bar clean snapped in half, and I am not the first to do so. Previous were primarily caused by a lack of twin mounting points on the nose to counteract the nose rotating, mine had proper mounting at the front, but once it sheared a mounting bolt, the upper dog bone break was inevitable.
I will say that the damage to the differential mounting was due to me beating the **** out of it on the track, I monitored the mounting for the first 10,000miles of street driving and there was absolutely no sign of anything to worry about. I guess I got confident in the parts and they bit me in the ***. Oh well, now it will have a 8.8 diff and I dont need to worry anymore!
Sub frame out:
As you can see with the one cross brace took a bit of a pounding when the diff fell from its mounts, and tore the CV axle apart.
I am going to work a bunch with the rear subframe to stiffen it, found some great info on a V8R forum on how to beef it up! Hat tip to Perryracing on there!
Got the ears cut off of the expolorer differential. I am going to mount it very similar to the V8R kit, but I will produce the kit myself.
Finally finished getting all the sound deadener out of the car. This is maybe 1/3 of it lol
Alright so this is another project I am embarking onto for creativity with the front end of the car to optimize rad positioning, intake positioning and I have a few idea's in mind for air flow systems. I am not going to get too deep into this yet, as I have already shot myself in the foot like 50 times getting excited for something I think I can do, just to find out its not possible/not worth it.
Realistically, 90% of what I have done to this car so far hasnt been worth it LOL , so I am just shooting to make it possible hahaha
Core of the dash is back in the car, clears the notches fine and heater lines are connected!!
Finally something that just came together without too much swearing or desire to burn the car down! Currently waiting for the mail man to bring me a Radiator I have ordered, some taps to tap the side of the waterpump and some 4an steam line adapters as if I have come this far with braided line, theres no point stopping now. Planning to make every damn fluid line I can be a braided
Thankfully I have bin's of fittings laying around from 10 years of builds and dad's extra stock from when he owned a race shop, and have primarily needed hose only!
Last edited by Chezmanbespoke; 12-15-2015 at 04:28 PM.
 12-17-2015, 01:40 PM
#234
Registered

Join Date: Jun 2015
Location: SC
Posts: 19
Likes: 0
Received 0 Likes
on
0 Posts
I am going to work a bunch with the rear subframe to stiffen it, found some great info on a V8R forum on how to beef it up! Hat tip to Perryracing on there!
Are you finding DIY working out better than off the shelf most of the time? Coming from miatas I found some off the shelf items were only a hair more expensive than collecting the raw materials for some things.
12-21-2015, 01:57 PM
#235
Pistons Please
Thread Starter
When I started reading the post that's exactly the thread I thought of.
Are you finding DIY working out better than off the shelf most of the time? Coming from miatas I found some off the shelf items were only a hair more expensive than collecting the raw materials for some things.
Are you finding DIY working out better than off the shelf most of the time? Coming from miatas I found some off the shelf items were only a hair more expensive than collecting the raw materials for some things.
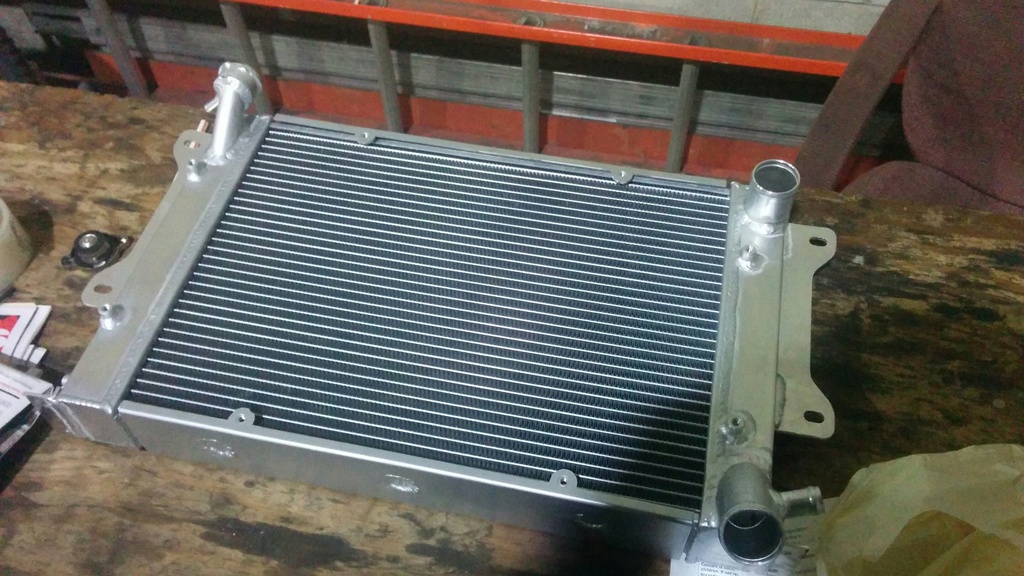
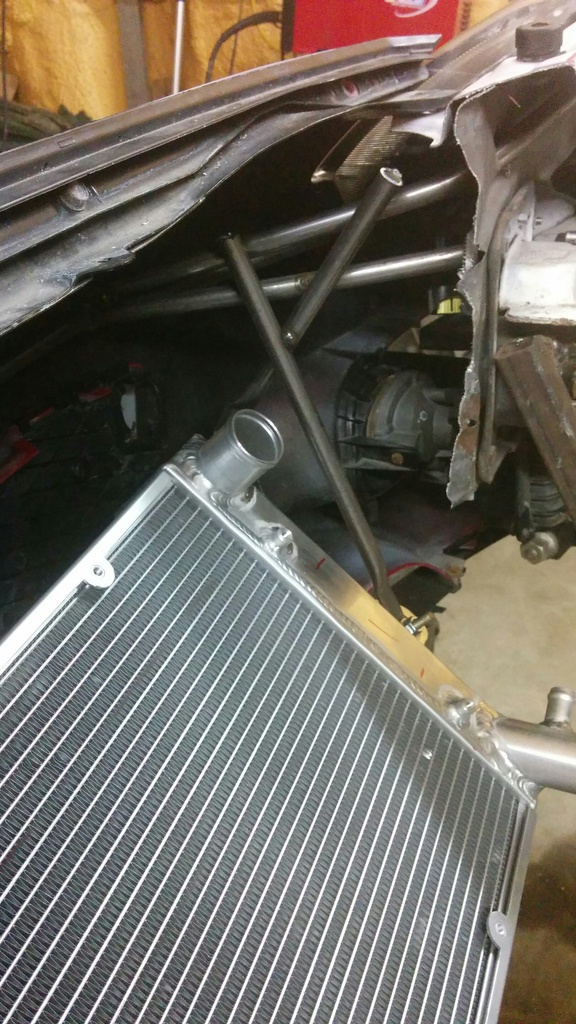
Unfortunately I didnt get **** all done this weekend other then about 15 minutes of staring at it and thinking about the electronics. Hoping to get a few hours in tonight, have boxes coming in from every which way full of goodies, today I got my new rad in! Looking forward to playing with this a bit tonight to figure out my plan for mounting and ducting! .
This thing is a 18x13x3 core section, plus tank size. I will be dropping it off to my buddy next week once I am confident in its fitment to have him weld on the 16AN upper and lower rad hoses, 8AN expansion to the tank, and 4an fitting for the steam line. Its a triple pass? I dunno, was tough to find a rad in the size range I like without going for a custom made rad and I really dont want to spend that kind of money yet as who knows how the setup is going to work in the front end. Updates to follow on that.
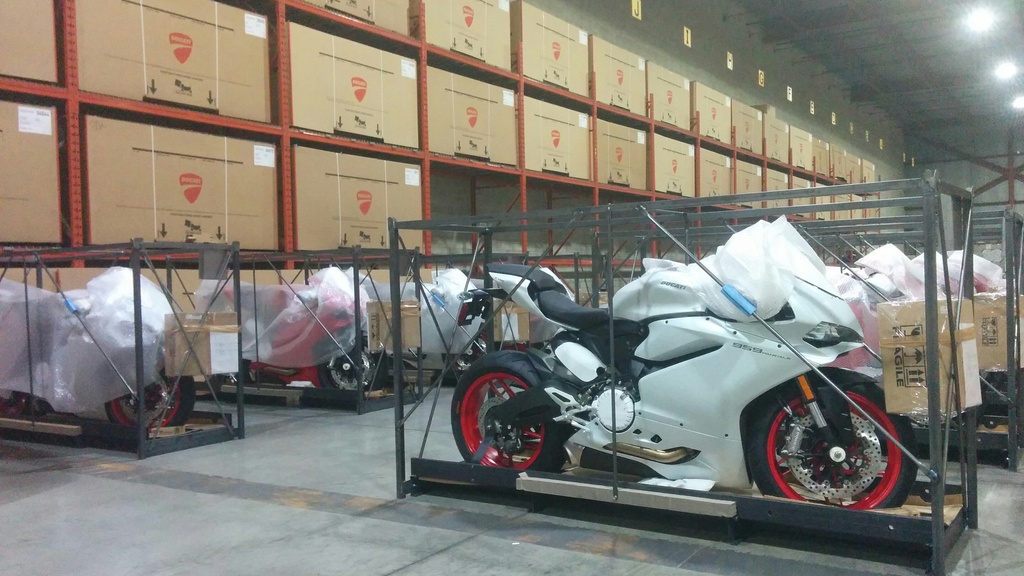
Been busy last week at work with the roll out of some new ducati models for 2016!
 12-23-2015, 11:16 AM
#236
Pistons Please
Thread Starter
Some more goodies have rolled in!
My apologies that my updates this week havent been that exciting lol
Should be one more box of goodies arriving tomorrow, and I have Sat-Mon off work so I intend on getting at least 30 hours into the car!
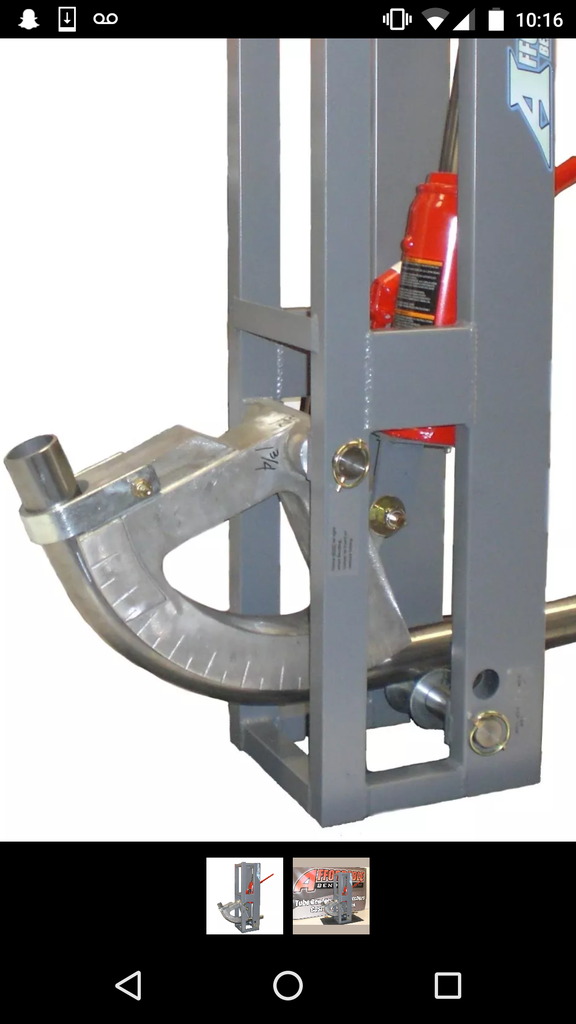
Ordered myself a little plasma cutter unit today, that will probably be a week or so before I see it but it should make a few steps coming up much easier, I am also looking into welding up a tube bender as it could be very helpful for a few parts of this. Planning to weld up something like this, I have ordered a 1.75" die and I have a spare cylinder I am going to use for it!
My apologies that my updates this week havent been that exciting lol
Should be one more box of goodies arriving tomorrow, and I have Sat-Mon off work so I intend on getting at least 30 hours into the car!
Ordered myself a little plasma cutter unit today, that will probably be a week or so before I see it but it should make a few steps coming up much easier, I am also looking into welding up a tube bender as it could be very helpful for a few parts of this. Planning to weld up something like this, I have ordered a 1.75" die and I have a spare cylinder I am going to use for it!
12-29-2015, 08:25 AM
#237
Pistons Please
Thread Starter
Weekend is over and I am sad. Want more work time!
I did managed to get a little work done over my holidays thankfully!
I started work making a mockup section for the front of the car as I will be reconstructing it out of DOM tube, but this was to get some idea's for how I can fit all the bar's and what kind of space im working with. This is just some metal that I could bend by hand and had piles of from damaged ducati crates
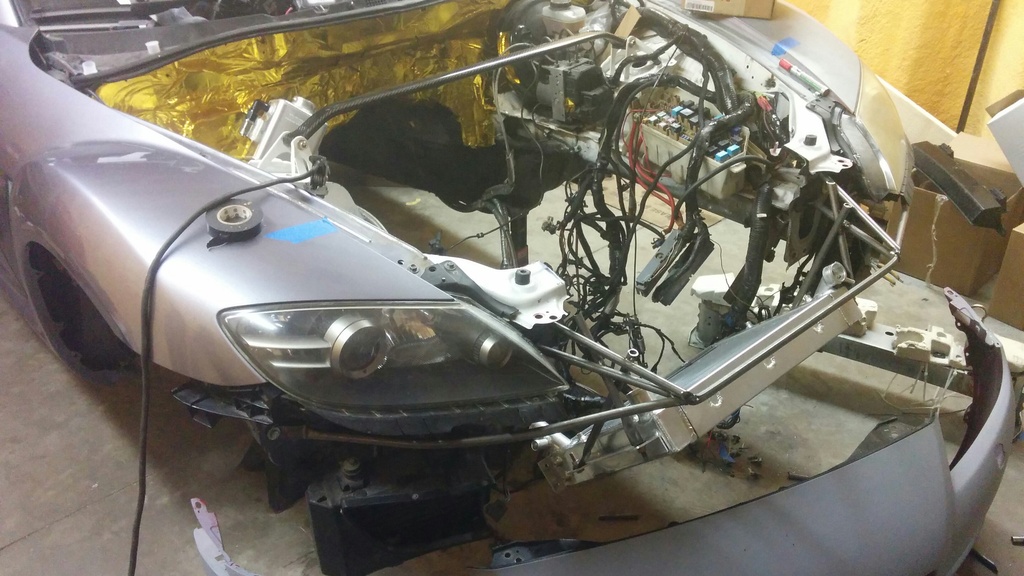
Allows me to fit the rad low and far forward which is going to work really nice for ducting it and getting a ton of air in through the radiator. I am going to open up the top of the grille section in the car now that the big crash bar is out of the way and I can actually use the whole grille
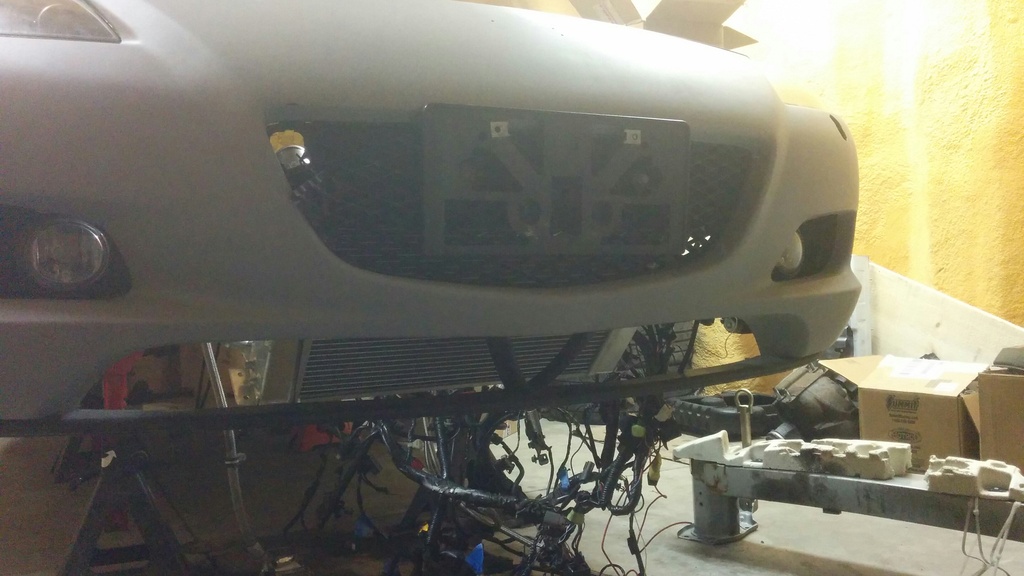 Here's an idea with the bumper set on it. This isnt final position, I think I will move the radiator up about 1" as I had been thinking of a way to duct air for the intake but it isnt seeming worth the effort, so I will fit the rad a little higher up.
The tubing will pick up 6 points on the chassis, to tie the upper rails where the fenders meet, the side corners and then the frame rail horns.
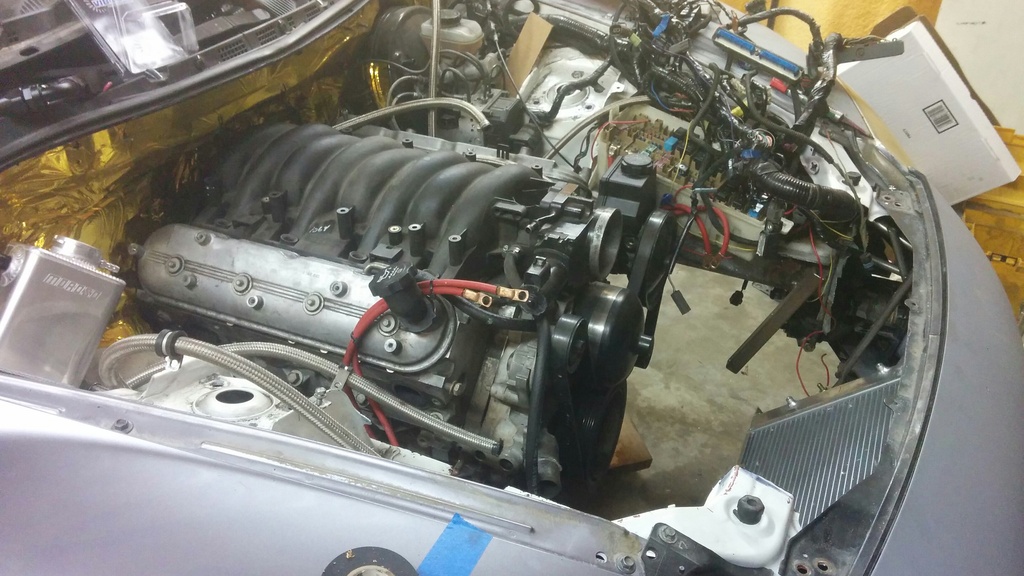
I sat the engine back in the car to check out positioning with the notches closed, and I am very excited for the outcome! total of 1.7" rearward shift from last year, and its atleast 2.5" further back then the V8R kit positions the engine. I can even change the 8th plug while the engine is in the car!
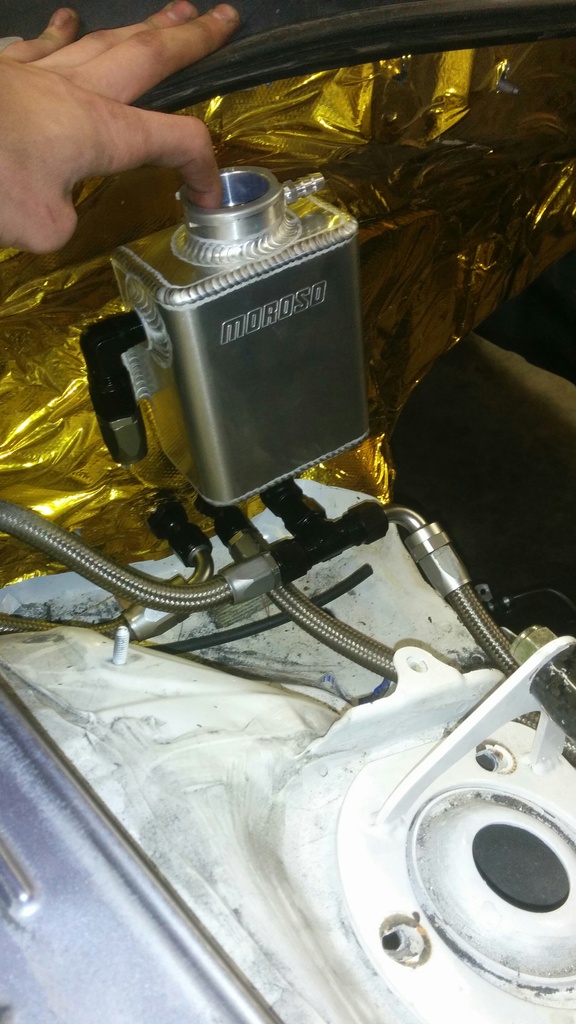
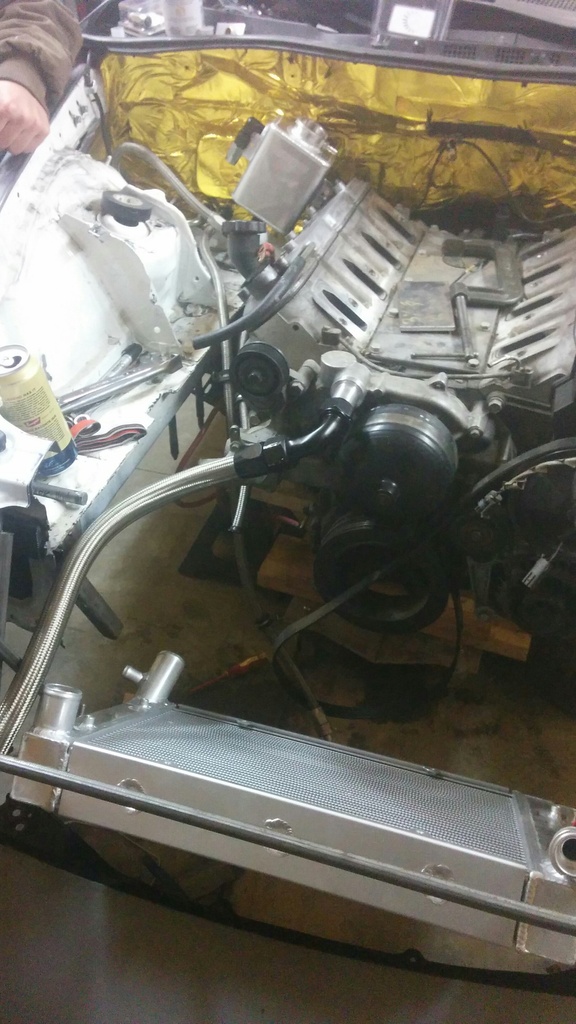
I did a little mockup of the coolant container, I am waiting for my new plasma cutter to arrive this week so I can start fabricating brackets to mount all of this ****. The heater hoses cross through the lower section, then the fitting with no hose will run up to the radiator where I am having bung's welded onto it.
I got the 16AN fitting pressed into the pump, wasnt too bad of a fit! Made up one end of the hose to get an idea of how it will fit. Going to need 1 more 90* fitting for the lower section, but wanted to see how it lays out before I buy fittings I dont need.
So I am hitting a bit of a hold up on the car, I now need a Subframe as my part's cars frame is pretty rough to say the least, I need my plasma cutter to start mounting more of this stuff, a bender to start fabbing the front section, and a few other pieces.
At the end of the weekend's progress
For comparison's sake for anyone else building the same, this is the engine positioning now and where a F-body T56 lines up. I will use the F-body shifter, as now the GTO would be way too far back. Tunnel is cut from last years positioning. Very excited for this to fit good
I setup the spindle I didnt ruin over the weekend as I have now designed a bracket and am waiting for my buddy to mill a piece out for me! Finally a win with these
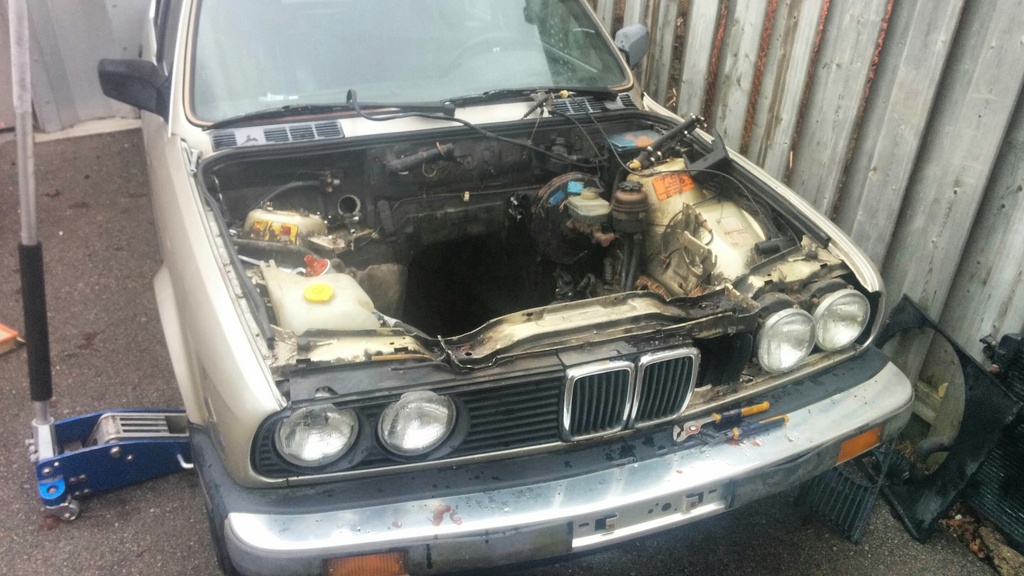
Amongst everything else, managed to get the engine out of my E30 this weekend also as the weather was pretty damn nice out side for christmas! Nothing like a +3 Celcius day after boxing day to do some outside work! I wish more cars were as easy to work on as this thing. Maybe I say that as I havent touched the electrical in it yet lol.
I did managed to get a little work done over my holidays thankfully!
I started work making a mockup section for the front of the car as I will be reconstructing it out of DOM tube, but this was to get some idea's for how I can fit all the bar's and what kind of space im working with. This is just some metal that I could bend by hand and had piles of from damaged ducati crates
Allows me to fit the rad low and far forward which is going to work really nice for ducting it and getting a ton of air in through the radiator. I am going to open up the top of the grille section in the car now that the big crash bar is out of the way and I can actually use the whole grille
Here's an idea with the bumper set on it. This isnt final position, I think I will move the radiator up about 1" as I had been thinking of a way to duct air for the intake but it isnt seeming worth the effort, so I will fit the rad a little higher up. The tubing will pick up 6 points on the chassis, to tie the upper rails where the fenders meet, the side corners and then the frame rail horns.
I sat the engine back in the car to check out positioning with the notches closed, and I am very excited for the outcome! total of 1.7" rearward shift from last year, and its atleast 2.5" further back then the V8R kit positions the engine. I can even change the 8th plug while the engine is in the car!
I did a little mockup of the coolant container, I am waiting for my new plasma cutter to arrive this week so I can start fabricating brackets to mount all of this ****. The heater hoses cross through the lower section, then the fitting with no hose will run up to the radiator where I am having bung's welded onto it.
I got the 16AN fitting pressed into the pump, wasnt too bad of a fit! Made up one end of the hose to get an idea of how it will fit. Going to need 1 more 90* fitting for the lower section, but wanted to see how it lays out before I buy fittings I dont need.
So I am hitting a bit of a hold up on the car, I now need a Subframe as my part's cars frame is pretty rough to say the least, I need my plasma cutter to start mounting more of this stuff, a bender to start fabbing the front section, and a few other pieces.
At the end of the weekend's progress
For comparison's sake for anyone else building the same, this is the engine positioning now and where a F-body T56 lines up. I will use the F-body shifter, as now the GTO would be way too far back. Tunnel is cut from last years positioning. Very excited for this to fit good
I setup the spindle I didnt ruin over the weekend as I have now designed a bracket and am waiting for my buddy to mill a piece out for me! Finally a win with these
Amongst everything else, managed to get the engine out of my E30 this weekend also as the weather was pretty damn nice out side for christmas! Nothing like a +3 Celcius day after boxing day to do some outside work! I wish more cars were as easy to work on as this thing. Maybe I say that as I havent touched the electrical in it yet lol.
12-30-2015, 08:17 PM
#238

You're a maniac. Do you do anything else other than working, then working on cars? Do you even sleep? Lol. By the way, how did the fuel system turn out for you, any fuel starvation issues with that setup? Sorry if you have answered this before, I admit I'm too lazy to go over all the pages on your build, haha! I'm in between ordering a fuel cell or keeping the stock fuel tank and using a surge tank...
12-30-2015, 09:12 PM
#239
FULLY SEMI AUTOMATIC
iTrader: (9)

nice work op. i love ducattis. if ya need any 8 parts give me a shout. i saw you had some issue with the rear assembely and i have a complete rear subframe sitting in my garage
12-31-2015, 08:14 AM
#240
Pistons Please
Thread Starter
You're a maniac. Do you do anything else other than working, then working on cars? Do you even sleep? Lol. By the way, how did the fuel system turn out for you, any fuel starvation issues with that setup? Sorry if you have answered this before, I admit I'm too lazy to go over all the pages on your build, haha! I'm in between ordering a fuel cell or keeping the stock fuel tank and using a surge tank...
lol! The fuel system worked out amazing for street driving, though I do feel the siphon needs to be reexamined, as I would like to offer a full kit that corrects the siphon issues but it will be a rather expensive system, and I am not sure its worth putting together if no one wants to buy it.
As far as fuel starvation, when I was just below half a tank, there is a quick jog at Toronto Motorsports Park where it would starve itself a tad as it threw its fuel to the other side of the tank. It wasnt a major starve, but if i came into it at 5000 rpm and was accellerating, id feel a quick second of it kinda hit a wall and not climb, then it keeps climbing RPM. When I ran the car at shannonville, I never had that issue as it was a more sweepy fast track, but I always kept my fuel above half for racing regardless.
I have yet to ever remove the module piece on the other side of the tank where the level sensor is, I had wondered about using the stock pump that was replaced on the driver side, and moving it to the pass side to feed fuel over.
The issue I am seeing, is the siphon requires fuel pressure through it to siphon, so if it throws its fuel to the other side of the tank and drops pressure for a second, it also stops siphoning. A surge tank likely would be a great cure, but that doesnt address the issue that it cant siphon fuel fast enough to the drivers side at the track when below 1/2 tank. Any idea's on how we could solve this?
200.mph - Thank you!! They have some beautiful bikes coming in right now as the international motorcylce show in toronto is very soon. We have had the new XDiavel, Panigale 959, Hypermotard 929, Monster 1200R and new Diavel carbon in the past couple weeks! lots of drooling

I may be needing that subframe from you! I am a little concerned that when the diff dropped and bent that one brace, it may have pulled the subframe together a bit. Im gonna measure it out to see!
01-02-2016, 03:42 PM
#241
I was thinking about replacing the siphon with another OE pump assembly and both pumps feeding a surge tank. I'd be using an in-line high flow pump after the surge tank or getting a surge tank that already has a pump.
 01-03-2016, 12:44 AM
#243
If I wasn't going to be using a fuel cell setup, I probably would have tried to adapt this into the stock tank and bypass the OEM venturi solution.
https://www.radiumauto.com/Venturi-J...-Kit-P760.aspx
https://www.radiumauto.com/Venturi-J...-Kit-P760.aspx
 01-03-2016, 03:59 PM
#245
Man, you are taking this to a whole new level... Well done!
BTW, my "poor man" fuel setup using stock fuel cup, retaining the venturi system, and swapping in an F-body Walbro pump seems to work like a damn. Our track is tight as hell with many back and forth corners and the car does not fuel starve even at quarter tank.
BTW, my "poor man" fuel setup using stock fuel cup, retaining the venturi system, and swapping in an F-body Walbro pump seems to work like a damn. Our track is tight as hell with many back and forth corners and the car does not fuel starve even at quarter tank.
01-11-2016, 06:53 AM
#246
Pistons Please
Thread Starter
Arca_ex - Wow, I havent seen that piece before, looks like a really nice unit and I know radium is top notch stuff. Maybe that's the answer? I think I'll order that and give it a shot. Looks promising.
Brokegang - Haha it's only exciting when new models roll in and we can lift some sleeves, otherwise I dont get to see much
Hold tight on the module, we are getting very close!!! I was actually working a bit on that last night with my brother, just about at the point where my next hold up will be having my car running to test the module. Pistonized - Thanks!! I may be going a little overboard, but its keeping me busy
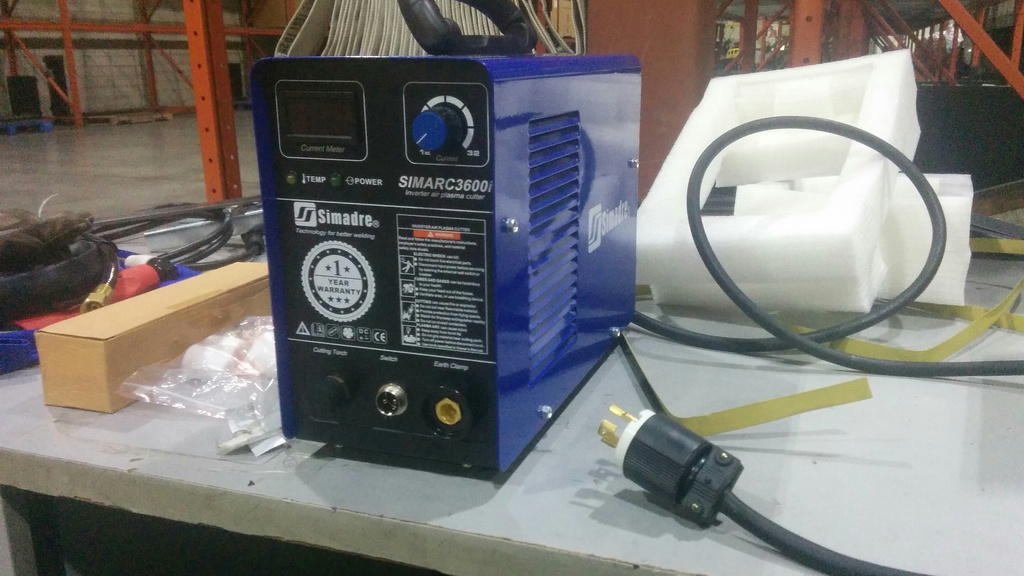
That is great news!! did you open up the factory siphon to a larger diameter? Mine is the 320LPH pump, I think i always ran 255's in my F-bodies, this pump I am using now was just a good price so figured it wouldnt hurt having a little more available.Finally got back in the shop over the weekend, admittedly I wish I could have completed more but I am about at a hold up where I need to have a subframe. I will be getting a subframe from Tyler as my part's car's subframe looks like it was on the bottom of the ocean for a few years. Mazda's rust like nothing else on earth lol.
Got my new plasma cutter setup! Cuts thin plate like a dream! Leaves a little to be desired when it comes to thicker plate, I wouldnt try to cut anything beyond like 10 gauge which I had hoped it would have a little more grunt, but honestly I am just excited that it works at all. It is a Simadre CT3600i, was $249 shipped, so it was peanuts in cost and actually works damn well for the price of it. We cut a miata hood up yesterday to fit a vent panel and it cut through the aluminum like a hot knife through butter. Very nice!
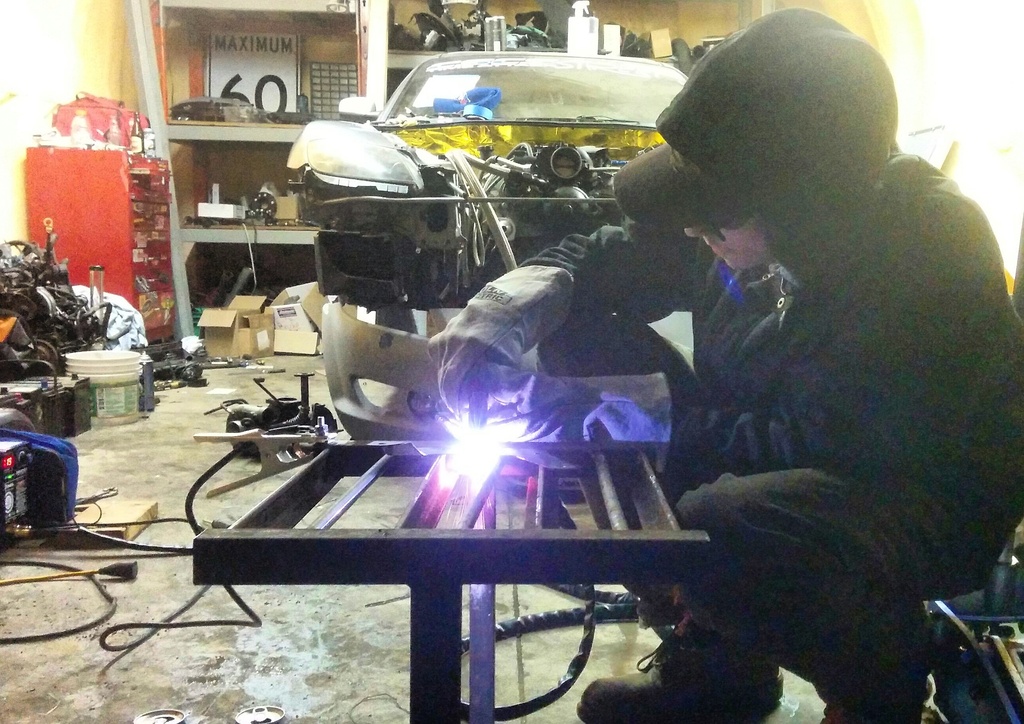
The little hood vent setup we threw together. This is for a drift missle that will likely get wrecked at some point or another so precision was less then important lol

First piece I made up with it was a bracket for the coolant container out of 16 gauge plate, which worked excellent! Very happy with the outcome of this. For the space to the left of it, there will be 2x oil catch can's mounted there.

I worked a bit on mounting the electronic pedal again. Last year the swing on the pedal was too long and caused it either to sit too high in relation to the brake pedal, or it was contacting the floor before WOT. I am going to shorten the arm on it and move the sensor further down to hopefully correct this. Unfortunately no pictures of it yet, as there isnt much to see.
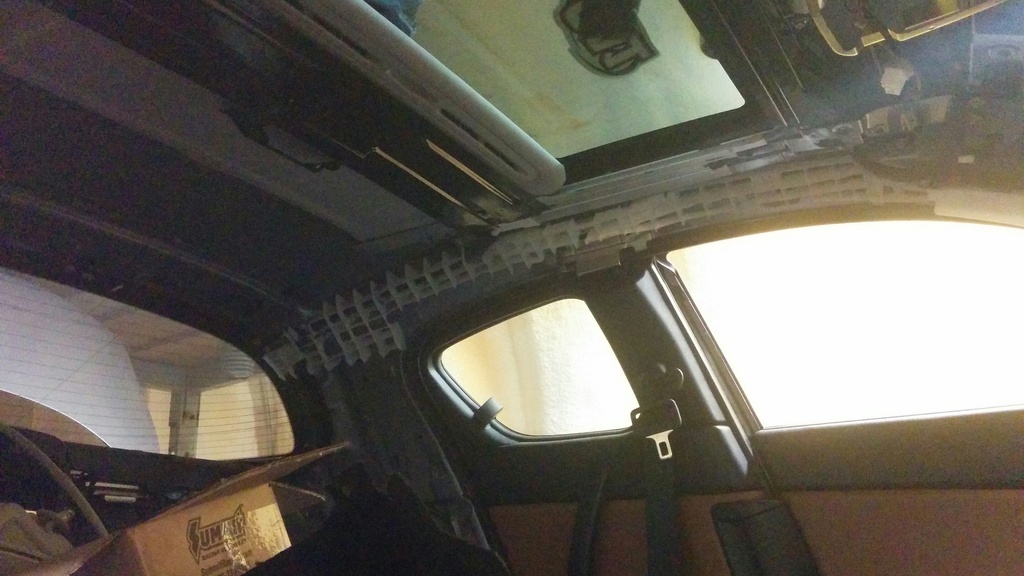
I did take the headliner out of the car as I am going to recover it in something pretty and I took the side curtain airbags out of it, cause I dont intend on having a functioning SRS system (given the bags were deployed in this car when I got it so I dont want to make them work) and the **** adds weight in the roof, where I want it least.
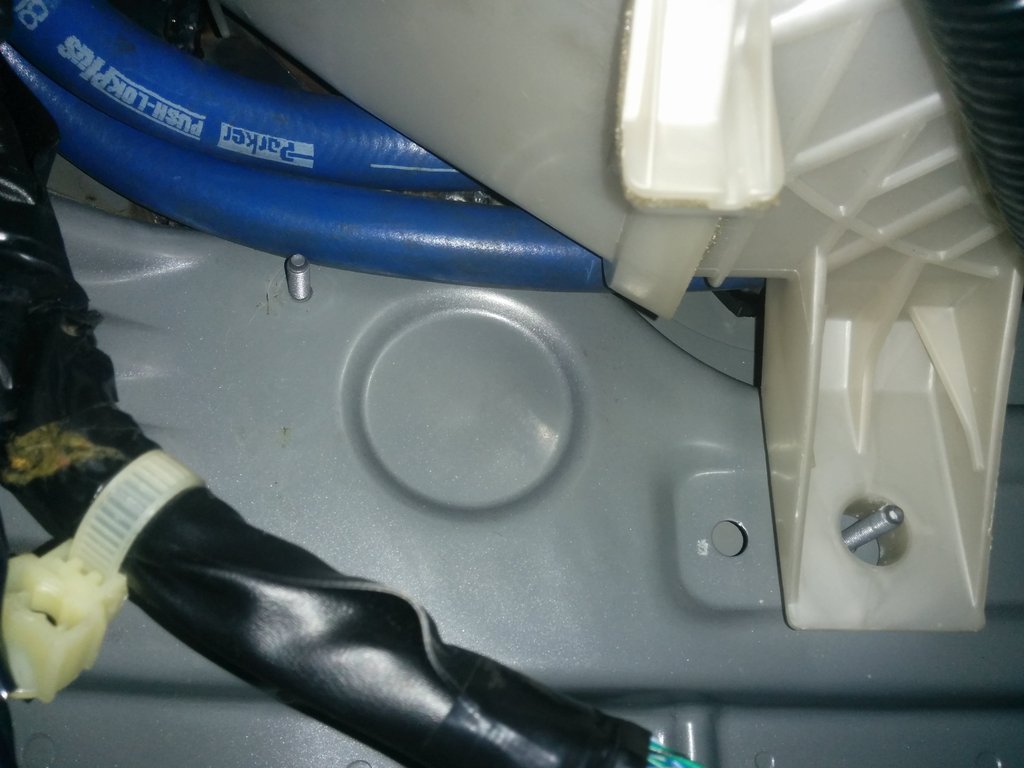
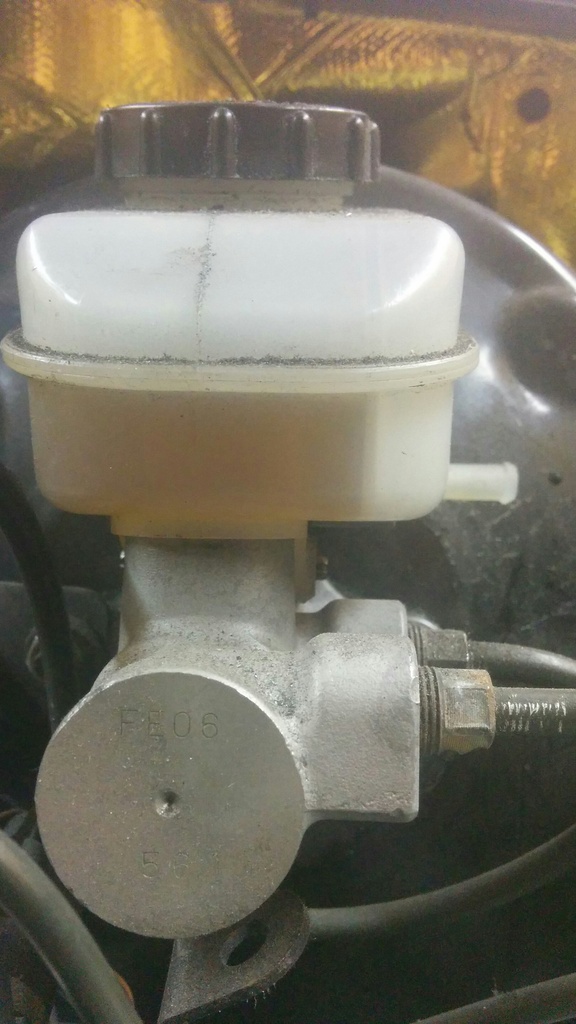
Only other thing I noticed over the weekend, and this may be common knowledge, but if anyone didnt know and was wondering about the shared reservoir for the clutch and the brake masters, they appear to be divided units inside the reservoir? there is no clutch hydraulics in my car right now. I was going to mount a seperate reservoir this year, but it is seemingly pointless when there is a perfectly usable reservoir beside it
That's all for now. My tube bender parts should be here by wednesday, and I can get to work on fabricating the front structure for the car!
 01-12-2016, 12:41 PM
#248
Registered

Interesting to see you cutting out the standard crash bar, collapsible columns and engine bay front cross-member. I assume you've also cut out the battery support cross-member too.
What are your thoughts over chassis rigidity and crash-worthiness (yes, she's a track car so legal repercussions are less, but it's still worth thinking about)? Here, your design looks as if it uses the rad as a crash bar and is a mock-up so I don't know how strong your tubing will be (but I think it will add little rigidity); I also don't know what you're planning elsewhere for acceptable rigidity (for example, fender braces or uprated strut brace) given your experience on track.
BTW I'm particularly interested as I'm doing a 13B REW conversion with a novel cooling arrangement (intercooler cooling air and some of the radiator cooling air with ducting venting out the bonnet) where I'm hoping to keep the collapsible towers with replacement crash bars.
01-12-2016, 08:04 PM
#249
Pistons Please
Thread Starter
Interesting to see you cutting out the standard crash bar, collapsible columns and engine bay front cross-member. I assume you've also cut out the battery support cross-member too.
What are your thoughts over chassis rigidity and crash-worthiness (yes, she's a track car so legal repercussions are less, but it's still worth thinking about)? Here, your design looks as if it uses the rad as a crash bar and is a mock-up so I don't know how strong your tubing will be (but I think it will add little rigidity); I also don't know what you're planning elsewhere for acceptable rigidity (for example, fender braces or uprated strut brace) given your experience on track.
BTW I'm particularly interested as I'm doing a 13B REW conversion with a novel cooling arrangement (intercooler cooling air and some of the radiator cooling air with ducting venting out the bonnet) where I'm hoping to keep the collapsible towers with replacement crash bars.
What are your thoughts over chassis rigidity and crash-worthiness (yes, she's a track car so legal repercussions are less, but it's still worth thinking about)? Here, your design looks as if it uses the rad as a crash bar and is a mock-up so I don't know how strong your tubing will be (but I think it will add little rigidity); I also don't know what you're planning elsewhere for acceptable rigidity (for example, fender braces or uprated strut brace) given your experience on track.
BTW I'm particularly interested as I'm doing a 13B REW conversion with a novel cooling arrangement (intercooler cooling air and some of the radiator cooling air with ducting venting out the bonnet) where I'm hoping to keep the collapsible towers with replacement crash bars.
All piston swaps need to have the battery support section removed due to the engine interfering with it.
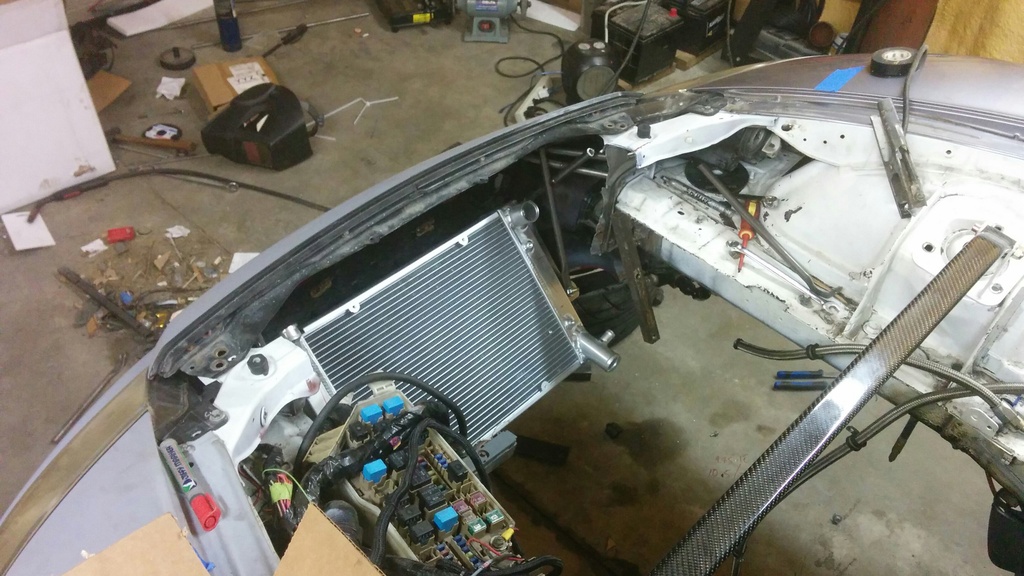
In regards to rigidity, the front crash bar section will help it vastly, it ties into the rails under the fender, the section at the front, along with further out below the headlights. I am eliminating the crush section of the front bar, but on the other hand it will be significantly stronger then the factory stamped steel piece. The wireform there is just that, I am picking up a bunch of 1.75" DOM tube tomorrow which is what the section will actually be created out of. The radiator will not be the furthest forward point, as the entire bar will follow the inside of the bumper and will be the bumper support.
In regards to the overall crash worthiness of the car, I think it will take a significantly harder hit to damage the front, and if anything I have more bulk in the engine bay then the rotary system did, so it may overall fare better. Hoping to never find out, as that will be expensive LOL. The car will be a safer place to be then it was from the factory overall with a 4pt roll bar in it.
A better designed strut tower brace is something I still need to sort out. I am trying to come up with something a little more elaborate then some tube as everything else on the car has gone off the deep end at this point, so why stop now lol
Still have alot of learning to go, this car is teaching me so much. Next I need to learn how to really drive
01-13-2016, 02:40 PM
#250
Registered
Thanks. 1.75" tube should be pretty good. I did a lot of structural work at uni over 35 years ago Triangles are your best friend; anything else is inefficient and a potential weak point.
IMO Mazda's collapsible turrets and crash bar are a pretty good design for their intended purpose, contributing to the RX8's sound 30,000 Nm per degree stiffness. My starting points to improve rigidity are bracing between the 2 suspension turrets (not some namby-pamby aluminium bar hinged on turret extensions) and bracing between the A frame and suspension turrets (ie fender braces); stiffening at the front is behind those 2 in priority, particularly as the chassis rail isn't very tall so bracing on the collapsible turrets is relatively inefficient.
I may yet follow you in redoing the front end. I've come up with at least a dozen different designs for fitting the cooling systems (notably the rad, intercooler, oil coolers and all ducting), airbox and turbo to get the best balance of performance, space, work and cost, but nothing quite gels. Getting rid of the collapsible turrets would free up space for the inlet tube/snorkel to the airbox, solving the main issue for my favoured design, and if I'm doing that then I may as well look at the front structure as a whole . . . . . . . .