Notices
Series I Do It Yourself Forum Wanna save some coin or time/money in the shop? Read up on Do-It-Yourself custom mods and repairs & post your own here.

DIY: Mazda Ignition Coils (with pics)

Thread Tools
 
Search this Thread
 
Rate Thread
 
Old 07-16-2009, 07:13 PM
  #1  
on his 3rd rx8
Thread Starter
iTrader: (3)
 
dozer's Avatar
 
Join Date: Dec 2006
Location: santa ana, ca
Posts: 6,034
Received 10 Likes on 5 Posts
DIY: Mazda Ignition Coils (with pics)

since i read all over the forum that people dont know how to change out coils, heres my very own DIY

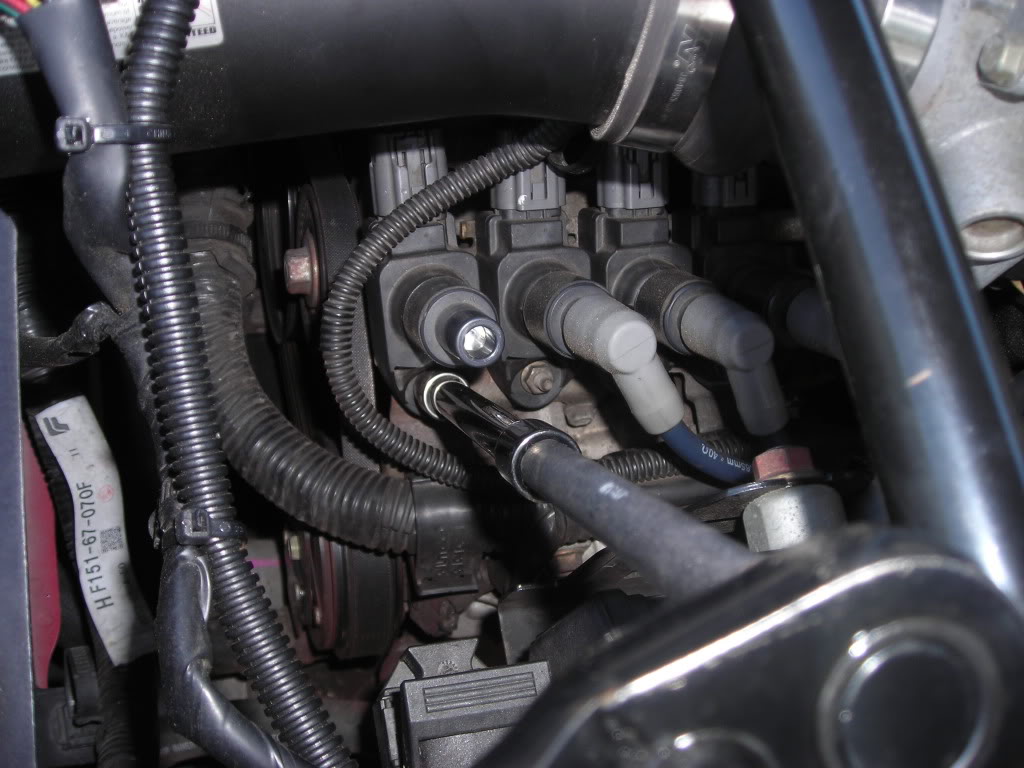
first of all, for those of you that dont know where they are, they're located right underneath the airbox/intake tube, this is what they look like
Name:  DSCN0720.jpg
Views: 2906
Size:  136.7 KB

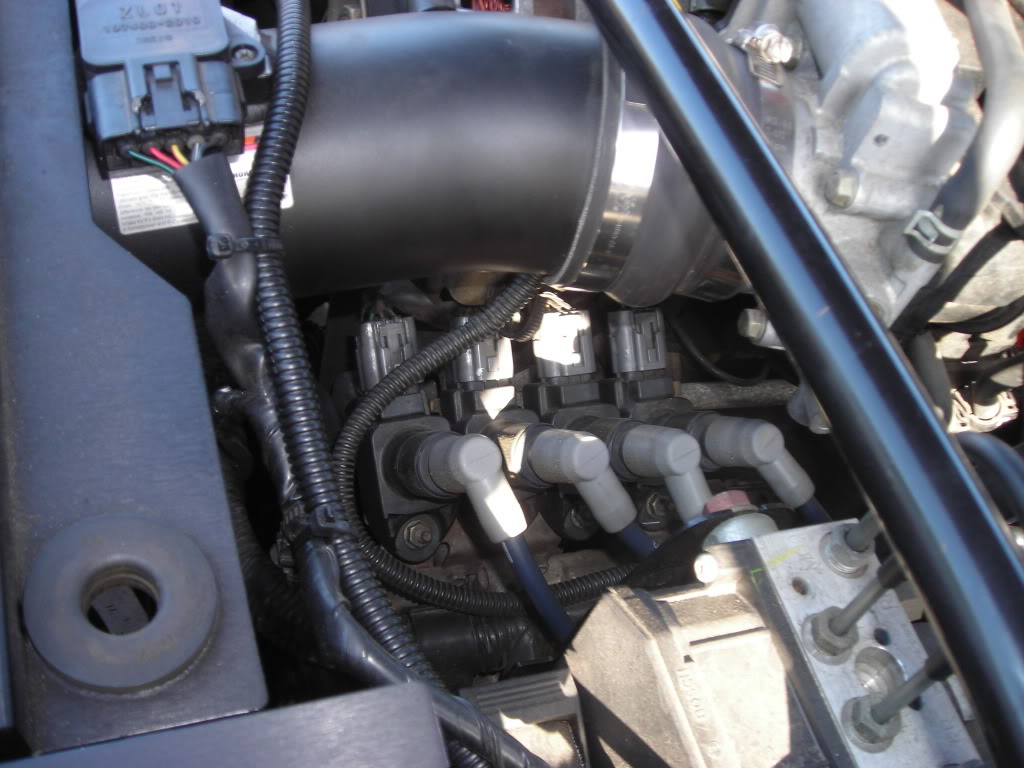
for those of you with the stock air box, that will need to come out first, i have the k&n intake so it was much easier for me to get to.

Dont forget to unplug your battery first, just to be on the safe side

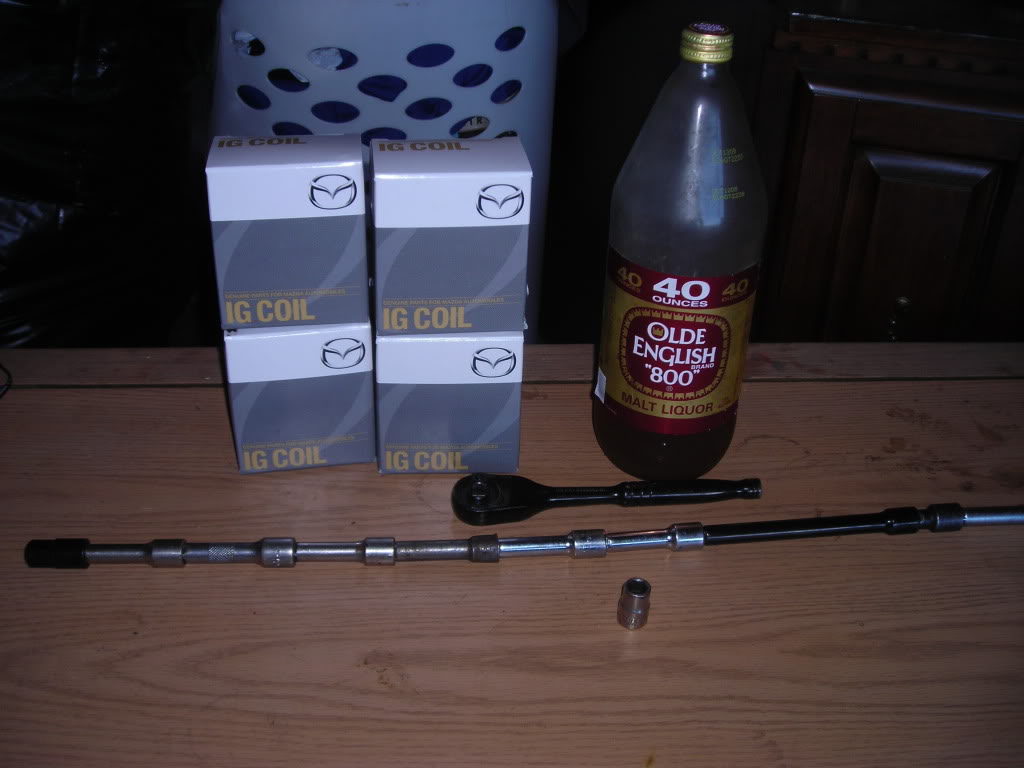
things you will need.
1. a ratchet
2. a 10mm socket
3. an extension (long enough so that it can reach the nuts)
4. coils
5. beer of choice (not necessary)
Name:  DSCN0721.jpg
Views: 2767
Size:  108.5 KB

aright now open your hood and locate your coils like so
Name:  DSCN0722.jpg
Views: 2810
Size:  95.7 KB

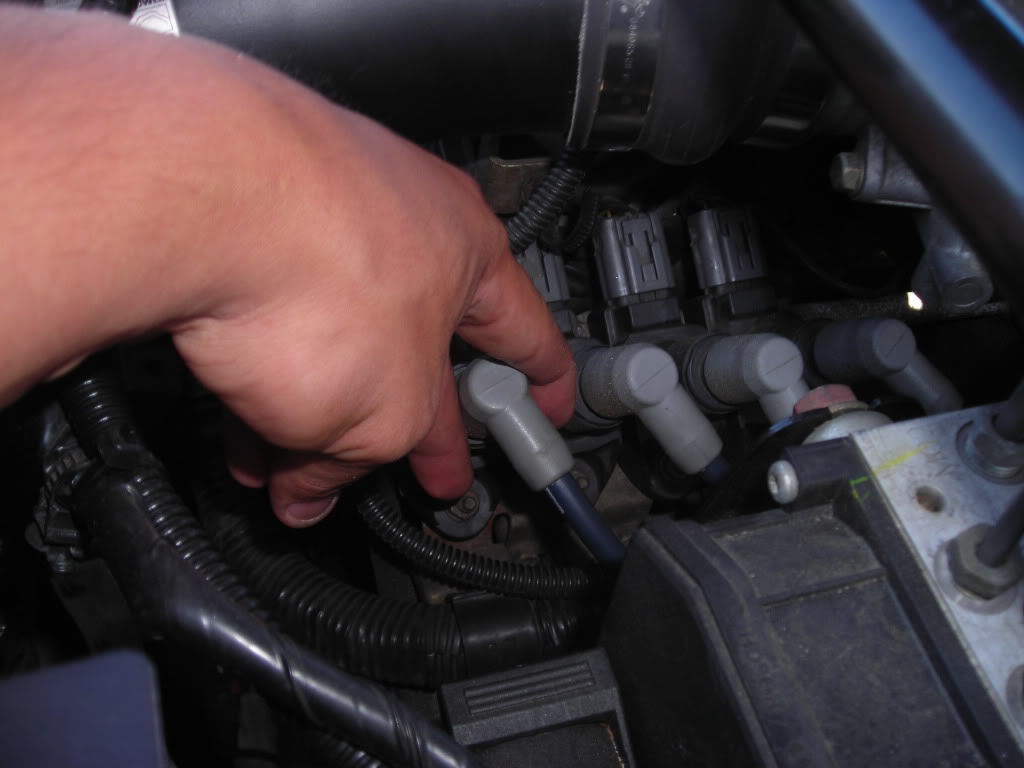
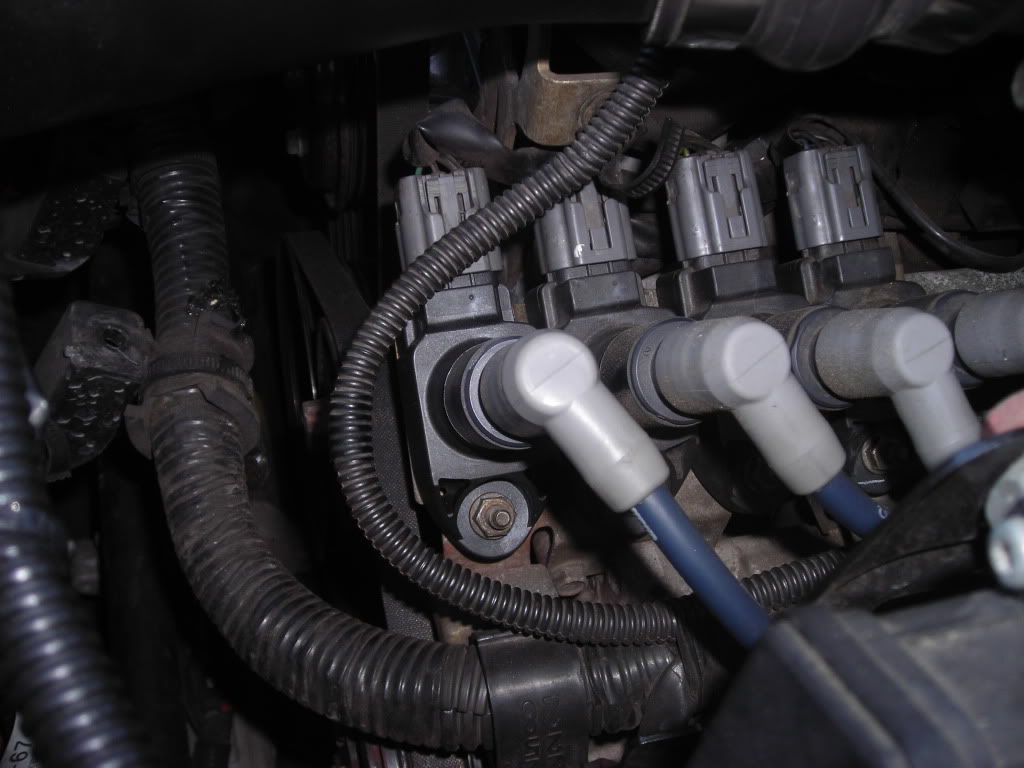
now unplug the spark plug wire, it should come out with ease. should look something like this
Name:  DSCN0725.jpg
Views: 2843
Size:  138.7 KB

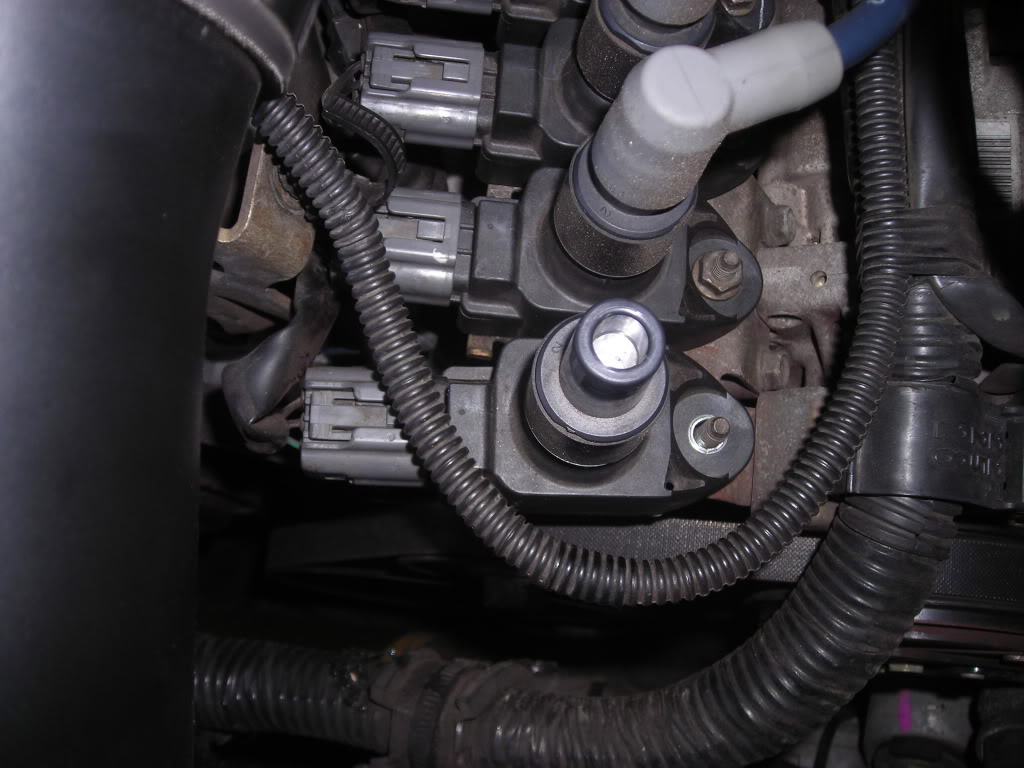
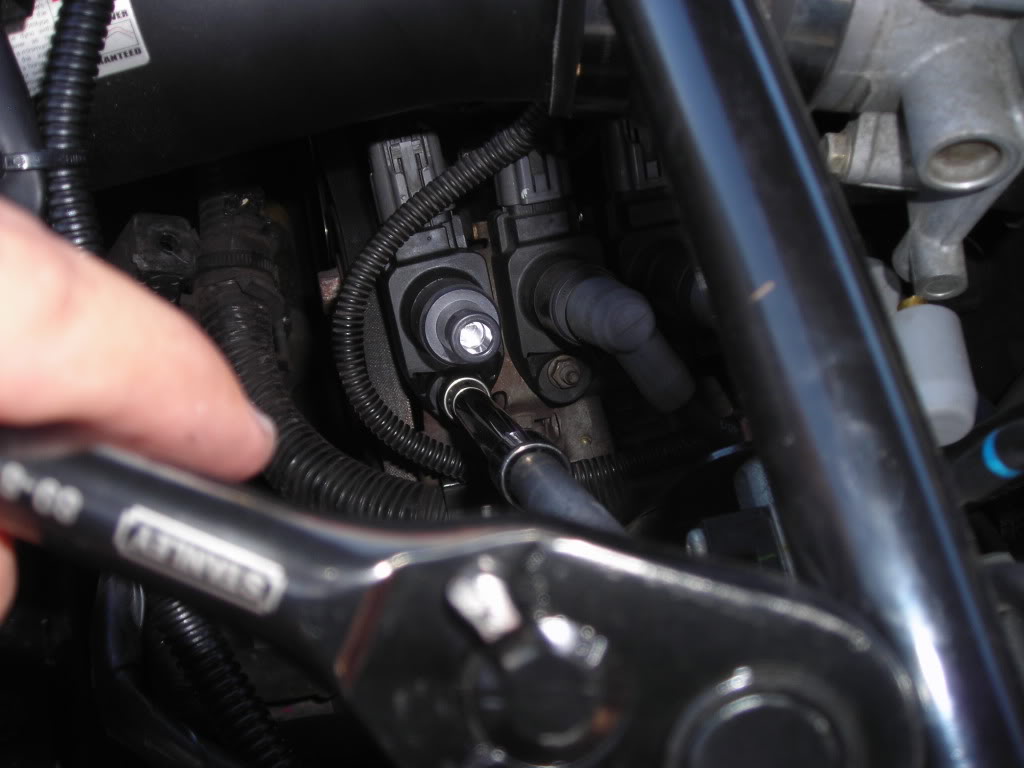
now with the ratchet and 10mm socket attached to your extension, remove the nut like so, remember this nut is small so i suggest loosening it up then removing it with your fingers, because if you drop it and lose it, well your *** out and then you need to make a trip to your local auto parts store.
Name:  DSCN0723.jpg
Views: 3638
Size:  142.5 KB

i suggest you put the nut in a safe spot where i wont get lost, and have it next to you for easy access
Name:  DSCN0724.jpg
Views: 2830
Size:  136.0 KB

now remove the coil from the bolt and unplug it from the back, simple clip just needs to be pinched
Name:  DSCN0727.jpg
Views: 2823
Size:  110.8 KB

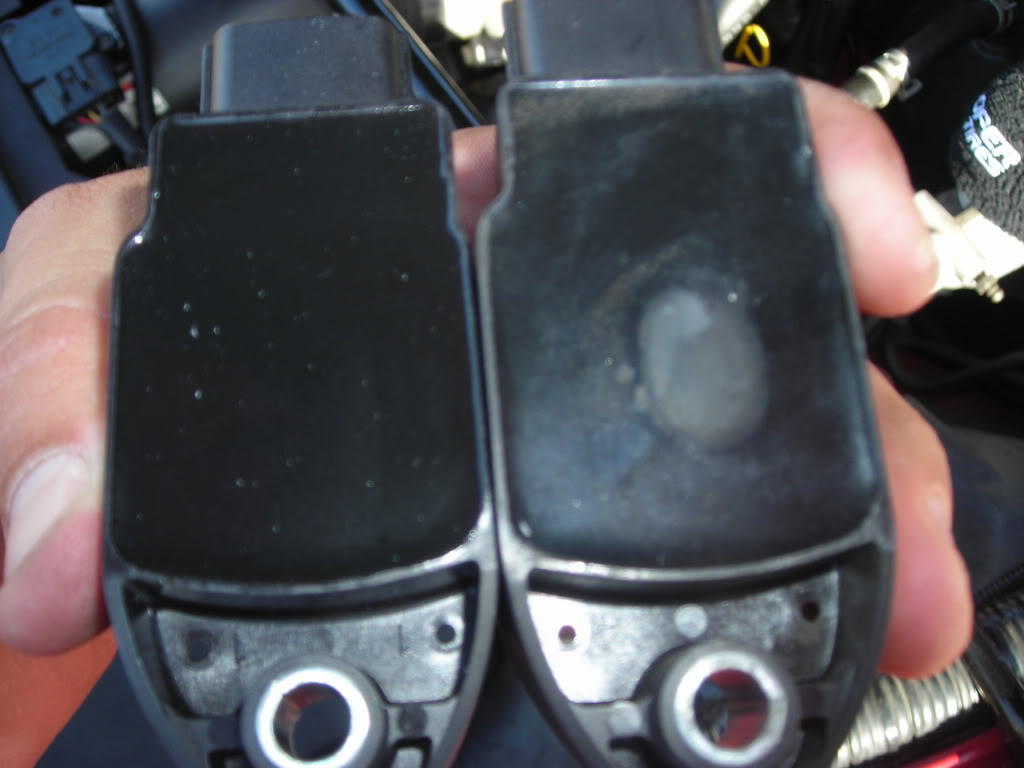
new coil VS old coil, this is what mine looked like
Name:  DSCN0728.jpg
Views: 2817
Size:  101.2 KB

plug the new coil in and put the coil back on the bolt and tighten like so, i tightened it a little over hand tight about 5-10 pounds, not too much
Name:  DSCN0731.jpg
Views: 2797
Size:  105.9 KB

put the wire back on, and continue to the next one, only doing one at a time so you dont get them mixed up
Name:  DSCN0732.jpg
Views: 2844
Size:  125.1 KB

repeat the same process for all four and you should have em in, in no time!
Name:  DSCN0731.jpg
Views: 2797
Size:  105.9 KB
Attached Images
File Type: jpg
DSCN0731.jpg (105.9 KB, 200 views)

Last edited by dozer; 07-16-2009 at 07:16 PM.
The following 3 users liked this post by dozer:
Little White Rotary (08-01-2023), novelwriter333 (08-10-2023), skyhighclaw (11-08-2017)
Old 07-16-2009, 07:22 PM
  #2  
Banned
iTrader: (3)
 
MazdaManiac's Avatar
 
Join Date: Oct 2003
Location: Under my car
Posts: 16,386
Likes: 0
Received 24 Likes on 21 Posts
I don't know what I liked better - the ratchet "extension" or the 40.

Mod Edit..
An easy way to identify IF the Coils you purchased are actual OE...

On the side of the black Coil there are three rows of text information stamped into (concave) the coil body, first line is Mazda part number.

Anything else is a knock off product (some on eBay and others)...not originals and can give performance/reliability issues.


Generally if they are dirt cheap they are not OE.

ASH8
Old 07-16-2009, 07:28 PM
  #3  
on his 3rd rx8
Thread Starter
iTrader: (3)
 
dozer's Avatar
 
Join Date: Dec 2006
Location: santa ana, ca
Posts: 6,034
Received 10 Likes on 5 Posts
ahahhahaha yeah i tried to make it as big as i could, i literally have like 30 extension, and NO way in hell were they gonna fit in that pic...
Old 07-16-2009, 09:05 PM
  #4  
Registered
iTrader: (1)
 
tunerwannab's Avatar
 
Join Date: Feb 2008
Location: Puyallup
Posts: 831
Likes: 0
Received 1 Like on 1 Post
All the stuff in your first pic look like you bought it from the guy in your avitar. LOL
Old 07-16-2009, 09:07 PM
  #5  
on his 3rd rx8
Thread Starter
iTrader: (3)
 
dozer's Avatar
 
Join Date: Dec 2006
Location: santa ana, ca
Posts: 6,034
Received 10 Likes on 5 Posts
fck buyin em, i clucked that sh*t, a lil crack for some tools goes a long way
Old 07-17-2009, 10:20 AM
  #6  
I am THAT guy
iTrader: (1)
 
Atilla's Avatar
 
Join Date: May 2007
Location: Caca Cali
Posts: 5,994
Likes: 0
Received 5 Likes on 4 Posts
nice diy dozer

The 40 in the background was like a signature.
Old 07-17-2009, 10:25 AM
  #7  
True love is blue x2
iTrader: (2)
 
xun4gvn4everx's Avatar
 
Join Date: Dec 2008
Location: Future
Posts: 2,801
Likes: 0
Received 1 Like on 1 Post
If you don't get it right the first time, drink a 40 and try it again
Old 07-17-2009, 11:43 AM
  #8  
Sauteed
 
Red_Fox's Avatar
 
Join Date: Apr 2009
Location: SoCal
Posts: 393
Likes: 0
Received 0 Likes on 0 Posts
olde english good **** lol
Old 07-17-2009, 11:48 AM
  #9  
I am THAT guy
iTrader: (1)
 
Atilla's Avatar
 
Join Date: May 2007
Location: Caca Cali
Posts: 5,994
Likes: 0
Received 5 Likes on 4 Posts
Originally Posted by xun4gvn4everx
If you don't get it right the first time, drink a 40 and try it again
^correction

If you've ever noticed how we do installs around dozers house you'll realize that if you messed up the first time - you should probably put down the 40.
Old 07-17-2009, 12:10 PM
  #10  
Sauteed
 
Red_Fox's Avatar
 
Join Date: Apr 2009
Location: SoCal
Posts: 393
Likes: 0
Received 0 Likes on 0 Posts
yeah like dropping the extention down a live engine hood and sparks flying and ppl getting electricuted?
Old 07-17-2009, 12:44 PM
  #11  
Never Blend In
iTrader: (2)
 
nuke0907's Avatar
 
Join Date: Oct 2006
Location: Summerville, SC
Posts: 4,524
Received 5 Likes on 5 Posts
you don't need to disconnect the battery. just don't turn the ignition on.
Old 07-17-2009, 10:52 PM
  #12  
Registered User
iTrader: (1)
 
NoOdLe BoY's Avatar
 
Join Date: Jan 2007
Location: NyC
Posts: 1,224
Likes: 0
Received 0 Likes on 0 Posts
me and dozer got the same husky ratchet set. black chrome FTW!!!!! 5x less corrosive!!!! lol
Old 07-21-2009, 09:55 PM
  #13  
WENTGERMAN
iTrader: (6)
 
shadycrew31's Avatar
 
Join Date: Apr 2008
Location: Burbs,PA
Posts: 5,805
Received 30 Likes on 22 Posts
Boobssss
Old 07-21-2009, 10:07 PM
  #14  
on his 3rd rx8
Thread Starter
iTrader: (3)
 
dozer's Avatar
 
Join Date: Dec 2006
Location: santa ana, ca
Posts: 6,034
Received 10 Likes on 5 Posts
where?
Old 07-21-2009, 10:10 PM
  #15  
silent assasin
iTrader: (6)
 
rodjonathan's Avatar
 
Join Date: May 2008
Location: Houston
Posts: 3,398
Likes: 0
Received 1 Like on 1 Post
ha ha awesome extension great write up ill definitely do it now.
Old 07-21-2009, 10:11 PM
  #16  
on his 3rd rx8
Thread Starter
iTrader: (3)
 
dozer's Avatar
 
Join Date: Dec 2006
Location: santa ana, ca
Posts: 6,034
Received 10 Likes on 5 Posts
w00t w00t!
Old 07-21-2009, 10:18 PM
  #17  
Registered
 
shazy's Avatar
 
Join Date: Oct 2008
Location: Montreal,QC
Posts: 2,256
Likes: 0
Received 0 Likes on 0 Posts
Nice DIY dozer

Thanks for making them!
Taking out the stock airbox is going to be a bitch though...
Old 07-21-2009, 10:23 PM
  #18  
on his 3rd rx8
Thread Starter
iTrader: (3)
 
dozer's Avatar
 
Join Date: Dec 2006
Location: santa ana, ca
Posts: 6,034
Received 10 Likes on 5 Posts
yeah i totally forgot about the stock airbox, im running the K&N and i dont have to remove it to get to my coils...thanks anyways
Old 07-22-2009, 12:20 AM
  #19  
Registered
 
shazy's Avatar
 
Join Date: Oct 2008
Location: Montreal,QC
Posts: 2,256
Likes: 0
Received 0 Likes on 0 Posts
No problem Homer ... Dozer...
Old 08-10-2009, 09:30 AM
  #20  
Oilfield trash
iTrader: (2)
 
Grungepup's Avatar
 
Join Date: Feb 2008
Posts: 2,509
Likes: 0
Received 0 Likes on 0 Posts
now im ready to do my coils this weekend..... dont know where to find the 40 of OE though, the ghetto is to far to drive to
Old 08-10-2009, 10:01 AM
  #21  
on his 3rd rx8
Thread Starter
iTrader: (3)
 
dozer's Avatar
 
Join Date: Dec 2006
Location: santa ana, ca
Posts: 6,034
Received 10 Likes on 5 Posts
it clearly says beer of choice, that doesnt mean you need an OE
Old 08-10-2009, 05:02 PM
  #22  
Oilfield trash
iTrader: (2)
 
Grungepup's Avatar
 
Join Date: Feb 2008
Posts: 2,509
Likes: 0
Received 0 Likes on 0 Posts
so is COLT 45 a viable subsitute?
Old 08-10-2009, 05:05 PM
  #23  
on his 3rd rx8
Thread Starter
iTrader: (3)
 
dozer's Avatar
 
Join Date: Dec 2006
Location: santa ana, ca
Posts: 6,034
Received 10 Likes on 5 Posts
Old 08-10-2009, 05:07 PM
  #24  
Oilfield trash
iTrader: (2)
 
Grungepup's Avatar
 
Join Date: Feb 2008
Posts: 2,509
Likes: 0
Received 0 Likes on 0 Posts
SWWWWEEEEEEEEEEEEEEEEEEEET I'll make a DIY video starring BILLY D WILLIAMS and COLT 45
Old 08-11-2009, 05:16 PM
  #25  
Registered User
 
rotary369's Avatar
 
Join Date: Mar 2009
Posts: 22
Likes: 0
Received 0 Likes on 0 Posts
I just did this today man it was easy. My car was log overdue for new coils I have noticed a MUCH bigger low end torque improvement. My only question is why did I not change them sooner.


You have already rated this thread Rating: Thread Rating: 0 votes,  average.

Quick Reply: DIY: Mazda Ignition Coils (with pics)


All times are GMT -5. The time now is 07:00 AM.