DIY: Make your own engine grounding kit.
 10-02-2005, 12:58 PM
#1
www.evoperform.com
Thread Starter
Join Date: Apr 2005
Location: tax free delaware
Posts: 2,010
Likes: 0
Received 0 Likes
on
0 Posts
DIY: Make your own engine grounding kit.
In my quest for more horsepower AND better audio, I have found that upgrading your vehicle's ground system yields benefits in both categories. Now this wont give you 50 HP or make your system gain an extra 10 decibles, but it does help improve throttle response, seems to make the idle a little better, and definately helps the response of the factory bose system. Another possible benefit, since installing these ground wires, I have noticed significantly less sooting of my exhaust tips. (by significant, I haven't had a chance to wash my car for a little over a week now, and have driven approximately 200 miles, and my tips are still shiny)
Now this DIY is not a do all, say all, definitave answer to how this should be done. I took information from this DIY on the lineage grounding system, and expanded on it. Feel free to post comments, criticisms, etc.
On to the fun.
Materials needed for this project:
1: Mazda RX-8
2: Heavy guage wire, about 24 feet, leaves enough if you make a mistake, you have extra. About $2.00 per foot(my wire of choice was the Stinger HPM series 4 guage blue power wire) I recommend using a high strand count, oxygen free power cable available from your local audio specialty retailer.
3: Ring terminals for the ends of your wires. (Again, I used Stinger, about $10 for 2 Red and 2 Black. I chose to do all red on mine, so I spent about 2x as much as i needed to.)
4: Washers to go under bolt heads. (I picked up 24 stainless steel ones for about $2.00)
Tools needed:
1: 10mm socket
2: 12mm socket
3: socket wrench
4: various extensions for socket wrench
5: phillips screwdriver, #2 point
6: good wire cutters
7: something to strip 4 guage, some people use a razor blade, i used my handy cutters
8: good crimpers for 4 guage wire, again, i used my same wire cutters
9: a bit of patience :D
steps:
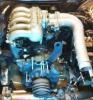
1: I started by losening the alternator tensioning bolt and the bolt holding the alternator in place, you can see both of these in the picture below. Attach a ring terminal to the end of the wire, and attach the wire to the bolt as shown, between the alternator and the bracket, not between the bolt head and the bracket.
Now this DIY is not a do all, say all, definitave answer to how this should be done. I took information from this DIY on the lineage grounding system, and expanded on it. Feel free to post comments, criticisms, etc.
On to the fun.
Materials needed for this project:
1: Mazda RX-8
2: Heavy guage wire, about 24 feet, leaves enough if you make a mistake, you have extra. About $2.00 per foot(my wire of choice was the Stinger HPM series 4 guage blue power wire) I recommend using a high strand count, oxygen free power cable available from your local audio specialty retailer.
3: Ring terminals for the ends of your wires. (Again, I used Stinger, about $10 for 2 Red and 2 Black. I chose to do all red on mine, so I spent about 2x as much as i needed to.)
4: Washers to go under bolt heads. (I picked up 24 stainless steel ones for about $2.00)
Tools needed:
1: 10mm socket
2: 12mm socket
3: socket wrench
4: various extensions for socket wrench
5: phillips screwdriver, #2 point
6: good wire cutters
7: something to strip 4 guage, some people use a razor blade, i used my handy cutters
8: good crimpers for 4 guage wire, again, i used my same wire cutters
9: a bit of patience :D
steps:
1: I started by losening the alternator tensioning bolt and the bolt holding the alternator in place, you can see both of these in the picture below. Attach a ring terminal to the end of the wire, and attach the wire to the bolt as shown, between the alternator and the bracket, not between the bolt head and the bracket.
 10-02-2005, 01:01 PM
#2
www.evoperform.com
Thread Starter
Join Date: Apr 2005
Location: tax free delaware
Posts: 2,010
Likes: 0
Received 0 Likes
on
0 Posts
2: Next, I cut the wire to length to reach the ground bolt on the intake manifold. Remove the bolt shown in the picture, remove the ground wire. Attach a ring terminal to the wire, as well as to the end of the wire, ready to be cut to length for the next piece. Place both ring terminals on the bolt, and reattach.
10-02-2005, 01:04 PM
#3
www.evoperform.com
Thread Starter
Join Date: Apr 2005
Location: tax free delaware
Posts: 2,010
Likes: 0
Received 0 Likes
on
0 Posts
3: Next disconnect the ground wire that you removed from the intake manifold at the point where it attaches to the chassis below the air pump. Again, cut your wire to length to reach this point, and attach a ring terminal to the end, as well as attaching a ring terminal to your next piece of wire. Place a washer on the bolt, then the 2 ring terminals, and attach to the chassis.
10-02-2005, 01:10 PM
#4
www.evoperform.com
Thread Starter
Join Date: Apr 2005
Location: tax free delaware
Posts: 2,010
Likes: 0
Received 0 Likes
on
0 Posts
4: This particular point is a little tricky, as you can see from the number of wires. I routed the wire from the point under the air pump under the washer fluid resivoir and up to the ground point you see in the picture. There are actually 2 ground points as you can see, and I used the one without the white plastic connector for this wire. I also made a short ground wire (without terminals the whole wire is about 1.5" and has no insulation on it) between the 2 ground points. This may be a bit of overkill, but I figured what the hell.
Anyway, back on subject. Put your ring terminal on, as well as one on the end of the next wire, place washer on bolt, then your ground wires, then factory ground, then attach to the fender as shown.
Anyway, back on subject. Put your ring terminal on, as well as one on the end of the next wire, place washer on bolt, then your ground wires, then factory ground, then attach to the fender as shown.
10-02-2005, 01:13 PM
#5
www.evoperform.com
Thread Starter
Join Date: Apr 2005
Location: tax free delaware
Posts: 2,010
Likes: 0
Received 0 Likes
on
0 Posts
5: Next is the point just forward of the strut tower bar on the passenger side. Again, attach your ring terminals, place a washer on the bolt, ring terminals, factory grounds, then bolt in place.
10-02-2005, 01:19 PM
#6
www.evoperform.com
Thread Starter
Join Date: Apr 2005
Location: tax free delaware
Posts: 2,010
Likes: 0
Received 0 Likes
on
0 Posts
6: Cut your latest wire to length to reach the pictured bolt, located below the battery, and can best be reached by removing the factory air box.
Do not remove this bolt at this time. We will come back to this.
Do not remove this bolt at this time. We will come back to this.
10-02-2005, 01:23 PM
#7
www.evoperform.com
Thread Starter
Join Date: Apr 2005
Location: tax free delaware
Posts: 2,010
Likes: 0
Received 0 Likes
on
0 Posts
7: Remove the front mounting bolt from the A/C compressor. Cut a length of wire to reach from this point to the ground point below the battery as seen in the last step. Place a ring terminal on your uncut length of wire, place your 2 ring terminals under the compressor bolt, and reinstall bolt. As you can see from these pictures, there is a factory piece that holds the wire nicely in place.
10-02-2005, 01:32 PM
#8
www.evoperform.com
Thread Starter
Join Date: Apr 2005
Location: tax free delaware
Posts: 2,010
Likes: 0
Received 0 Likes
on
0 Posts
8: Now over on the driver's side fender, you can see another ground point. Cut to length the wire from the A/C compressor, and attach here. As you can see, there is another wire there as well, and that runs from the driver's side fender, up under the cowl, all the way over to the passenger side fender, making a "ring" of grounds all the way around the engine bay. It is an extra step, and doesnt necessarily need to be made, but again, I am a stickler for details like that.
To losen the cowl enough to run the wire, squeez the little retaining clips holding the rubber piece to the cowl, and they should pop right up. Next undo the phillips screws holding the cowl in place, pull the cowl forward slightly, and then it should be able to be lifted up enough to push the wire under. As you can see in the pic from step 4, there is just enough room to get teh wire around the edge with no modification.
To losen the cowl enough to run the wire, squeez the little retaining clips holding the rubber piece to the cowl, and they should pop right up. Next undo the phillips screws holding the cowl in place, pull the cowl forward slightly, and then it should be able to be lifted up enough to push the wire under. As you can see in the pic from step 4, there is just enough room to get teh wire around the edge with no modification.
10-02-2005, 02:22 PM
#9
www.evoperform.com
Thread Starter
Join Date: Apr 2005
Location: tax free delaware
Posts: 2,010
Likes: 0
Received 0 Likes
on
0 Posts
9: Last step is to connect the 2 wires that come down to the ground bolt below the battery, as well as making one from this point up to the negative battery terminal.
Make sure all the bolts are tight, you havent left any tools in the car, clean up, and enjoy.
Make sure all the bolts are tight, you havent left any tools in the car, clean up, and enjoy.


 10-11-2005, 04:41 AM
#16
Registered User

Join Date: Jun 2005
Location: England RH6
Posts: 33
Likes: 0
Received 0 Likes
on
0 Posts
Managed to complete the mod for free thanks to the aircraft generator cables and eye end crimps hanging about in my stores at work. Dont know if he wires are as per the spec u mentioned but i figured if its good enough for modern jets it must do for a modern car.
Only had the mod in place for little over a week... I still cant decide if the sound is louder or is it just me thinking it is, u know, the placebo effect. Because to me anyway its not really a noticeable increase in sound. As for the sooting on the exhaust tips, its just as bad as before. And for the idleing and throttle response? It is just marginally noticeable.
The bottom line is if u got access to free materials to complete this mod go for it. If anything it was good fun doing the mod and poking around the engine bay. But if u end up paying a fair bit for the wires and eye end crimps, then best just leave the mod till u r totally bored and want to play around. I dunno how expensive it was for u guys in the states but it seemed to work out around US$100, and over in the UK it was about �73, at �73 u could probably buy an after market set at a car show...

Thread
Thread Starter
Forum
Replies
Last Post
jay_tibo
Series I Aftermarket Performance Modifications
22
09-13-2016 08:10 PM
akagc
RX-8's For Sale/Wanted
7
08-11-2015 07:07 PM