
DIY: Installing the Beltronics RX75 Pro Plus Remote Radar Detector


Thread Starter
Nerd with a gun...
Joined: Jan 2005
Posts: 70
Likes: 0
From: Piedmont-Triad, North Carolina
DIY: Installing the Beltronics RX75 Pro Plus Remote Radar Detector
Wanting a stealth look on the outside and a fully integrated look on the inside, I've decided to install the Bel RX75 Remote Radar Detector in My 8.
I bought the RX75 brand new off the Internet for $700.
This week I actually started the project, and I thought I would journal it here - for anyone interested in seeing.
I began with mounting the remote sensors.
The Bel RX75 has four sensor modules: three laser sensors and a radar sensor module. Two of the laser sensors mount in the front facing forward and one mounts in the rear facing back. All laser sensors must have a clear sight of the road. The single radar sensor mounts in the front, also facing forward.
The front sensors are intended to mount behind the front grill above or below the front bumper. The laser sensors can't be behind anything that will block their forward view. The radar detector can't be mounted behind anything metal.
The rear laser detector is intended to be mounted on the bottom screws of the reR license plate.
Next Post: Mounting the rear laser sensor
Thread Starter
Nerd with a gun...
Joined: Jan 2005
Posts: 70
Likes: 0
From: Piedmont-Triad, North Carolina
Mounting the rear sensor.
The RX75 rear laser sensor was intended to mount on the bottom screws of the rear license plate. This posed several problems for my RX8. First, there are no screws on the bottom of the license plate. Second, the sensor must be parallel to the ground, and the license plate actually tilts back about 10 degrees. Third, the black sensor would look conspicuously noticeable on the lines of the rear around the plate.
Now I've added a chrome frame around my license plate, and actually added screws to the bottom, by drilling and inserting well-nuts into the body, in order to give the chrome frame a detailed finish.
Still the spacing and angle made it a poor location to mount the rear sensor. Instead, I modified the existing license plate brackets on the sensor such that I could mount it down in the black portion of the rear bumper.
I drilled three holes upward under the bumper cowling: two for the brackets and one to feed the sensor wire through. These holes are in a position that if I ever desire to remove the system, they can't be seen unless you are on the ground looking up.
Next post: the Front Sensors
Last edited by datasmith; Mar 12, 2005 at 10:39 PM.
Thread Starter
Nerd with a gun...
Joined: Jan 2005
Posts: 70
Likes: 0
From: Piedmont-Triad, North Carolina
Mounting the front sensors
The front sensors were even more challenging. I wanted this to be clean as well as effective. I discovered that there is a square-tube frame that runs across the front of the car, right behind the grill. The car's ambient temperature guage is mounted to the bottom of it.
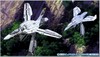
I figured I could mount my forward sensors to that tube frame as well. The radar sensor could mount right to the tube, but the laser sensors needed to drop down about seven inches to peek out from under the grill to get an unbostructed view of the road. So using 1" aluminum stock, I extended the factory brackets on the laser sensors. See the pictures below for the mounting arrangement details.
The first two pictures show the laser detectors with the backets extended.
The second picture shows all three sensors and how they would be positioned on the tube frame in the car.
Next post: Front Sensors Continued
Last edited by datasmith; Mar 12, 2005 at 11:31 PM.
Thread Starter
Nerd with a gun...
Joined: Jan 2005
Posts: 70
Likes: 0
From: Piedmont-Triad, North Carolina
Mounting the front sensors - continued
OK - Now I know where I want them to go. How do I get them there? Well for me it's a good thing to know a good mechanic.
To get to that tube-frame you have to remove the entire plastic skirt from the bottom that channels air through the radiator.
Once you get to the tube-frame, you will have to drill and tap holes, as there's no way to get nuts inside the tube.
The plastic skirt is held on by about a dozen plastic 1/4 turn screws and a couple of 10mm bolts. The skirt actually is in three pieces. Two small pieces on each side, which don't have to be completely removed, and a large center piece that is actually U shaped and extends up on each side into the wheel wells. The ABS sensor wires are clipped to the upward extending wings of the center skirt on either side. They must be un-snapped before the center skirt is dropped.
My mechanic only charged me $60 for the entire job.
I used the kit's provided mounting screws. The mechanic drilled and tapped the holes to fit the screws.
Oh yeah, In order to get the laser sensors centered in their openings properly, I had to move the ambient temperature sensor over about 2 inches. You can spot it on the left side of the tube-frame next to the left sensor in the picture below. You can see the original temp sensor hole in front of the left laser sensor bracket.
First picture - the easy way to do it
Second picture - removing the under-skirt.
Third picture - sensors mounted
Next post: Front Sensors done
Last edited by datasmith; Mar 12, 2005 at 11:33 PM.
Thread Starter
Nerd with a gun...
Joined: Jan 2005
Posts: 70
Likes: 0
From: Piedmont-Triad, North Carolina
Front Sensors Done
Front sensors are now installed. I routed the wiring through existing wiring holes up into the engine compartment. In the engine compartment I tied the sensor wires to the existing harness until I got to the firewall.
There is only a single firewall pass-through where the wiring harness goes into the cab, on the driver side near the brake assembly. There is enough room to cut a slit in the rubber boot below the wiring harness, big enough to pass all three sensor wires through.
Here are pictures of the front of the car with the sensors installed. I used the flash so the sensors would be illuminated.
OK- it's time to take a break... Pat myself on the back and all...Before I begin on the interior work. I will begin posting my interior work in a couple of days.
Last edited by datasmith; Mar 12, 2005 at 11:27 PM.


Attracts tree branches
Joined: Jun 2004
Posts: 5,940
Likes: 3
THIS IS AWESOME
1. Move this to permanent DIY section
2. You want to install this on mine?
3. So this is the PLUS version with Laser Jamming eh? GREAT CHOICE!!!! You are just about the only person on the forum who is fully protected!! (there is one or two others but using the Escort Laser shift system which is identical to the Beltronics version since Bel owns Escort)
As for mounting the control unit...personally I would install the display in the air vent...YES, IN the air vent to the immediate right of the steering column. This way it is totally stealth...then use the remote mute button to control the unit...this is great since your already wired to ignition and so you won't need to modify the controls...besides if you need to simply use a tweezers.
Great Job!
Thread Starter
Nerd with a gun...
Joined: Jan 2005
Posts: 70
Likes: 0
From: Piedmont-Triad, North Carolina
Looking really good, Datasmith! Where are you going to install the interior control panel?
Thread Starter
Nerd with a gun...
Joined: Jan 2005
Posts: 70
Likes: 0
From: Piedmont-Triad, North Carolina
1. Move this to permanent DIY section
2. The rest of this work is going to be Interior, Audio, and Electronics stuff.
3. So if I should move, can someone tell me how?
BTW - It is the PRO PLUS with Laser Jamming
Thread Starter
Nerd with a gun...
Joined: Jan 2005
Posts: 70
Likes: 0
From: Piedmont-Triad, North Carolina
As for mounting the control unit...personally I would install the display in the air vent...YES, IN the air vent to the immediate right of the steering column.
Last edited by datasmith; Mar 13, 2005 at 06:28 PM.
Thread Starter
Nerd with a gun...
Joined: Jan 2005
Posts: 70
Likes: 0
From: Piedmont-Triad, North Carolina
Just curious...how will road debris effect performance? In other words, wouldn't chips in the front of the sensor significantly effect performance?
As far as dirt goes. I'll probably have to watch that. But hey, I'm the kind of guy that goes around and wipes my rims down every other day... so wiping down the sensors as well will just as much appeal to my ****-retentiveness.

Registered User
Joined: Feb 2005
Posts: 53
Likes: 0
Originally Posted by datasmith
Are you talking about the four small vertical slits in the dash near you right knee? I don't know what they are intended for. Although is seems like there's povision behind there for something to mount, there's absolutly nothing behind them... and BTW, that's a perfect little opening in the dash where I plan to mount the powered speaker that provides the tone/voice response.
Thread Starter
Nerd with a gun...
Joined: Jan 2005
Posts: 70
Likes: 0
From: Piedmont-Triad, North Carolina
AudioPilot Microphone
Originally Posted by RedRexNJ
Those little slits by your right knee are for the AudioPilot microphone. If you have Bose, then there's a little mic mounted in there. Don't know if anythings in there on the base audio system.
I don't think I actually got the AudioPilot. It seemed like there was no difference between setting AudioPilot on or off. Still had to adjust the volume when I slowed down.
My dilemma now is...should I use the hole for my radar detector speaker and screw the AudioPilot? or find out if I can get AudioPilot added and find another location for the speaker?
Opinions welcome, of course.
The next post on page 2 starts the interior work-->
Last edited by datasmith; Mar 13, 2005 at 12:27 PM.
Thread Starter
Nerd with a gun...
Joined: Jan 2005
Posts: 70
Likes: 0
From: Piedmont-Triad, North Carolina
Head Unit Exploratory
OK. Started work on the radar display unit.
Needed to take a look at my dash and head unit space.
Pulled the Head Unit out using l008com's link:
http://www.whatsmyip.org/ipodrx8
Even with his great instructions, the head unit was a bear to remove. You'd think they could add just one more inch to those cable lengths!
Turns out the that the radar display unit is a fraction of an inch too big to slide into the Mini-disk space with its case in tact... so I had to do some trimming... see the pictures below.
The space is tight and I want the fit to be clean, so I found a local machine shop that will mill out the slot for the display.. will add PICs when I get it back from them.
Last edited by datasmith; Mar 13, 2005 at 06:31 PM.
Attracts tree branches
Joined: Jun 2004
Posts: 5,940
Likes: 3
the audiopilot microphone is located on the center forward dash near the front windshield..not by your knee
and as I was referring to the air vents...I meant the ones located above the HU, speciffically the left on closer to the steering column
although thew's location is great too...plus it beautifully integrates
and as I was referring to the air vents...I meant the ones located above the HU, speciffically the left on closer to the steering column
although thew's location is great too...plus it beautifully integrates
Thread Starter
Nerd with a gun...
Joined: Jan 2005
Posts: 70
Likes: 0
From: Piedmont-Triad, North Carolina
Mounting the powered speaker
TrueMagellen wrote:
Thanks for the info. That resolves where I'm putting the powered speaker.
I'm mountng it back somewhat on a bracket where some available holes are.
Pointing it forward to play through those vertical slits to the right of the steering column, as well as through the gaps around the steering column.
I had to move a cable harness strap from the bracket. I used the hole that it was in, along with another spare hole. I then re-tied the cable harness with a wire tie.
I will temporarily hook everything up and gvie it a test sounding at about 70 mph with the stereo going.
PS. Anyone know what those vertical slits in the dash by the steering column are actually for? You can see them in the first picture below. Absolutly nothing but open space behind my slits.
below are PICs of the powered speaker mounted....
the audiopilot microphone is located on the center forward dash near the front windshield..not by your knee
I'm mountng it back somewhat on a bracket where some available holes are.
Pointing it forward to play through those vertical slits to the right of the steering column, as well as through the gaps around the steering column.
I had to move a cable harness strap from the bracket. I used the hole that it was in, along with another spare hole. I then re-tied the cable harness with a wire tie.
I will temporarily hook everything up and gvie it a test sounding at about 70 mph with the stereo going.
PS. Anyone know what those vertical slits in the dash by the steering column are actually for? You can see them in the first picture below. Absolutly nothing but open space behind my slits.
below are PICs of the powered speaker mounted....
Last edited by datasmith; Mar 13, 2005 at 02:48 PM.
Thread Starter
Nerd with a gun...
Joined: Jan 2005
Posts: 70
Likes: 0
From: Piedmont-Triad, North Carolina
Originally Posted by Dookie_Rx-8
hey how many hours did it take you to do this so far?
Running cable through trunk, door sill, under dash ~1 hour
Fabricating front sensor bracket extensions ~2 hours
Installing front sensors (mechanic's time) ~2 hours
Running cables through engine compartment ~1 hour
Figuring out/placing the powered speaker ~1hour
Pulling head unit - trimming remote display ~1-1/2 hour
Replace head unit after exploratory look ~1/2 hour
Looks like about 10 hours so far....
Thread Starter
Nerd with a gun...
Joined: Jan 2005
Posts: 70
Likes: 0
From: Piedmont-Triad, North Carolina
Latest Update: Remote in-dash indicator
Well thanks to THEW at the RX8 Garage I've got my spare head-unit faceplate... and it's already off to the machine shop to have the opening milled for the display-control unit to fit through. Since the space is tight, I can't use the provided bezel that comes with the Plus package. So, the opening has to be clean for the display unit to fit through without the bezel. Pictures will follow when it comes back from the machine shop. It will be another week before I get it back, so I'm moving on to other sections while I wait.
The Bel RX75 comes with a remote in-dash alarm indicator... which is basically a two-color LED on the end of a cable that plugs into the RX75 interface unit.
See picture 1 below.
The Idea is that you drill a hole in your dash near or inside your instrument cluster, and stick the LED through... such that it is in your normal field of view while driving. It glows solid green when the radar detector is on and flashes red when a radar is detected.
There are not many places in the RX8 instrument cluster that this indicator can be put. On top of that, I suffer from an **** retentive desire to have things symmetric. So I can't put just one indicator in the RX8 instrument cluster and have symmetry. But I can have symmetry with two indicators.
Picture 2 below shows where I plan to put a pair of indicators.
For the LED indicators to fit in with the round bezel style of the instrument cluster, I found a nice little LED panel bezel from good old Radio Shack that will just do the job.
See picture 3 below.
Now the output of the radar detector interface only has enough power to drive a single LED. So I had to whip up a little booster circuit that will drive two LEDs from the single LED signal cable.
Picture 4 shows the circuit bread-boarded up and driving the LEDs with the Radio Shack bezels installed.
I will be using a thread by magixpuma named "Removing the guage cluster" right here in DIY, to pull the dash cluster and install the LEDs.
Pictures of that installation will follow.