
Grom BT3 bluetooth/mic/aux/usb placement


Thread Starter
Registered
iTrader: (1)
Joined: Oct 2005
Posts: 772
Likes: 2
From: California, Chula Vista, Otay Ranch
Grom BT3 bluetooth/mic/aux/usb placement

Having read through every DIY I could find, during the install a few placement issues were discovered and optimized. There were some updates in the Grom line, if anyone thinks a more detailed writeup would be helpful? Below utilizes the Grom BT3 unit, Grom AUX-IN 3.5mm audio and 5V USB Charging cable, Grom Flush Mount 3.5mm female auxiliary cable, and Xtenzi USB marine flushmount.
Ideally, the Grom placement should:
1. Be accessible without ripping out the dash. (It may break and need replacement, you may need to re-seat a loose connection, or you may wish to show the buyer the location when it comes time to sell the car).
2. Not take up any glove box space.
3. Wires not subject to physical stressors. (Direct contact with moving shifter boot, opening/closing glovebox, etc).
4. Positively secured from movement. (Hard braking situation, possibility of rattling if put behind the a/c heater controls, or crammed into the empty space next to the glove box).
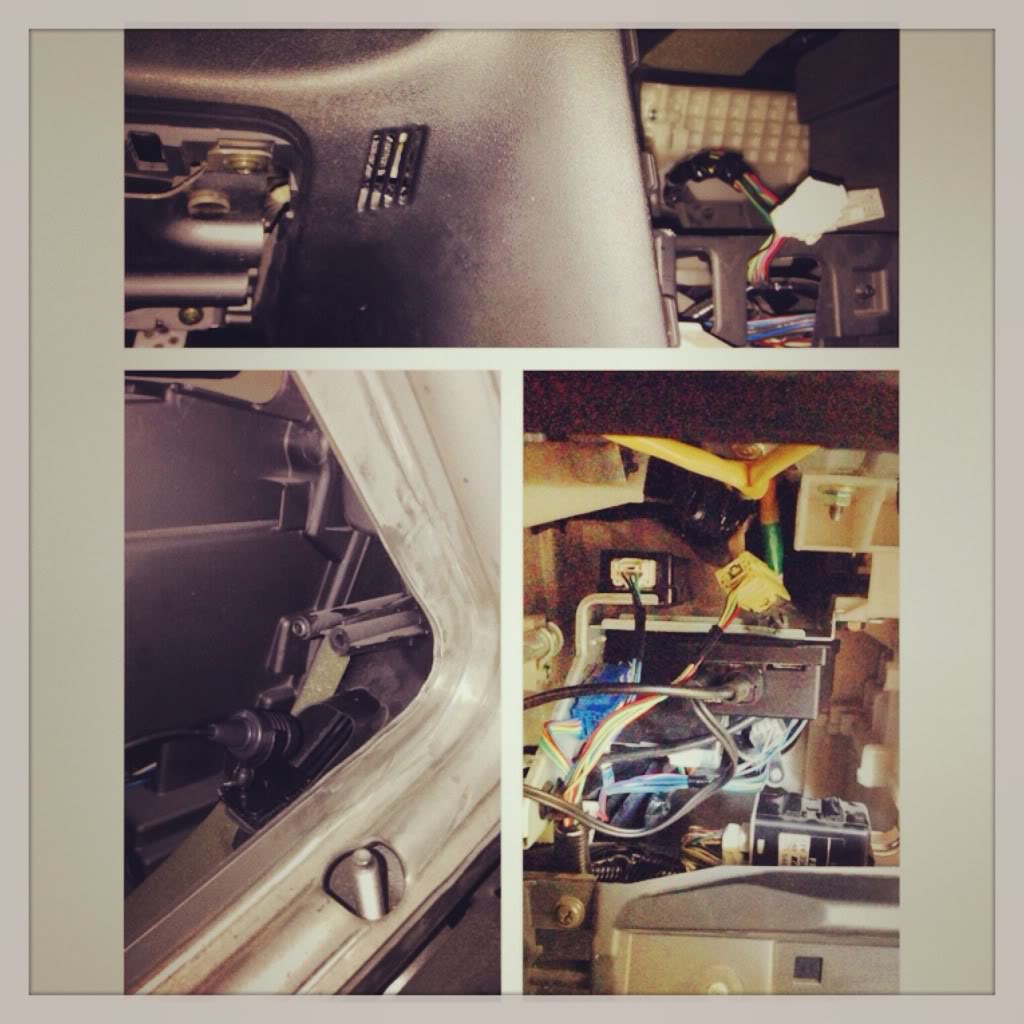
Such a location is found on this bracket:

The 2 notches on the Grom case are perfectly sized to lock zipties in:

With bluetooth no more install is needed, unless you want a mic, aux, or usb charge port without taking up additional power sockets.
Utilize the existing OEM wire path:


Wires tuck into place, grey plastic fits over:


This is where my USB to USB connection ended up, but I think there is room for improvement:

The only thing different, was the hidden bolt. It was clearly visible and no extensions were needed to reach it:


Audio and USB charge work, but have not figured out voice dialing mode yet:

Last edited by User24; Jan 5, 2014 at 04:58 PM.

OP, great position for your GROM box, thats exactly where I placed mine.
One thing though, I am not a fan of your mic placement as everything else is very clean and your mic location stands out like a sore thumb. Obviously I ran into the same problem as you as far as mic placement.
I ended up placing mine by my right knee, in the little slit opening (kind of hard to describe).


"That Guy"
Joined: Apr 2006
Posts: 62
Likes: 3
From: It's Sinful
I put the grom box in the same spot though it doesn't fit too well with the ps2 style connectors. The mic is in that vent thing but the quality is bad for the person I'm calling so it looks like I'll be moving it up by the mirror. I wish grom gave us a couple of clip options instead of some two sided tape.
I also followed your lead with the 3.5mm adapter and will be picking up the USB extender too so it can be cleanly mounted. It's currently tapped off.
Chad
I also followed your lead with the 3.5mm adapter and will be picking up the USB extender too so it can be cleanly mounted. It's currently tapped off.
Chad

Thread
Thread Starter
Forum
Replies
Last Post
ktec
Series I Aftermarket Performance Modifications
3
Jul 29, 2015 01:17 PM
8 Maniac
Series I Interior, Audio, and Electronics
12
Dec 20, 2007 08:03 AM