
DIY: Brake Cooling Ducts for Track Use


Thread Starter
Momentum Keeps Me Going
Joined: Sep 2002
Posts: 5,036
Likes: 5
From: Colorado
DIY: Brake Cooling Ducts for Track Use
On track, our RX-8 brakes can get hot, real hot. The smaller the track, the more turns it has, the more the brakes are used and the less time they have to cool. I noticed that temps in pit after a session on such a track were exceeding the capacity of my Infrared Thermometer to measure, which means they were hotter than 590 degrees. That's too warm for good long term survivability of fluid and pads.
Looking at the RX-8 it is unclear if Mazda has done something to help brake ventilation or not. There are vent slits behind the oil coolers in the fender wells, but is that for cooling the oil radiator only or was it for also helping cool the brakes? One thing for sure, the air leaving those slits is close to 212 degrees, so I figured there was a better way.
Looking into the left and right front radiator air inlet area there is an angled spot that helps form the funnel leading to the radiator & air conditioner core. I figured an inlet put there could be used to funnel cool ambient air back to the brakes and at an appropriate angle so as to point towards the brake shield air collector (the bent part of the brake shield) and not just at the tire (like the air from the oil cooler vents).
So here is how I did this mod. Some pictures are not available, as I am doing theis DYI after I finished the mod, but once you get into this I'm quite sure you easily understand what needs to be done.
Afterwards at the same track, I measured brake temps again in the same conditions as approx 300+ degrees. As it was towards the end of the season, I'll be doing more measurements this coming season, but at least I know my brakes are getting some fresh cool air for a change and staying as cool as possible. Enjoy.
Last edited by Spin9k; Feb 26, 2006 at 12:15 PM.
Thread Starter
Momentum Keeps Me Going
Joined: Sep 2002
Posts: 5,036
Likes: 5
From: Colorado
Cost of materials was less than $20. Here is how it can be accomplished. You'll need:
- four - 4" Corr to S/D Adapters, whatever that means ( Home Depot or similar store in the sewer pipe dept)
- waterproofing repair tape ( Nashua Tape Products - Walmart paint Dept w/masking tape)
- some foam core board or other 1/4 thick weather resistant board (optional)
- can of dull black spray paint
- a strong cutting knife
- 2 small pieces of thick rubber floor pad material (Home Depot)
- plastic screen (gutter guard) to keep big debris out
Last edited by Spin9k; Mar 11, 2011 at 09:15 AM.
Thread Starter
Momentum Keeps Me Going
Joined: Sep 2002
Posts: 5,036
Likes: 5
From: Colorado
1) Loosen the wheel nuts of both front wheels. Put the front of the car on jack stands and remove both front wheels. Remove the front inner fender shields (behind the oil cooler radiators) by first removing the small plastic snap pins that hold it in place. To do this, use a small screwdriver to turn the center plastic screw a half turn then pull the screw out with your fingernails, then remove the pin. Remove the front wheel shroud.
2) From behind, inside the wheel well, in the plastic that makes the air intake area that is on an angle (not shown - but look into the front area and you'll see the area of interest easily - then return to inside the wheel well area) mark a rough circle with a magic marker pen - then cut a hole roughly the shape of the small end of the tube so that the tube can be forced into the opening from behind (approx 3.75" diameter). This hole will need to be slightly flattened rather than perfectly round due to the space available in the area. Refer to the (finished) front pic for placement of the hole.
Push the small end of one tube piece into this cutout. You'll need to flatten the end, but it should fit snugly and just protrude in the front by only a small amount. Use a couiple pieces of waterproof tape to hold this in place - you'll be sealing it completely later, but this is just for positioning.
Last edited by Spin9k; Feb 26, 2006 at 12:29 PM.
Thread Starter
Momentum Keeps Me Going
Joined: Sep 2002
Posts: 5,036
Likes: 5
From: Colorado
3) From inside the wheel well, and sighting back to the whole in the front plastic, mark the shroud area to cut out with a magic marker. This needs to be the size of the larger, other end of the tube piece. Note the ridge on this end of the tube. The whole you cut should be sized so that the ridge will stop the tube from going completely through the shroud, that is, the shroud should hold the tube by the tube lip tightly (cut whole is approx 4.75" diameter).
The path produced by the joining of the two tubes will naturally produce a flow path for air that points at an angle toward the bent out section of the brake dust shield when the wheel is pointed roughly ahead or to the outside.
4) Force the small end of the tube through the fender shroud. It should fit snug into the hole you just cut.
5) Put the fender shroud back into the wheel well, fitting the two pieces of tubing together so they overlap, one fitting into the other.
Last edited by Spin9k; Feb 26, 2006 at 12:30 PM.
Thread Starter
Momentum Keeps Me Going
Joined: Sep 2002
Posts: 5,036
Likes: 5
From: Colorado
6) Using the weatherproof tape, completely seal the following areas in this order, a) from the front, completely seal the tube to the plastic of the air inlet; b) from inside the fender well, seal the two tubes together by placing tape all around the circumference of the tubes where they meet.
7) Using plastic screening of your choice (I used course gutter screen), cut out pieces to cover the front duct holes, and put them in place and secure with a second layer of weatherproof tape.
8) (optional) Cut out some foam board material to make form a separate channel from the radiator flow. Once trimmed to fit, spray paint the material black. Use a single self tapping screw to attach the piece to the plastic sidewall (as shown in the picture), then tape as necessary to form an airtight tunnel to the brake duct.
Last edited by Spin9k; Feb 26, 2006 at 12:34 PM.
Thread Starter
Momentum Keeps Me Going
Joined: Sep 2002
Posts: 5,036
Likes: 5
From: Colorado
9) Spray paint the front areas with flat black paint as needed to hide the tape.
10) Cut two small pieces of material to form a block that can be put into the front intake areas when off track, to keep water, sand and other foreign material out of the duct.
That's it, your done!
10) Cut two small pieces of material to form a block that can be put into the front intake areas when off track, to keep water, sand and other foreign material out of the duct.
That's it, your done!
Last edited by Spin9k; Feb 26, 2006 at 12:31 PM.


Thread Starter
Momentum Keeps Me Going
Joined: Sep 2002
Posts: 5,036
Likes: 5
From: Colorado
Originally Posted by Go48
I think he is asking if there's a pipe connecting the 2 rubber tubes. (Good DIY, BTW.)
....hell my PT Cruiser has this from the factory... I recently noticed this and was amazed!! It's not so big as these, but sure enough, right beside the fogs in the cutout like the 8 is a hole going back to the fenderwell.

New Member
Joined: Mar 2003
Posts: 9,944
Likes: 2
From: Melbourne, Australia
Thanks Spin.
My caliper paint is burn and it is label to withstand 600 degree heat. No wonder I felt brake fade for a 700 degree pad
Nice little mod. That give me ideas to cool the new caliper when it comes in.
My caliper paint is burn and it is label to withstand 600 degree heat. No wonder I felt brake fade for a 700 degree pad
Nice little mod. That give me ideas to cool the new caliper when it comes in.

Registered User
Joined: Jun 2002
Posts: 3,086
Likes: 1
From: Misinformation Director - Evolv Chicago
Spin this was a great DIY and a great idea...thanks!
But looking at this, does everyone agree that the divider between the brake duct and radiator needs to be installed? I was looking at this yesterday on my car and am not sure air needs to be directed to the ducting. Won't air naturally go through the new brake ducts regardless?
But looking at this, does everyone agree that the divider between the brake duct and radiator needs to be installed? I was looking at this yesterday on my car and am not sure air needs to be directed to the ducting. Won't air naturally go through the new brake ducts regardless?

Registered
Joined: Jul 2006
Posts: 558
Likes: 3
From: Richland, WA
I just bought my 8 3 days ago, and had already decided that a hole through the fender wall in that exact location would benefit the brakes.
While waxing the car, I looked into the triangular space in front of the radiator and could see that there was nothoing between the space and the wheel well except a plastic panel. There is going to be positive pressure in that area at speed which should be sufficient to force air through the hole into the wheel well. Ducting would only raise the bar if a flex duct could be mounted directly to the rotor shield such that the air was forced directly into the rotor hub. If you aren't going that far, all you are really doing is producing airflow to the wheel well, which shouldn't require a duct.
I haven't yet investigated whether the vents behind the front wheels are functional. Do they vent the engine bay, wheel well, or both?

did something similar to my car thx for the idea.
https://www.rx8club.com/series-i-do-yourself-forum-73/diy-brake-cooling-ducts-96296/
https://www.rx8club.com/series-i-do-yourself-forum-73/diy-brake-cooling-ducts-96296/
Hmmmmmm.........
Joined: Mar 2005
Posts: 3,564
Likes: 6
From: Melbourne, Australia
I decided to investigate doing this yesterday. All looks simple enough, however I ran into a snag and I wonder where the difference is.
From the attached picture of a front end with bumper removed, you can see the centre plastic that sits under the engine. This plastic is moulded and comes up behind the wheel well plastic directly in line with where the hole in this DIY is cut.
Have I missed in the instructions where this is supposed to be cut?
Cheers
Andrew

Registered
Joined: Aug 2006
Posts: 142
Likes: 0
Originally Posted by takahashi
Thanks Spin.
My caliper paint is burn and it is label to withstand 600 degree heat. No wonder I felt brake fade for a 700 degree pad
Nice little mod. That give me ideas to cool the new caliper when it comes in.
My caliper paint is burn and it is label to withstand 600 degree heat. No wonder I felt brake fade for a 700 degree pad
Nice little mod. That give me ideas to cool the new caliper when it comes in.
You need paint capable of 1200d to properly measure track temps.
Those ducts are about 1/2 way there, you need to get air to the -center- of the back of the rotor to do any good.
Sure, more air is getting into the well, but the wheel well wasnt lacking for air inthe first place, the CENTER of the rotor is lacking high CFM airflow..but of course, this would only matter if you had actual temperature problems WRT rotor failure (heat stress cracking, etc). This wont affect pad temps whatsoever.
The more focused high CFM airflow is on the inside core of the rotor, the better, which also means the less lost to 'leaking' from that area, the better.
Cooling ducting that points to the center but doesnt seal it there, commonly shows up as rotors that heat crack on the outside face only, while the inside face remains in excelent shape.
If you are heat cracking both sides..youre not getting enough air to the rotor to cool anything..or youre just going fast enough to find the limits of your current cooling.
Also, dont forget the extreme value of a cooldown lap if you get any at all, you can come into your pit well under 400d or less if you learn to practice a good cooldown lap at the track.
Its the hot parking that boils inferior brake fluid 99% of the time, the other 1% is back to either cooling or improper brake technique.
Eventually you cant get a hot enough pad, or enough cooling, then you gotta go bling to fix it.
Last edited by Speedtoys; Oct 2, 2006 at 01:04 AM.

Registered
Joined: Aug 2006
Posts: 142
Likes: 0
Im not convinced theres a reason ducts whatsoever unless you own a dedicated race '8 with MUCH more HP.
Sames goes for a big brake kit.
Theres so much you can do on pad materials that few ever consider before spending thoudands of $$$$ on kits or hundreds and hundreds on custom WELL designed duct installs.
Sames goes for a big brake kit.
Theres so much you can do on pad materials that few ever consider before spending thoudands of $$$$ on kits or hundreds and hundreds on custom WELL designed duct installs.
Registered
Joined: Jul 2006
Posts: 558
Likes: 3
From: Richland, WA
Originally Posted by Speedtoys
Im not convinced theres a reason ducts whatsoever unless you own a dedicated race '8 with MUCH more HP.
Brake cooling needs are proportional to horsepower.
It is easier to upgrade to better pads for a track day than to design and install an effective cooling system.
Registered
Joined: Aug 2006
Posts: 142
Likes: 0
And also..agreed. But unless someone is documenting sustained and exceeding 1200d rotor temps, you can solve the problem with materials much easier.
This is also the proper method to manage track braking performance. Installing ducting to get pads NOT suited for the environment to work "better" is just dressing up a pig.
Track day on OEM pads is quite acceptable for MOST people, I drive harder and faster than most because I can do so safely (I outran the NASA TTD class winner by .05sec in my fastest lap on stock brakes, OEM 25k old tires, zero mods) at Sears Point last event when I compared by hot lap times to his transponder times. Gimme some rubber and pads..thats 2 seconds without thinking about it.
A 405Hp 3200lb Z06 with 12.8" rotors -needs- ducts irregardless of pad material, because you can (And I do) crack rotors on the Z in about 2 days, thankfully theyre only $23/ea. And yes, $100 OEM rotors crack just as fast. Thats when you need ducts. And thats only for the _really_ fast drivers. The not so fast drivers wont heat crack rotors at all very easilly.
A 225Hp 3200lb Rx8 on 11.8 or 12.8 rotors just simply doesnt have the same need at all.
That 180Hp difference is a lot, and it tells me that ducting isnt on the required list of non dedicated super high HP RX8's.
If you do track days, and you find OEM pads aint cutting it and it's not your braking technique, get the right tools for the job..get the right pads.
Thread Starter
Momentum Keeps Me Going
Joined: Sep 2002
Posts: 5,036
Likes: 5
From: Colorado
Here's a bit of an update...my goal has always been to have fadproof braking with aggressive friction at all times during multiple track sessions of 20-25 min each over the course of a weekend with NO CHANGE in brake action over the event. I THOUGHT I was getting close before, but feel/friction was never right for my driving and brakes often became a bit numb over an event. The end result was loss of confidence and resulting holding back.
To that end I've changed/updated a couple key components and believe I now have the braking characteristics I've needed/always wanted for this type of track use. Yea!!! BTW I've graduated to R-Compounds to up the speeds and brake stress just a bit
-------------------
Just back yesterday from trackdays at a long 3.5 mile track with multiple high speed ~100+ braking zones. Setup on brakes is DIY ducts of course, stock calipers, dust shield in place, RB 2-piece rotors front only, fresh Motul 594 degree dry boiling point brake fluid (upgrade from ATE Super Blue), Cobalt Friction GT-Sport pads (HUGE friction/feel/modulation upgrade from Hawk HP+).
I check temps in the paddock area, but checkered flag to brake temp test is only ~60 sec as the flag is given just 3 turns before pit-in.
Results were consistent during 2 days of runs. Hotest spot (top of brake pad front) was just shy of 500 degrees. Other areas pads/calipers were is mid 400 degree range. Pads are rated to 1200 degrees, Motul to 592 degrees so cooling is keeping things well within an acceptable range for this application.
Last edited by Spin9k; Jul 17, 2007 at 09:19 AM.
Thread Starter
Momentum Keeps Me Going
Joined: Sep 2002
Posts: 5,036
Likes: 5
From: Colorado
++++++++++++++++++++++++++++++++++
UPDATE MARCH 2011 - ADDED SOME FURTHER DETAIL
I located pics I'd taken during the brake duct redo I did last summer when I had my bumper off. The 1st time I didn't have the bumper off to do this mod...it was OK but much more of a pain than having free access like this. I'd recommend the bumper off approach if you can manage it.
These show better the internal construction that was missing in the original pics from 2006.
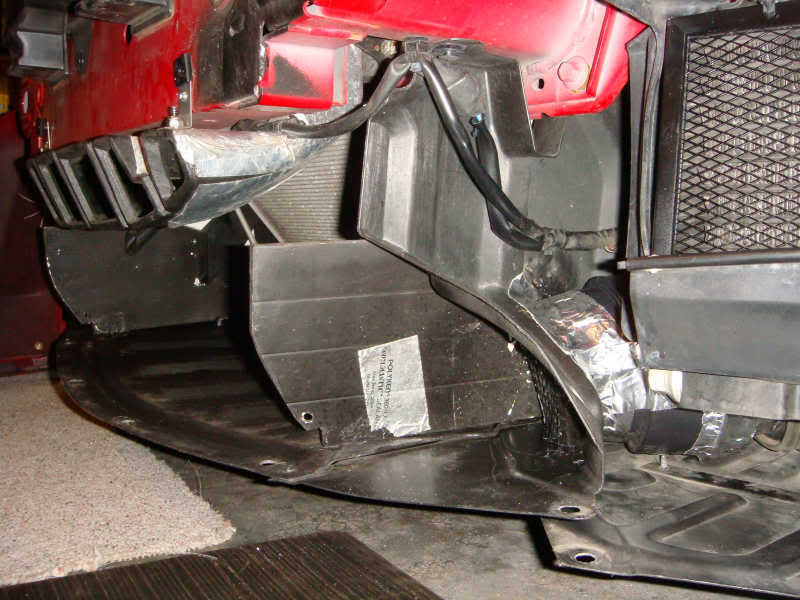
This 1st shows the ducts finished and the side separators in place. You can see generous use of the weather resistant tape (not duct tape, nor metal tape, but Tyco adhesive #330 All weather foil)
 and
and 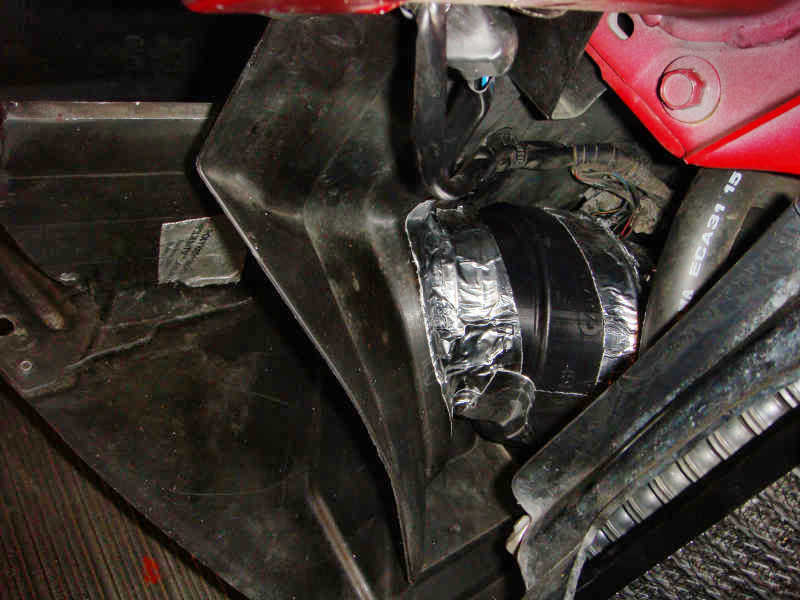
This shows the gutter guard mesh in place. In a 2 step process, the plastic tube is taped securely to the shroud that was cut. Then the mesh cut and placed over the whole, and another layer of tape applied all around. The last step was to apply a back coating. i used truck bed liner spray, as it is thick and lasts far longer than paint at such a vulnerable place close to the road and debris.

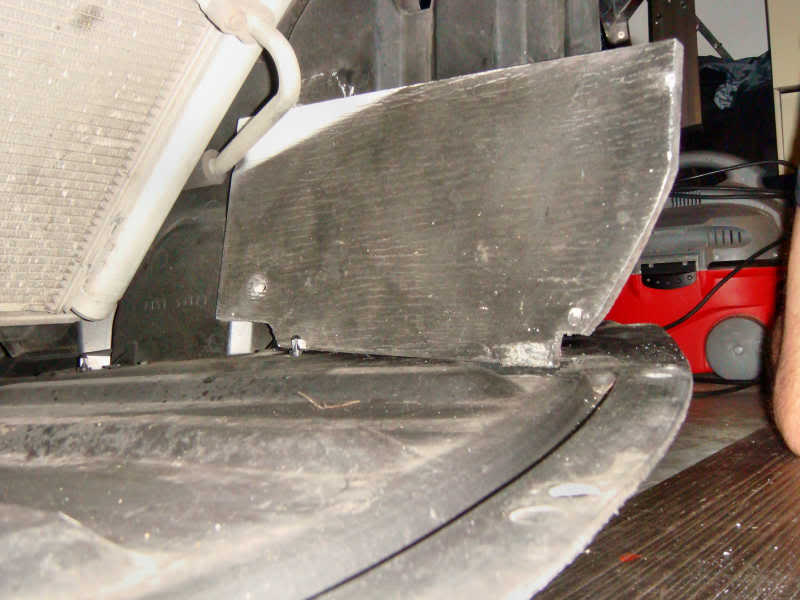
This shows the separator board position next to the air conditioner coil. Here in the pic it's not completely installed yet. The two holes are for (rear) a screw that goes through into the shroud and hold it securely in place, and (front) a hole for a tiewrap that will attach to screening when the bumper is on.
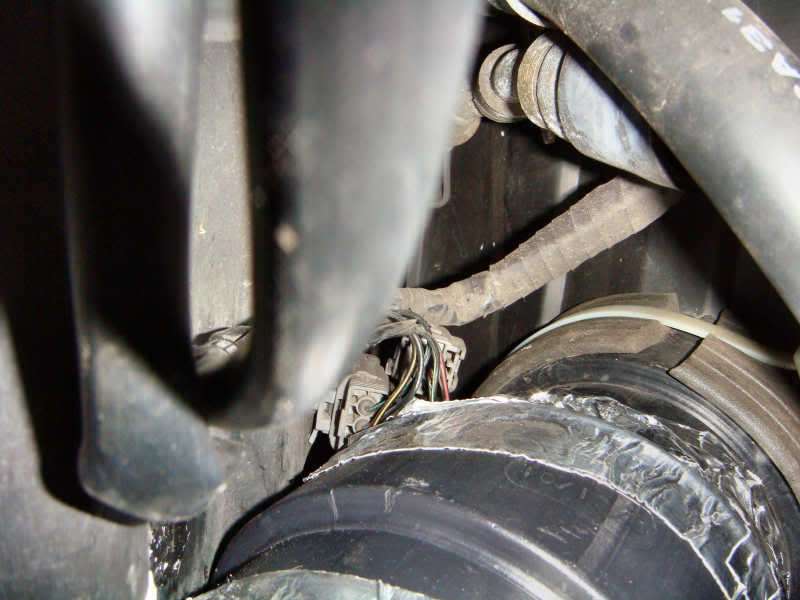
last this shows a extra modification I did. I found the tube (inside the wheel well) would pop out of the cutout in the shroud sometimes, so I took a piece of foam rubber mat, cut it and used a giant tiwrap to secure it on the inside of the tube. This made it secure so it wouldn't pop out.
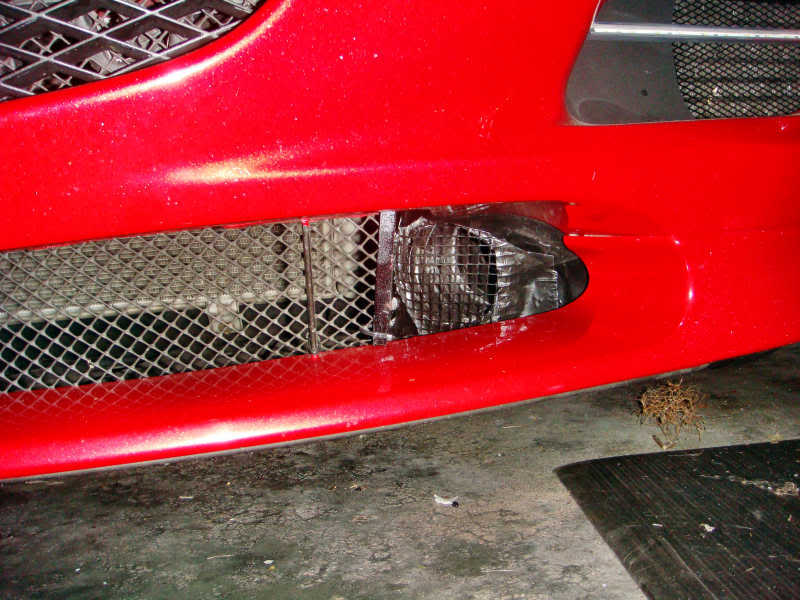
Here is the competeled duct with the bumper back on. I use the same gutter guard across the entire front of the lower opening to keep debris out. The divider is attached to that to keep it secure and straight under high air pressure that developes there at speed.
UPDATE MARCH 2011 - ADDED SOME FURTHER DETAIL
I located pics I'd taken during the brake duct redo I did last summer when I had my bumper off. The 1st time I didn't have the bumper off to do this mod...it was OK but much more of a pain than having free access like this. I'd recommend the bumper off approach if you can manage it.
These show better the internal construction that was missing in the original pics from 2006.
This 1st shows the ducts finished and the side separators in place. You can see generous use of the weather resistant tape (not duct tape, nor metal tape, but Tyco adhesive #330 All weather foil)
and This shows the gutter guard mesh in place. In a 2 step process, the plastic tube is taped securely to the shroud that was cut. Then the mesh cut and placed over the whole, and another layer of tape applied all around. The last step was to apply a back coating. i used truck bed liner spray, as it is thick and lasts far longer than paint at such a vulnerable place close to the road and debris.
This shows the separator board position next to the air conditioner coil. Here in the pic it's not completely installed yet. The two holes are for (rear) a screw that goes through into the shroud and hold it securely in place, and (front) a hole for a tiewrap that will attach to screening when the bumper is on.
last this shows a extra modification I did. I found the tube (inside the wheel well) would pop out of the cutout in the shroud sometimes, so I took a piece of foam rubber mat, cut it and used a giant tiwrap to secure it on the inside of the tube. This made it secure so it wouldn't pop out.
Here is the competeled duct with the bumper back on. I use the same gutter guard across the entire front of the lower opening to keep debris out. The divider is attached to that to keep it secure and straight under high air pressure that developes there at speed.
Last edited by Spin9k; Mar 12, 2011 at 08:14 AM.

Rotary Rocket
Joined: Oct 2011
Posts: 238
Likes: 1
From: England

New Member
Joined: Jul 2014
Posts: 8
Likes: 0
From: Wellington, New Zealand
Anyone looked at rear brake cooling? I recently cracked an OEM disc rotor on my race car and have since upgraded them. With the heat shields and lack of ducting at the rear I think they could use a little more cooling.