
Coolant leak question


Thread Starter
Registered User
iTrader: (1)
Joined: Sep 2010
Posts: 436
Likes: 1
From: Montgomery, AL
Coolant leak question
My coolant light had come on for a little while right after starting the car a couple times, so this morning I checked it and it was a little low. I had a hard time figuring out exactly how much to add because it was hard to read, but was pretty sure I got it right to the full line, if anything maybe a slight bit under...
I went back out about 30 minutes later and there was a pretty good size puddle of something around the front passenger side tire, and I'm pretty positive it was coolant, so I cranked the car and moved it back 10 feet, then left it running while I went and checked out the puddle. I let the car sit running for about 5 minutes so I could see how big of a puddle it made while it was sitting there, but when I moved it again there wasn't a drop of anything under it. So in other words, being turned off for 30 minutes made a pretty good size puddle, but running for 5 made nothing... It is possible that the puddle was there before I added coolant, but I'm pretty sure I would have noticed it.
So my question, if I were to have a small hole in one of my hoses or something, would it be likely to leak while the car isn't on, but then not leak while it is running because the coolant is moving under pressure? I would think it is probably a leak in a hose rather than in the tank itself based on where the puddle was...
Any input? Thanks


Registered User
Joined: Jan 2004
Posts: 361
Likes: 1
Thread Starter
Registered User
iTrader: (1)
Joined: Sep 2010
Posts: 436
Likes: 1
From: Montgomery, AL
Nah, I didn't have to take anything out but I did have to run by a shop and use their lift... It was impossible to see from the top, and it was pretty hidden from the bottom too, so just jacking it up and crawling under there with a flashlight didn't help much either cause I didn't really have room to look around good enough to find the hole. Once I lifted it it wasn't too hard to spot though....
Are you having a similar problem or something?
Are you having a similar problem or something?
Registered User
Joined: Jan 2004
Posts: 361
Likes: 1
Yes, I'm having the same problem. Still need to diagnose like you did to see if the leaking stops when my engine is on (and crossing my fingers that that's the case).
When my car was at the dealership for an oil change and they lifted it up, they let me go look underneath. We couldn't tell anything about where the coolant dripping was specifically coming from other than from the passenger side. They said I'd have to take out the undertray.
However, I've heard that you can take out the battery and battery tray to get a look in there.
BTW, how many hoses are there to the cooling system circuit?

Thread Starter
Registered User
iTrader: (1)
Joined: Sep 2010
Posts: 436
Likes: 1
From: Montgomery, AL
I'm not positive, but 3 major ones sounds right to me too..... Yeah, I got lucky that mine happened to be in a spot that was visible without taking anything out. I was able to spot it looking through the opening in the undertray that is right under the waterpump. See if you can find an opening that gives you a decent view, find the spot that it is dripping out of the bottom from, and follow the trail of liquid up as far as you can....
If you can't find it that way then yeah taking out the battery and battery tray should give you a pretty good view of that whole area
If you can't find it that way then yeah taking out the battery and battery tray should give you a pretty good view of that whole area

Registered User
Joined: Sep 2010
Posts: 41
Likes: 0
Small Hint Please
Kinda the same problem here. Today I went to get an oil change and the dealer informed me that there is a small coolant leak. Not at all what I extecpeted. Well he stated that I would need a new Upper and lower radiator hose, Thermolstat plus gasket. All for a whopping $400.00!! Bullshit!  My car does not overheat just for ya'll to know. I found both hoses and thermolstat for $60. So I need a few hints. Where extactly is the thermolstat located? Just to be sure. Do I have to drain the radiator first in order to replace the hoses and thermolstat? Here is my big question: The dealer stated GASKET. Does anybody know what he means? What Gasket?

If you don't know where the thermostat is and if you have to drain the radiator or not I wouldn't do this job until you learn a little more. But just so you know.
Draining the radiator before replacing the hoses will keep you from making a huge mess.
The thermostat is found where the engine block and upper hose meet.
He is talking about the water pump gasket.
THERMOSTAT REMOVAL/INSTALLATION
--------------------------------------------------------------------------------
BHE011215171W01
Warning
� Remove and install all parts when the engine is cold, otherwise they can cause severe burns or serious injury.
1. Remove the engine cover. (See ENGINE COVER REMOVAL/INSTALLATION.)
2. Remove the battery cover.
3. Disconnect the negative battery cable. (See BATTERY REMOVAL/INSTALLATION.)
4. Drain the engine coolant. (See ENGINE COOLANT REPLACEMENT.)
5. Remove the battery, battery box. (See BATTERY REMOVAL/INSTALLATION.)
6. Remove the secondary air control valve. (See SECONDARY AIR INJECTION (AIR) CONTROL VALVE REMOVAL/INSTALLATION.)
7. Before positioning the drive belt out of the way, loosen the water pump pulley installation bolt.
8. Position the drive belt out of the way. (See DRIVE BELT REPLACEMENT.)
9. Remove the water pump pulley. (See WATER PUMP REMOVAL/INSTALLATION.)
10. Remove in the order indicated in the table.
11. Install in the reverse order of removal.
12. Add engine coolant. (See ENGINE COOLANT REPLACEMENT.)
13. Inspect for engine coolant leakage. (See ENGINE COOLANT LEAKAGE INSPECTION.)
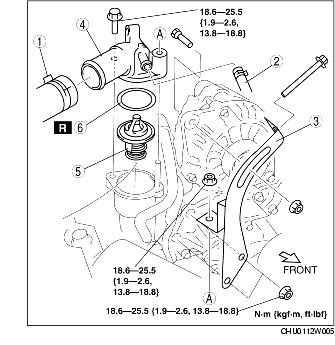
1 Upper radiator hose
2 Hose
3 Generator strap
4 Thermostat cover
5 Thermostat
(See Thermostat Installation Note.)
6 O-ring
Thermostat Installation Note
1. Install the thermostat by fitting the projection on the thermostat to the recess of the thermostat case.
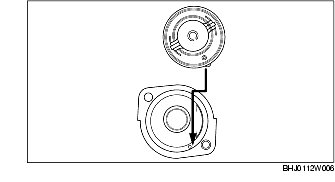
2. Install the thermostat.
SECONDARY AIR INJECTION (AIR) CONTROL VALVE REMOVAL/INSTALLATION
--------------------------------------------------------------------------------
BHE011613988W01
1. Remove in the order indicated in the table.

1 Air hose
2Vacuum hose
3 AIR control valve
2. Install in the reverse order of removal.
WATER PUMP REMOVAL/INSTALLATION
--------------------------------------------------------------------------------
BHE011215010W01
Warning
� Remove and install all parts when the engine is cold, otherwise they can cause severe burns or serious injury.
1. Remove the engine cover. (See ENGINE COVER REMOVAL/INSTALLATION.)
2. Remove the battery cover.
3. Disconnect the negative battery cable. (See BATTERY REMOVAL/INSTALLATION.)
4. Drain the engine coolant. (See ENGINE COOLANT REPLACEMENT.)
5. Remove the battery, battery box and battery tray. (See BATTERY REMOVAL/INSTALLATION.)
6. Before positioning the drive belt out of the way, loosen the water pump pulley installation bolt.
7. Position the drive belt out of the way. (See DRIVE BELT REPLACEMENT.)
8. Remove in the order indicated in the table.
9. Install in the reverse order of removal.
10. Add engine coolant. (See ENGINE COOLANT REPLACEMENT.)
11. Inspect for engine coolant leakage. (See ENGINE COOLANT LEAKAGE INSPECTION.)

1 Water pump pulley
2 Engine hanger (engine front side)
3 Generator strap
4 Water pump body
5 Gasket
Draining the radiator before replacing the hoses will keep you from making a huge mess.
The thermostat is found where the engine block and upper hose meet.
He is talking about the water pump gasket.
THERMOSTAT REMOVAL/INSTALLATION
--------------------------------------------------------------------------------
BHE011215171W01
Warning
� Remove and install all parts when the engine is cold, otherwise they can cause severe burns or serious injury.
1. Remove the engine cover. (See ENGINE COVER REMOVAL/INSTALLATION.)
2. Remove the battery cover.
3. Disconnect the negative battery cable. (See BATTERY REMOVAL/INSTALLATION.)
4. Drain the engine coolant. (See ENGINE COOLANT REPLACEMENT.)
5. Remove the battery, battery box. (See BATTERY REMOVAL/INSTALLATION.)
6. Remove the secondary air control valve. (See SECONDARY AIR INJECTION (AIR) CONTROL VALVE REMOVAL/INSTALLATION.)
7. Before positioning the drive belt out of the way, loosen the water pump pulley installation bolt.
8. Position the drive belt out of the way. (See DRIVE BELT REPLACEMENT.)
9. Remove the water pump pulley. (See WATER PUMP REMOVAL/INSTALLATION.)
10. Remove in the order indicated in the table.
11. Install in the reverse order of removal.
12. Add engine coolant. (See ENGINE COOLANT REPLACEMENT.)
13. Inspect for engine coolant leakage. (See ENGINE COOLANT LEAKAGE INSPECTION.)
1 Upper radiator hose
2 Hose
3 Generator strap
4 Thermostat cover
5 Thermostat
(See Thermostat Installation Note.)
6 O-ring
Thermostat Installation Note
1. Install the thermostat by fitting the projection on the thermostat to the recess of the thermostat case.
2. Install the thermostat.
SECONDARY AIR INJECTION (AIR) CONTROL VALVE REMOVAL/INSTALLATION
--------------------------------------------------------------------------------
BHE011613988W01
1. Remove in the order indicated in the table.
1 Air hose
2Vacuum hose
3 AIR control valve
2. Install in the reverse order of removal.
WATER PUMP REMOVAL/INSTALLATION
--------------------------------------------------------------------------------
BHE011215010W01
Warning
� Remove and install all parts when the engine is cold, otherwise they can cause severe burns or serious injury.
1. Remove the engine cover. (See ENGINE COVER REMOVAL/INSTALLATION.)
2. Remove the battery cover.
3. Disconnect the negative battery cable. (See BATTERY REMOVAL/INSTALLATION.)
4. Drain the engine coolant. (See ENGINE COOLANT REPLACEMENT.)
5. Remove the battery, battery box and battery tray. (See BATTERY REMOVAL/INSTALLATION.)
6. Before positioning the drive belt out of the way, loosen the water pump pulley installation bolt.
7. Position the drive belt out of the way. (See DRIVE BELT REPLACEMENT.)
8. Remove in the order indicated in the table.
9. Install in the reverse order of removal.
10. Add engine coolant. (See ENGINE COOLANT REPLACEMENT.)
11. Inspect for engine coolant leakage. (See ENGINE COOLANT LEAKAGE INSPECTION.)
1 Water pump pulley
2 Engine hanger (engine front side)
3 Generator strap
4 Water pump body
5 Gasket
DRIVE BELT REPLACEMENT
--------------------------------------------------------------------------------
BHE011015800W03
Generator Drive Belt
1. Remove the engine cover. (See ENGINE COVER REMOVAL/INSTALLATION.)
2. Remove the A/C drive belt.
3. Loosen generator installation bolt A and locknut B.

4. Loosen adjusting bolt C and remove the drive belt.
5. Install the drive belt and adjust the drive belt deflection by tightening adjusting bolt C to the specification.
Caution
� After replacing with a the new drive belt, assemble with the deflection/tension for new drive belt and operate the drive belt for 1 min or more while idling the engine. Then adjust it to the deflection/tension used when adjusting.
Drive belt deflection (with pressure of 98 N {10 kgf, 22 lbf})
New (mm {in})
When adjusting (mm {in})
4.0-4.5 {0.16-0.17} 4.5-5.0 {0.18-0.19}
Drive belt tension (when using the SST)
New (N {kgf, lbf})
When adjusting
(N {kgf, lbf})
620-767
{63.3-78.2, 140-172} 519-666
{53.0-67.9, 117-149}
6. Tighten generator installation bolt A and locknut B to the specified torque.
Tightening torque
A: 38-51 N�m {3.9-5.2 kgf�m, 29-37 ft�lbf}
B: 20-30 N�m {2.1-3.0 kgf�m, 15-22 ft�lbf}
7. Crank the engine and measure the deflection and tension again. If not within the specification, repeat from Step 3 again.
8. Install the A/C drive belt.
9. Install the engine cover. (See ENGINE COVER REMOVAL/INSTALLATION.)
A/C Drive Belt
1. Remove the engine cover. (See ENGINE COVER REMOVAL/INSTALLATION.)
2. Loosen idle pulley locknut A.

3. Loosen adjusting bolt B and remove the belt.
4. Install the drive belt and adjust the drive belt deflection by tightening adjusting bolt B to the specification.
Caution
� After replacing with a the new drive belt, assemble with the deflection/tension for new drive belt and operate the drive belt for 5 min or more while idling the engine. Then adjust it to the deflection/tension used when adjusting.
Drive belt deflection (with pressure of 98 N {10 kgf, 22 lbf})
New (mm {in})
When adjusting (mm {in})
3.0-3.8 {0.11-0.14} 3.3-4.0 {0.13-0.15}
Drive belt tension (when using the SST)
New (N {kgf, lbf})
When adjusting
(N {kgf,lbf})
559-706
{57.1-71.9, 126-158} 519-617
{53.0-62.9, 117-138}
5. Tighten idle pulley locknut A to the specified torque.
Tightening torque
37.2-51.9 N�m
{3.80-5.29 kgf�m, 27.5-38.2 ft�lbf}
6. Crank the engine and measure the deflection and tension again. If not within the specification, repeat from Step 2 again.
7. Install the engine cover. (See ENGINE COVER REMOVAL/INSTALLATION.)
--------------------------------------------------------------------------------
BHE011015800W03
Generator Drive Belt
1. Remove the engine cover. (See ENGINE COVER REMOVAL/INSTALLATION.)
2. Remove the A/C drive belt.
3. Loosen generator installation bolt A and locknut B.
4. Loosen adjusting bolt C and remove the drive belt.
5. Install the drive belt and adjust the drive belt deflection by tightening adjusting bolt C to the specification.
Caution
� After replacing with a the new drive belt, assemble with the deflection/tension for new drive belt and operate the drive belt for 1 min or more while idling the engine. Then adjust it to the deflection/tension used when adjusting.
Drive belt deflection (with pressure of 98 N {10 kgf, 22 lbf})
New (mm {in})
When adjusting (mm {in})
4.0-4.5 {0.16-0.17} 4.5-5.0 {0.18-0.19}
Drive belt tension (when using the SST)
New (N {kgf, lbf})
When adjusting
(N {kgf, lbf})
620-767
{63.3-78.2, 140-172} 519-666
{53.0-67.9, 117-149}
6. Tighten generator installation bolt A and locknut B to the specified torque.
Tightening torque
A: 38-51 N�m {3.9-5.2 kgf�m, 29-37 ft�lbf}
B: 20-30 N�m {2.1-3.0 kgf�m, 15-22 ft�lbf}
7. Crank the engine and measure the deflection and tension again. If not within the specification, repeat from Step 3 again.
8. Install the A/C drive belt.
9. Install the engine cover. (See ENGINE COVER REMOVAL/INSTALLATION.)
A/C Drive Belt
1. Remove the engine cover. (See ENGINE COVER REMOVAL/INSTALLATION.)
2. Loosen idle pulley locknut A.
3. Loosen adjusting bolt B and remove the belt.
4. Install the drive belt and adjust the drive belt deflection by tightening adjusting bolt B to the specification.
Caution
� After replacing with a the new drive belt, assemble with the deflection/tension for new drive belt and operate the drive belt for 5 min or more while idling the engine. Then adjust it to the deflection/tension used when adjusting.
Drive belt deflection (with pressure of 98 N {10 kgf, 22 lbf})
New (mm {in})
When adjusting (mm {in})
3.0-3.8 {0.11-0.14} 3.3-4.0 {0.13-0.15}
Drive belt tension (when using the SST)
New (N {kgf, lbf})
When adjusting
(N {kgf,lbf})
559-706
{57.1-71.9, 126-158} 519-617
{53.0-62.9, 117-138}
5. Tighten idle pulley locknut A to the specified torque.
Tightening torque
37.2-51.9 N�m
{3.80-5.29 kgf�m, 27.5-38.2 ft�lbf}
6. Crank the engine and measure the deflection and tension again. If not within the specification, repeat from Step 2 again.
7. Install the engine cover. (See ENGINE COVER REMOVAL/INSTALLATION.)

Thread
Thread Starter
Forum
Replies
Last Post
gwailo
New Member Forum
38
May 14, 2024 06:57 AM
LMURailsplitter02
New Member Forum
1
Sep 6, 2015 10:56 PM