RB Revi intake filter alternative
#1
RB Revi intake filter alternative
I was wondering if anyone has had found an alternative filter to the K&N item used in the Revi intake?
I ask as I really like the Revi intake, but am not a great fan of the oiled K&N filters efficiency compared to other types. I have been looking through the plethora of available generic dry filters available from different manufacturers but haven't had any luck yet.
Has anyone found a replacement that works from a reputable brand?
#2
Water Foul
Do you still have a stock airbox and are thinking about purchasing a Revi? If so, just stick with the stock airbox. It is already quite good, and the Revi intake offers minimal, if any performance gain.
#3
Sorry for the late reply. Yeah I already have the Revi and like it, I think the gains are worth it - especially given what other bolt ons will give you. I just really dislike the K&N element and its sub par filtering, Ill have to keep looking!
#4
No respecter of malarkey
iTrader: (25)
What "gains" would those be and how did you measure them?
Been running K&N filters like forever and am not aware of any issues despite the stuff that you also only read on teh intrawebz, but can't say for sure if it's actually accurate in the real world sense or not. If you're concerned about it though you can get a Nylon sock pre-filter from a company like Outerwears that filters off most of the crap before it gets to the K&N filter for improved filtering performance and much longer times between cleanings.
Outerwears, Inc. - Original manufacturer of Pre-Filters & Shockwears
#5
What "gains" would those be and how did you measure them?
Been running K&N filters like forever and am not aware of any issues despite the stuff that you also only read on teh intrawebz, but can't say for sure if it's actually accurate in the real world sense or not. If you're concerned about it though you can get a Nylon sock pre-filter from a company like Outerwears that filters off most of the crap before it gets to the K&N filter for improved filtering performance and much longer times between cleanings.
Outerwears, Inc. - Original manufacturer of Pre-Filters & Shockwears
Been running K&N filters like forever and am not aware of any issues despite the stuff that you also only read on teh intrawebz, but can't say for sure if it's actually accurate in the real world sense or not. If you're concerned about it though you can get a Nylon sock pre-filter from a company like Outerwears that filters off most of the crap before it gets to the K&N filter for improved filtering performance and much longer times between cleanings.
Outerwears, Inc. - Original manufacturer of Pre-Filters & Shockwears
Anyway yes any test ever done shows the K&N style oiled filters to have low efficiency - not sure how that is bad for the track but somehow okay for the street? I hadn't considered the pre filter/sock idea though - nice. I think it might be a good option if I cant find a replacement filter for the Revi. Cheers.
#7
Water Foul
If anyone is really interested in K&N filter efficiency, I have before and after used oil analysis results showing the difference between a Wix pleated paper style filter and K&N cone filter, as installed in my 2003 Miata. With the pleated paper filter, silicon was 4ppm. With the K&N filter, silicon was 24ppm. Universal average is 12ppm.
#8
No respecter of malarkey
iTrader: (25)
Except you didn’t run the pre-filter and the question is does that really matter and what did it cost in terms of power. I know the turbo guys figured out that the non-oiled filters were costing them 2 psi boost at low rpm because they just don’t flow as well in under certain circumstances. Full power was about the same though. So for tip-in and light throttle I’d expect them to be holding an NA motor back wrt response. I pretty much tried and tested about every type out there and always ended back at K&N, but now with the pre-filter. Now somebody will say that small difference doesn’t matter. My response to that is, then why are you bothering with changing it from the OE box then?
#9
If anyone is really interested in K&N filter efficiency, I have before and after used oil analysis results showing the difference between a Wix pleated paper style filter and K&N cone filter, as installed in my 2003 Miata. With the pleated paper filter, silicon was 4ppm. With the K&N filter, silicon was 24ppm. Universal average is 12ppm.
The pre filter idea seems a good one team, I was planning to do a couple of UOA's as part of a new oil I am running - I might do one with and one without the pre filter to see if there is a perceptible difference in filtration.
Last edited by -=drvr=-; 01-06-2018 at 11:27 PM.
#10
No respecter of malarkey
iTrader: (25)
that's very possible, it has to be configured properly for sure
just making sure that you saw the lower section of this page
Technology and Benefits | Outerwears, Inc
just making sure that you saw the lower section of this page
Technology and Benefits | Outerwears, Inc
#11
that's very possible, it has to be configured properly for sure
just making sure that you saw the lower section of this page
Technology and Benefits | Outerwears, Inc
just making sure that you saw the lower section of this page
Technology and Benefits | Outerwears, Inc
It looks like a pretty minimal penalty from their graph. I should have a couple of UOA’s done in the next few months to give a rough idea of how effective it is over the K&N filter in my Revi. It would be great if it reduces how often I clean the damn thing too - the duct just seems to suck up everthing on the highway and catapult it into the element.
#13
I have always wondered about possiblities of modifying the UIM as no one seems to have really tried it, and all of the aftermarket intakes limit themselves to modifying pre TB for commercial reasons.
#15
No respecter of malarkey
iTrader: (25)
Wow, that looks really nicely done. Is this on your car Team? How have you tested it and what did you get from it?
I have always wondered about possibilities of modifying the UIM as no one seems to have really tried it, and all of the aftermarket intakes limit themselves to modifying pre-TB for commercial reasons.
I have always wondered about possibilities of modifying the UIM as no one seems to have really tried it, and all of the aftermarket intakes limit themselves to modifying pre-TB for commercial reasons.
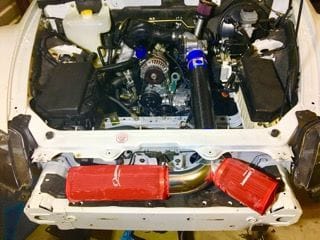
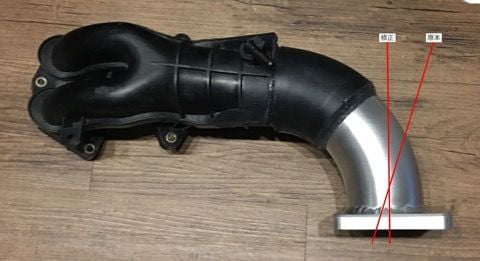
I don't really expect much if any power increase, though a bit might be possible. I only "straightened" the UIM by essentially unbending the last 22 deg bend before the TB. The overall center length of the UIM is the same as original Mazda UIM to maintain the same resonance tuning feature. This then allows a completely straight MAF tube to the intake box inlet's oval-shaped hole opening in the front frame structure, which I used a carbon fiber tube with the correct 3.375" ID x 3.5" OD sizing, and then also bonded the proper MAF bung onto it using some high-tech epoxy made for bonding those two materials together that withstands up to 250*F temperature yet retains some flexibility to neither fail from heat exposure nor crack from being too rigid. The 3.375" ID x 3.5" OD dual filter tee at the front is from a dual filter kit I bought on eBay for $40 or so, threw away the cheapo filters, couplers, etc, and cut the short filter side to the correct angle. The short K&N filter is a standard OTS part from K&N, which I had them make a custom one for the RH side that is the same as the short filter but 2X longer.
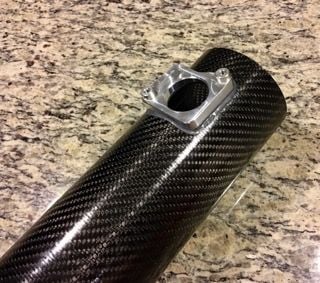
There's not a lot of room in that area and for the SCCA racing class I'm planning to run in the rules don't allow removing the plastic radiator shroud underneath it, so there isn't enough clearance space to use a filter that allows a bell type opening. So without the bell it's essentially a straight tube opening. Which if you understand fluid dynamics, a straight tube opening acts like a venturi that has an effective opening smaller that the actual tube ID and then being equivalent to a smaller tube relative to flow potential. Adding the second filter, which is similar to the original VFAD without the noise reducing flap, allows enough opening to offset the straight tube venturi effect so that the MAF tube can then still flow to it's maximum potential at high rpm.
The throttle body was also sent to maxbore.com to have the butterfly punched out to the max size of 72.5mm (OE is 70mm), polished the bore to a fine finish, and then I also had them machine off any excess material. Which didn't really amount to much weight and was mostly the two coolant heating passages. It mostly gave it a more clean external look. The TB inlet opening exterior surface also has a cast wider edge to help retain the clamp and prevent the OE accordion tube from pulling off, but when you install an aftermarket reducing coupling on the TB inlet this creates a gap between the TB ID inlet opening and the reducer coupling ID surface, which in turn creates turbulence as airflow hits it and then also creates the same venturi-type smaller diameter opening issue as the bell-less filter I mentioned earlier. So I also had them machine that off and smooth. The silicone reducer coupler is a stretched fit and a bit of a pain to get on, but then it essentially squeezes the silicone ID surface tight against the TB opening exterior lip to now provide an almost perfect flow fit as if it were all one piece. Just so you know, the DBW throttle body electronic internals can be removed and replaced. So if the TB TPS, motor, circuit board, etc ever goes bonky or fails you don't have to throw away the modified TB assy. You just swap out the new internals into the modified TB and you're good to go again. If the modified TB shaft bushing, seals, shaft, BF plate ever have an issue you just send it to maxbore.com and they can fix and send it back like new.
Regarding any power increase, it might be small to nothing really, though some small amount is more likely. I did all this to improve throttle response by paying attention to details and eliminating whatever bends were possible and all those other changes/improvements to provide for max potential flow/response into the UIM with the least amount of resistance. The MAF is located as close as possible to the TB inlet, which also improves response if using MAF tuning, but I'll be using the new Adaptronic PnP Modular CAN-Based ecu and it uses MAP tuning but also retains the factory DBW feature and the software for how it responds to pedal input is tunable too. For MAP tuning the MAF is only needed to measure the inlet air temp, which I cut the MAF airflow measurement projection part off, to again have the least amount of airflow restriction to the UIM. So only the small temp bulb is projecting into the air stream and it's so small and narrow that this leaves the the CAI at essentially maximum potential flow capacity and response to engine demands. Inside the UIM at or near every opening, there are raised casting lines. These also tend to result in the venturi-effect of flow turbulence resulting in a smaller opening area. I intend to smooth all those out with sanding tools, even though it tends to result in a slightly rougher surface area than the UIM casting produces. There is always the boundary layer effect of no flow at the surface regardless of finish and that effect is much smaller than the raised lip turbulence effect.
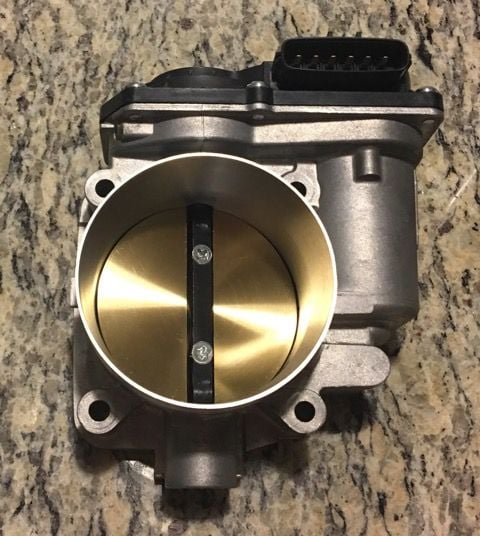
The UIM also has all the emissions stuff gone and is about as simple as possible now. I also eliminated the oil fill/venting sump/Intake valve solenoid-vacuum chamber assembly that bolts on to the under side of the UIM to open up the area between the top of the engine keg and the UIM. The oil fill/venting sump flange on the LH side of the engine now has a long aluminum tube with a mating flange on one end to bolt to the engine oil sump fill/vent flange and a small K&N oil sump venting filter on the other end that just dumps bypassed combustion gases o air now rather than back into the engine. Now I just pop off the K&N filter to pour oil directly into the engine sump. I cut the intake valve solenoid/vacuum tank part off that lower assembly and relocated it at the bottom of the front RH shock tower with wiring harness extensions. So its a lot easier to access and test/replace the intake valve solenoids now too and since we don't use the VFAD solenoid with the race exhaust it just sits there as a spare when needed.
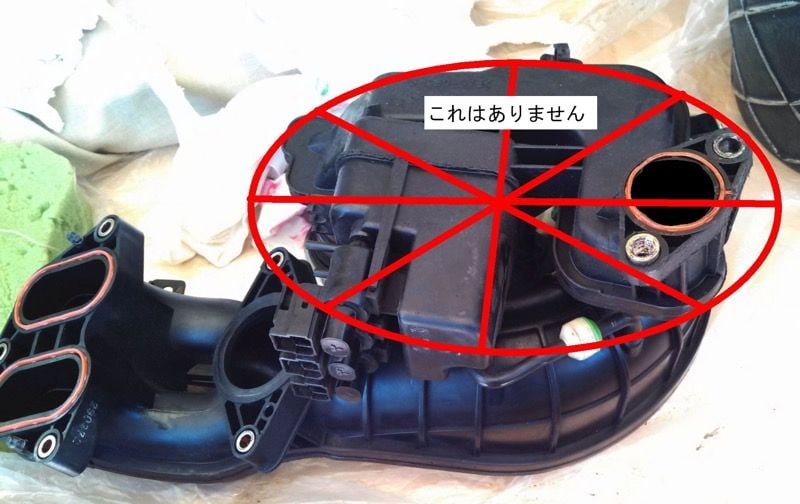
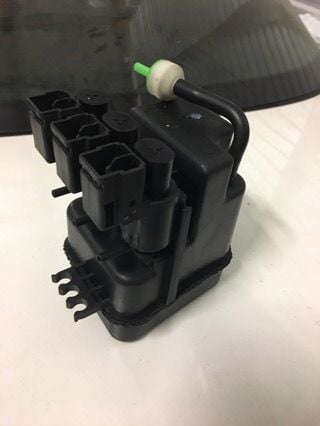
I also have the intake primary port JET air line and the rotor housing oil injector air line, which are normally plumbed into the OE intake tube accordion, plumbed together into a small external K&N filter that sticks up just behind and above the alternator. It's actually in the engine bay intake photo above, the blue thing on the upper RH side of the alternator. The blue color is an Overwears Nylon protective cover since we don't want dirt getting into the engine through the JET line or into the oil injectors for sure. So this also eliminated those projections into the intake stream ahead of the TB, but they will pull hotter engine bay air now too, but I figured those small amounts aren't really that critical. With MAP tuning the airflow from all of those no longer have to be measured and accounted for like with MAF tuning. Other than the filter maintenance, it's all a lot simpler and allows for more airflow over the top of the motor rather than it being cramped, excessively hot, and hard to access like the OE setup. Just a lot of detailing and common sense stuff mostly.
.
Last edited by TeamRX8; 01-10-2018 at 12:39 PM.
Thread
Thread Starter
Forum
Replies
Last Post
mzzsushi89
Gulf RX-8 Forum
0
07-10-2010 09:37 PM
lshu
Series I Aftermarket Performance Modifications
11
01-11-2008 05:13 AM
turok4n64
Series I Aftermarket Performance Modifications
4
02-05-2007 09:13 AM
jAydApiNoy83
Series I Aftermarket Performance Modifications
9
08-02-2005 08:43 PM


