
How to Install 52mm Gauges On The Roof


Thread Starter
Registered User
Joined: May 2010
Posts: 10
Likes: 0
How to Install 52mm Gauges On The Roof
Hi everyone, this is an old thread of mine I am copying over from the UK owners club forum. I just thought that I would open it up to a wider audience and hopefully help someone out.
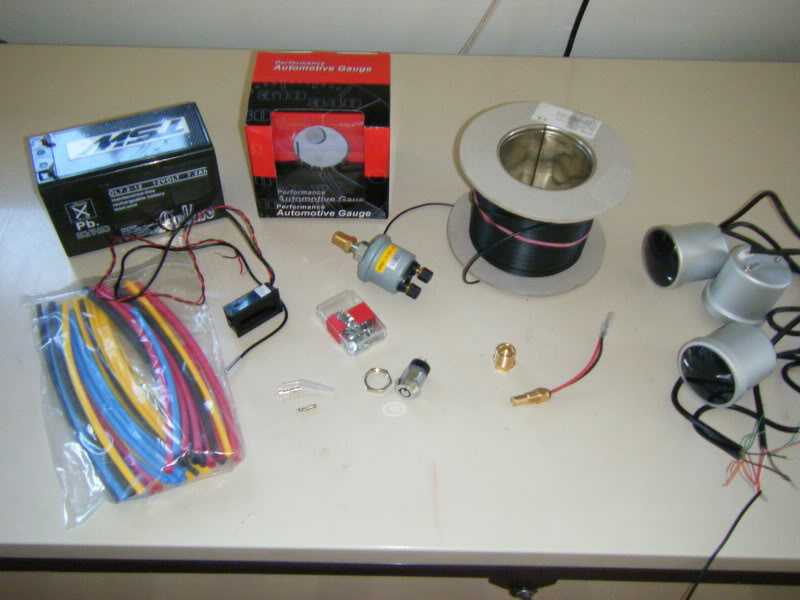
You will need -
3 (or less) 52mm Gauges of your choice with a depth of no more than 6cm approx
Large phillips screwdriver
Medium slot head screwdriver
Pencil
Wire cutters / strippers
Old mousemat or other dampening foam
Stanley knife
Insulation tape
12mm socket and ratchet
Crimping tool
Small zip ties
Heat shrink tubing
Reel of suitable wire
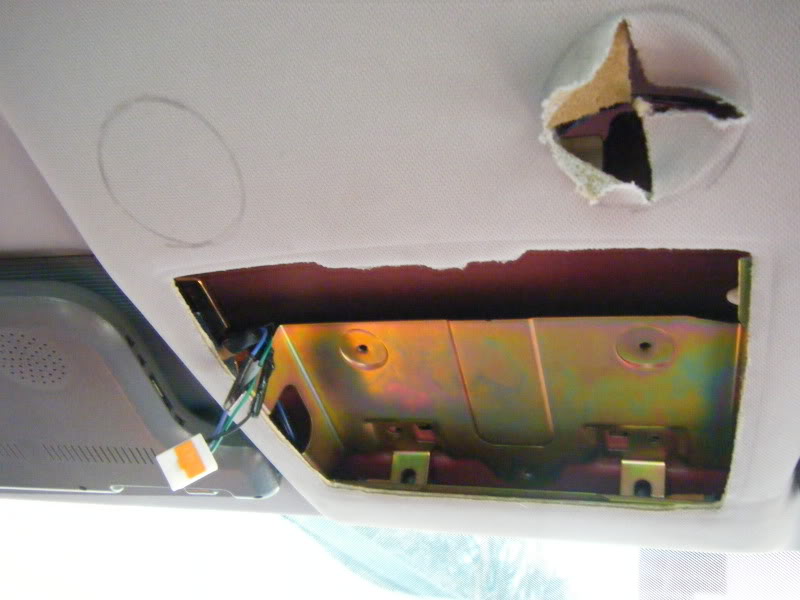
Firstly remove the sunglasses holder panel by unscrewing the two phillips screws visible inside and prising it out then unplug the wires going to the courtesy lights. Be quite forceful as it will be a snug fit on its clips.
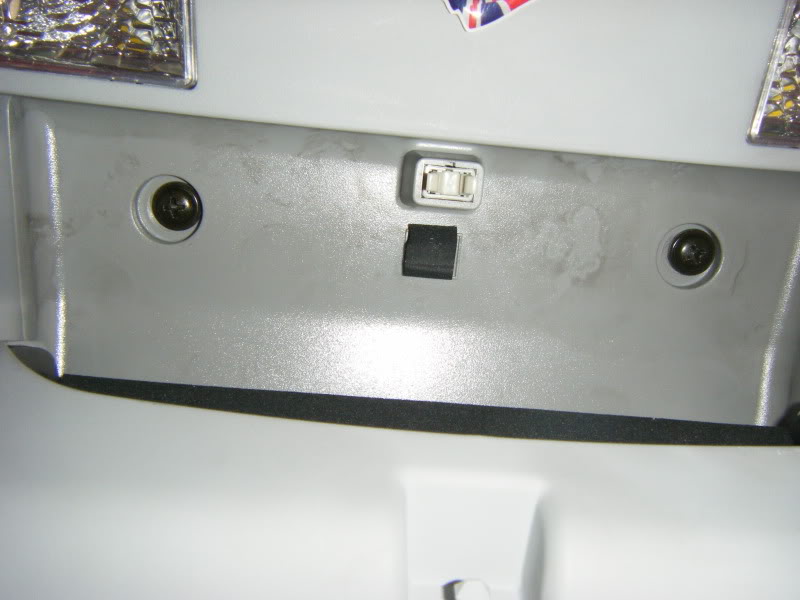
Next you will need to unscrew the 3 bolts holding on the brass plate. You may be able to skip this stage but I found it made manoeuvring things a bit easier with that panel free to move about.
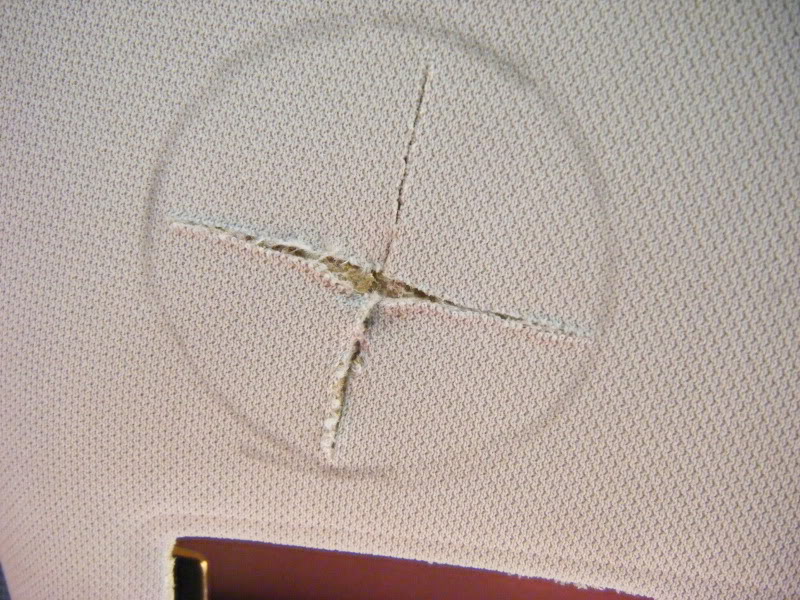
The 52mm gauges should be a pretty much standard size and have a lip around the front edge for a flush mounting. Trace round the smallest point and mark out the 3 places you want them onto the headlining with a pencil. It would be best to have them about one centimetre up from where the glasses panel finishes as the further back you go the smaller the space becomes behind. An impression of the panel will probably have been left in the fabric so this should help as a guide.
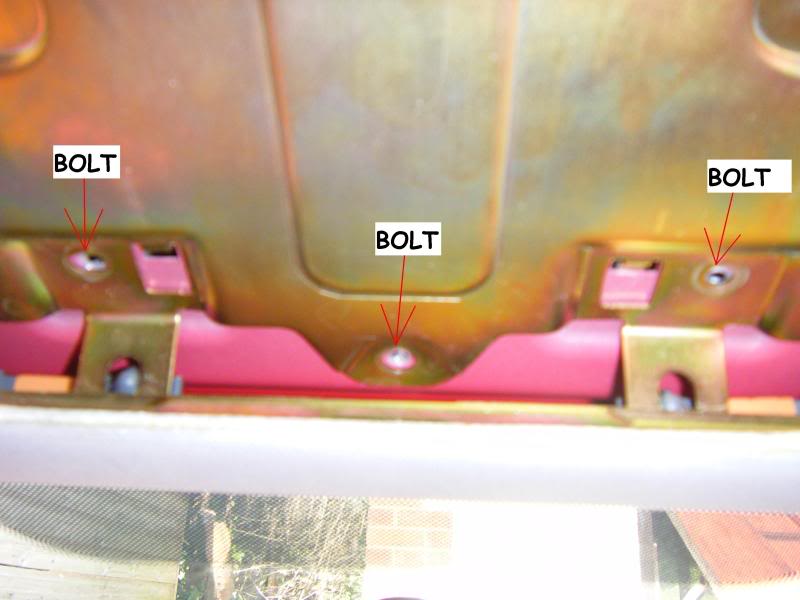
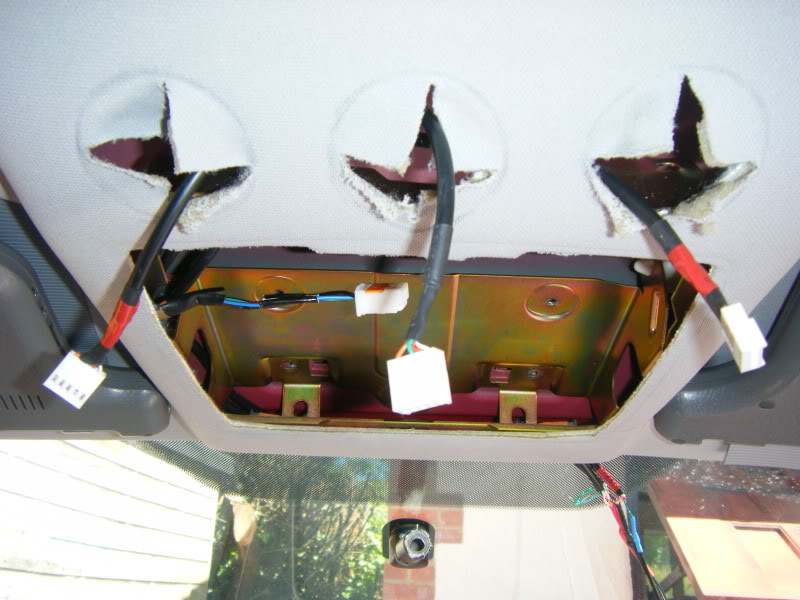
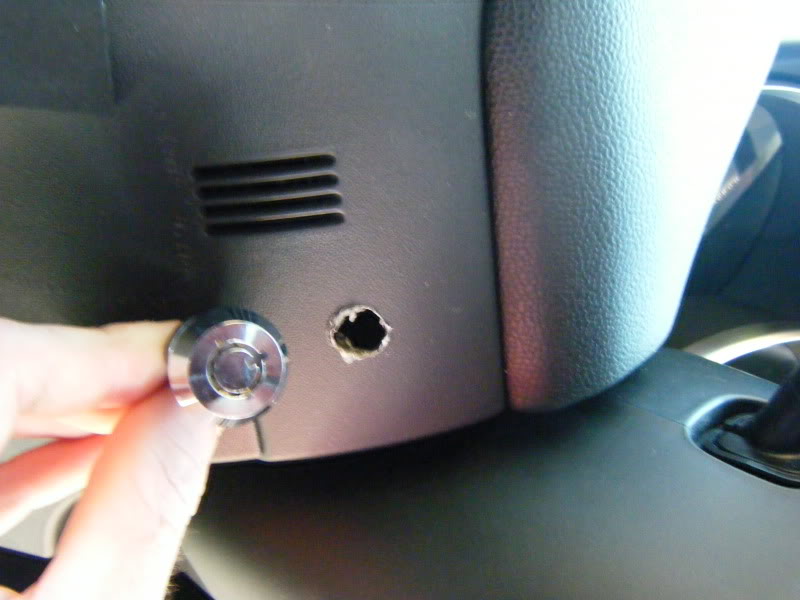
Looking up and backwards you should see the ends of two protruding screws that are attaching a box and wires to the brass plate you have just un-secured. Now comes the point where you really need to commit yourself as to get to these bolt heads you will need to cut an access hole in the headlining to allow you to get a socket to them.
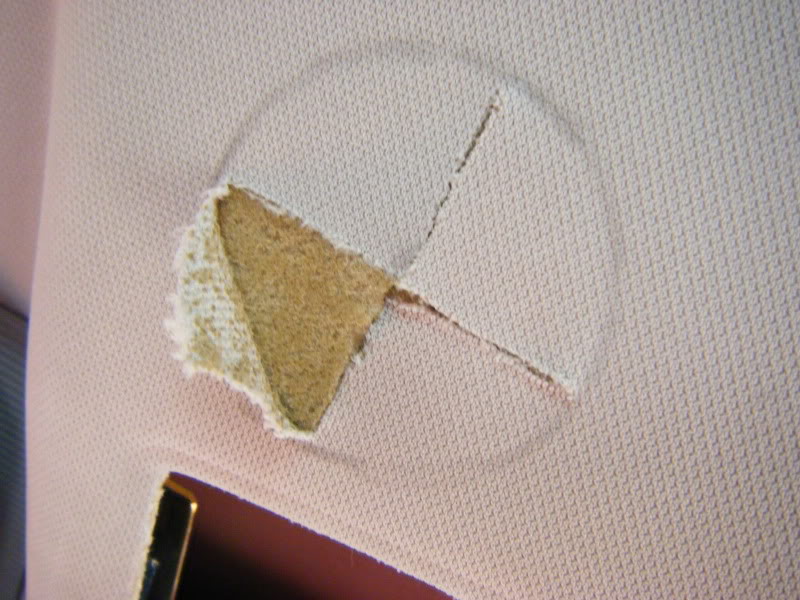
Cut a cross shape within the width of your circles and peel back the top fabric layer. Use a smaller blade to neatly remove the 4 quarter sections to complete a nice neat circular hole. Just do the outer two for now.
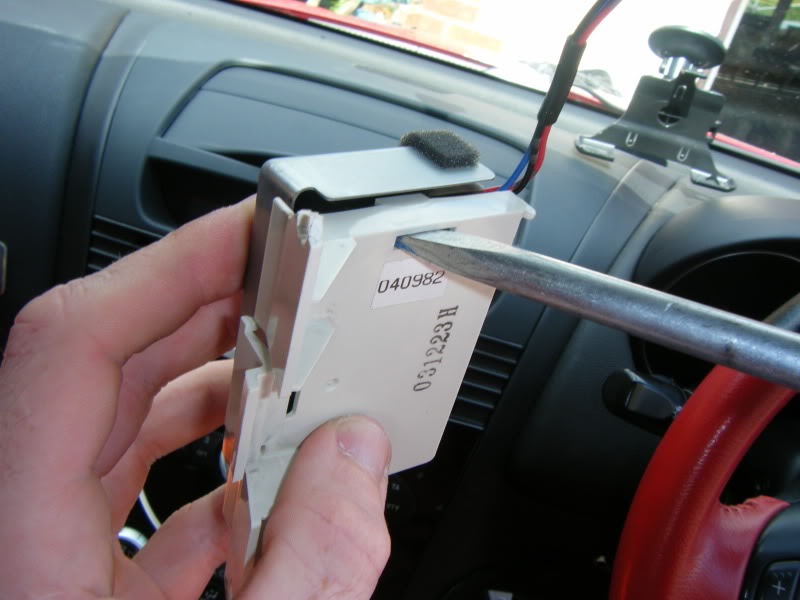
You should now be able to get a socket to the bolts and undo them. Pinch together the wire holder clips to release and pull the box out. Use a flat blade screwdriver to prise off the outer white plastic casing.
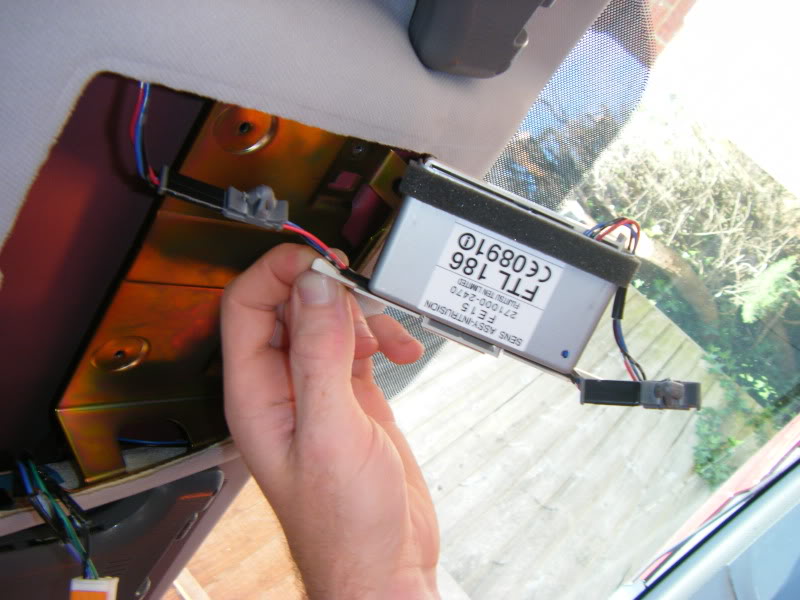
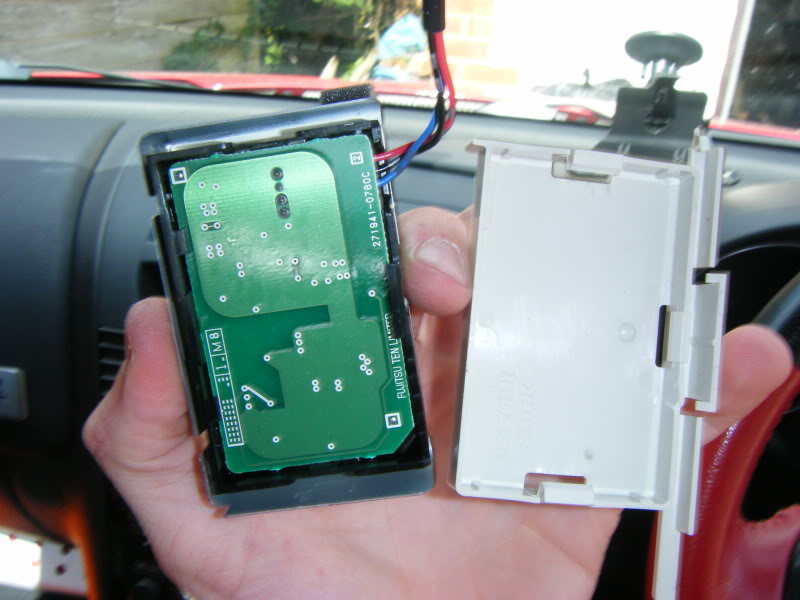
You should re-protect the back of the circuit board from shorting against the roof so tape something over it. I cut a piece out from the back of a mouse mat and used that on the front and back of the box this also stopped it slipping about and making a rattle. You should now be able to wedge it to one side under the headlining out of the way.
Now mark out your 3rd hole as before.
Now you can try each of your gauges for size, but don�t keep putting them in and out more than is necessary as they may become loose.

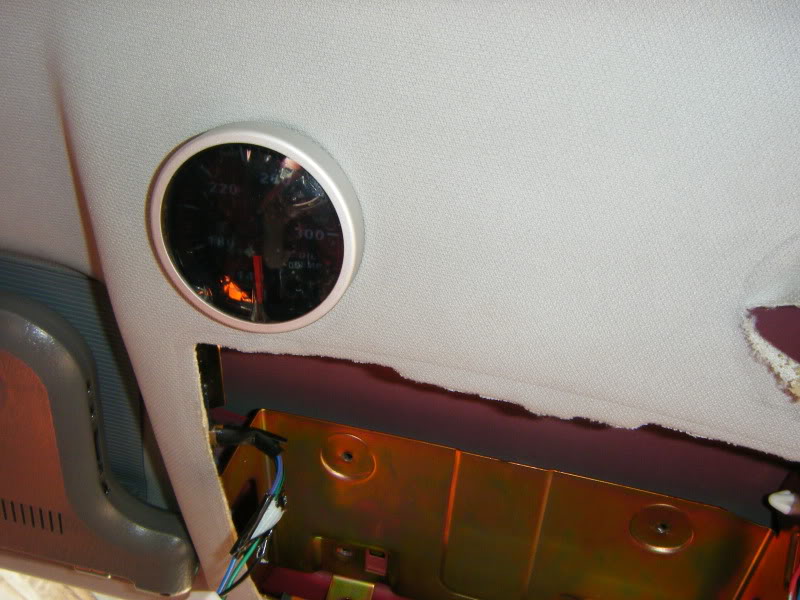
You may find the metal surround stops them from being pushed all the way in. If this is the case you can pry it back a bit to give clearance.

Once you are happy they will go in OK you can begin the wiring. It would be best to link everything up and test them out of the car with a battery.
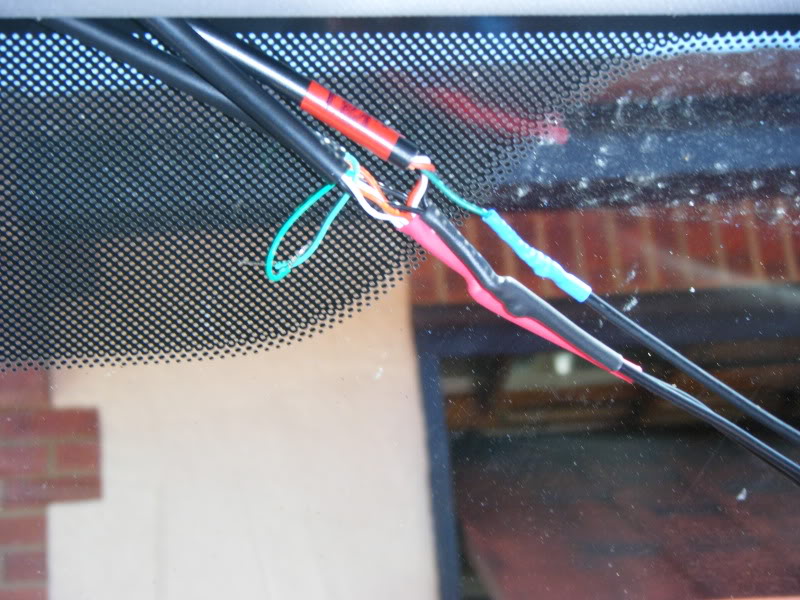
You can gather the ground and +12v wiires together from your guages and group them together with heatshrink. Depending on where you are taking your live feed from extend the wires as neccessary. Do the same for what ever signal / sensor wires you may have. From past experience spllicing into the coutesy / vanity mirror lights will not work as they do not have enough juice for most things so I would not bother with trying those as you will probably just trip the room fuse.
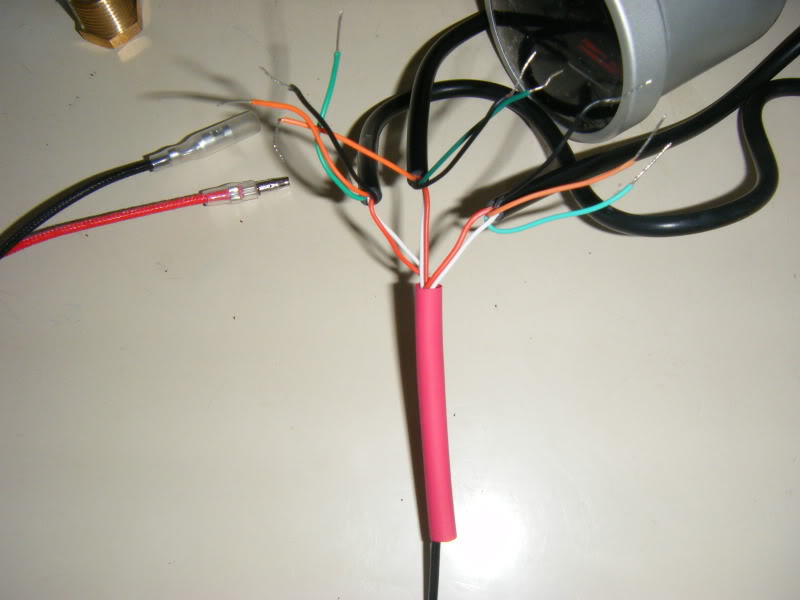
Next position the wires with enough slack to allow them to be plugged in and route them around the side of the brass plate so the glasses panel does not pinch them when fitted back.
It is then quite easy to conseal all the wires behind the headling and lead them along the edge of the windscreen and down the door pillars to a suitable place. Be carefull of the curtain airbags when doing this and make sure you DO NOT impede their deployment!
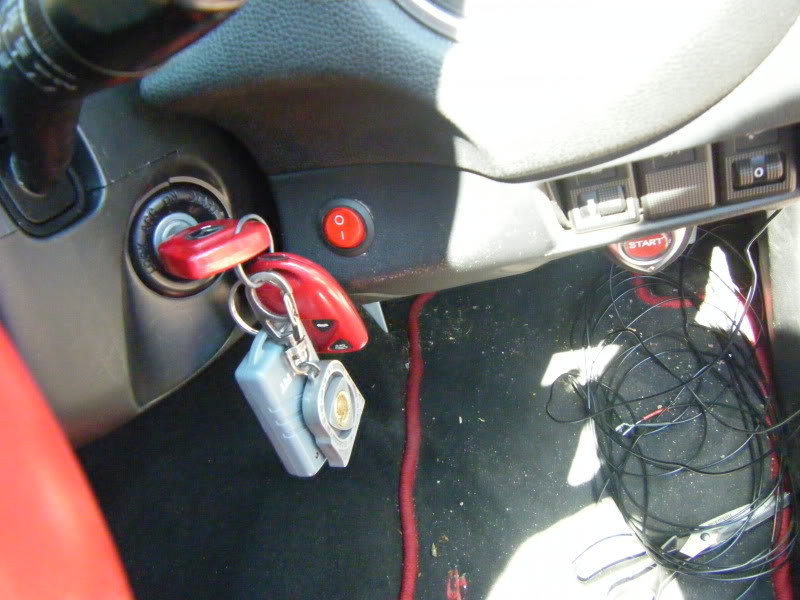
I have them wired in to the accessories position of the ignition so they come on with the dash, speedo etc. If you want to fit a switch its easy to place one inline and can be mounted in numerous places.
I won't go into wiring in the sensors as it will depend on what type of guages you get. Usually you get any T-bars, fixings, etc in the box. It should be straight forward to get them into the engine bay either through an existing grommet in the firewall or out under the door seals.
The finished thing should look something like this - 8)
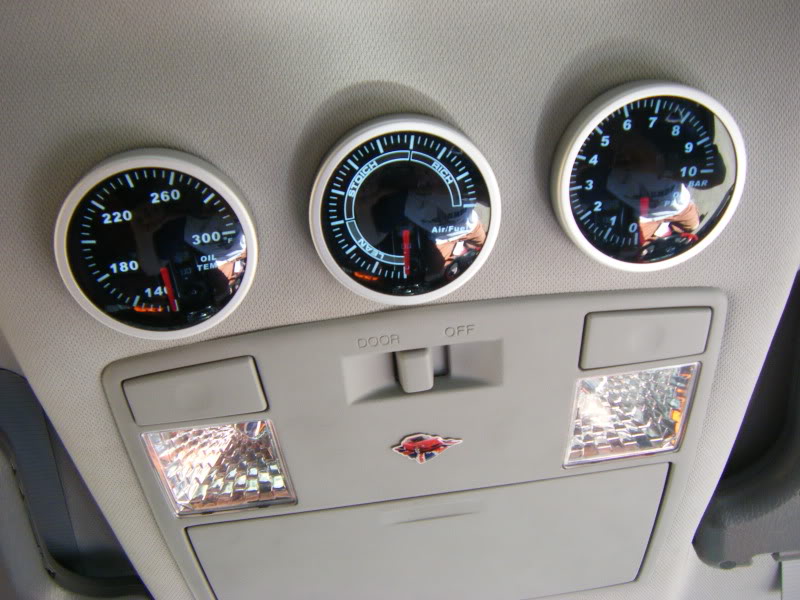
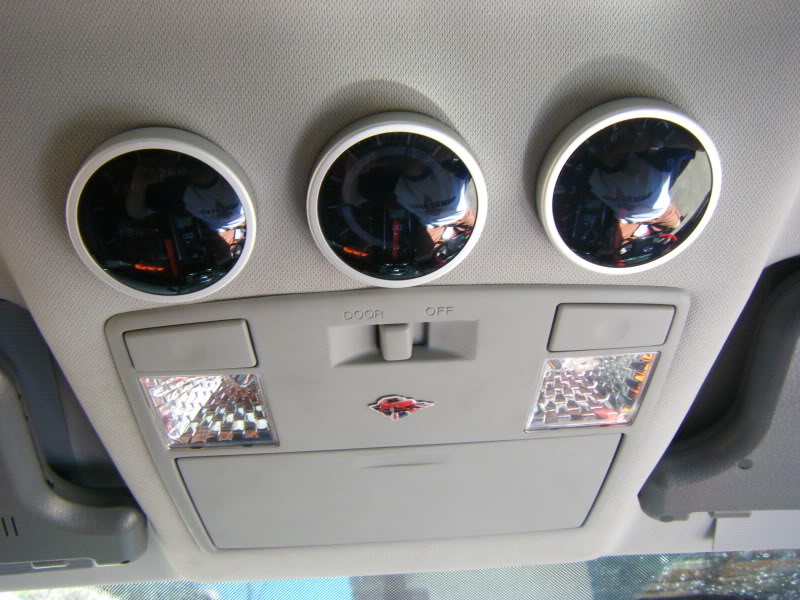
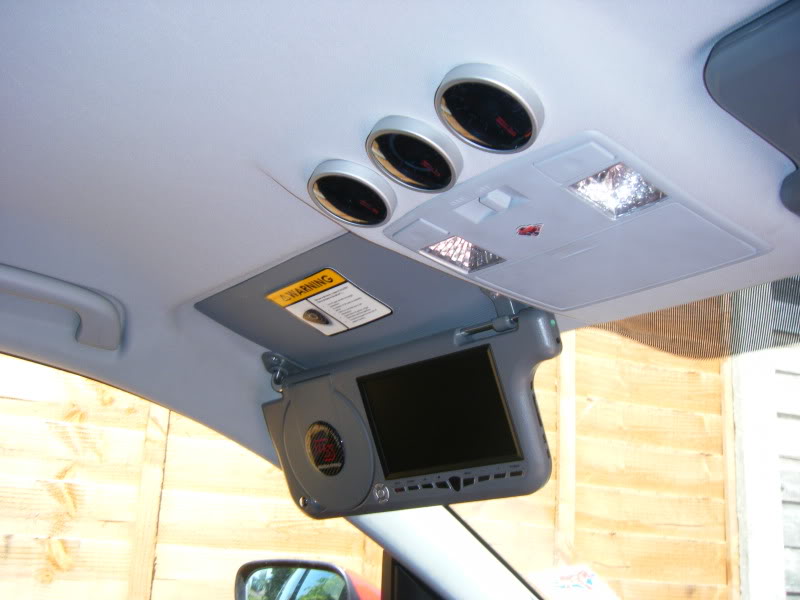
The ones I choose are very clear and match the speedo clusters lighting of red and white a treat so they really look the part and very OEMish.

You will need -
3 (or less) 52mm Gauges of your choice with a depth of no more than 6cm approx
Large phillips screwdriver
Medium slot head screwdriver
Pencil
Wire cutters / strippers
Old mousemat or other dampening foam
Stanley knife
Insulation tape
12mm socket and ratchet
Crimping tool
Small zip ties
Heat shrink tubing
Reel of suitable wire
Firstly remove the sunglasses holder panel by unscrewing the two phillips screws visible inside and prising it out then unplug the wires going to the courtesy lights. Be quite forceful as it will be a snug fit on its clips.
Next you will need to unscrew the 3 bolts holding on the brass plate. You may be able to skip this stage but I found it made manoeuvring things a bit easier with that panel free to move about.
The 52mm gauges should be a pretty much standard size and have a lip around the front edge for a flush mounting. Trace round the smallest point and mark out the 3 places you want them onto the headlining with a pencil. It would be best to have them about one centimetre up from where the glasses panel finishes as the further back you go the smaller the space becomes behind. An impression of the panel will probably have been left in the fabric so this should help as a guide.
Looking up and backwards you should see the ends of two protruding screws that are attaching a box and wires to the brass plate you have just un-secured. Now comes the point where you really need to commit yourself as to get to these bolt heads you will need to cut an access hole in the headlining to allow you to get a socket to them.
Cut a cross shape within the width of your circles and peel back the top fabric layer. Use a smaller blade to neatly remove the 4 quarter sections to complete a nice neat circular hole. Just do the outer two for now.
You should now be able to get a socket to the bolts and undo them. Pinch together the wire holder clips to release and pull the box out. Use a flat blade screwdriver to prise off the outer white plastic casing.
You should re-protect the back of the circuit board from shorting against the roof so tape something over it. I cut a piece out from the back of a mouse mat and used that on the front and back of the box this also stopped it slipping about and making a rattle. You should now be able to wedge it to one side under the headlining out of the way.
Now mark out your 3rd hole as before.
Now you can try each of your gauges for size, but don�t keep putting them in and out more than is necessary as they may become loose.
You may find the metal surround stops them from being pushed all the way in. If this is the case you can pry it back a bit to give clearance.
Once you are happy they will go in OK you can begin the wiring. It would be best to link everything up and test them out of the car with a battery.
You can gather the ground and +12v wiires together from your guages and group them together with heatshrink. Depending on where you are taking your live feed from extend the wires as neccessary. Do the same for what ever signal / sensor wires you may have. From past experience spllicing into the coutesy / vanity mirror lights will not work as they do not have enough juice for most things so I would not bother with trying those as you will probably just trip the room fuse.
Next position the wires with enough slack to allow them to be plugged in and route them around the side of the brass plate so the glasses panel does not pinch them when fitted back.
It is then quite easy to conseal all the wires behind the headling and lead them along the edge of the windscreen and down the door pillars to a suitable place. Be carefull of the curtain airbags when doing this and make sure you DO NOT impede their deployment!
I have them wired in to the accessories position of the ignition so they come on with the dash, speedo etc. If you want to fit a switch its easy to place one inline and can be mounted in numerous places.
I won't go into wiring in the sensors as it will depend on what type of guages you get. Usually you get any T-bars, fixings, etc in the box. It should be straight forward to get them into the engine bay either through an existing grommet in the firewall or out under the door seals.
The finished thing should look something like this - 8)
The ones I choose are very clear and match the speedo clusters lighting of red and white a treat so they really look the part and very OEMish.

Thread Starter
Registered User
Joined: May 2010
Posts: 10
Likes: 0
Its not the clearest of places to look at TBH. Really depends how tall you are and how you like your seat positioned.
It suits me OK though, I find I can quite easilly glance up at them whilst driving just enough to register what they are reading.
They are not the type that demand constant attention anyway.
I'm actually going to mold in a couple of pods on top of a spare speedo cluster soon aswell so will see how that turns out and might put them in the car.
Oh and do you know why the pictures do not show? Other ones seem to have worked fine.

Bubblicious? DEF.
Joined: Mar 2004
Posts: 4,062
Likes: 0
that is an insanely odd location.. when i first read this thread i thought you were going to take out the sunglass holder and do something like the rb gauge up there..
back in 04 when i had my 8 i had my omnifi head unit screen up there.. i think if u put it there it would be DOPEE
back in 04 when i had my 8 i had my omnifi head unit screen up there.. i think if u put it there it would be DOPEE

Registered
Joined: Jun 2010
Posts: 14
Likes: 3
From: Batesburg, SC
Are you freaking kidding me? 
Now, to test it out, go out driving. Let me know how long it takes for you to crash into a light pole. I had to check the date of this post to make sure it wasn't an April Fool's joke.
Answer your door. Darwin is knocking.
Now, to test it out, go out driving. Let me know how long it takes for you to crash into a light pole. I had to check the date of this post to make sure it wasn't an April Fool's joke.
Answer your door. Darwin is knocking.

I don't "smell good".
Joined: Dec 2001
Posts: 910
Likes: 0
From: Crowfield Plantation, SC
Good effort, but that makes no sense to me. It's not a good place to mount anything that you want to constantly monitor...or even occasionally monitor really as it takes your eyes completely off the road.


Thread Starter
Registered User
Joined: May 2010
Posts: 10
Likes: 0
I know its not going to suit everyone and it wouldn't have been my first choice of places had it not of been for me having other bits installed in the more common locations. Just thought I would throw the idea out there for any one who did fancy it.
It works well enough for me, the types of guage I have are the sort where during normal use there is very little movement so a quick glance is all it takes to register the fact that they are at the position you would hope for. Looking up there is no different or any more dangerous than looking down at the AC controls etc.
It works well enough for me, the types of guage I have are the sort where during normal use there is very little movement so a quick glance is all it takes to register the fact that they are at the position you would hope for. Looking up there is no different or any more dangerous than looking down at the AC controls etc.

Thread
Thread Starter
Forum
Replies
Last Post
JimmyBlack
Series I Major Horsepower Upgrades
273
Feb 10, 2020 10:23 PM
yurcivicsux
Series I Major Horsepower Upgrades
192
Sep 12, 2017 10:54 PM
05rx8mazda
RX-8 Parts For Sale/Wanted
18
Nov 28, 2015 09:42 AM