
HELP! VFAD trouble


HELP! VFAD trouble
So i just removed my VFAD after reading all the threads. but...im having trouble now. everytime i put the car in neutral as im driving, the rpms, just keep going down to 0 and then the car stalls!. any ideas of what i might have done wrong?
the only thing i can think of is that i did not plug up the hose, would that do anything?
the only thing i can think of is that i did not plug up the hose, would that do anything?


I just capped the hose where it rests in front of the intake box in case I ever revert back to stock... no problems so far. I have seen 5-6 degree hotter temperatures though... will be making a custom cai shortly to get colder air
hmmm... now you got me thinking. when I removed the hose off the "mesh tube" that goes through the bumper, a vaccuum was released, so I figured capping it would be good. Do I actually have to take out all the crap under the intake box up to the uim to remove vfad?
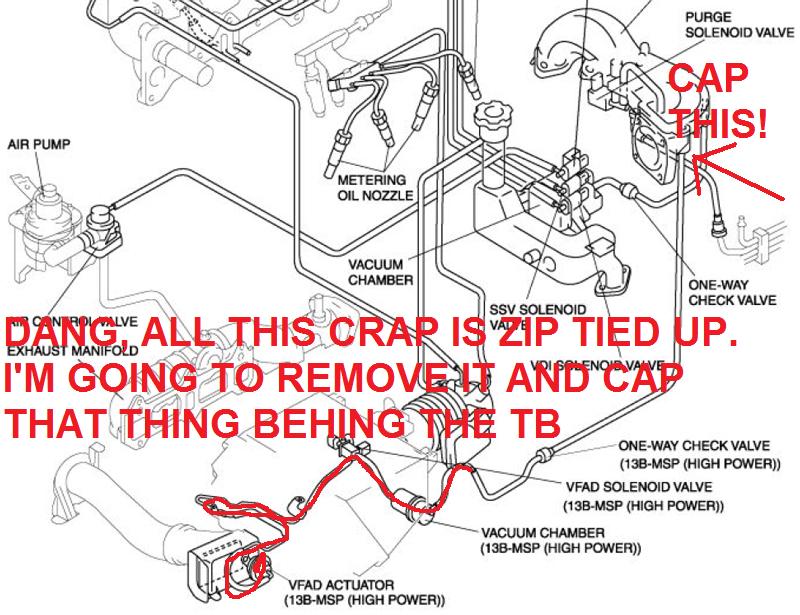
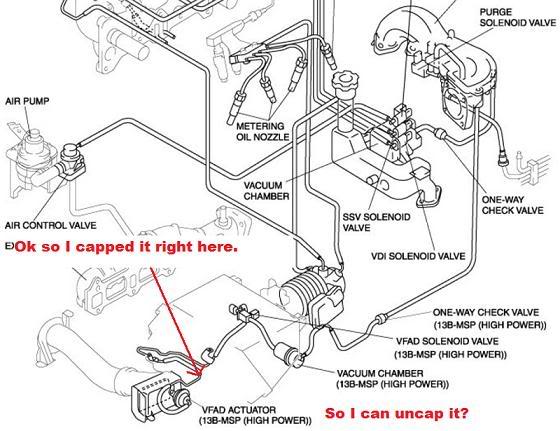
Let me try to explain this better:
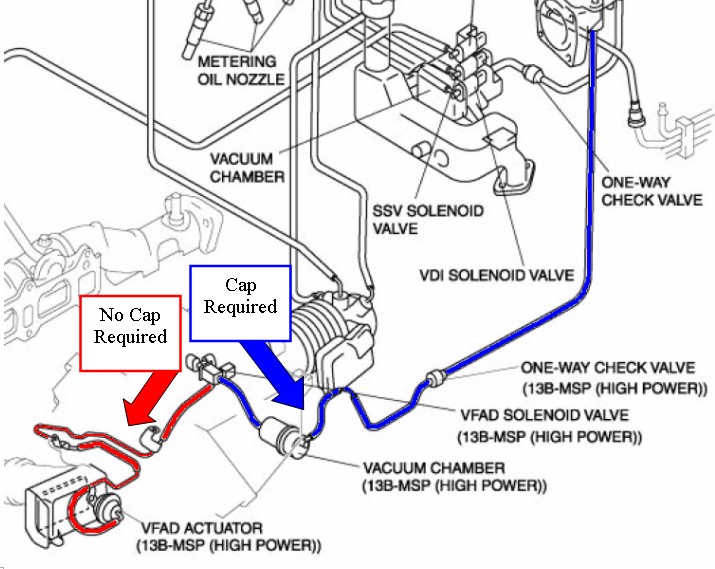
There are sections of hoses and hard lines in the VFAD assembly.
You also have a solenoid, vacuum chamber, and a one-way valve.
If you disconnect a hose anywhere in this assembly, you'll bleed off vacuum to the VFAD actuator and the valve will open.
The valve will remain open until vacuum is applied to the actuator.
This is why you do not need to cap the hose leading to the actuator, but the other side of the line needs to be capped so you don't introduce a vacuum leak to your intake.
There are many ways to do this instead of capping the nipple behind the throttle body (as I posted above).
Here are a couple examples:
You can remove the hose connecting to the solenoid (on the actuator side) and cap the nipple on the solenoid.

Or you can remove the hose from the vacuum chamber (on the actuator & solenoid side) and just cap the nipple on the vacuum chamber.
These are a couple examples just to visually show what side you need to worry about capping (which is the line leading to the intake).
The goal is to prevent vacuum from reaching the VFAD actuator (which closes the valve) and plugging the line leading to the intake (to prevent a vacuum leak).
But some like to just cap the nipple behind the throttle body and remove the rest of the line to make it look cleaner.
There are sections of hoses and hard lines in the VFAD assembly.
You also have a solenoid, vacuum chamber, and a one-way valve.
If you disconnect a hose anywhere in this assembly, you'll bleed off vacuum to the VFAD actuator and the valve will open.
The valve will remain open until vacuum is applied to the actuator.
This is why you do not need to cap the hose leading to the actuator, but the other side of the line needs to be capped so you don't introduce a vacuum leak to your intake.
There are many ways to do this instead of capping the nipple behind the throttle body (as I posted above).
Here are a couple examples:
You can remove the hose connecting to the solenoid (on the actuator side) and cap the nipple on the solenoid.
Or you can remove the hose from the vacuum chamber (on the actuator & solenoid side) and just cap the nipple on the vacuum chamber.
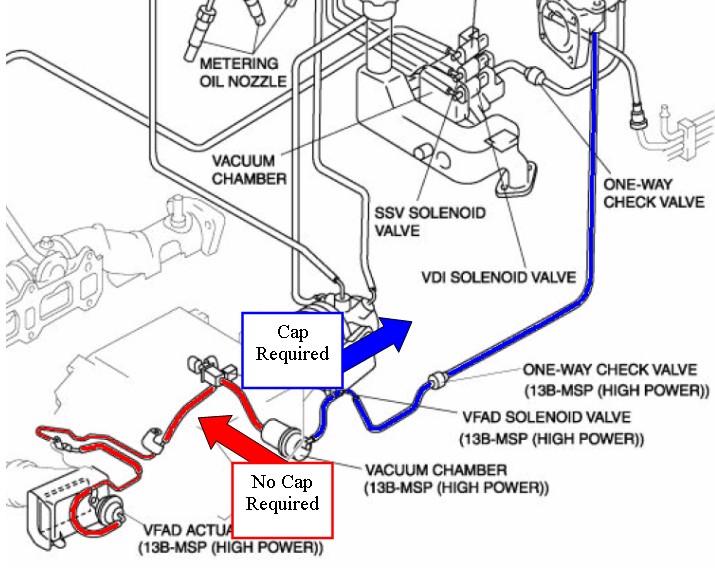
These are a couple examples just to visually show what side you need to worry about capping (which is the line leading to the intake).
The goal is to prevent vacuum from reaching the VFAD actuator (which closes the valve) and plugging the line leading to the intake (to prevent a vacuum leak).
But some like to just cap the nipple behind the throttle body and remove the rest of the line to make it look cleaner.


I always suggest capping behind the throttle body since its easy to explain to others.
Capping elsewhere in the VFAD assembly would involve knowing to cap the intake side and not the actuator side (which involves me drawing little illustrations like above
 ).
).

I made a DIY video explaining how to test the intake valves (VFAD, VDI, SSV, and APV).
You'll see that I used a vacuum pump to close the VFAD valve (the SSV and VDI are opposite and requires vacuum to open their valve).
https://www.rx8club.com/series-i-do-yourself-forum-73/diy-troubleshoot-intake-valves-174009/
You'll see that I used a vacuum pump to close the VFAD valve (the SSV and VDI are opposite and requires vacuum to open their valve).
https://www.rx8club.com/series-i-do-yourself-forum-73/diy-troubleshoot-intake-valves-174009/

