
Headlight aim


Registered User
Joined: Mar 2004
Posts: 2
Likes: 0
From: Taft Ca.
whats up everybody? I've had my rx-8 since oct. 11 and had the same problem with low projection, i.e cant see stop signs and such. I am a very curious and mechanically inclined individual and couldnt forget about the problem. I solved the problem by jacking up one side of the car, so the tire will drop out of the fender for clearance to gain access to the inner fender well which is removed using a phillips screw driver, quarter to half turn only on the screw snaps, then pull straight out of the hole. With the plastic fender well removed you should see the back of the light housing. A flat head screw, white colored plastic I think, is sticking out of the light housing, this is your light projection angle screw. The best way I found to adjust the lights is with both fender wells removed drive to a flat surface where there is a wall or fence at least five foot tall. Do this only in dry weather on dry roads. Park about sixty feet away from the wall or fence with lights on, mark the wall with tape where the uppermost beam of your lights is projected. Use the adjustment screw to move the projection of the lights up only a small amount at a time, take the car for a test drive. Dont adjust your lights so you get flashed by other drivers this is not necessary and is dangerous, cuz these lights r bright. I also tried to adjust the lights so they project evenly all across with no real results because they were designed to project that way. I no longer have vision problems at night in my rx-8. When reinstalling the fender well be sure not to force the plastic screw snaps. If you have any questions feel free to e-mail me. I love this car!!!

Prodigal Wankler
Joined: Nov 2002
Posts: 1,761
Likes: 2
From: Austin, TX
Originally posted by Smoker
Is it possible for someone to take some pictures and post a official DIY thread on our DIY Forum ? I think a lot of members will be benefited from this. Thanks !
Is it possible for someone to take some pictures and post a official DIY thread on our DIY Forum ? I think a lot of members will be benefited from this. Thanks !
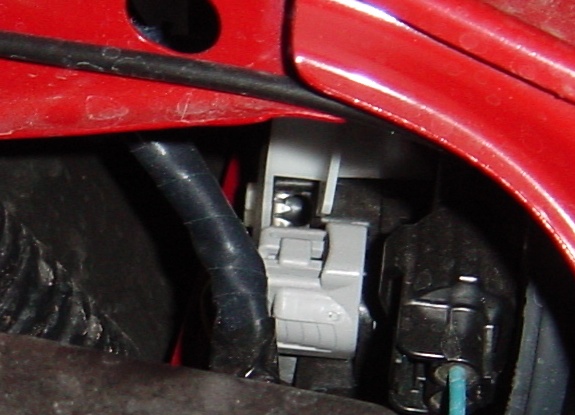
That's the rear of the left-hand headlight assembly, taken from inside the engine bay. The right-hand light is identical.
See that hole right in the middle of the picture? See the shiney metal teeth at the bottom the hole? Well, those teeth are attached to the adjustment screw, and by inserting a phillips screwdriver into the hole you can engage those teeth with the head of the driver in a sort of "rack and pinion" configuration, and by carefully turning the driver, you can move the adjuster. (A #2 phillips doesn't engage them particularly well; a larger head would probably work better.)
I didn't actually adjust mine - just tried it as a proof of concept. If someone would care to start a DIY thread, you're welcome to use the picture. In fact, you might like to photochop in a couple of circles and arrows.


Lubricious
Joined: Oct 2003
Posts: 3,425
Likes: 4
From: SF Bay Area, California
Things that make you go "Duh!"
OMG!! How dumb can I get?
That clears up a big misconception I had even after looking at the workshop guide. Their little pictogram does show a scredriver held in a vertical orientation but I figured it was just an attempt to not cover up the device; the "real" target of the little screwdriver seemed to be a round fitting facing the rear of the car. I did look for some fitting reachable from outside and saw those teeth but it never dawned on me that they were there to engage a screwdriver. I figured it was just part of some ratcheting mechanism. Seemed silly to have to remove the bumper but there you go. Hardening of the brain - I was only looking for "regular" phillips receptacles.
Oh well... I will be adjusting sooner than I thought
Prodigal Wankler
Joined: Nov 2002
Posts: 1,761
Likes: 2
From: Austin, TX
For Pete's sake people, don't just go screwing around with the aim if you don't know how to aim them properly! Chances are that they're properly adjusted already, and you're just going to start blinding oncoming traffic if you crank 'em up too high.
At the very least, read Mr M's post at the bottom of the first page of this thread before you start tinkering (or should that be tampering).
At the very least, read Mr M's post at the bottom of the first page of this thread before you start tinkering (or should that be tampering).


Registered User
Joined: Sep 2003
Posts: 230
Likes: 0
From: Alhambra, CA
Dude, relax man, we all arent little kids that just screw around with things. I think I know I when I am aiming it too high, the cutoff line will tell me that
Originally posted by eccles
For Pete's sake people, don't just go screwing around with the aim if you don't know how to aim them properly! Chances are that they're properly adjusted already, and you're just going to start blinding oncoming traffic if you crank 'em up too high.
At the very least, read Mr M's post at the bottom of the first page of this thread before you start tinkering (or should that be tampering).
Lubricious
Joined: Oct 2003
Posts: 3,425
Likes: 4
From: SF Bay Area, California
I discovered that it's not so easy to "eyeball" the adjustment. My "coupla degrees" turned into a way-too-high beam on my test drive. A closer look reveals the correct aim results in a very small declination from horizontal - about 1/2 degree. Not much margin for error if you go above that.
The problem I have with the beam pattern is that the cutoff is SO stark; plenty of light below but almost none above. Your eyes aren't dark adapted because of the bright lighted zone and so the area above the cutoff is quite dark. It is definitely a hassle to see roadsigns at times, and also under certain road conditions your sight distance can be surprisingly short. I definitely understand designing it not to blind oncoming traffic but not sure why that equates to practically ZERO light above the line. If this is European tech superiority I think there's room for improvement. A complete discontinuity is a really bad idea, imho. It really is tempting to be selfish and aim high but having been blinded enough times I won't do it. Just wish the beam pattern was a little more intelligently designed.
I'll try and post the "official" aiming diagram tonite.

Lubricious
Joined: Oct 2003
Posts: 3,425
Likes: 4
From: SF Bay Area, California
This is the adjustment section.
Notes:
- I don't know what the dashed box is all about
- Note that proper adjustment means that the cutoff has only "dropped" 30 mm in the course of 3 meters, or on the order of 1/2 degree. It wouldn't seem to take too much sloppiness by the user to end up with the cutoff above horizontal, resulting in excessive glare for oncoming motorists. Measure carefully.
- wording of the "note" seems obtuse. I'm not sure if "always turn the screws in the tightening direction" means what it says, or if the intention was to suggest always FINISH with clockwise turn. I assumed the latter for my adjustment.
- there is no "shaded area" in the diagram.
Refer to the image earlier in the thread for a visual of the adjusting gear from under the hood. It's reachable with a decent length phillips screwdriver.
edit - mistated the horizontal distance (it's 3 meters, not 9)
Last edited by Nubo; Mar 23, 2004 at 01:55 PM.

Prodigal Wankler
Joined: Nov 2002
Posts: 1,761
Likes: 2
From: Austin, TX
Originally posted by Nubo
- Note that proper adjustment means that the cutoff has only "dropped" 30 mm in the course of 9 meters, or on the order of 1/2 degree. It wouldn't seem to take too much sloppiness by the user to end up with the cutoff above horizontal, resulting in excessive glare for oncoming motorists. Measure carefully.
- Note that proper adjustment means that the cutoff has only "dropped" 30 mm in the course of 9 meters, or on the order of 1/2 degree. It wouldn't seem to take too much sloppiness by the user to end up with the cutoff above horizontal, resulting in excessive glare for oncoming motorists. Measure carefully.
- wording of the "note" seems obtuse. I'm not sure if "always turn the screws in the tightening direction" means what it says, or if the intention was to suggest always FINISH with clockwise turn. I assumed the latter for my adjustment.
Prodigal Wankler
Joined: Nov 2002
Posts: 1,761
Likes: 2
From: Austin, TX
Originally posted by oi812
Ok, now we know vert but how about right to left adjustment? I want mine a little to the left from where they are now.
Ok, now we know vert but how about right to left adjustment? I want mine a little to the left from where they are now.
Lubricious
Joined: Oct 2003
Posts: 3,425
Likes: 4
From: SF Bay Area, California
Originally posted by eccles
That's 9 feet or 3 meters, but yes, careful measurement is required
That's 9 feet or 3 meters, but yes, careful measurement is required
not to mention wrong...

EX-Member
Joined: Aug 2004
Posts: 1,286
Likes: 0
From: Jacksonville FL
My headlight on the driver side is aimed to the left and there is a dark shadow where the light is suppose to aim but its going outward. Before the HID kit it was fine but now its aiming to the left pls help.

'RX-EIGHT'
Joined: Feb 2004
Posts: 2,768
Likes: 0
Originally Posted by slllygrl10
My headlight on the driver side is aimed to the left and there is a dark shadow where the light is suppose to aim but its going outward. Before the HID kit it was fine but now its aiming to the left pls help.
'RX-EIGHT'
Joined: Feb 2004
Posts: 2,768
Likes: 0
Originally Posted by slllygrl10
Is it necessary to remove the headlamp or just get thru from the back? It took us 8 hrs to install the kit last time *sigh he better fix this! I'm going to cry....
You will need to remove the wheel in order to do this.
EX-Member
Joined: Aug 2004
Posts: 1,286
Likes: 0
From: Jacksonville FL
Originally Posted by nojooc
You should be able to remove the bulb through the inner guard by removing the mudguard/splash shield.
You will need to remove the wheel in order to do this.
You will need to remove the wheel in order to do this.
I think we're better off removing the wheel rather than removing the headlamp itself.
'RX-EIGHT'
Joined: Feb 2004
Posts: 2,768
Likes: 0
Originally Posted by slllygrl10
I think we're better off removing the wheel rather than removing the headlamp itself.
From what you have described to me both in this thread and in the PM's, it sounds like the actual bulb assembly has not been inserted into the housing at the correct angle, causing the beam to shine sideways.
What I am suggesting is for you to remove the bulb just like you were to replace a blown light bulb, by this, you are not required to remove the entire housing assembly.
Remove the wheel and the inner splash guard and you should be able to access the backside of the headlight assembly.
Locate the main headlight bulb unit and remove this to ensure all its parts have been assembled correctly.
Re-assemble the mounting unit and reinsert into the housing.
Turn headlights on and inspect.
It should be okay, but if symptoms persist, consult the nearest dealer.
I don't think there is anything else anyone here can do without actually seeing it.
Good luck with it and let us know how you go.
Lubricious
Joined: Oct 2003
Posts: 3,425
Likes: 4
From: SF Bay Area, California
As I replied to slllygrl10 in PM, I am not even sure a simple bulb swap is a legitimate conversion. Doesn't the HID require special lense and reflector both for proper beam pattern, and also for heat tolerance? I guess if you're happy with the passenger side light then it may just be a crooked bulb, but I thought there was more to it. I was hoping she'd find someone who'd already done a conversion....
EX-Member
Joined: Aug 2004
Posts: 1,286
Likes: 0
From: Jacksonville FL
Originally Posted by Nubo
As I replied to slllygrl10 in PM, I am not even sure a simple bulb swap is a legitimate conversion. Doesn't the HID require special lense and reflector both for proper beam pattern, and also for heat tolerance? I guess if you're happy with the passenger side light then it may just be a crooked bulb, but I thought there was more to it. I was hoping she'd find someone who'd already done a conversion....
I didnt swap just the bulbs it came with a ballast. Doesnt the stock or xenon powers 35w? If so the hid I got is 35w.