DIY Ultimate Greddy Turbo CAI for AP owners
 04-06-2008, 11:34 PM
#26


 04-07-2008, 03:53 PM
#29
I will forever miss my 8!
Join Date: Sep 2006
Location: Northern Kentucky / Cincinnati
Posts: 167
Likes: 0
Received 0 Likes
on
0 Posts


 04-07-2008, 07:24 PM
#31
Registered User
Thread Starter

Join Date: Feb 2008
Posts: 249
Likes: 0
Received 0 Likes
on
0 Posts
some more pics here and some important comments. I assume everyone who wants one of these things have their stock airbox sitting in their garage on a shelf. IF NOT, that is ok too, as I will explain many variants and options.
Pictured here in order, is the hacksawed off (takes about ten seconds) plastic ABS maf tube from the stock airbox. There are also two metal mesh screens that were part of the stock airbox. You can choose to use this screen and this plastic tube for the mount. (next post I will list other ways you can do it, this is just one super fast 30 second way).
more steps:
1. hacksaw off stock maf cylindrical part (10 seconds), and also obtain a stock screen, which is already there, it just comes off.
2. Place cyclindrical tube with hole facing upwards and hacksaw the thing in half as shown.
as you can now see, you have TWO maf sensor mounts now so you can give one to your friend. The backside of the thing you just cut in half, has a flat spot with what looks like a 1.25" knock-out hole. With the hole-saw blade used earlier, you can knock this hole out and have two mounts.
using plastic or metal straps or t-bolt clamps, align the hole with the hole in the aluminum tube and strap it on. this is ready for use now.
COMMENTS:
1. if you think this is ugly, it's because i spent in total about 3 minutes on the whole process. you can use some household tools on the plastic and make it looking really pretty and fast. get a file or dremel and have a party. put your name on it or the word FAST. I think mine looks badass like the terminator
2. the 3.5" OD aluminum cylinder i used is exactly 1.5 mm thick. This will result in the maf sensor 1.5mm offset from the center of the tube. Looking at it inside the stock tube, and inside the greddy maf tube, it is not exactly in the center anyways, maybe it should be? I hope Chamberlain or Jeff can comment on this There is an EASY FIX anyways, if you don't like this. Simply take a piece of sandpaper, wrap it around a small rectangular block and sand down the flat surface of where the maf is and the two pegs where the screws go in by 1.5 mm or more. you can now completely adjust where you want the maf sensor to be. i just assume it doesn't matter because of looking at other configurations.
3. I tried putting the maf sensor (more pics later) directly into the aluminum hole i drilled. There is an o-ring around the maf sensor where it touches the hole. the hole is 1.25" in the aluminum and is PERFECT. there is literally not even a fraction of a mm gap around the maf sensor and there is literally zero air-gap. You can get a 1.25" ID rubber washer or another o-ring and put it on the maf sensor, and directly stick the sensor into the aluminum hole. MOUNTING this can be done in several ways also. You can just strap the sensor in with a strap, or drill two holes in the aluminum tube where the screws go, and use long tiny computer screws from the inside of the tube, facing out, and thru the holes on your maf sensor and use little cute nuts to bolt it on
4. However you choose to do it, it should be very secure. But don't worry about it needing to be super secure. Being located in an area so close to the open atmosphere (the air filter), there is not going to be a significant pressure or vacuum differential where the maf sensor is. It's not going to pop out or get sucked in by air. But it needs to be secure because like all the other parts in your car, it's going to vibrate and you don't want this thing fallin out while driving, i suppose
5. I just remembered, so yeeah, if you don't wanna chop up your stock maf housing and don't wanna mount directly (which I think would work very well with a nice solid 1.25" OD rubber washer), you can just find something else to strap on and make a flat spot and drill the hole where the maf is. Plastic would be the easiest. Or wood, lol
summary: there are more than a few cool ways to mount this thing without the use of any welding and it will look just as nice, if you spend more than my 30 seconds on it, and work just as good. i will post pics and instructions of the other methods also
Last edited by Grouch; 04-07-2008 at 07:49 PM.
04-07-2008, 07:35 PM
#32
Registered User
Thread Starter
Join Date: Feb 2008
Posts: 249
Likes: 0
Received 0 Likes
on
0 Posts
Here are some more pics of the finished maf mount setup. I will post more pics of options, the completed setup, and the installation.
note that the stock plastic maf housing is about 1/3 mm larger in diameter so after fitting it onto the aluminum pipe, it was a PERFECT fit. You have two of these now and can make two, and you have two screens also
Unfortunately the stock screen didn't fit as shown in the prior post picture. I will post pics of just simply putting this screen (unless you wanna use a different screen) on a piece of wood and just cutting out the exterior ring. then it will fit perfectly.
Also, I heard a rumor that Charles R. Hill might be throwing together a complete parts kit for this setup. This setup has some unique advantages over any other setup on the market:
1. Maximixed length of maf sensor housing, being a full 12" long right out to your bumper, with NO bends or interruptions in the tube before or after the sensor which is right in the middle of this tube
2. 3.5" outer diameter tube is larger so you will not max out your maf setup as fast as you would in a 3" tube
3. the 90 degree bends, since coupled with a silicone coupler and t-bolt clamps, can be fully adjusted. So if you are going to upgrade your intercooler, or change the position of it, or anything else under your bumper, you don't have to hack up a brand new shiny CAI that you bought. You can simply twist the position of the tubes to where you want your air filter to be, and you can disconnect these 90 degree elbows, take a hacksaw and do a 30 second cut to adjust the new height of where you want your air filter to be.
4. it's lightweight aluminum and matches your intercooler and other pipes that came with your greddy kit
5. it doesn't really take any extra time to go this route since if you buy another aftermarket CAI, you still have to pull your bumper off and install it anyways, so with all the legwork done, all you need to do is make a trip, buy your parts and have a hacksaw and drill ready and you're done.
Please let me know if you have any questions, comments, or ideas to help make this thing even cooler - literally (like by coating the 3.5" tube with an insulator).
 04-10-2008, 07:44 PM
#36
I will forever miss my 8!
Join Date: Sep 2006
Location: Northern Kentucky / Cincinnati
Posts: 167
Likes: 0
Received 0 Likes
on
0 Posts
any updates grouch?
did it work?
I tried to make my own however it ran like crap so I am back to the greddy one and saving some money and maybe have a shop make it for me
did it work?
I tried to make my own however it ran like crap so I am back to the greddy one and saving some money and maybe have a shop make it for me
 04-12-2008, 10:18 PM
#40
Registered User
Thread Starter
Join Date: Feb 2008
Posts: 249
Likes: 0
Received 0 Likes
on
0 Posts
I haven't had the time for updates since the weather was pretty crappy but today I managed to be able to take a quick peek at how much room I had after I pulled the bumper off. I've now decided on which filter to go with, and for sure, you can choose any filter you want, providing it is approximately this size:
http://www.knfilters.com/search/prod...x?Prod=RU-5111
PART NUMBER: RU-5111
I should be able to show pics of everything installed tomorrow.
http://www.knfilters.com/search/prod...x?Prod=RU-5111
PART NUMBER: RU-5111
I should be able to show pics of everything installed tomorrow.
04-13-2008, 07:50 PM
#41
Registered User
Thread Starter
Join Date: Feb 2008
Posts: 249
Likes: 0
Received 0 Likes
on
0 Posts
UPDATE: I used K&N part number RE-0930 and it fit perfectly (it's what I could get same day in-stock)
UPDATE: Intercooler will need to be relocated no matter what CAI you use with the GReddy T-kit, but it's easy but probably took me an extra 30 min. at least and cost an extra 10 bucks for that holy angle bar from home depot to make a bracket for each side. All you need is a good pair of metal snips and pliers to bend the thing and a hacksaw to cut it.
UPDATE: One of the 90 degree elbows needs to be cut. From the outside measure 2 and 3/4" and mark it and on the inside measure 2 and 3/8" and mark it, cut with hacksaw, extra ten seconds of work.
Check out all the pics! Twelve more in total! It's totally done now.
04-13-2008, 07:58 PM
#43
Registered User
Thread Starter
Join Date: Feb 2008
Posts: 249
Likes: 0
Received 0 Likes
on
0 Posts
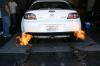
Here's a pic of the side view of the air filter and how it's perfectly parallel to the intercooler. what a perfect choice and it's not super small either! also there's pics of the front of the relocated intercooler, and when you put your front bumper on, the intercooler is now visible. no more sleeper.
04-13-2008, 07:59 PM
#44

I bought 2 of these from home depot, and bent them into a Z shape to hold the intercooler in that position. Then just drilled holes so they fit. It's not pretty, but you can't see it unless the front bumper is off. They're very thick, maybe 18 gauge?
The nice thing about the intercooler relocation is that the top 1" or so of the intercooler that was useless behind the low impact bumper is now getting airflow. I just don't know if the flow is as good at the 35 degree angle as it was before, but I haven't had any issues.
The nice thing about the intercooler relocation is that the top 1" or so of the intercooler that was useless behind the low impact bumper is now getting airflow. I just don't know if the flow is as good at the 35 degree angle as it was before, but I haven't had any issues.
04-13-2008, 08:42 PM
#47
I realise you are busy and on the road so when you get back I would love to try a different map.
I might even have my Mazsport CAI before then.
04-13-2008, 08:49 PM
#49
he's running with the greddy maf housing. It will get rich in boost. That's just how it reacts.
I've got several days under my belt with the 5.0 map, and I still have 0 LTFT. It's spot on except for my stumbling issue at high load and high boost.
btw, Jeff, are you getting my SMS messages?! heh.
I've got several days under my belt with the 5.0 map, and I still have 0 LTFT. It's spot on except for my stumbling issue at high load and high boost.
btw, Jeff, are you getting my SMS messages?! heh.