Vent POD + Gauge installed


 09-14-2010, 07:38 PM
#52
Tetsumakysenpukyaku
iTrader: (5)

Join Date: Jan 2008
Location: Throwing Sonic Booms
Posts: 249
Likes: 0
Received 0 Likes
on
0 Posts
Looking good dude. I have the dual pod coming and glowshift digitals in hand. Their installation I think is a bit different but your thread can definitely lead me in the right direction. Thanks for making the thread.
09-14-2010, 09:09 PM
#53
Surf Hard, Drive Hard
Thread Starter

Join Date: Feb 2007
Location: Indialantic, Florida
Posts: 7,840
Likes: 0
Received 11 Likes
on
9 Posts
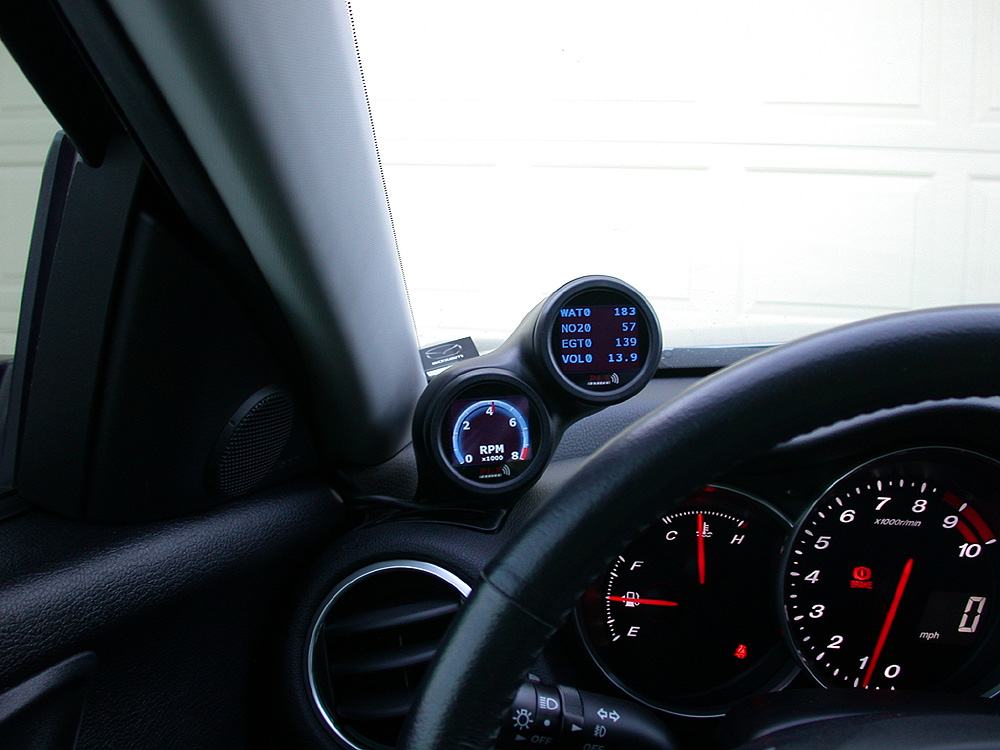
Well, here's the pics with the gauges turned on and functioning.
I am still waiting for my oil pressure sensor to get in, so that will be hooked up probably next weekend.
I haven't really decided what all, I will be displaying, but I still retain the ability to display anything on the ODBII bus, plus
I will have the oil temp(because I already have the sensor) and oil pressure. You can blame me for the color choice, If you knew what else I have in the car, you'd understand. Anyway..............everything is 256 color selectable right down to the tick marks, needles, labels, everything.
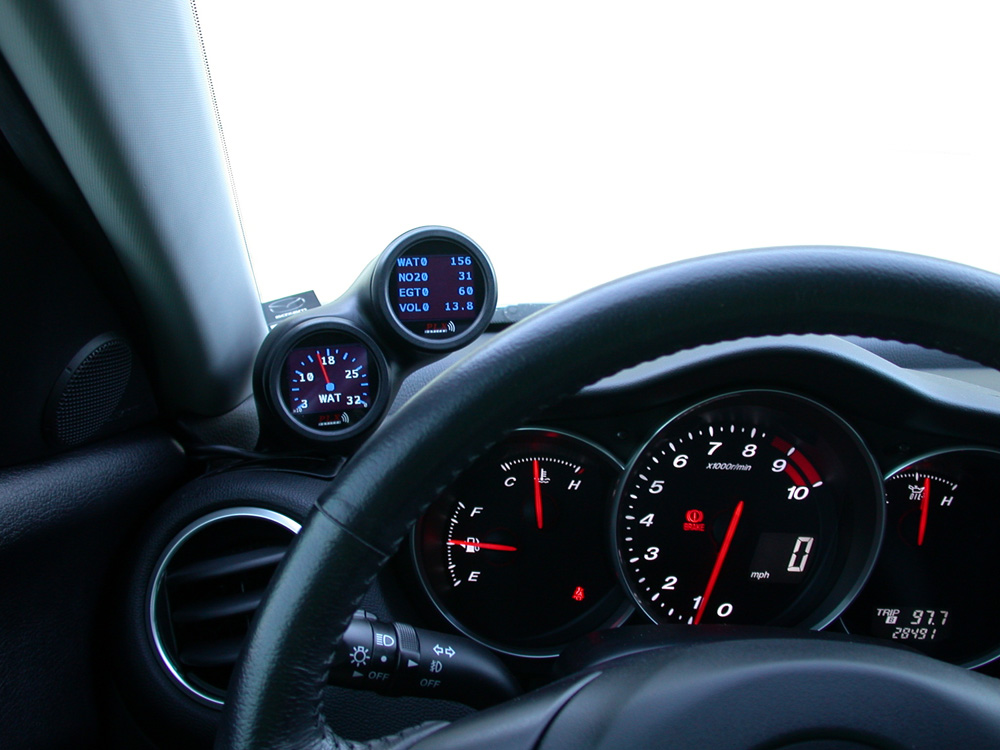
First shot is with the ODBII on the top gauge in 4 parameter mode, while the bottom one is in graphics mode.
Obviously after having just started the car about a minute or so ago.........as I'm not fully warmed up, as witnessed by the EGT, Water temp, and NO2(which is sort of an AF ratio).
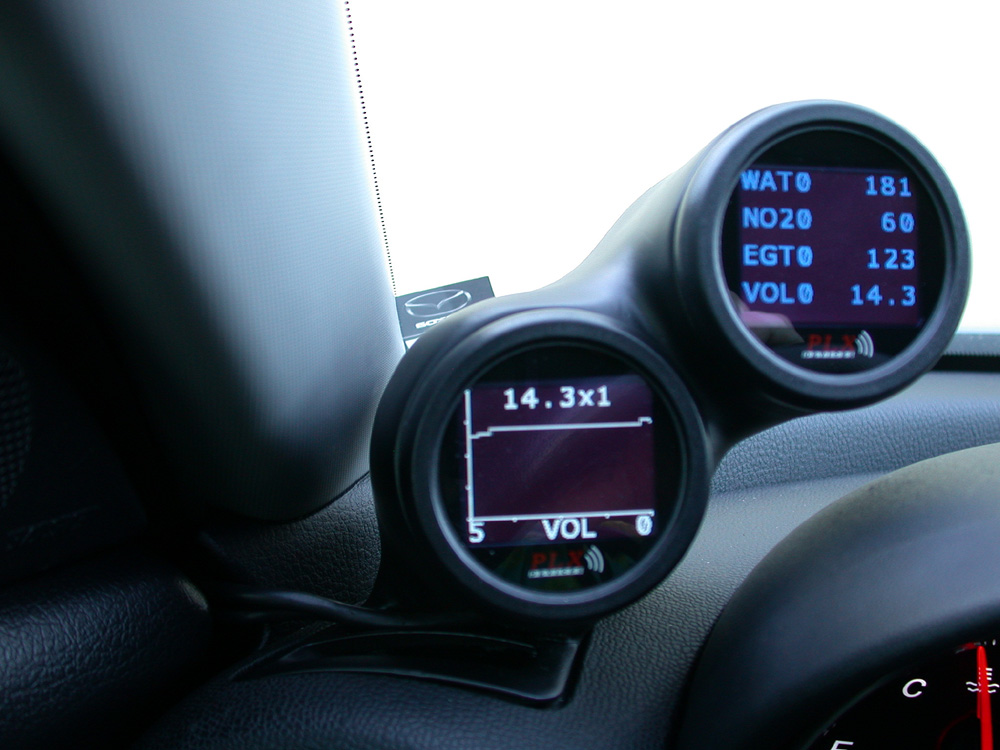
Second one is closer to being warm, but still at idle. Changed the bottom gauge to plot mode via the remote and looking at battery voltage.
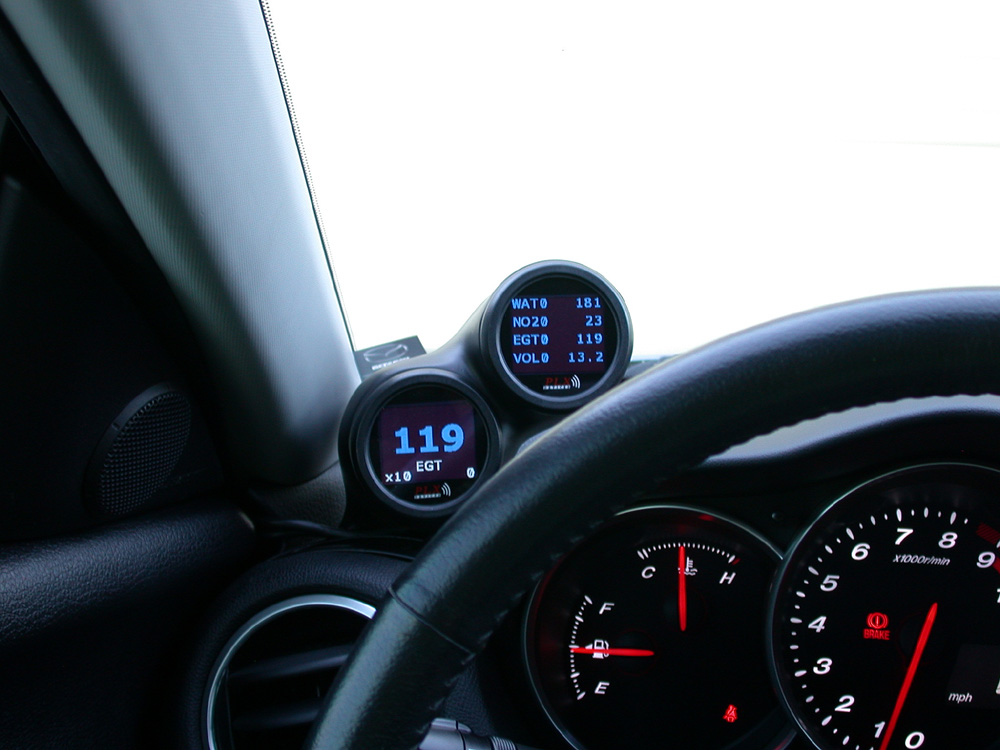
Again, just change the bottom one to EGT and changed mode to numeric.
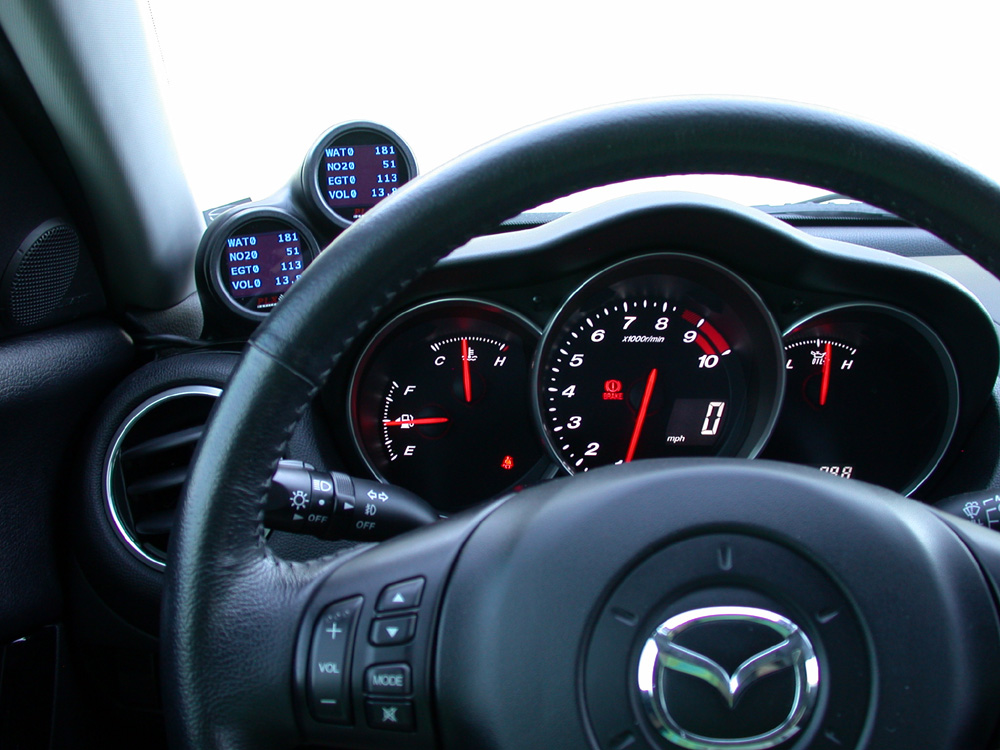
This one just shows the 4 parameter mode on both with the same parameters selected. This picture is mis-leading as it appears the top gauge might be obstructed by the steering wheel, but it really isn't.
This one is actually BS for the moment because you will note that it says I'm sitting at 4k rpm, but look at my normal tach. I'm not rev'ing at all and am sitting at idle. I just threw this one in there to show how one of the basic displays look that they give you, I didn't really tell it to show my RPM's but I could have.
I am still waiting for my oil pressure sensor to get in, so that will be hooked up probably next weekend.
I haven't really decided what all, I will be displaying, but I still retain the ability to display anything on the ODBII bus, plus
I will have the oil temp(because I already have the sensor) and oil pressure. You can blame me for the color choice, If you knew what else I have in the car, you'd understand. Anyway..............everything is 256 color selectable right down to the tick marks, needles, labels, everything.
First shot is with the ODBII on the top gauge in 4 parameter mode, while the bottom one is in graphics mode.
Obviously after having just started the car about a minute or so ago.........as I'm not fully warmed up, as witnessed by the EGT, Water temp, and NO2(which is sort of an AF ratio).
Second one is closer to being warm, but still at idle. Changed the bottom gauge to plot mode via the remote and looking at battery voltage.
Again, just change the bottom one to EGT and changed mode to numeric.
This one just shows the 4 parameter mode on both with the same parameters selected. This picture is mis-leading as it appears the top gauge might be obstructed by the steering wheel, but it really isn't.
This one is actually BS for the moment because you will note that it says I'm sitting at 4k rpm, but look at my normal tach. I'm not rev'ing at all and am sitting at idle. I just threw this one in there to show how one of the basic displays look that they give you, I didn't really tell it to show my RPM's but I could have.
Last edited by Mazurfer; 09-14-2010 at 09:34 PM.
09-14-2010, 09:22 PM
#54
Well, here's the pics with the gauges turned on and functioning.
I am still waiting for my oil pressure sensor to get in, so that will be hooked up probably next weekend.
I haven't really decided what all, I will be displaying, but I still retain the ability to display anything on the ODBII bus, plus
I will have the oil temp(because I already have the sensor) and oil pressure.
First shot is with the ODBII on the top gauge in 4 parameter mode, while the bottom one is in graphics mode.
Obviously after having just started the car as I'm not fully warmed up, as witnessed by the EGT and water temp.

i wish i still have my 8
 09-14-2010, 09:35 PM
#55
Surf Hard, Drive Hard
Thread Starter
Join Date: Feb 2007
Location: Indialantic, Florida
Posts: 7,840
Likes: 0
Received 11 Likes
on
9 Posts
No worries..........go right ahead. Steal away!
I'm still editing that post for words, but the pics will remain.
Don't take the one of the voltage plot as it's out of focus!
I'm still editing that post for words, but the pics will remain.
Don't take the one of the voltage plot as it's out of focus!
Last edited by Mazurfer; 09-14-2010 at 09:37 PM.
09-14-2010, 09:45 PM
#56
Surf Hard, Drive Hard
Thread Starter
Join Date: Feb 2007
Location: Indialantic, Florida
Posts: 7,840
Likes: 0
Received 11 Likes
on
9 Posts
Chunbelievable - What you first need to understand is that the gauges I am running are somewhat unique I think.
Look at the picture below and focus on what the OLED display looks like(even though it's wrapped up in a bag in this picture) and the cable that runs to it. The cable at the display end is NOT detachable(it's hard wired). Now, look at the other end of the cable and notice there is about a 25 pin D type connector. It's not detachable at that end either and trust me, there are 25 very small wires in there with shielding around each one and then shielding around them all.
The size of that connector is about 1/2 inch wide and about 1 1/4 inch long, so might you be able to see what issues I might encounter given the type of gauge I wanted to use.

Now, for the sake of argument, here is a pic of the single pod that I used to have installed. You can see the slot that I cut with a dremel tool.
Why?, well there were two reasons.
1.) I realized that with the single pod that if I made the normal hole inside at the bottom of the pod large enough to get the connector through, it was going to be very, very close to compromising(jacking up) the exterior of the pod and I didn't want to do that.
2.) Don't forget that even then, I still had that connector that I would've had to deal with in the air vent duct and would've had to cut a hole in the duct big enough to pass the connector through. 1 1/4" long by 1/2" wide. That's a big hole!
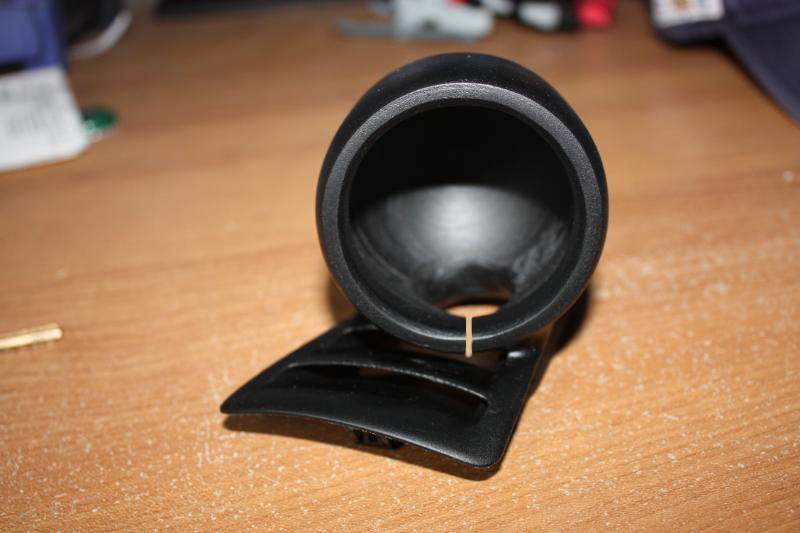
So, for the single pod I decided to just cut a slot that would allow me to then get the gauge in there and bring the cable back out down by the vents(in the pod) and run it over to the A-pillar. Not perfect, but after a lot of thought, that was my best solution.
If you look close in this pic, you will see the slot is still there.
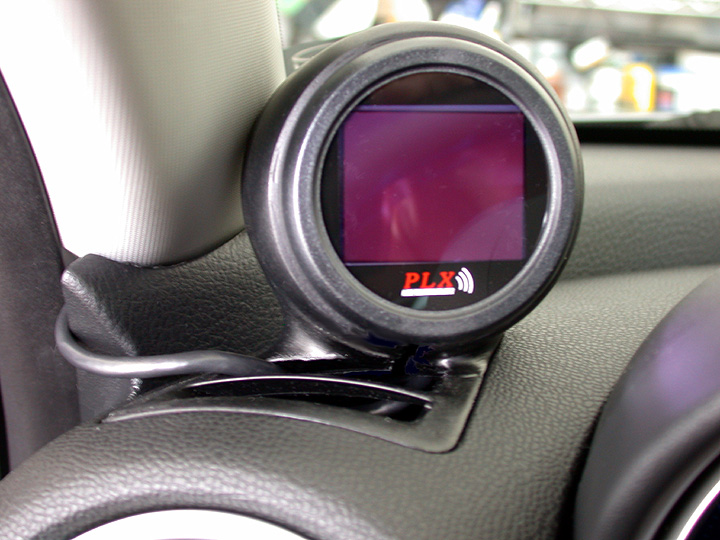
Now, let's jump to the dual pod.
You can see that using the two gauges of this type, I just magnified my problem.
First off, I got lucky in that for the top pod, I was actually able to get the connector through the hole into the bottom pod by removing those
long hand tightening screw things on the connector and making the hole feeding down into the bottom pod just a little bit bigger(with the dremel). The same thing was done with the lower pod(enlarging the hole) just big enough where needed to pass both connectors one at a time down through and out the bottom pod.
So, now I'm basically faced with both gauges are in the PODs, the wires are run through the appropriate holes and out the bottom, but I have two huge connectors left to deal with.
Once again I needed a way to get the cables out the front as I didn't want to deal with cutting a gaping hole in the vent duct to pass them on down. So......there is a slot cut in the dual vent gauge pod and they are run out the front sort of like the single pod setup and run over to the A-pillar. I don't think this would be an issues for most gauges as you can just drill a hole small enough in the vent duct and just pass the wires on through, but not in my application.
So...........you know there is a slot in my bottom pod of the dual pod, but it's not in the exact same place as before since I could pass the connectors through the bottom this time, the slot doesn't have to be on the pod face itself.
I wanted to make it as invisible as I could and also remove the least amount of material from the POD. Can you spot where it is in the dual pod pictures? You really cannot see it at all this time!
Do I really like having the cables showing running over the the A-pillar......no, not really................but it was simply my best option.
Look at the picture below and focus on what the OLED display looks like(even though it's wrapped up in a bag in this picture) and the cable that runs to it. The cable at the display end is NOT detachable(it's hard wired). Now, look at the other end of the cable and notice there is about a 25 pin D type connector. It's not detachable at that end either and trust me, there are 25 very small wires in there with shielding around each one and then shielding around them all.
The size of that connector is about 1/2 inch wide and about 1 1/4 inch long, so might you be able to see what issues I might encounter given the type of gauge I wanted to use.
Now, for the sake of argument, here is a pic of the single pod that I used to have installed. You can see the slot that I cut with a dremel tool.
Why?, well there were two reasons.
1.) I realized that with the single pod that if I made the normal hole inside at the bottom of the pod large enough to get the connector through, it was going to be very, very close to compromising(jacking up) the exterior of the pod and I didn't want to do that.
2.) Don't forget that even then, I still had that connector that I would've had to deal with in the air vent duct and would've had to cut a hole in the duct big enough to pass the connector through. 1 1/4" long by 1/2" wide. That's a big hole!
So, for the single pod I decided to just cut a slot that would allow me to then get the gauge in there and bring the cable back out down by the vents(in the pod) and run it over to the A-pillar. Not perfect, but after a lot of thought, that was my best solution.
If you look close in this pic, you will see the slot is still there.
Now, let's jump to the dual pod.
You can see that using the two gauges of this type, I just magnified my problem.
First off, I got lucky in that for the top pod, I was actually able to get the connector through the hole into the bottom pod by removing those
long hand tightening screw things on the connector and making the hole feeding down into the bottom pod just a little bit bigger(with the dremel). The same thing was done with the lower pod(enlarging the hole) just big enough where needed to pass both connectors one at a time down through and out the bottom pod.
So, now I'm basically faced with both gauges are in the PODs, the wires are run through the appropriate holes and out the bottom, but I have two huge connectors left to deal with.
Once again I needed a way to get the cables out the front as I didn't want to deal with cutting a gaping hole in the vent duct to pass them on down. So......there is a slot cut in the dual vent gauge pod and they are run out the front sort of like the single pod setup and run over to the A-pillar. I don't think this would be an issues for most gauges as you can just drill a hole small enough in the vent duct and just pass the wires on through, but not in my application.
So...........you know there is a slot in my bottom pod of the dual pod, but it's not in the exact same place as before since I could pass the connectors through the bottom this time, the slot doesn't have to be on the pod face itself.
I wanted to make it as invisible as I could and also remove the least amount of material from the POD. Can you spot where it is in the dual pod pictures? You really cannot see it at all this time!
Do I really like having the cables showing running over the the A-pillar......no, not really................but it was simply my best option.
Last edited by Mazurfer; 09-15-2010 at 06:40 AM.
09-15-2010, 08:23 AM
#57
Surf Hard, Drive Hard
Thread Starter
Join Date: Feb 2007
Location: Indialantic, Florida
Posts: 7,840
Likes: 0
Received 11 Likes
on
9 Posts
So, I'm not familiar with your gauges............how do the wires connect at either end? This will have a whole lot to do with what you end up having to do.
09-17-2010, 09:40 PM
#58
Surf Hard, Drive Hard
Thread Starter
Join Date: Feb 2007
Location: Indialantic, Florida
Posts: 7,840
Likes: 0
Received 11 Likes
on
9 Posts

Guess what came in tonight!
Got the PLX oil pressure and temperature sensors in the mail!
Look like I'll be doing that this weekend if the waves don't clean up!

 09-19-2010, 07:04 AM
#60
Surf Hard, Drive Hard
Thread Starter
Join Date: Feb 2007
Location: Indialantic, Florida
Posts: 7,840
Likes: 0
Received 11 Likes
on
9 Posts
Thanks!
I was just beginning to wonder where you have been, must have been very busy as I hadn't see any posts in quite sometime.
Anyway, I threw my freakin back out yesterday morning when I was cleaning my two house A/C units(both air handlers and outside condenser units), so I guess the installation of the oil temp and pressure units or going to have to wait. Argh!
There is no way at the moment I can bend over and engine bay much less crawl around under the dash.
I did spend time yesterday doing the pre-lim wiring and such on the bench, but that's all I really could do.
12-10-2010, 02:32 AM
#61
Registered User

Join Date: Dec 2008
Location: SYDNEY
Posts: 35
Likes: 0
Received 0 Likes
on
0 Posts
one question how did u connet 2 obd ~?
i have my ship to me today~~
can i have few pic from obd module~?
and also what is the oil pressure and temperature sensors read?
i have s2 and oil pressure is 156 or somthing higher......
i have my ship to me today~~
can i have few pic from obd module~?
and also what is the oil pressure and temperature sensors read?
i have s2 and oil pressure is 156 or somthing higher......
12-11-2010, 07:48 AM
#62
Surf Hard, Drive Hard
Thread Starter
Join Date: Feb 2007
Location: Indialantic, Florida
Posts: 7,840
Likes: 0
Received 11 Likes
on
9 Posts
1.) If you buy the version that includes the ODBII (The ones on the right of the following page) http://www.plxdevices.com/multigauges.html then you get a cable that goes from the odb module to the port located under your dash by your left knee(near the steering column). Yours is probably by your right knee since you guys are upside down!
2.) the ODB module look no different than any of the others sensor modules other than it's a wee bit thinner and longer.
3.) Remember, you don't get oil pressure or oil temp directly from the OBD II port of the car. It may be different on an S2, but on an S1 those parameters are not available via the ECU.
4.) Oil pressure................they(threads I've read) say about 50psi at 3k rpm, I read a little higher than that. They say 15-18 psi at idle and that's about what I read.
5.) Oil temp..............generally in the high 190's(F). Driving fairly hard I've seen it get to about 212F but I don't track this vehicle.
Hopefully you read through this thread.....especially post 50 where I explained my install? https://www.rx8club.com/showthread.p...12174#poststop
I did notice in that pic of everything that the ODB cable isn't shown, that's because it was already in the car when I took the pics of the second module I am using for the oil/presure(a straight DM-100) with no ODB. The ODB module and gauge was already in the car.
Hope that helps????
Last edited by Mazurfer; 12-11-2010 at 07:50 AM.
12-12-2010, 06:58 AM
#64
Surf Hard, Drive Hard
Thread Starter
Join Date: Feb 2007
Location: Indialantic, Florida
Posts: 7,840
Likes: 0
Received 11 Likes
on
9 Posts
You have two OBD II boxes? Oh......I see......I only have one ODB II box and then a DM100 that doesn't have the OBD II. Well, I'll have to research and see if there is an adapter(cable) of sorts that would pigtail out the port under the steering wheel. Check back later today and I'll see if there is such an animal.
12-12-2010, 07:59 AM
#65
Surf Hard, Drive Hard
Thread Starter
Join Date: Feb 2007
Location: Indialantic, Florida
Posts: 7,840
Likes: 0
Received 11 Likes
on
9 Posts
Looks like you need one of these then!

Here's where I found it.
http://www.amazon.com/Cable-J1962M-2.../dp/B000TMCX72
I cannot guarantee this, but I think it's the one you need. You may also have to be careful about setting up the refresh rates and how many parameters you intend to monitor as things may slow down.
Here's where I found it.
http://www.amazon.com/Cable-J1962M-2.../dp/B000TMCX72
I cannot guarantee this, but I think it's the one you need. You may also have to be careful about setting up the refresh rates and how many parameters you intend to monitor as things may slow down.
12-12-2010, 09:20 AM
#66
Resident Alien

Join Date: Apr 2010
Location: Florida
Posts: 495
Likes: 0
Received 0 Likes
on
0 Posts
Ok so question, since you have two gauges, are they both the OBD type, or do you just need one OBD and the other just a regular DM-100? Pretty big price difference..
Awesome install. Definitely want to do the same. Tax return FTW!
Awesome install. Definitely want to do the same. Tax return FTW!
12-12-2010, 10:27 AM
#67
Surf Hard, Drive Hard
Thread Starter
Join Date: Feb 2007
Location: Indialantic, Florida
Posts: 7,840
Likes: 0
Received 11 Likes
on
9 Posts
On the non-ODB one, I run the oil temp and oil pressure sensors that come from the RB oil plate adapter.
Hope that clears it up?
I do need to go verify that this is my wiring, but I will do so and let you know!
If thinking of going with the PLX devices, make sure you visit the site as they have other options now, that may be better....the Kiwi? And also realize I didn't have your basic 1-2-3 you're done install. Better look at post 50 or so!
If you didn't want the ODB at all, then you'd need one DM-100 to run the one display, and up to 32 different sensor boxes could plug into that.
Last edited by Mazurfer; 12-12-2010 at 07:13 PM.
12-12-2010, 11:15 AM
#68
Resident Alien
Join Date: Apr 2010
Location: Florida
Posts: 495
Likes: 0
Received 0 Likes
on
0 Posts
Yeah I read the thread, just didn't know if you could run one OBD model, and then the other one would get its info from that one or whatever.. But again, not gonna happen for a few months, til tax season. Thanks for the info!
12-12-2010, 12:29 PM
#69
weeeeeeeeee
iTrader: (12)

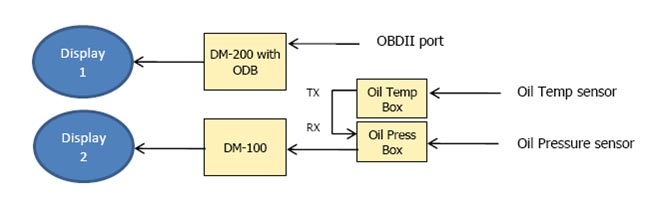
Interesting that the boxes are daisy chained. Implies there's a protocol in place separating the two signals. I'm assuming the boxes and the DM-100 are all plx?
Also not sure how much luck, or any, someone is going to have with an "active/active" dual odb2 connection. There's only so much data that can pass across the bus and have heard of numerous issues trying to get more than one thing running at once.
Also not sure how much luck, or any, someone is going to have with an "active/active" dual odb2 connection. There's only so much data that can pass across the bus and have heard of numerous issues trying to get more than one thing running at once.
12-12-2010, 06:58 PM
#70
Surf Hard, Drive Hard
Thread Starter
Join Date: Feb 2007
Location: Indialantic, Florida
Posts: 7,840
Likes: 0
Received 11 Likes
on
9 Posts
Interesting that the boxes are daisy chained. Implies there's a protocol in place separating the two signals. I'm assuming the boxes and the DM-100 are all plx?
Also not sure how much luck, or any, someone is going to have with an "active/active" dual odb2 connection. There's only so much data that can pass across the bus and have heard of numerous issues trying to get more than one thing running at once.
Also not sure how much luck, or any, someone is going to have with an "active/active" dual odb2 connection. There's only so much data that can pass across the bus and have heard of numerous issues trying to get more than one thing running at once.
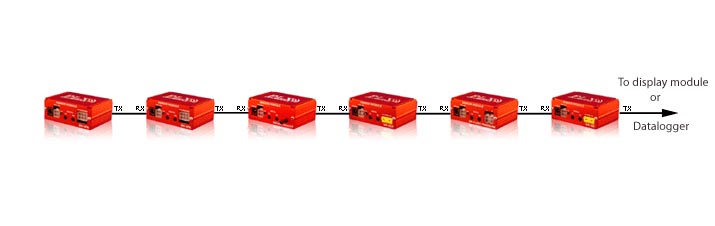
I agree with your comment about dual obdII connection he's think of using and that's why I suggested he keep the refresh or reading of parameters at the longest possible setting, at least to start with.
I don't have that issue with what I'm doing.
I also updated my drawing above to more clearly define that serial bus(daisy chain).
Dave
Last edited by Mazurfer; 12-12-2010 at 07:15 PM.
12-13-2010, 06:36 PM
#72
Surf Hard, Drive Hard
Thread Starter
Join Date: Feb 2007
Location: Indialantic, Florida
Posts: 7,840
Likes: 0
Received 11 Likes
on
9 Posts
I'll check but sadly I'm not sure you can. If I remember, when you hook up the ODB to one of the display modules you are done because you have to take the OBDII TX output and run it over to the sensor RX on the same module(The DM-xxx OBDII) using a supplied jumper and set the DM-xxx box to "Terminated". This gives you four sensors to pick off any one of the 26 or so available ODBII parameters.
1) ABS THROTTLE (Absolute Throttle Position)
2) ENGINE RPM
3) VEHICLE SPEED
4) ENGINE LOAD
5) TIMING
6) INTAKE MAP (Manifold Absolute Pressure)
7) INTAKE MAF (Mass Air Flow Sensor)
8) STFUEL B1 (Short Term Fuel Trim Bank 1)
9) LTFUEL B1 (Long Term Fuel Trim Bank 1)
10) STFUEL B2 (Short Term Fuel Trim Bank 2)
11) LTFUEL B2 (Long Term Fuel Trim Bank 2)
12) AIR INT TEMP (Air Intake Temperature)
13) COOLANT TEMP
14) FUEL PRESSURE
15) O2VOLTAGE 1B1 (Narrowband O2 Sensor Voltage 1 Bank 1)
16) O2VOLTAGE 1B2 (Narrowband O2 Sensor Voltage 1 Bank 2)
17) O2VOLTAGE 2B1 (Narrowband O2 Sensor Voltage 2 Bank 1)
18) O2VOLTAGE 2B2 (Narrowband O2 Sensor Voltage 2 Bank 2)
19) FUEL LEVEL
20) CAT TEMP 1B1 (Catalytic Converter Temperature 1 Bank 1)
21) CAT TEMP 2B1 (Catalytic Converter Temperature 2 Bank 1)
22) CAT TEMP 1B2 (Catalytic Converter Temperature 1 Bank 2)
23) CAT TEMP 2B2 (Catalytic Converter Temperature 2 Bank 2)
24) ECU VOLTAGE
25) ABS ENG LOAD (Absolute Engine Load)
26) AMB AIR TEMP (Ambient Air Temperature) "AMB AIR TEMP");
Our car does not support all of the above list, but almost all. We also have get a select few that are not on this list!
If you look up in this thread and find the two posts I made on 12/31/2008 you will see the ones that it does.
It's all the readouts that are orange in color.
You can also go download the manuals from the PLX site and take a look yourself. They are available
I can already display 4 OBDII sensors at a time on one gauge, so if you had two ODBII boxes, that splitter cable, and two OLED displays......and set then up to show different parameters, then you could be displaying a total of 8, but you should keep in mind what Shelldude and I were discussing.
Last edited by Mazurfer; 12-13-2010 at 07:17 PM.
12-14-2010, 06:54 PM
#74
Surf Hard, Drive Hard
Thread Starter
Join Date: Feb 2007
Location: Indialantic, Florida
Posts: 7,840
Likes: 0
Received 11 Likes
on
9 Posts
Yeah, I had just a standalone Nordskog oil temp gauge in there for awhile, and then I figured since I had an extra DM-100 and another OLED display, I might as well use them.