
CarPC and Stereo upgrade finished


Thread Starter
Registered User
Joined: Jun 2006
Posts: 135
Likes: 0
From: South Florida
CarPC and Stereo upgrade finished
Well finally finshed dispite a few set backs with Motherboard had to RMA it 3 times recieved 2 DOA boards  . If anybody is interested in PC specs I'll post them or just look me up on Mp3Car forum under the same user name Kimota.
I'd like to THANK everybody on this forum, I would HAVE never attempted or let alone completed this project if it wasn't for MP3Car and RX8 Club forums :peace:
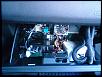
Heres the PC in glovebox (I'll clean it up a bit latter)
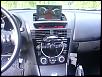
Here's the Screen Open (Transflective baby ) Yes that is Giant Robo you see on the screen.
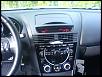
The Screen closed
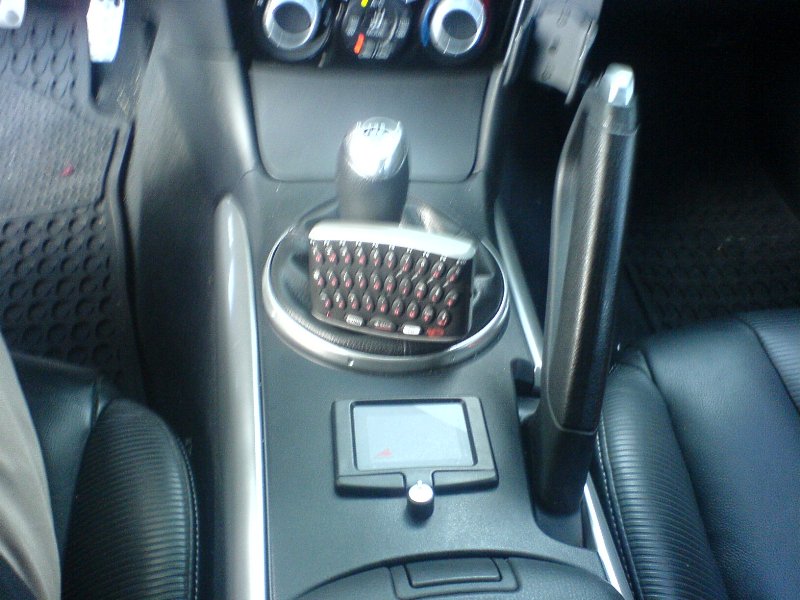
PS3 mini wireless keyboard touchpad and bass **** install. Replaced orginal center console with one with non heated seats (never used them in South Florida) cut out for touch pad and bass control ***. Touch pad works super sweet with CarPC don't even have to touch my screen and gestures in frontend work too.

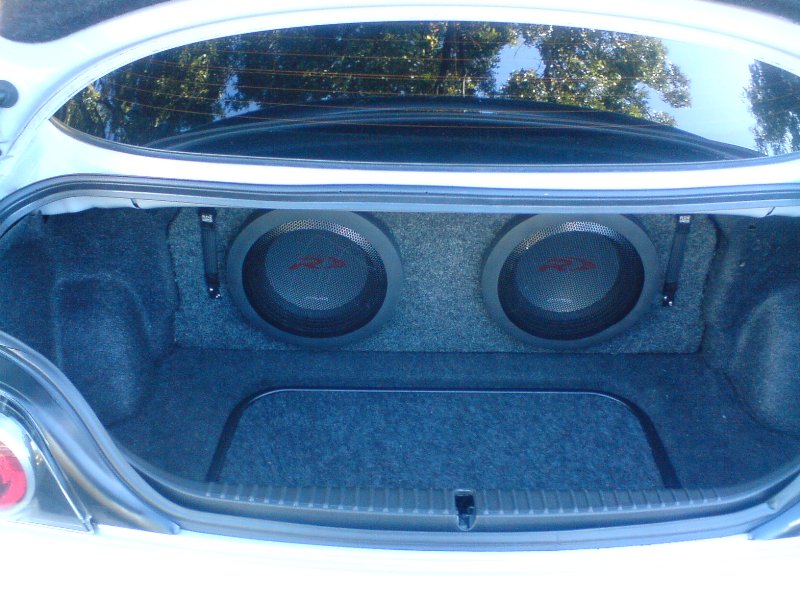
Sub Box in trunk amps are mounted on back of sub box with 2X Stinger SF3N fans on either side of sub box. I'm using a Zenclosure box and 2X 10"Alpine Type R woofers had them take 1 3/4" off width as to mount amps on the back of box. With the fans blowing I haven't had the amps shutdown on me and believe me it get INSANELY hot in South Florida.

Well thats pretty much it, the project took me a while to complete as I also did a complete sound system upgrade and had to relocate the PC to glove box because of heating issues (HOT as hell in South Florida ) . Replaced all the cabin speakers with MB Quarts including tweeters, added a sub box with 2X 10" Alpine Type R as well as 2 Alpine PDX amps and Rockford Fosgate 3sixty.2 sound processor.
I'm pretty satisfied with the way it all turned out, one thing that I really love my car still looks bone stock when prying eyes look in (we know its not)
Again a BIG thank you to RX8 Club forum couldn't have done it without you
. If anybody is interested in PC specs I'll post them or just look me up on Mp3Car forum under the same user name Kimota.I'd like to THANK everybody on this forum, I would HAVE never attempted or let alone completed this project if it wasn't for MP3Car and RX8 Club forums :peace:
Heres the PC in glovebox (I'll clean it up a bit latter)

Here's the Screen Open (Transflective baby
) Yes that is Giant Robo you see on the screen. 
The Screen closed
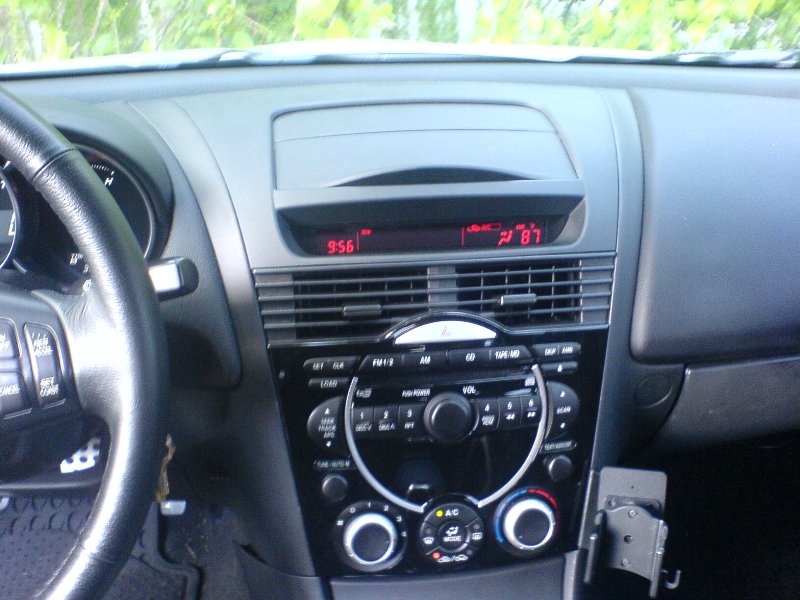
PS3 mini wireless keyboard touchpad and bass **** install. Replaced orginal center console with one with non heated seats (never used them in South Florida) cut out for touch pad and bass control ***. Touch pad works super sweet with CarPC don't even have to touch my screen and gestures in frontend work too.
Sub Box in trunk amps are mounted on back of sub box with 2X Stinger SF3N fans on either side of sub box. I'm using a Zenclosure box and 2X 10"Alpine Type R woofers had them take 1 3/4" off width as to mount amps on the back of box. With the fans blowing I haven't had the amps shutdown on me and believe me it get INSANELY hot in South Florida.
Well thats pretty much it, the project took me a while to complete as I also did a complete sound system upgrade and had to relocate the PC to glove box because of heating issues (HOT as hell in South Florida
) . Replaced all the cabin speakers with MB Quarts including tweeters, added a sub box with 2X 10" Alpine Type R as well as 2 Alpine PDX amps and Rockford Fosgate 3sixty.2 sound processor.I'm pretty satisfied with the way it all turned out, one thing that I really love my car still looks bone stock when prying eyes look in (we know its not)
Again a BIG thank you to RX8 Club forum couldn't have done it without you
Last edited by kimota; Jan 9, 2008 at 03:40 PM. Reason: Listed upgraded stereo goodness


awesome job, what all did you use to get this done if you don't mind me asking? Like for power and such to be more specific. I'm really wanting to do something in this direction, but am pretty new to the whole car pc deal. If you could shoot me a quick pm or something whenever it's convenient that would rock.
Thread Starter
Registered User
Joined: Jun 2006
Posts: 135
Likes: 0
From: South Florida
I used the Carnetix CNX-2140 (for PC and Monitor) and a Carnetix CNX-P5V (for usb hub) DC to DC regulators for power. The 2140 is an intelligent DC-DC regulator that can be used to startup and shutdown your PC the P5V actually sits inside the 2140.
If you plan on going the CarPC route the MP3Car Forums is a must. If you have any more questions let me know I'll answer them if I can
If you plan on going the CarPC route the MP3Car Forums is a must. If you have any more questions let me know I'll answer them if I can
Last edited by kimota; Jul 12, 2007 at 02:35 PM.
I use the Carnetix CNX-2140 (for PC and Monitor) and a Carnetix CNX-P5V (for usb hub) DC to DC regulators for power. The 2140 is an intelligent DC-DC regulator that can be used to startup and shutdown your PC the P5V actually sits inside the 2140.
If you plan on going the CarPC route the MP3Car Forums is a must. If you have any more questions let me know I'll answer them if I can
If you plan on going the CarPC route the MP3Car Forums is a must. If you have any more questions let me know I'll answer them if I can
Thread Starter
Registered User
Joined: Jun 2006
Posts: 135
Likes: 0
From: South Florida


Registered
Joined: May 2007
Posts: 896
Likes: 0
From: Montreal


Registered User
Joined: Jun 2006
Posts: 54
Likes: 0
From: Farmingville, NY
really nice install!!
Yes more info on the keyboard please. I have the same but wired USB. Is it IR or B/T?
Great job with the mouse pad. How much is a replacement center console? I have a touch pad as well but keep in in the glove box.
Looking good!
Yes more info on the keyboard please. I have the same but wired USB. Is it IR or B/T?
Great job with the mouse pad. How much is a replacement center console? I have a touch pad as well but keep in in the glove box.
Looking good!
Thread Starter
Registered User
Joined: Jun 2006
Posts: 135
Likes: 0
From: South Florida
Thanks for the compliments
Okay on to the questions
The Keyboard is a PS3 MadCatz thumpad and uses radio frequency it has really good range
The Toucpad is the Adesso Easy Cat I picked up from newegg.com
The replacement center console is the Retractable LCD / Nav Holder $347.87
Total cost hmm never really added it all up, as I picked up parts from all over the place. I'd have to say combined for both the CarPC and complete stereo upgrade.
between $2900 and $3300
There are some other goodies I didnt take pictures of usb WIFI, microphone hidden in headboard and gps receiver under dash board behind monitor.

Damn, you beat me to it! I'm doing the same thing with my carPC; I have the transflective screen in the JDM retractable nav tray as well. The thing holding me up right now is determining the best way to mount my hardware in the glovebox. If you could, please elaborate on how you mounted everything in there. My thoughts were to mount the smaller stuff like the HDD, USB hub, and video card (PCI video card to get 800x480 rez) using velcro. However, the bigger components like the Epia MII-10000 and my Opus 120W, i would need to mount more securely; how did you do it?
Thread Starter
Registered User
Joined: Jun 2006
Posts: 135
Likes: 0
From: South Florida
hahhah I'd seen you post about a CarPC and was thing the same thing
As far as PC components we went a differnt route check out my PC specs next to my name (Kimota) on MP3Car.com and this post #13 here will explain how everything is mounted in the glove box. Yes velcro was used extensively, get good sticky sided velcro from a hobby shop the stuff at Walmart, Office depot etc is crap.
As far as PC components we went a differnt route check out my PC specs next to my name (Kimota) on MP3Car.com and this post #13 here will explain how everything is mounted in the glove box. Yes velcro was used extensively, get good sticky sided velcro from a hobby shop the stuff at Walmart, Office depot etc is crap.

Registered User
Joined: Sep 2006
Posts: 24
Likes: 0
Neat!
Very Nice!
So you did not go for a pre-configured PC unit? What screen did you get?
I would appreciate if you can post all the parts needed for doing this neat install.
And, how would the sound connection to the stock bose system would work, is there a cable to get?
Cheers!
So you did not go for a pre-configured PC unit? What screen did you get?
I would appreciate if you can post all the parts needed for doing this neat install.
And, how would the sound connection to the stock bose system would work, is there a cable to get?
Cheers!
Last edited by IsMao; Sep 27, 2007 at 03:28 PM.
Thread Starter
Registered User
Joined: Jun 2006
Posts: 135
Likes: 0
From: South Florida
So you did not go for a pre-configured PC unit? What screen did you get?
I would appreciate if you can post all the parts needed for doing this neat install.
And, how would the sound connection to the stock Bose system would work, is there a cable to get?
I would appreciate if you can post all the parts needed for doing this neat install.
And, how would the sound connection to the stock Bose system would work, is there a cable to get?
I put the PC together myself using an Aopen i945gtt mother board, the processor is an Intel core 2 duo. I used the Car2PC-MAZ adapter to connect the sound to my Bose stereo. You can see a list of the components underneath my name at mp3car.com, see this link.
ok the retractable is great for me!
however my car was never equipped with a navi system on it. do i need to change the cd player? if yes with what?
however my car was never equipped with a navi system on it. do i need to change the cd player? if yes with what?
Registered User
Joined: Sep 2006
Posts: 24
Likes: 0
Ordered
I used the Car2PC-MAZ adapter to connect the sound to my Bose stereo.
One more question... does the retractable nav top piece plastic looks like the stock one? I mean the stock one is not completely plain, it has some texture.
Oh my! I was reading the installation instructions for the cnx-p2140 at http://www.carnetix.com/installation...anual_V1_2.pdf. This is all Greek to me!!!
Can you share information on how you did your wiring for the battery, ground and ignition? I've no idea where to start or find the right cables.
Please and thank you
Last edited by IsMao; Sep 29, 2007 at 11:38 PM.
Thread Starter
Registered User
Joined: Jun 2006
Posts: 135
Likes: 0
From: South Florida
The retractable nav does have texture but is operated manually it is not powered by a motor like the factory nav.
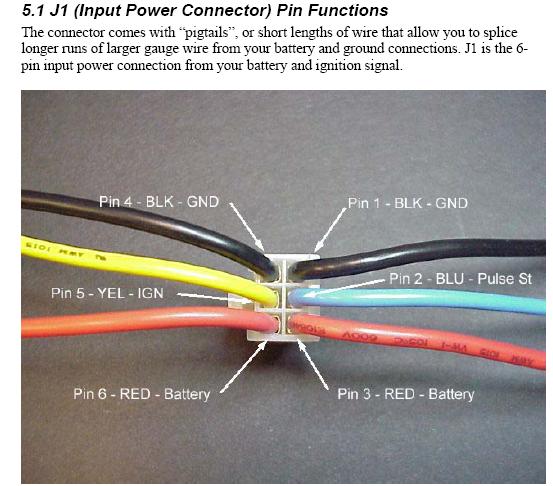
Okay now for the wiring diagram for the 2140 it does look a bit confusing but its not that bad you just have to take a littel time and study it. Keep in mind there are sevearl diagrams listed on the .pdf. Note the 2140 will only supply power to 2 devices some of the diagrams listed also include the P5v (a small dc-dc regulator, sold seperately) that is placed inside of the 2140. The P5v will power to a single device and is seen powering the 3rd device a usb hub in the diagrams.
First look at the input cable for the 2140
On the Right of picture you have 3 wires
4. Black (ground)
5. Yellow, (ignition)
6. Red (battery)
On the left you also have 3 wires
1. Black (ground),
2. Blue (pulse start)
3. Red Battery
Depending on what type of PC you will be using, one or both of the Red battery cables will be used this also applies the black cables (in my case I only used one of each)
You simply run a cable from the postitive terminal on your battery to the Red (battery) wire on the input. Then your ground to the Black (ground) cable on the input.
For the Yellow (ignition) run a wire from your front or rear cigarette lighter as these are switched on with the ignition when you turn the car on.
Blue (pulse start) is used if you want your PC to turn on when deactive the alarm using your remote. I'd recommend running a wire from one of your rear signal lights as they flash when the alarm is turned off providing the signal to turn on PC, that what I did.
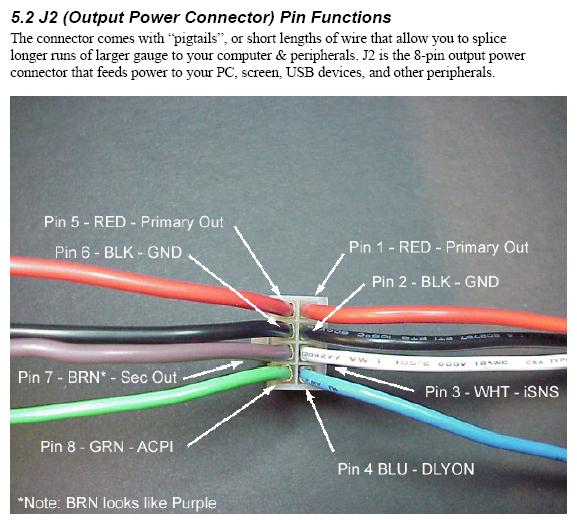
Now for the Output, in my case I followed figure 5.4 Aopen Panda Applications Diagram (Using AOPac power cable kit and P5V) as my setup was simular to that but did not use the power cable kit.

On the Right of picture you have 4 wires
5. Red (Primary Out)
6. Black, (Ground)
7. Brown/Purble (Secondary Out)
8. Green (APCI)
On the left you also have 4 wires
1. Red (Primary Out)
2. Black (Ground)
3. White(APCI)
4. Blue (Dlyon)
The mother board I used the Aopen i945 gtt has a barrel connector that plugs into the board to provide power. I purchased a barrel connector with a short length of cable the positive is connected to the one Red(primary out) on the output the negative connected one of the Black (ground) cables.
The same applied to to Monitor concerning the barrel connector the positive is connected to the Brown/Purple (secondary output) the negative to the other Black (ground) cable.
I'm also using the P5v inside of the 2140 to power a usb hub by simply attaching the positve and negative leads from the P5v to those on the usb hub.
The Green (APCI) is attached to positive side of the cable from your reset button on the PC. This will send the pulse to start the PC when your turn car on or deactive alarm.
The White (APCI -) is connected to the negative side of the cable from your reset button on PC.
The Blue (DYLON) can be used as the remote turn on for an amplifer but can be configured to delay start up between 0 and 60 seconds.
Hi nikos_g
I think you may be a bit confused there is no after market navigation that I know of that will work with the retractable nav screen holder. Its meant to be used if you install a PC in your car it simply houses your monitor. What I have is a GPS receiver and PC installed in my car which runs navigation software. I aslo have and mp3 library as well as movies that I play on the PC.
There are after market units you can install by Pioneer and Eclipse to name a few that can do navigaion amoung other things but do not work with the retracable nav screen holder.
Okay now for the wiring diagram for the 2140 it does look a bit confusing but its not that bad you just have to take a littel time and study it. Keep in mind there are sevearl diagrams listed on the .pdf. Note the 2140 will only supply power to 2 devices some of the diagrams listed also include the P5v (a small dc-dc regulator, sold seperately) that is placed inside of the 2140. The P5v will power to a single device and is seen powering the 3rd device a usb hub in the diagrams.
First look at the input cable for the 2140
On the Right of picture you have 3 wires
4. Black (ground)
5. Yellow, (ignition)
6. Red (battery)
On the left you also have 3 wires
1. Black (ground),
2. Blue (pulse start)
3. Red Battery
Depending on what type of PC you will be using, one or both of the Red battery cables will be used this also applies the black cables (in my case I only used one of each)
You simply run a cable from the postitive terminal on your battery to the Red (battery) wire on the input. Then your ground to the Black (ground) cable on the input.
For the Yellow (ignition) run a wire from your front or rear cigarette lighter as these are switched on with the ignition when you turn the car on.
Blue (pulse start) is used if you want your PC to turn on when deactive the alarm using your remote. I'd recommend running a wire from one of your rear signal lights as they flash when the alarm is turned off providing the signal to turn on PC, that what I did.
Now for the Output, in my case I followed figure 5.4 Aopen Panda Applications Diagram (Using AOPac power cable kit and P5V) as my setup was simular to that but did not use the power cable kit.
On the Right of picture you have 4 wires
5. Red (Primary Out)
6. Black, (Ground)
7. Brown/Purble (Secondary Out)
8. Green (APCI)
On the left you also have 4 wires
1. Red (Primary Out)
2. Black (Ground)
3. White(APCI)
4. Blue (Dlyon)
The mother board I used the Aopen i945 gtt has a barrel connector that plugs into the board to provide power. I purchased a barrel connector with a short length of cable the positive is connected to the one Red(primary out) on the output the negative connected one of the Black (ground) cables.
The same applied to to Monitor concerning the barrel connector the positive is connected to the Brown/Purple (secondary output) the negative to the other Black (ground) cable.
I'm also using the P5v inside of the 2140 to power a usb hub by simply attaching the positve and negative leads from the P5v to those on the usb hub.
The Green (APCI) is attached to positive side of the cable from your reset button on the PC. This will send the pulse to start the PC when your turn car on or deactive alarm.
The White (APCI -) is connected to the negative side of the cable from your reset button on PC.
The Blue (DYLON) can be used as the remote turn on for an amplifer but can be configured to delay start up between 0 and 60 seconds.
ok kimota thanks!
i think i just gona buy it until i find what navi player i will install. Any idea which brand to look for?
i wonder if it will coop with the buttons on the steering ....
i think i just gona buy it until i find what navi player i will install. Any idea which brand to look for?
i wonder if it will coop with the buttons on the steering ....
I think you may be a bit confused there is no after market navigation that I know of that will work with the retractable nav screen holder. Its meant to be used if you install a PC in your car it simply houses your monitor. What I have is a GPS receiver and PC installed in my car which runs navigation software. I aslo have and mp3 library as well as movies that I play on the PC.
There are after market units you can install by Pioneer and Eclipse to name a few that can do navigaion amoung other things but do not work with the retracable nav screen holder.
Registered User
Joined: Sep 2006
Posts: 24
Likes: 0
Thanks Kimota!
Hedge, from the mp3car forum, has also suggested an alternative way of doing the cnxp2140 power connection from the driver's side fuse box.
I will wait until the unit arrives and will start figuring what way will be easier for me to hook all this up. You may then hear from me again with more questions.
Thanks again!
Last edited by IsMao; Oct 1, 2007 at 02:52 PM.
Thread Starter
Registered User
Joined: Jun 2006
Posts: 135
Likes: 0
From: South Florida
Sorry forgot to mention that option, I was only thinking of my install I needed to go directly from the battery because I was also installed after market amps and ran 4 agw cable to a distribution block. But all the wiring methods I mentioned will still apply. If you are only doing a CarPC you can get both swithed and unswithed from the drives side fuse box. For pulse start the best place I found was still the rear signal light.
Good luck keep us posted.
Good luck keep us posted.

Registered
Joined: Apr 2006
Posts: 143
Likes: 0
From: Singapore
Kimota bro, let me list out what I intend to put in my car. Can you tell me do I need to get the extra P5V?
1) MP3car voice mic
2) 3.5G Router (always on even if I not in my car - will drain my first battery, that's why I putting a second battery for this)
3) IP web camera
Because 2 and 3 need to be on all the time, would getting the P5V matters? How else can I tap power to 2 and 3 from? Is it the cnx-p2140?
IsMao Bro, just wondering which country you are from. If we are near each other, we can co-operate on our project.
I am from Singapore.