05 RX-8 custom fab install (motorized flip-up screen)


Thread Starter
Registered
Joined: Sep 2005
Posts: 34
Likes: 0
From: Ottawa, Canada
I'd suggest just picking up non-motorized retractable dash piece:
http://www.mazdaparts.com/ProductDet...000-1159943707
or the navigation hood:
http://www.mazdaparts.com/ProductDet...000-1155120408
Cost wise if I were to charge myself by the hour for the time put in to fabricate, it would be more expensive than buying the real hood
")
Also, I started the project last year before the nav hood could be purchased from mazdaparts.com. Had I started the project after that, I may have considered just buying the hood. I tried to find a nav hood from salvage yards or on ebay, but I was never one of the lucky ones.

Thread Starter
Registered
Joined: Sep 2005
Posts: 34
Likes: 0
From: Ottawa, Canada

looks like im going to have to post some pics of my car up here.... i use the lower piece below the radio volume **** for my push button start and my computer switch instead of using where the dimmer switch is for the computer switch.... this is making me want to change it to there though and put something else there... and i definitely like the usb ports in the ashtray altough i find mine more hidden in the rear middle console where the cig lighter is, which i use for my screen power... nice job though! looks clean!

Registered
Joined: Apr 2007
Posts: 94
Likes: 0
From: WINTER HAVEN, FLORIDA
Very nice job indeed! As far as the dvd drive placement...i placed mine above the ashtray. You should be able to do the same...

Heres the thread i made about the mod i came up with...
https://www.rx8club.com/series-i-interior-audio-electronics-24/dvd-player-mounted-under-radio-sucess-121158/
Heres the thread i made about the mod i came up with...
https://www.rx8club.com/series-i-interior-audio-electronics-24/dvd-player-mounted-under-radio-sucess-121158/
Last edited by DDJFLW; Jul 20, 2007 at 11:50 PM.
Thread Starter
Registered
Joined: Sep 2005
Posts: 34
Likes: 0
From: Ottawa, Canada
I saw your thread DDJFLW, good stuff. The dvd placement looks nice there. You had to cut a lot of stuff in the dash to make it fit I see. I'll have to keep your idea as an option for sure.


Very freakin nice is a total understatement. I commend you on spending THAT much time on your setup. It really, honest to god, looks perfect. Could you give us a round about ballpark guesstimate of what it would cost Joe Random to do this? Any ballpark number would be better than nothing. And more importantly, you don't have any problems with vibrations on the HDD? I would think hitting a pothole would be equivalent to me throwing my computer off the roof. 
Last edited by firebirdude; Jul 23, 2007 at 03:27 PM.
Thread Starter
Registered
Joined: Sep 2005
Posts: 34
Likes: 0
From: Ottawa, Canada
Here's some rough estimates of prices in canadian dollars unless stated otherwise and without shipping.
In dash screen and ashtray
$120 2nd middle dash unit from local dealership
$250USD lilliput 7" LCD touchscreen
$12 five sheets of 12"x12"
$15 servo
$30 for paints
$30 for glue
$20 circuit board w/ PIC programmer
$5 PIC microchip
$40 2nd ash tray (used)
$25 7port usb hub
$100USD slim slot load dvd drive
$15USD slim dvd drive enclosure
PC:
$50 acrylic for case
$60 mobo
$200 CPU
$60 HD
$25 PCI wireless card
$75USD GPS
$20 usb bluetooth
$150USD DSATX power supply
And some more for cables and connectors (ie VGA, USB, power, ground, PCB board connectors, molex connectors, etc).
There's some rough estimates for the main things I can remember of... there's definitely some more costs involved.
All else you need is lots of time, tools, skills, and patients
Thread Starter
Registered
Joined: Sep 2005
Posts: 34
Likes: 0
From: Ottawa, Canada
So far everything is working well. Just got some software customizations and quirks to work on.
To hold the PC in the trunk I used the same method as mazda uses to hold the tire repair kit. It holds it in place very well.

Thread Starter
Registered
Joined: Sep 2005
Posts: 34
Likes: 0
From: Ottawa, Canada
It cost about $500 to create the in dashretractable screen incl the LCD.
Registered User
Joined: Aug 2002
Posts: 2,744
Likes: 1
Where would I go to learn how to make custom mounts like you have for your USB? I want to make mounts for other things that look something like that... much obliged if you can help me out and point me in the right direction!


Thread Starter
Registered
Joined: Sep 2005
Posts: 34
Likes: 0
From: Ottawa, Canada
- Cut the back of the ash tray (both the removable piece and the main piece) to have access through the back.
- Cut a piece of plastic the size of the removable tray opening. Make sure this fits very snug on all sides.
- Cut the necessary openings (in my case the usb, audio jack, and button) into the plastic.
- Create whatever mountings for your circuitry to fit in the back. For my USBs, I removed the USB cuircuit board and mounted it on a small thing piece of plexiglass made to fit in the back and hold the USB in place.
- Test fit everything
- Using whatever glue you feel is best (I used the same dynatron bumper repair glue), glue the top part of the plastic to the removable tray. Also glue from the back. I used a syringe filled with the same glue to get in from the back.
- Once the glue has set, sand the face till it's smooth. Then move on to paint.
- Finally mount your stuff from the back. Again I used the same glue and since I made a custom mount, everything fit nice and snug, and the glue holds it in place well.
- Once last thing I did was screwed the removable tray to the main ash tray so that it can't be removed when installed.
Thread Starter
Registered
Joined: Sep 2005
Posts: 34
Likes: 0
From: Ottawa, Canada
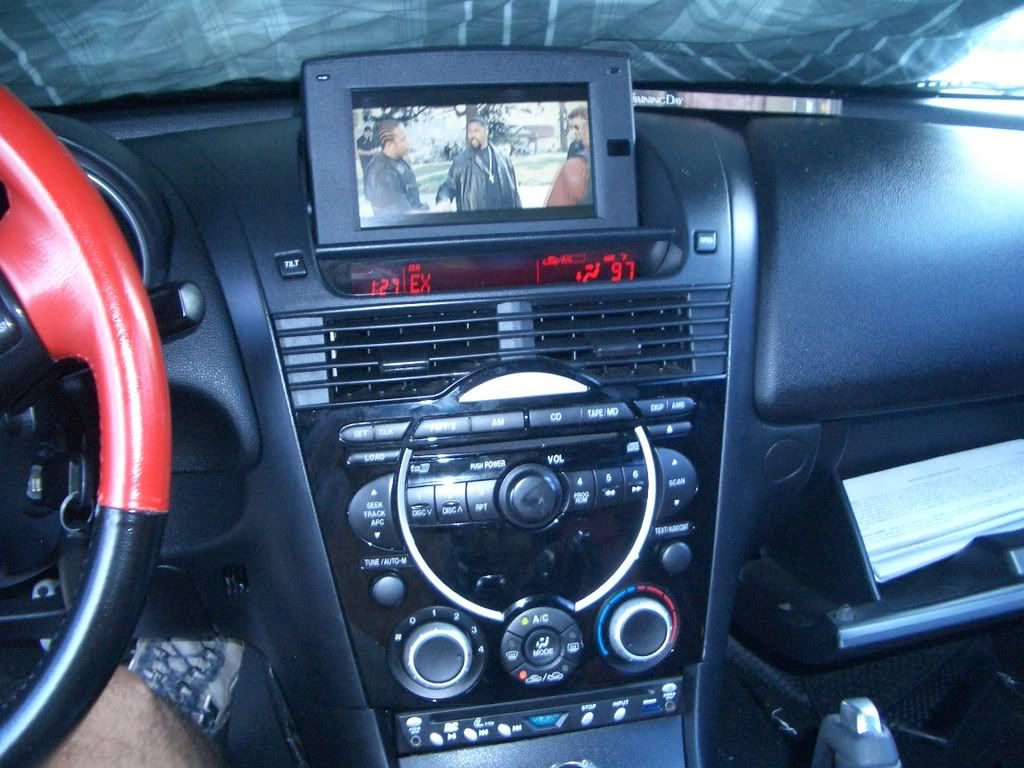
You can sort of see how the base has two different types of holes on either side for the pivot points. All the guts resides inside the LCD housing, and not the base. On the left side of the LCD housing I have a small servo, and on the right side I have a small rotary damper. The servo and the damper act as my pivot points and are screwed in place in the LCD housing, and their external mounts are screwed to the base.
The servo is connected to a circuit board controller. You can find several types of PIC development boards at most electronics stores.
I programmed a PIC micro chip to send the servo signals for positioning the screen to open and close slowly. A servo works by receiving a square wave signal anywhere from 0.7ms to 2.2ms (also depends on the type of servo), which translates into absolute position points. So by trial and error, I tested my program until I found the correct open and close positions. So when the screen is set to open, it will iterate over all the intermediate positions from close to open and do so over a couple seconds to give a smooth slow opening. When the screen is closed the board will send a signal to the LCD to turn off, and when it's open it'll send a signal to turn it on.
The board also takes an input from the button to toggle the current screen position from open to close and vise-versa.
If you want some more specifics on something just ask.


Thread Starter
Registered
Joined: Sep 2005
Posts: 34
Likes: 0
From: Ottawa, Canada
I used one of these utility blades to cut the top of the dash piece.

Registered User
Joined: Mar 2010
Posts: 46
Likes: 0
I posted this on the mp3car forum so I'll just re-post the info here but for pictures please visit the thread on the mp3car forum at:
http://www.mp3car.com/vbulletin/show...up-screen.html
--------------
I own a 2005 white RX-8 and I've been using my custom made carputer for a while now. I wanted to have a motorized touch screen but the OEM nav unit price could not be justified. I figured I could fabricate my own for less. So here are the details
Control board:
I programmed a PIC microchip to handle opening / closing the LCD screen when the car is turned on / off using a servo motor. I tapped into the touchscreen's button panel to control turning off the LCD panel when the screen is closed, and turning on the LCD panel when the screen is opened. The board is also hooked up to a button in the ashtray which can be used to open / close the screen once the car is started.
Plexiglass computer case:
Cut some plexiglass to form a box large enough to house the mobo, wireless card, HD, power supply, fans, and future low profile video card. Cut out the necessary holes for the mobo back plate, wires, fans, etc. Glued it together using a solvent meant for plexiglass. Mounted the mobo and powersupply on brass mounts. Installed the fans and HD. The top part of the case can be opened for servicing.
Motorized flip up touch screen in dash:
This part of the project took the longest. I bought a center dash piece from my local mazda dealership and carefully cut an opening on the top, saving the cut out piece to be re-used. Bought some abs plastic sheets and fabricated the base of the dash unit to mount the LCD unit into. I used the abs plastic and lilliput bezel to also fabricate the LCD screen unit. I re-used the cut out dash piece for the top of the LCD screen unit. Glued and smoothed everything together and then primed, sanded, spot puttied, and painted the units with SEM texture and trim black paint.
Modified ashtray:
After completing the dash piece the ashtray went quickly. I took apart a 7-port USB hub and fabricated a mounting plate using some very thin plexiglass. The mounting plate was necessary to mount the unit in the ashtray and keep the unit in place while withstanding the force of inserting external USB devices into the ports. The face of the ashtray unit was fabricated with abs plastic and holes were cut for the 4 usb ports, an audio input jack, and a button which is used to open and close the LCD screen. Once glued, I then primed, sanded, spot puttied, and painted using SEM texture and trim black paint again.
The unit has 4 ports on the front and 3 in the rear. The 3 rear ports are all being used for the car2pc unit, touchscreen usb, and the slot load dvd drive.
Basic carputer stats:
BioStar micro ATX mobo w/ Geforce 6100 and PCI-E
AMD Turion MT37
80gig WD low profile HD
BU-353 USB GPS receiver
Belkin usb bluetooth adapter
DSATX power supply
PCI wireless card
Lilliput 7" touchscreen
7 port USB hub in ashtray
slim slot load dvd-r cd-rw in glovebox
Mazda Car2PC adapter
Created my own wires w/ molex connectors for running power from the trunk to the front. All wires (USB, VGA, audio out, audio in, power), run from the computer in the trunk through the center console. The main 8awg wire from the battery runs through the wiring harness boot on the drivers side and along the door sills to the rear, and then into the trunk. I tapped into the 12v fused accessories line at the fusebox and ran a wire from it to a switch in one of the blanks and then back to the DSATX power supply acc in. This allows the computer to be turned on / off while the car accessories are on.
OMG, you are amazing, extremely professionally done.... could you please explain a bit more and guide me on smoothing, priming, sanding, spot putting and painting in details. such as the tools, equipments used and procedures..etc, thanks and appreciate your help as I would like to repair my OEM panel with bad scratches, thanks again.

New Member
Joined: Sep 2013
Posts: 3
Likes: 0
I know it has been years since you posted this, but could you explain how you did the PIC board and servo motor? (or links on what you used.)
I would just like to swap my screen, knowing that the current servo controller board is tied into the LCD control board, it renders the servo partly functional as there is no longer a video signal coming from the stock DVD/NAV. I did kind of already start :0(
I would just like to swap my screen, knowing that the current servo controller board is tied into the LCD control board, it renders the servo partly functional as there is no longer a video signal coming from the stock DVD/NAV. I did kind of already start :0(

Registered
Joined: Jun 2013
Posts: 11
Likes: 0
Brilliant! Awesome! Legend!
Awesome work! I'm also doing a car pc job.. But I'm about to hit the fu#% roof... Can anybody pleeeeeees tel me in plain english how to wire up the flip up screen to open/close without building pc-boards ect. All I want is to hook it up to my existing wiring in the car... And for the thing to open and close... I have a 2004 rx8, it did not have a sat nav.. So no wire loom to plug into.. The light thing I'll try and sort some other time.. So just a basic pinout will work... Thanks..
Last edited by WaCoNZ; May 6, 2014 at 04:07 AM.

Awesome work! I'm also doing a car pc job.. But I'm about to hit the fu#% roof... Can anybody pleeeeeees tel me in plain english how to wire up the flip up screen to open/close without building pc-boards ect. All I want is to hook it up to my existing wiring in the car... And for the thing to open and close... I have a 2004 rx8, it did not have a sat nav.. So no wire loom to plug into.. The light thing I'll try and sort some other time.. So just a basic pinout will work... Thanks..