How to install NEONS (undercar) : ZUMNRX8

 04-19-2009, 03:21 PM
#55
Registered User

Join Date: May 2008
Posts: 103
Likes: 0
Received 0 Likes
on
0 Posts
Hey guys. I really want these lights. But everyone I talk to is telling me that they will end up breaking. Is this really common with undercar lights? I don't want to waste all my money for nothing.

 04-19-2009, 04:36 PM
#58
RX8 & RX7 owner
Thread Starter


P.s. I can show you how to install a NO---> sticker.
Last edited by ZumnRx8; 04-19-2009 at 04:38 PM.
04-19-2009, 04:58 PM
#59

Mine havent broke yet and i driven with them in the rain. I dont know why people keep saying that they break easily, thats wrong information. They are protected by a super hard Flexible plastic tube with Bushings for Vibration. If you install them correctly you should not have any problems.
Its all about your install. Take your time and you'll do fine.
04-20-2009, 06:17 PM
#61
Registered User

Join Date: Mar 2009
Posts: 45
Likes: 0
Received 0 Likes
on
0 Posts
I went on ebay i saw that they range from 80 used to 100 new. I got mine for 85. The guy i got mine from bought them and never installed them, for some reason at the last second he didn't want neo blue any more so i got a great deal .If you look around properly you shoul dbe able to find some for a good price. Hope i helped
04-21-2009, 12:49 AM
#62
Registered User
Join Date: Mar 2009
Posts: 45
Likes: 0
Received 0 Likes
on
0 Posts
Just got my lights today. Its been raining here in NJ now for about 2 days so im waiting for the weather to get better. I also need to get all the tools and what nots to complete my project.
04-21-2009, 01:02 AM
#63
Registered User
Join Date: May 2008
Posts: 103
Likes: 0
Received 0 Likes
on
0 Posts
sweet man, take lots of pics, of the box too if you can, i wanna see what brand it is. cant wait to see pics of ur car after.
04-22-2009, 04:15 PM
#64
RX8 & RX7 owner
Thread Starter
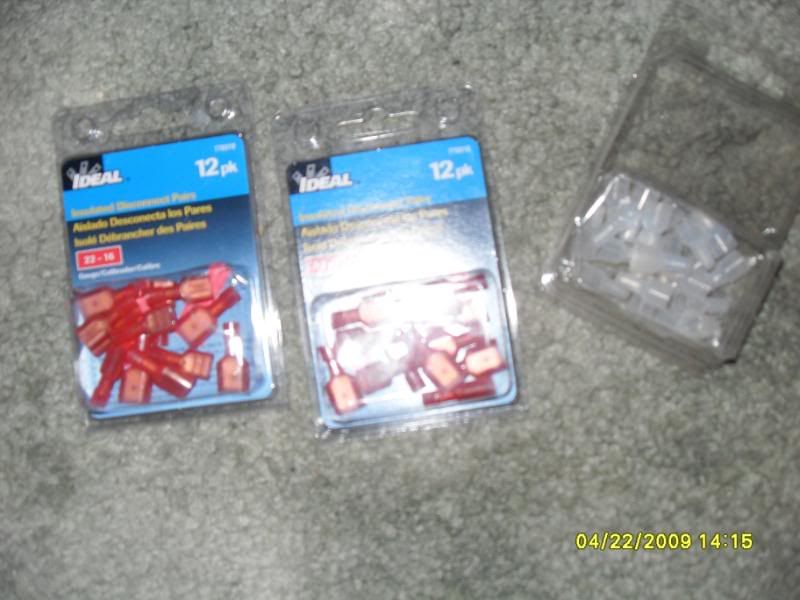
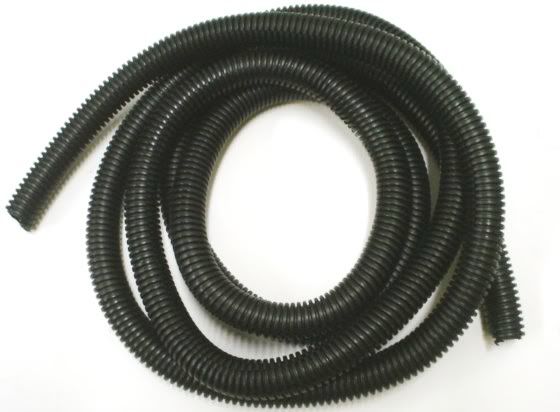 ]
]The ones to the left (red) are 22-16 GaugeInsulated Disconnect Pairs Which lets you join wires and u can also disconnect all the wires if you needed to. The ones on the right (white) are Insulated Crimp Sleeves, They are the ones that you join two wires together by twisting them and then insert them in the sleeve and u pliers to cramp them together and they stay like that. Make sure you buy black "FIRE RETARDANT" split loom or non split loom for the wires in your engine bay, the last thing you want is wires melting from the engine heat. There are two types of split loom available from AUTOZONE, Spectra and other generic kind either will do, please dont do color to match your car it'll look tacky, just get flat black so it will blend with your engine bay and keep it looking stock. I ran my wires the same way as the PCM wires or other existing wires (black split loom) so it will look stock and zip tied them together using black zip ties, If I was to pop my hood, you would not be able to telll that i ran extra wires for neon lights. The only thing you can see is my Transformer where all the neons connect to. Im still looking online because they sell boxes something related to like the cover/box for our fuses and/or computer in our engine bay. I want a box to protect my transformer.
All of this is cheap to buy and is to prevent fire, water getting to the wires/ or to just make it look proffessional You get me? sorry i didnt respond to your text right away, sometimes my daughter barely lets me do anything. Ill take a pic of my engine bay tomorrow and show you what i mean with my black split loom, and making the engine bay look stock.
Last edited by ZumnRx8; 04-22-2009 at 04:41 PM.
 05-19-2009, 01:24 PM
#66
Registered User

Join Date: Apr 2009
Posts: 5
Likes: 0
Received 0 Likes
on
0 Posts
(still being worked on) full picture description of how to install neons. This is my installation with streetglows optx undercar neon.

this is all the tools you are gonna need
-engine cover (helps you from losing stuff when flipped upside down, use as a tray)
-screwdriver
-wirecutters
-small flat head screwdriver
-zip ties
-scissors
-jack (if you have a lift you can probably finish in 30 min)
-installation instructions
-insulated crimp sleeves (from lowes)
-1/8 titanium drill bit for metal (about $3.00 from true value hardware store)
-marker

okay first you are going to want to complete the circuit (like the picture guide in the installation manual) to individually test each neon. I did mine all right over my engine and only took about 4 minutes. You can see my switch near my hood hatch. Heres a pic.

once you have tested that each neon is working properly its time to mount the neons. This is the easiest part. When you mount the neons make sure that you are placing the clamp where the neons says "clamp here" there are bushins in the tube for vibration!. remember there are 4 clamps for each 42" tube and 3 for each 32" tube. Heres a pic
the following pictures show you where under my car i mounted my side neons. Look where i started from. You can see three little bump things.


hold the neon in place the with first clamp and mark for the hole. Use the 1/8 drill bit to drill the hole. They provide you with self-tap screws but they dont work too well so the drill bit will speed things up. Once you drilled the hole put the neon in place with the clamp and put the screw in. Your neon should be partially hanging/on at this point. this gives you an opportunity to put the other clamps in place and mark for their holes. make sure you are keeping ur neon parrallel from when you started your first clamp! once you marked the holes take the first clamp and neon off and drill the rest of the holes. remember you should only drill for 4 holes on the side 42" neons!! Not 5! Or you will have an extra hole and no clamp for it. once you drilled the holes you can now put your neon in place. It should look like this from underneath and the side.


once you have successfully mounted the first side, go ahead and do the same for the other side. Now you are ready to mount the front. Heres a pic of where i mounted my front neon.


the neon should fit perfectly in place. Drill and place the same as the sides.
Take note that i have not installed my rear neon yet because the heat of the exhaust will melt it. However the exhaust heat shield that protects your bumper will need to be bent closer to your muffler to be able to place the neon. I will post pictures of the rear installation when i install it. now to run the wires.i ran side neon wires to the front and behind the fender liners. I had to drill a hole to be able to run the cable up to the engine bay. Heres a pic.

this is all the tools you are gonna need
-engine cover (helps you from losing stuff when flipped upside down, use as a tray)
-screwdriver
-wirecutters
-small flat head screwdriver
-zip ties
-scissors
-jack (if you have a lift you can probably finish in 30 min)
-installation instructions
-insulated crimp sleeves (from lowes)
-1/8 titanium drill bit for metal (about $3.00 from true value hardware store)
-marker
okay first you are going to want to complete the circuit (like the picture guide in the installation manual) to individually test each neon. I did mine all right over my engine and only took about 4 minutes. You can see my switch near my hood hatch. Heres a pic.
once you have tested that each neon is working properly its time to mount the neons. This is the easiest part. When you mount the neons make sure that you are placing the clamp where the neons says "clamp here" there are bushins in the tube for vibration!. remember there are 4 clamps for each 42" tube and 3 for each 32" tube. Heres a pic
the following pictures show you where under my car i mounted my side neons. Look where i started from. You can see three little bump things.
hold the neon in place the with first clamp and mark for the hole. Use the 1/8 drill bit to drill the hole. They provide you with self-tap screws but they dont work too well so the drill bit will speed things up. Once you drilled the hole put the neon in place with the clamp and put the screw in. Your neon should be partially hanging/on at this point. this gives you an opportunity to put the other clamps in place and mark for their holes. make sure you are keeping ur neon parrallel from when you started your first clamp! once you marked the holes take the first clamp and neon off and drill the rest of the holes. remember you should only drill for 4 holes on the side 42" neons!! Not 5! Or you will have an extra hole and no clamp for it. once you drilled the holes you can now put your neon in place. It should look like this from underneath and the side.
once you have successfully mounted the first side, go ahead and do the same for the other side. Now you are ready to mount the front. Heres a pic of where i mounted my front neon.
the neon should fit perfectly in place. Drill and place the same as the sides.
Take note that i have not installed my rear neon yet because the heat of the exhaust will melt it. However the exhaust heat shield that protects your bumper will need to be bent closer to your muffler to be able to place the neon. I will post pictures of the rear installation when i install it. now to run the wires.i ran side neon wires to the front and behind the fender liners. I had to drill a hole to be able to run the cable up to the engine bay. Heres a pic.
why!

 05-19-2009, 03:18 PM
#74
RX8 & RX7 owner
Thread Starter
05-19-2009, 05:06 PM
#75
OMGITM!
iTrader: (15)

Join Date: Jan 2006
Location: Sunny Southern California
Posts: 3,513
Likes: 0
Received 6 Likes
on
6 Posts
search username alexisthemovie
He had someone sending him hate messages here as well as myspace attacking his personal life and making unjustified and blatantly false statements. Now that **** was stalker status!
Sorry for off topic...
He had someone sending him hate messages here as well as myspace attacking his personal life and making unjustified and blatantly false statements. Now that **** was stalker status!
Sorry for off topic...