
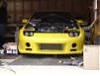
DIY Request: Front Bumper Detail.


Thread Starter
Pew Pew
Joined: Apr 2008
Posts: 74
Likes: 0
From: New Hope MN,
DIY Request: Front Bumper Detail.
Looking to see if anyone has or knows of any good DIY guides for detailing my front bumper i want to get rid of the rock chips and such. Any links would be greatly appreciated. Thanks!

Certified Mazda Tech
Joined: May 2003
Posts: 645
Likes: 12
From: Wayne, NJ
here's all I can provide (this is like the ultra basics and simply some instructions)
FRONT BUMPER DISASSEMBLY/ASSEMBLY
1. To disassemble the front bumper, remove the following parts:
_a. Front fog lights (Vehicles with the front fog lights)
_b. Headlight cleaner hose (Vehicles with the headlight cleaner)
_c. Headlight cleaner nozzles (Vehicles with the headlight cleaner)
_d. Headlight cleaner actuator (Vehicles with the headlight cleaner)
2. Disassemble in the order indicated in the table.
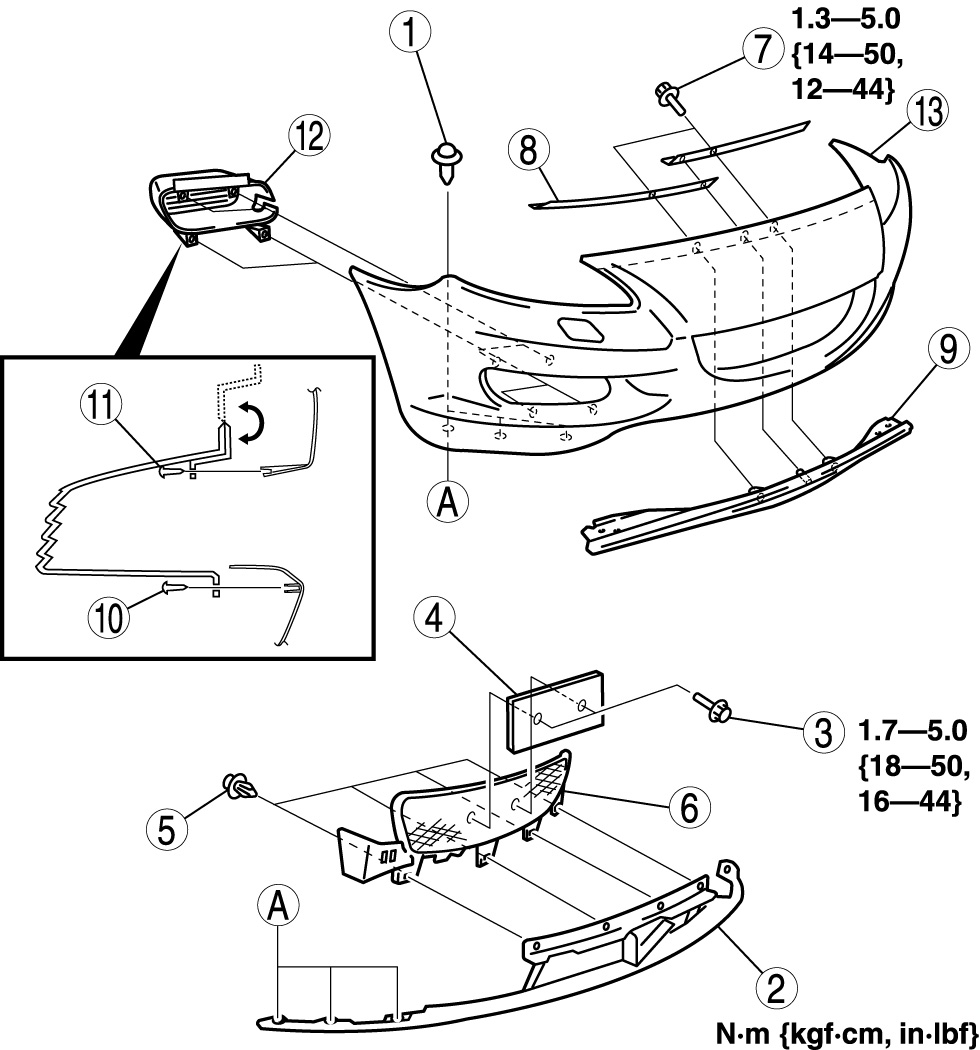
(see attached)
1-Screw A
2-Airdam skirt
3-Bolt A
4-License plate holder
5-Fastener
6-Front bumper mesh
7-Bolt B
8-Set plate
9-Front bumper retainer No.1
10-Screw B
11-Screw C
12-Front fog light hole cover
13-Front bumper fascia
Preparation Instructions for PolyPropylene Bumpers (PP)

(see other attachment)
kevin.
FRONT BUMPER DISASSEMBLY/ASSEMBLY
1. To disassemble the front bumper, remove the following parts:
_a. Front fog lights (Vehicles with the front fog lights)
_b. Headlight cleaner hose (Vehicles with the headlight cleaner)
_c. Headlight cleaner nozzles (Vehicles with the headlight cleaner)
_d. Headlight cleaner actuator (Vehicles with the headlight cleaner)
2. Disassemble in the order indicated in the table.
(see attached)
1-Screw A
2-Airdam skirt
3-Bolt A
4-License plate holder
5-Fastener
6-Front bumper mesh
7-Bolt B
8-Set plate
9-Front bumper retainer No.1
10-Screw B
11-Screw C
12-Front fog light hole cover
13-Front bumper fascia
Preparation Instructions for PolyPropylene Bumpers (PP)
(see other attachment)
kevin.

Registered User
Joined: Mar 2009
Posts: 23
Likes: 0
From: Owensboro, KY
I worked on my front bumper yesterday with the front of the 8 up on ramps. I had a big bunch of chips and dents that were mostly a lot smaller than a pin head and a few that were a little bigger down low on the bumper. They were very noticeable when you were close to the car.
I'd seen this suggested someplace on the web a couple of months ago. A woman suggested using a small paint filled syringe and needle with a little touch up paint in it to fill scratches. She claimed it was ideal...you got paint into the scratch and no place else.
Ex-wife #2 was a nurse. Once in awhile she'd forget to empty her pockets after a shift and I collected several disposable syringes of various sizes and a variety of needles from her. Anyway, I tried the using a 2.5 cc syringe with a quarter cc of titanium gray paint in it. The disposable one inch needle was probably a 22 or 24 gauge needle and I filed off the sharp point.
I was surprised how well it worked after I found that I shouldn't press on the plunger and get a big drop on the end of the needle. When I put the tip of the needle into a tiny chip the paint would flow into it. It didn't fill the chip, but it coated it making it almost invisible...even with my nose 2 feet from the bumper. After 2 or 3 chips, I'd have to tap with a finger on the plunger to get the paint to flow again.
This really worked well and I'm very pleased with the result. I cleaned the needle and syringe by sucking some acetone into the syringe.
It would likely work better for scratches with a 1 cc syringe and 27 gauge needle that drug stores sell to diabetics.
Registered User
Joined: Mar 2009
Posts: 23
Likes: 0
From: Owensboro, KY
I worked on my front bumper yesterday with the front of the 8 up on ramps. I had a big bunch of chips that were mostly a lot smaller than a pin head and a few that were a little bigger down low on the bumper. They were very noticeable when you were close to the car.
I'd seen this suggested someplace on the web a couple of months ago. A woman suggested using a small paint filled syringe and needle with a little touch up paint in it to fill scratches. She claimed it was ideal...you got paint into the scratch and no place else.
Ex-wife #2 was a nurse. Once in awhile she'd forget to empty her pockets after a shift and I collected several disposable syringes of various sizes and a variety of needles from her. Anyway, I tried using a 2.5 cc syringe with a quarter cc of titanium gray paint in it. The disposable one inch needle was probably a 22 or 24 gauge needle and I filed off the sharp point.
I was surprised how well it worked after I found that I shouldn't press on the plunger and get a big drop on the end of the needle. When I put the tip of the needle into a tiny chip the paint would flow into it. It didn't fill the chip, but it coated it making it almost invisible...even with my nose 2 feet from the bumper. After 2 or 3 chips, I'd have to tap with a finger on the plunger to get the paint to flow again.
This really worked well and I'm very pleased with the result. I cleaned the needle and syringe by sucking some acetone into the syringe.
It would likely work better for scratches with a 1 cc syringe and 27 gauge needle that drug stores sell to diabetics.
Certified Mazda Tech
Joined: May 2003
Posts: 645
Likes: 12
From: Wayne, NJ
I worked on my front bumper yesterday with the front of the 8 up on ramps. I had a big bunch of chips and dents that were mostly a lot smaller than a pin head and a few that were a little bigger down low on the bumper. They were very noticeable when you were close to the car.
I'd seen this suggested someplace on the web a couple of months ago. A woman suggested using a small paint filled syringe and needle with a little touch up paint in it to fill scratches. She claimed it was ideal...you got paint into the scratch and no place else.
Ex-wife #2 was a nurse. Once in awhile she'd forget to empty her pockets after a shift and I collected several disposable syringes of various sizes and a variety of needles from her. Anyway, I tried the using a 2.5 cc syringe with a quarter cc of titanium gray paint in it. The disposable one inch needle was probably a 22 or 24 gauge needle and I filed off the sharp point.
I was surprised how well it worked after I found that I shouldn't press on the plunger and get a big drop on the end of the needle. When I put the tip of the needle into a tiny chip the paint would flow into it. It didn't fill the chip, but it coated it making it almost invisible...even with my nose 2 feet from the bumper. After 2 or 3 chips, I'd have to tap with a finger on the plunger to get the paint to flow again.
This really worked well and I'm very pleased with the result. I cleaned the needle and syringe by sucking some acetone into the syringe.
It would likely work better for scratches with a 1 cc syringe and 27 gauge needle that drug stores sell to diabetics.
I'd seen this suggested someplace on the web a couple of months ago. A woman suggested using a small paint filled syringe and needle with a little touch up paint in it to fill scratches. She claimed it was ideal...you got paint into the scratch and no place else.
Ex-wife #2 was a nurse. Once in awhile she'd forget to empty her pockets after a shift and I collected several disposable syringes of various sizes and a variety of needles from her. Anyway, I tried the using a 2.5 cc syringe with a quarter cc of titanium gray paint in it. The disposable one inch needle was probably a 22 or 24 gauge needle and I filed off the sharp point.
I was surprised how well it worked after I found that I shouldn't press on the plunger and get a big drop on the end of the needle. When I put the tip of the needle into a tiny chip the paint would flow into it. It didn't fill the chip, but it coated it making it almost invisible...even with my nose 2 feet from the bumper. After 2 or 3 chips, I'd have to tap with a finger on the plunger to get the paint to flow again.
This really worked well and I'm very pleased with the result. I cleaned the needle and syringe by sucking some acetone into the syringe.
It would likely work better for scratches with a 1 cc syringe and 27 gauge needle that drug stores sell to diabetics.
kevin.

I usually use toothpick to fill tiny chips or scratches(with touch up paint), this process takes painfully long cuz you will need at least 2-3 layers of paint.
Apply 1 layer ... let it dry ... apply another layer ... let it dry ... until its even or "above" the paint around it.
then I'll use some Ultra fine sandpaper (like 2500+) Plus Water to "smooth" it out. after that just wax it.
Takes time, but saves ya money.
Apply 1 layer ... let it dry ... apply another layer ... let it dry ... until its even or "above" the paint around it.
then I'll use some Ultra fine sandpaper (like 2500+) Plus Water to "smooth" it out. after that just wax it.
Takes time, but saves ya money.
Last edited by nycgps; Apr 9, 2009 at 11:59 AM.
Registered User
Joined: Mar 2009
Posts: 23
Likes: 0
From: Owensboro, KY
I usually use toothpick to fill tiny chips or scratches(with touch up paint), this process takes painfully long cuz you will need at least 2-3 layers of paint.
Apply 1 layer ... let it dry ... apply another layer ... let it dry ... until its even or "above" the paint around it.
then I'll use some Ultra fine sandpaper (like 2500+) Plus Water to "smooth" it out. after that just wax it.
Takes time, but saves ya money.
Apply 1 layer ... let it dry ... apply another layer ... let it dry ... until its even or "above" the paint around it.
then I'll use some Ultra fine sandpaper (like 2500+) Plus Water to "smooth" it out. after that just wax it.
Takes time, but saves ya money.
Using a syringe was a much, much easier and quicker cosmetic fix.


Registered
Joined: Feb 2005
Posts: 185
Likes: 0
From: SoCal
I have heard good things about Dr. ColorChip product. http://drcolorchip.com/
(no affiliation). I am planning to use it on my other car this summer. I'll post results when I am finished.
As for my 8, best money I spent on the car was a clear bra. Did it right after delivery and 40K miles and 4 years later not a chip on it. I would highly recommend it to anyone with a new or nearly new car that they want to protect. I did the bumper, lights, mirrors, and about the 4 leading inches on the roof.
Registered User
Joined: Mar 2009
Posts: 23
Likes: 0
From: Owensboro, KY
Bring cold Campechanas...preferably from the restaurant in the little Mexican mall near the Alamo. I'm dying for one.
I'll supply the tequila.
-Bill
Certified Mazda Tech
Joined: May 2003
Posts: 645
Likes: 12
From: Wayne, NJ
I have heard good things about Dr. ColorChip product. http://drcolorchip.com/
(no affiliation). I am planning to use it on my other car this summer. I'll post results when I am finished.
As for my 8, best money I spent on the car was a clear bra. Did it right after delivery and 40K miles and 4 years later not a chip on it. I would highly recommend it to anyone with a new or nearly new car that they want to protect. I did the bumper, lights, mirrors, and about the 4 leading inches on the roof.
(no affiliation). I am planning to use it on my other car this summer. I'll post results when I am finished.
As for my 8, best money I spent on the car was a clear bra. Did it right after delivery and 40K miles and 4 years later not a chip on it. I would highly recommend it to anyone with a new or nearly new car that they want to protect. I did the bumper, lights, mirrors, and about the 4 leading inches on the roof.
kevin.

Redlined Rotary = Sex
Joined: Sep 2008
Posts: 55
Likes: 0
I have heard good things about Dr. ColorChip product. http://drcolorchip.com/
(no affiliation). I am planning to use it on my other car this summer. I'll post results when I am finished.
As for my 8, best money I spent on the car was a clear bra. Did it right after delivery and 40K miles and 4 years later not a chip on it. I would highly recommend it to anyone with a new or nearly new car that they want to protect. I did the bumper, lights, mirrors, and about the 4 leading inches on the roof.
(no affiliation). I am planning to use it on my other car this summer. I'll post results when I am finished.
As for my 8, best money I spent on the car was a clear bra. Did it right after delivery and 40K miles and 4 years later not a chip on it. I would highly recommend it to anyone with a new or nearly new car that they want to protect. I did the bumper, lights, mirrors, and about the 4 leading inches on the roof.

Thread
Thread Starter
Forum
Replies
Last Post
projectr13b
Series I Do It Yourself Forum
1
Sep 6, 2015 01:04 PM