Custom RX8 Front Splitter


Thread Starter
Registered User
Joined: Mar 2006
Posts: 45
Likes: 1
From: Orange County
Custom RX8 Front Splitter
First of all, I really want to thank everyone on this forum for posts, opinions, and never ending supply of technical info and research. This forum has made my life sooo much easier in so many ways when it comes to fitments and general product knowledge, now I want to add a bit of my own.
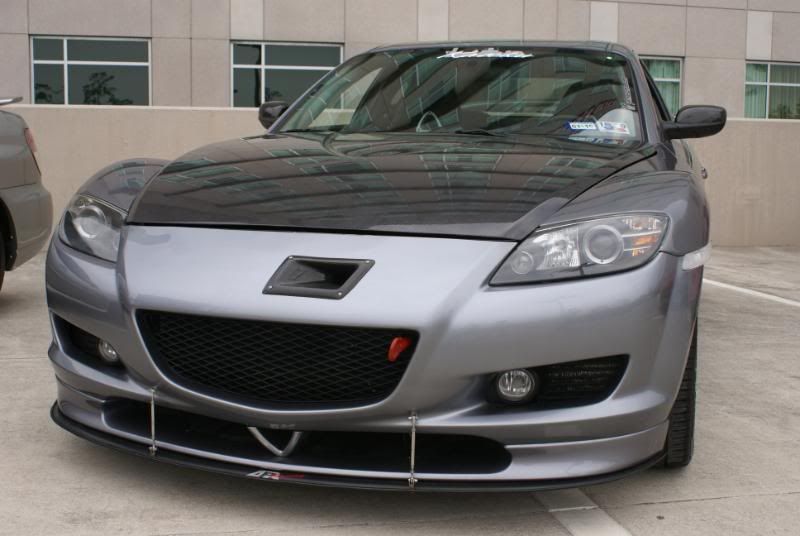
I made this splitter last weekend mostly for aesthetics, but it is also fully functional and adjustable. I removed the lower front lip (the air dam I believe) with the rotary accent in the center. I was getting tired of the triangles EVERYWHERE on this car, and the front end needed a bit of a pick me up.
It is made out of �” ABS plastic, textured on one side and smooth on the other side. I tested a few materials including PVC sheets type 1 & 2 and plexi, and the ABS was the most flexible, and resistant to cracking and chipping. The turnbuckles are marine grade stainless steel, very nice. They are off the car right now and out for flat black powder coating as i’m not crazy about the way the turnbuckles stand out so much.
I am REALLY pleased with the outcome, the front end is much more aggressive now and the clearance is actually better than before.
I will post a DIY on this in the days to come, it was pretty simple to do. For now, here are some pics. Let me know what you think!
Thanks again guys, keep up the good work!


Like I promised, here is my splitter DIY:
First, remove the front fascia, then unscrew the piece of the air dam that comes off with the fascia. I traced out the shape of the original air dam (just the front lip section, which is easily removed once the fascia is off, the lower air diversion plates are still used in the installation) onto a few pieces of foam core or a large sheet of paper. Then draw out the shape that you want the splitter to be. This part took the most time as you want to get the shape just right or it will look like $#it.


Then cut it out and test fit it on the fascia using tape or screws to hold it in place. At this point, you can put it on the car to get an idea of what it will look like.

Trace the shape onto a sheet of ABS plastic and cut it out using a jigsaw. Use a coarse tip blade for this because the plastic has a tendency to heat up and ‘re-weld’ itself together after the cut when a fine bit is used.
Use an orbital or belt sander to smooth out the edges and shape it into a nice smooth curve, then I used a router on the edges. Cut and adhered the mounting plates (on the outside edges) for support at the mounting point. I used an acidic compound to melt the two pieces together which is much stronger than using glue. Then sand the top of the piece down with a coarse grit sandpaper to dull the mirror finish of the ABS sheet.


Then paint it or have it painted. I used flat black fusion spray paint. It bonds with plastics, and is wet sandable. I did about 6 coats, and 2-3 coats of matte clear coat for protection. Then I let it dry overnight.
Clamp the splitter in place on the fascia, and drill out the holes for the bolts and nuts to hold the splitter in place. See pic for my suggested mounting points. I used black anodized bolts and nuts for this application. There are two bolts on each side that hold it firmly.


The rotary symbol on the stock air dam works as a support for the center, and the splitter will require this as well. I fabricated two support brackets out of some scrap aluminum that I had in the garage. These brackets connect to the two mounting points that the OE air dam is connected to (the two center screws of the ten that hold the air dam in place).


Then connect the turnbuckles where they look best, but still close enough to the center to be effective. I used anodized allan screws and rubber washers to connect the turnbuckles. Don’t tighten everything up just yet, wait until it is on the car to do that.
Mount the fascia (after removing the Vfad!) and connected the two aluminum bracket braces utilizing the factory holes in the lower air dam. Don’t forget to re-connect your fog lights now if you have them.
Finish putting all the screws and plastic fasteners back in, adjust the height of your splitter, and you’re done


Note: The turnbuckles are at the shop getting a black powder coat, and I’ve been driving the car without them with no noise or vibration issues, so they are not necessary for the splitter. If you plan on using the vehicle on the track or at very high speeds though, it is a good idea to have the adjustability and extra support in the front.
I hope this was helpful!
I made this splitter last weekend mostly for aesthetics, but it is also fully functional and adjustable. I removed the lower front lip (the air dam I believe) with the rotary accent in the center. I was getting tired of the triangles EVERYWHERE on this car, and the front end needed a bit of a pick me up.
It is made out of �” ABS plastic, textured on one side and smooth on the other side. I tested a few materials including PVC sheets type 1 & 2 and plexi, and the ABS was the most flexible, and resistant to cracking and chipping. The turnbuckles are marine grade stainless steel, very nice. They are off the car right now and out for flat black powder coating as i’m not crazy about the way the turnbuckles stand out so much.
I am REALLY pleased with the outcome, the front end is much more aggressive now and the clearance is actually better than before.
I will post a DIY on this in the days to come, it was pretty simple to do. For now, here are some pics. Let me know what you think!
Thanks again guys, keep up the good work!
Like I promised, here is my splitter DIY:
First, remove the front fascia, then unscrew the piece of the air dam that comes off with the fascia. I traced out the shape of the original air dam (just the front lip section, which is easily removed once the fascia is off, the lower air diversion plates are still used in the installation) onto a few pieces of foam core or a large sheet of paper. Then draw out the shape that you want the splitter to be. This part took the most time as you want to get the shape just right or it will look like $#it.
Then cut it out and test fit it on the fascia using tape or screws to hold it in place. At this point, you can put it on the car to get an idea of what it will look like.
Trace the shape onto a sheet of ABS plastic and cut it out using a jigsaw. Use a coarse tip blade for this because the plastic has a tendency to heat up and ‘re-weld’ itself together after the cut when a fine bit is used.
Use an orbital or belt sander to smooth out the edges and shape it into a nice smooth curve, then I used a router on the edges. Cut and adhered the mounting plates (on the outside edges) for support at the mounting point. I used an acidic compound to melt the two pieces together which is much stronger than using glue. Then sand the top of the piece down with a coarse grit sandpaper to dull the mirror finish of the ABS sheet.
Then paint it or have it painted. I used flat black fusion spray paint. It bonds with plastics, and is wet sandable. I did about 6 coats, and 2-3 coats of matte clear coat for protection. Then I let it dry overnight.
Clamp the splitter in place on the fascia, and drill out the holes for the bolts and nuts to hold the splitter in place. See pic for my suggested mounting points. I used black anodized bolts and nuts for this application. There are two bolts on each side that hold it firmly.
The rotary symbol on the stock air dam works as a support for the center, and the splitter will require this as well. I fabricated two support brackets out of some scrap aluminum that I had in the garage. These brackets connect to the two mounting points that the OE air dam is connected to (the two center screws of the ten that hold the air dam in place).
Then connect the turnbuckles where they look best, but still close enough to the center to be effective. I used anodized allan screws and rubber washers to connect the turnbuckles. Don’t tighten everything up just yet, wait until it is on the car to do that.
Mount the fascia (after removing the Vfad!) and connected the two aluminum bracket braces utilizing the factory holes in the lower air dam. Don’t forget to re-connect your fog lights now if you have them.
Finish putting all the screws and plastic fasteners back in, adjust the height of your splitter, and you’re done
Note: The turnbuckles are at the shop getting a black powder coat, and I’ve been driving the car without them with no noise or vibration issues, so they are not necessary for the splitter. If you plan on using the vehicle on the track or at very high speeds though, it is a good idea to have the adjustability and extra support in the front.
I hope this was helpful!
Last edited by jammiman; Oct 2, 2009 at 12:28 AM. Reason: updated info
Thread Starter
Registered User
Joined: Mar 2006
Posts: 45
Likes: 1
From: Orange County
I took the front bumper off on saturday morning and put the completed piece back on on sunday morning. I let the paint dry overnight. The turnbuckles cost about $30, and the sheet of ABS was $150, but I have enough material left to make a few more. Other than that, I used a few sheets of foam core and some flat black spraypaint. I'll work on the DIY and pics tonight. Glad you like it!

Thread Starter
Registered User
Joined: Mar 2006
Posts: 45
Likes: 1
From: Orange County
I have enough material to make a few more, minus the turnbuckles, I had to order those from a boat store in VT. I can make you one if you want, but it will probably cost about $200ish
Thread Starter
Registered User
Joined: Mar 2006
Posts: 45
Likes: 1
From: Orange County
the wheels are stock size, 18" x 8", but I have some serious hub-centric spacers on there, 25mm all around. No rubbing, not even rolled. The suspension is Tein Basic. I would have gone with just springs, but I have audio equipment in the trunk that comes out on track days, so I needed the adjustability.

Registered User
Joined: Jan 2009
Posts: 553
Likes: 0
From: laguna hills, CA
oh i didnt notice u lived in oc. thats tight. hmmm 200 i might be way intersted if i say it up close. where in oc u at?


whines all the way home
iTrader: (2)
Joined: Oct 2004
Posts: 7,402
Likes: 2
From: Towson/Baltimore, MD
Im curious about how you arrived at the design,,,
I designed and built one , as far as I can tell, exactly like it, two years ago and put it on this past summer,,,,
I designed mine off the lines of my Burnout chin spoiler...


I designed and built one , as far as I can tell, exactly like it, two years ago and put it on this past summer,,,,
I designed mine off the lines of my Burnout chin spoiler...
Thread Starter
Registered User
Joined: Mar 2006
Posts: 45
Likes: 1
From: Orange County
Yes, Rotr, I am familiar with your stuff, and you are a mod god (I love the side ducts you made too), there is no question. There really isn't too much else that you can do with a splitter though, it either has fangs or its in a strait line. I just followed the lines of the car like you did. Did you ever complete that one? It looks good.
whines all the way home
iTrader: (2)
Joined: Oct 2004
Posts: 7,402
Likes: 2
From: Towson/Baltimore, MD
Its complete, Iwas just curious how you attatched yours, thats all,,, I wasnt trying to make anything of it,,,
Hell Id even give people my .dxf if they wanted to make thier own,,, but not too many people have access to a waterjet,,,
Hell Id even give people my .dxf if they wanted to make thier own,,, but not too many people have access to a waterjet,,,
Thread Starter
Registered User
Joined: Mar 2006
Posts: 45
Likes: 1
From: Orange County
I'll post the diy tonight. It attaches with six bolts, two brackets (in back) and two turnbuckles in front. I want to eventually make two small (1-2 inch tall) wings on the sides to continue the lines up to the wheel well, but I don't have your skill/knowledge with wet materials, so it will have to wait. I love to draw this stuff, but creating it is a lot harder than most people think 
I was also looking into getting carbon fiber cloth and resin, but that may be taking it a step too far...
I was also looking into getting carbon fiber cloth and resin, but that may be taking it a step too far...
Registered User
Joined: Jan 2009
Posts: 553
Likes: 0
From: laguna hills, CA
that looks really good with the splitter. jamm. idk if id be able to meet up tonight. i gotta drive to anaheim after work. how long would it take to make? im still considering. i just have to pay my vw paint guy.
Registered User
Joined: Jan 2009
Posts: 553
Likes: 0
From: laguna hills, CA
its cool i called u back. atm im looking to get get a front end actually either ms or ings so idk if this will work out if do get it.
u should still sell em hey mights be able to make back the money u spent
u should still sell em hey mights be able to make back the money u spent