Black Out Lights, and how I did mine
 06-29-2008, 10:28 PM
#1
Registered
Thread Starter
Black Out Lights, and how I did mine
So I am always seeing posts and threads about how complicated this "smoking out" the tail lights is... something to do with pre-heating your oven and nobody having enough eggs to actually cook their tail lights... Especially when it comes to putting them back together.
I avoided that whole recipe at first and just went to Lamin-X.com and picked up the pre-cut birthday cakes.... (since I already starting about baking)
Those turned out ok, but soon after they started peeling up and well that just was not smooth-
So finally after several months to almost a whole year of having peeled up tail lights I went to my local art store and picked up a few things- Here is the pics of my new tail lights, with cooking instructions-

This is the start, as you can see I started one, but well this is still good enough to go...

http://a726.ac-images.myspacecdn.com...7e296281e5.jpg
This is the stuff I used to spray the lights. and also to sand them-

After the wet sand, about to be sprayed... I guess this could be the mixing part?

This after the first coat, and also my sweet paint gun... Haha.. just an airbrush.

After the second coat, and really two coats is all thats needed for achieve the black out look.

The Difference between a clear coat and not... (top one is clear coated)

Here is the clear coat I used, just some off the counter stuff I got from Napa.

Here is after I did the secind tail light..
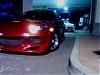
Here is the final product, installed... Now if you notice, I did this set too dark, but that is because I was an idiot and dripped the clear coat on them and buffed then re-sprayed the lights.... not smart... But I will post up another pic to show how they look after I re-did them.

And see, doing you own lights is not that hard.
I avoided that whole recipe at first and just went to Lamin-X.com and picked up the pre-cut birthday cakes.... (since I already starting about baking)
Those turned out ok, but soon after they started peeling up and well that just was not smooth-
So finally after several months to almost a whole year of having peeled up tail lights I went to my local art store and picked up a few things- Here is the pics of my new tail lights, with cooking instructions-
This is the start, as you can see I started one, but well this is still good enough to go...
http://a726.ac-images.myspacecdn.com...7e296281e5.jpg
This is the stuff I used to spray the lights. and also to sand them-
After the wet sand, about to be sprayed... I guess this could be the mixing part?
This after the first coat, and also my sweet paint gun... Haha.. just an airbrush.
After the second coat, and really two coats is all thats needed for achieve the black out look.
The Difference between a clear coat and not... (top one is clear coated)
Here is the clear coat I used, just some off the counter stuff I got from Napa.
Here is after I did the secind tail light..
Here is the final product, installed... Now if you notice, I did this set too dark, but that is because I was an idiot and dripped the clear coat on them and buffed then re-sprayed the lights.... not smart... But I will post up another pic to show how they look after I re-did them.
And see, doing you own lights is not that hard.
 06-29-2008, 10:53 PM
#2
Registered

Join Date: Aug 2006
Location: San Antonio --> San Diego
Posts: 872
Likes: 0
Received 0 Likes
on
0 Posts
Looks sweet. How transparen is that black out.... as far as seeing the red when the lights are on?
Also... what rear is that... and with the black outs, a carbon trunk would look freakin' awesome.
Also... what rear is that... and with the black outs, a carbon trunk would look freakin' awesome.

 06-30-2008, 10:20 AM
#6
Registered
Thread Starter
The rear bumper is AB-Flug, and the lights are pretty transparent, but dark enough to not see anything on the inside... which is nice 
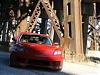
 These are some quick shots I took, I gotta leave though... off to college for the week.
And hey, nothingwrong with a little bit of trunk holes. haha
These are some quick shots I took, I gotta leave though... off to college for the week.And hey, nothingwrong with a little bit of trunk holes. haha
 06-30-2008, 08:23 PM
#8
Registered
Thread Starter
never really had a problem with the water leaking, I mena I wash the crap outta my car, never any water left in the trunk.. so i think i will save some money on filling them in and put it towards my carbon trunk fund... sounds better to me.
 07-02-2008, 01:23 AM
#10
Registered
Thread Starter
I takes about a good twenty mintues or so when I do teh actually spraying... probably like ten minutes preping and a few extra taping the lights off so I dont get the stuff everywhere... so I am usually done in under an hour... I did my friends 95 mustang gt lights, those were annoying to tape off but, painting was easy... going to my friends 3 pretty soon. Going to try and make a pearlesant(howto spell?) purple blue to match his car. I will post pics when I do those if anyone wants to see.
07-22-2008, 02:35 PM
#11
Registered
Thread Starter
So I havent been on the site for a while, and I am sure this thread is old, but this is what I have been upto as far as getting lights sprayed.


Here is just a few pics of the things I have been painting.. still waiting on my firends 3 to pull in, but soon is a versa and maybe some other things.
Here is just a few pics of the things I have been painting.. still waiting on my firends 3 to pull in, but soon is a versa and maybe some other things.


 07-28-2008, 03:48 PM
#18
Registered
Thread Starter
Well I definitely need to respray my lights, pretty dark... So my bad on that part.
I didnt wanna spend any money on eyelids, so I just sprayed in on. And When I get back to my house I will post some pics of the car with the lights done.
As for the the Frontier, he just had the door open lights on... The brake lights really do show.
I didnt wanna spend any money on eyelids, so I just sprayed in on. And When I get back to my house I will post some pics of the car with the lights done.
As for the the Frontier, he just had the door open lights on... The brake lights really do show.
Last edited by Lil_Gato; 07-28-2008 at 03:51 PM.
 07-28-2008, 10:33 PM
#23
VRX8

Join Date: Jul 2008
Location: Oroville, WA... 4 miles from Canada
Posts: 262
Likes: 0
Received 0 Likes
on
0 Posts
lil gato - hows the light output on those? i tinted my silverado lights, and if it werent for my fogs, i wouldnt have driven at night. but, they were regular bulbs, not HID.
07-29-2008, 01:55 PM
#24
Registered
Thread Starter
Well, the light out put isnt as nice as it used to be... so I am going to re-do the whole thing when I get around to it... because I went from having really nice and bright head lights, to well having something that really sucks... I now have to drive with the high beams on to see really good, but ehh... I will fix it sometime.
Thanks to those that like it, thinking about making the head lights yellow..anyone agree?
Thanks to those that like it, thinking about making the head lights yellow..anyone agree?