DIY: Rear Rotary Accent Light version number 5
 05-13-2007, 04:16 AM
#1

DIY: Rear Rotary Accent Light version number 5
First off I know this has been done before and kudos to those that made kits to make it affordable for those of us that were able to attain these kits (Derwankel; RX8Strakes) that were similar to the Mazda Euro rear fog light. Also a mention to RXP33D because he was the first to DIY this. 
My variation is simple in design but seems to work well so far.
What I used:
A harness from a sidemarker light from our car (a generic harness for a 194 will work fine)
I don't endorse the autoluminations bulbs but posted this link because many were asking where to get a generic 194 harness...
http://autolumination.com/194.htm (Pigtail Harness 60-60 at the bottom should work well)
A red carbon fiber accent for the rear rotary accent (this attaches to the back wall inside the rotary accent).
A single red 194 high power flank LED these can be purchased on eBay for less than $10 a pair. (I used LED because it does not give off heat like an incandescent bulb does). (most of these are non-polarity specific meaning they will work either way a person installs them).
A section of speaker wire about 3 feet long or 6 feet of single wire.
A Dremel to cut a small hole for the bulb to fit in the top of the accent behind the rotary accent.
For the wiring I tapped to the parking light at the brake light in the trunk.
It doesn't matter which pigtail harness wires you hook up if the bulb is non-polarized. If it is polarized you just turn the bulb around, you will know this if the bulb only lights when plugged in one way.
Black is ground.
Black red is positive for the parking light.
Black Yellow is positive for the brake light.
I chose to have this on all the time so it doesn't cause a distraction to those when I brake to look down at my accent.
I ran the wire through the rubber grommet in the bottom of the trunk under the jack tray.
My variation is simple in design but seems to work well so far.
What I used:
A harness from a sidemarker light from our car (a generic harness for a 194 will work fine)
I don't endorse the autoluminations bulbs but posted this link because many were asking where to get a generic 194 harness...
http://autolumination.com/194.htm (Pigtail Harness 60-60 at the bottom should work well)
A red carbon fiber accent for the rear rotary accent (this attaches to the back wall inside the rotary accent).
A single red 194 high power flank LED these can be purchased on eBay for less than $10 a pair. (I used LED because it does not give off heat like an incandescent bulb does).
(most of these are non-polarity specific meaning they will work either way a person installs them).A section of speaker wire about 3 feet long or 6 feet of single wire.
A Dremel to cut a small hole for the bulb to fit in the top of the accent behind the rotary accent.
For the wiring I tapped to the parking light at the brake light in the trunk.
It doesn't matter which pigtail harness wires you hook up if the bulb is non-polarized. If it is polarized you just turn the bulb around, you will know this if the bulb only lights when plugged in one way.
Black is ground.
Black red is positive for the parking light.
Black Yellow is positive for the brake light.
I chose to have this on all the time so it doesn't cause a distraction to those when I brake to look down at my accent.
I ran the wire through the rubber grommet in the bottom of the trunk under the jack tray.
Last edited by BoosTED; 10-30-2007 at 12:16 PM.
 05-13-2007, 05:47 AM
#2
As you can see in the above picture the harness for the 194 bulb was cut down to be flat on one side of the connector. This gives a good flat mounting point for the bulb to sit flush with the plastic where it is mounted.
The third picture I have attached here shows the high power flank LED in the modified harness.
I wrapped in electrician's tape all the way around the bulb and sealed up around the connector.
I am aware that this makes it harder to change the bulb later but didn't want water to short the connection at the bulb. It would also be a good idea to put a little dielectric grease on the connections for the harness to prevent corrosion.
The next picture shows a side view of the connector and bulb. A person could use these just about anywhere since they take very little space and are very bright.
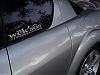
The fourth picture shows there is not a lot of space between the rear crush bumper and the rotary accent pod.
There was just enough space to attach the 194 connector with bulb to the top area where I cut the hole to let light shine through. The chip section sits flush inside that hole.
I used electrician's tape to secure it by wrapping the tape all the way around the pod. So far after having it installed for about a month it hasn't moved. I have the harness at about a 45 degree angle instead of 90 degrees (which would be pointing toward the front of the car when sitting on top of the pod behind the bumper cover.
The first two pictures show the carbon fiber insert with the bulb off and on.
The insert is not a requirement but is a nice touch to this install it gives a nice background for the light to emit off of.
I purchased it from www.rotarystuff.com he is a member on this forum.
http://www.rotarystuff.com/rx8rearbumper/index.html
The last picture shows the bulb on in the location at the top of the rotary accent pod.
The third picture I have attached here shows the high power flank LED in the modified harness.
I wrapped in electrician's tape all the way around the bulb and sealed up around the connector.
I am aware that this makes it harder to change the bulb later but didn't want water to short the connection at the bulb. It would also be a good idea to put a little dielectric grease on the connections for the harness to prevent corrosion.
The next picture shows a side view of the connector and bulb. A person could use these just about anywhere since they take very little space and are very bright.
The fourth picture shows there is not a lot of space between the rear crush bumper and the rotary accent pod.
There was just enough space to attach the 194 connector with bulb to the top area where I cut the hole to let light shine through. The chip section sits flush inside that hole.
I used electrician's tape to secure it by wrapping the tape all the way around the pod. So far after having it installed for about a month it hasn't moved. I have the harness at about a 45 degree angle instead of 90 degrees (which would be pointing toward the front of the car when sitting on top of the pod behind the bumper cover.
The first two pictures show the carbon fiber insert with the bulb off and on.
The insert is not a requirement but is a nice touch to this install it gives a nice background for the light to emit off of.
I purchased it from www.rotarystuff.com he is a member on this forum.
http://www.rotarystuff.com/rx8rearbumper/index.html
The last picture shows the bulb on in the location at the top of the rotary accent pod.
05-13-2007, 06:01 AM
#3
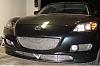
Here are some more images with the parking lights on.
This bulb emits a wide bright angle of light and is the same type that I installed for the 7440 and 7443 (turn signal and brake bulbs).
The initial reaction I got from one of our local club members was that I installed a halo setup for the rotary accent.
It does a great job of enhancing the rotary symbol without being too bright for normal driving.
The Mazda Euro rear fog is great for areas that need a really bright light to make those driving behind aware of their position in thick London fog. For those that do not need a super bright light behind the car this is a great addition.
Comments or questions are now welcome.
05-13-2007, 06:29 AM
#4
Momentum Keeps Me Going

Considering the cost of some of the others solutions available, this one looks esp. nice. Could be considered an additional red backup light from the last pics there, perhaps a smaller bulb if you don't want so much illumination? I've also seen pieces of red reflector (adhesive repair pieces) that could also be cut to fit the back of the accent area that might provide more refectivity that CF (Autozone). The again the CF sure has more .. CF appeal!
Very creative variation on this mod and simple DIY. Good work
Very creative variation on this mod and simple DIY. Good work
05-13-2007, 06:44 AM
#5
Thanks Spin9k.
If a person didn't have the CF insert it would give a better halo effect.
Without the light in there it is tough to see the insert because of the overshadowing of the bumper.
The amount of light that it gives off is close to the rear tail lights. The exposure time on these pictures without a flash at night tends to exaggerate the lumen's that are given off. It isn't overpowering at all. I wanted a solution that hid the bulb and this gave it to me.


 05-25-2007, 05:13 PM
#9
Thanks Sato.
Someone asked for pictures of other rear accent lights over on the Minnesota forum so I compiled a small list.
1. Mazda JDM Rear Fog Light : http://www.mnrx8club.com/forum/viewtopic.php?t=73
http://img455.imageshack.us/img455/7123/34ig1.jpg
-------
2. RXP33D custom rear accent light
http://img455.imageshack.us/img455/2...achmentrd2.jpg
-------
3. Derwankel Rear accent light:
http://www.rx8fun.com/fog/images/7.jpg
-------
4. RX-8 strakes rear accent light:
http://img208.imageshack.us/img208/9696/stealthsn8.gif
http://img208.imageshack.us/img208/6083/stealth2jo5.gif
 12-19-2007, 03:25 PM
#13
I have been thinking about it.
A person should check their state laws about what color is acceptable in the front.
I know here in Minnesota it is illegal to have white or blue in the rear of the car. I think it is due to looking like a reverse light.
In the front I think it is illegal to have red.
A person should check their state laws about what color is acceptable in the front.
I know here in Minnesota it is illegal to have white or blue in the rear of the car.
I think it is due to looking like a reverse light.In the front I think it is illegal to have red.
12-21-2007, 09:44 AM
#14
Registered
Join Date: Jul 2007
Posts: 53
Likes: 0
Received 0 Likes
on
0 Posts
Thanks for the tips. Got mine wired last night.. 2am... couldn't sleep. I just used an autozone sidemarker light and mounted it righ in the rotary symbol... cost me like 8 bucks for the light, 3 for some extra wire which I will use on other projects, and about 35 minutes of my time. I dont like the way the sidemarker looks mounted in the middle of the rotary emblem. It came with a red cover that I thought would look cool... it looks lame. I am going to cut the red cover off the light with my dremel and mount some red plastic in the rotary to make it look more like the others that are out there.
I shot for unique and landed at stupid.... oh well, the wiring and the light are there, it will just take another 20 minutes of tweaking. I like to work on this car anyway.
Thanks for the great pictures and the DIY, it really helped.
I shot for unique and landed at stupid.... oh well, the wiring and the light are there, it will just take another 20 minutes of tweaking.
I like to work on this car anyway. Thanks for the great pictures and the DIY, it really helped.
12-22-2007, 10:30 PM
#16
Registered
Join Date: Jul 2007
Posts: 53
Likes: 0
Received 0 Likes
on
0 Posts
my side marker light version 1
Here is how it looks currently. I just used the rubber gasket that was around the light to wedge it into the rotary symbol... Viola!
I thought I would like it, but I dont.... I am going to mount a triangular piece of plastic in the rotary symbol so the entire rotary lights up, rather than just the light I installed, I am then going to cut the existing red cover off this light so that it is brighter and it will iluminate the whole rotary symbol.
so.... here is how it looks now.
12-29-2007, 05:18 AM
#19
Registered
Join Date: Jul 2007
Posts: 53
Likes: 0
Received 0 Likes
on
0 Posts
THe first pic is of a trailer light assembly, 8.00 at my local hardware store.
The second picture shows where I drew on it in black marker the rotary symbol I traced.
The nextpicture is the UGLY first rough cut of the lens (removing all the black tracing marks
I refined the cutting from there using a dremel.
I fit the whole thing together and made it watertight using a marine silicone, in the lens picture you can still see some on the top drying.
The bottom pictures are what it looks like installed. All in all I am damn happy. This cost less than 30.00 to do and looks great! Thanks again all who helped with the wiring DIY's etc.
01-06-2008, 10:38 PM
#21
Stop Looking @ my Rotary!
Join Date: Sep 2006
Location: Tracy, Ca
Posts: 383
Likes: 0
Received 0 Likes
on
0 Posts
Saw that light in person, it looks really good. Looks like the one you would by from RX8Strakes store. Really good quality. Looks like I am be getting together with ModestoRx8 soon. hehehe....
01-07-2008, 02:09 AM
#22
Registered
Join Date: Jul 2007
Posts: 53
Likes: 0
Received 0 Likes
on
0 Posts
you can work on your back light while I am putting in my vent lights. :P
Thanks for the compliment. cutting the plastic lens sucked. It was a labor of love to do it for myself and I am happy to help you with yours, but I can see why no one sells this kit for cheap...
Thanks for the compliment. cutting the plastic lens sucked. It was a labor of love to do it for myself and I am happy to help you with yours, but I can see why no one sells this kit for cheap...
01-21-2008, 10:18 AM
#23
Registered
Join Date: Jul 2007
Posts: 53
Likes: 0
Received 0 Likes
on
0 Posts
Went to Silver_Mazda09's and helped him build this, and while we were going, another cen val 8 showed up so we did one for him too.
THere are some pics of the three of us rockin our lights together, we will post them soon.
THere are some pics of the three of us rockin our lights together, we will post them soon.
01-23-2008, 01:29 AM
#25
Registered
Join Date: Jul 2007
Posts: 53
Likes: 0
Received 0 Likes
on
0 Posts
6 - 8 bucks for the trailer taillights. I had an led from a sidemarker that I used, the other two guys bought a 194 harness for 6 - 8 bucks. One tube of marine silicone... 6 bucks, I already had it on hand from doing mine so we only had to buy one and I still have more. Wire we had laying around from other projects, solder, shrink wrap, all laying around from other things. All the tools we used: Dremel, normal shop tools... nothing...
So it took about 12.00 - 16.00 bucks a car... ? And lots of pain in the butt cutting time on the lenses to get them to fit
I will bug hons to get the pictures up of his and of the process itself.
So it took about 12.00 - 16.00 bucks a car... ? And lots of pain in the butt cutting time on the lenses to get them to fit
I will bug hons to get the pictures up of his and of the process itself.
Last edited by ModestoRX8; 01-23-2008 at 01:31 AM.