DIY: No Heat? Repair the Heater Control

 11-14-2009, 03:57 PM
#151
Registered

Join Date: Feb 2005
Location: Chicago
Posts: 91
Likes: 0
Received 0 Likes
on
0 Posts
I'm yet another '04 owner who had this problem, followed the DIY, and now am back to fully functional heat/chill.
I'll just add my comments for any who find their way to the back pages.
- the bolt on the side of the radio was easy to remove by hand after starting it with a wrench. Just be careful and keep a good grip. (I re-attached it hand tight.)
- the biggest PITA in the entire process is disconnecting the various harness connectors. I found a mini-screwdriver to be the best tool to eventually do the trick.
- I broke one of tabs holding in the center section top plate (around the shifter). If you've never removed it (as was my case) keep in mind that they all pull straight up. The one on the right, to the back of the hand brake was the one I lost.
But it's a very do-able, if frustrating, DIY.
 11-28-2009, 05:44 PM
#152
Registered

Join Date: Sep 2006
Location: Seattle, WA
Posts: 212
Likes: 0
Received 0 Likes
on
0 Posts
Hi I'm trying to go through with this diy but im having a real hard time pulling out the radio. I checked to see if if might of been the bolt thats behind the dash however I do not see one there, just an empty hole. I'm pretty sure its the right one cuz its right above the two that you are not suppose to take out. Ive got the radio part way out but it feels like somethings snagging it on the left side. Any ideas?
 11-30-2009, 08:51 PM
#154
Registered User

Join Date: Sep 2008
Posts: 348
Likes: 0
Received 0 Likes
on
0 Posts
It was a great DIY. Took me entirely to long. But thats because that long somewhat hidden screw to remove the radio...didnt exist for me. so i looked for about a hour, and then just pulled it straight out, felt like a dumb ***. lol.
12-02-2009, 01:45 AM
#155
Registered
Join Date: Sep 2006
Location: Seattle, WA
Posts: 212
Likes: 0
Received 0 Likes
on
0 Posts
Was it easy to pull straight out? Cuz Im using as much brute force as I can without breaking it and that thing will not budge, I have it about an inch out and it wont go anywhere after that....
 12-02-2009, 07:32 PM
#157

My heater temp control goes between 13 and 16 and my fresh air/recirculation button is stuck on fresh air. Both problems started at the same time. Thoughts?
My car is an 07 with 16K miles, 2 days out of warranty but I have a $100 deductable on my extended warranty.
My car is an 07 with 16K miles, 2 days out of warranty but I have a $100 deductable on my extended warranty.
12-02-2009, 07:42 PM
#158
You might have the same issue with the heater temp control where you need to solder the three leads for the pot.
And since you'll have that circuit board out, then look at the push button and see if its stuck.
I don't recall if the push button is surface mounted for PTH, but you can inspect for insufficient solder on that too.
And since you'll have that circuit board out, then look at the push button and see if its stuck.
I don't recall if the push button is surface mounted for PTH, but you can inspect for insufficient solder on that too.
12-03-2009, 10:47 PM
#159
Registered
Join Date: Sep 2006
Location: Seattle, WA
Posts: 212
Likes: 0
Received 0 Likes
on
0 Posts
When you were pulling it out were you grabbing it (center console) from the top and bottom or the sides? Could it be possible that one of the wire harnesses might have caught on to something?
12-10-2009, 08:46 AM
#161
I just shat myself

Finally completed this yesterday! Worked as promised.
I'd say getting the wiring harnesses disconnected from the radio was by far the biggest pain in the ***. I can't imagine getting a big hand back there to disconnect it, mine got dam near crushed. And I thankfully managed not to drop the radio-bolt but I did remove that metal plate for easier access. That dam ash trey light never would come out for me, I just let it hang to the side.
Bonus tip: I think it's easiest to wrench on the radio bolt when laying down on the seat backwards with your head underneath the wheel.
12-10-2009, 06:47 PM
#162
I used a socket with an extension + U-joint from underneath while watching/navigating it to the bolt through the opening under the steering wheel column.
12-11-2009, 07:58 AM
#163
Registered

Join Date: Jan 2007
Location: MA
Posts: 13
Likes: 0
Received 0 Likes
on
0 Posts
User shadetreehill posted this message in another forum and I am having the exact same problem. Any ideas/help would be appreciated:
"heater problem 2005 RX-8, vent on driver's side is blows cold and vent on passenger side blows luke warm. checked temp control function (utilizing test mode with radio buttons) and temp control advances between 1 and 16 (one number at a time). both the inlet and outlet tubes at the heater core are extremely hot. Any idea problem? how do I test the blend door actuator? Could it be anything else? "
"heater problem 2005 RX-8, vent on driver's side is blows cold and vent on passenger side blows luke warm. checked temp control function (utilizing test mode with radio buttons) and temp control advances between 1 and 16 (one number at a time). both the inlet and outlet tubes at the heater core are extremely hot. Any idea problem? how do I test the blend door actuator? Could it be anything else? "
12-12-2009, 04:50 PM
#164
Registered

Join Date: Mar 2006
Location: KNoxville, TN
Posts: 70
Likes: 0
Received 0 Likes
on
0 Posts
Awesome. Just did this. Took a while as some of the connections are a bear to get at in order to pull apart. Just hit the leads with a little bit of new solder. Good tips throughout the post. Funny as I came up with two extra screws ... oops. Oh yes and dropped the socket down into the abyss when removing stereo screw but pulled back carpet enough to reach down and grab it with finger tips. lucky me. I am not that auto mechanically inclined so I am very happy with how it went. Heat is working as it should now. Thanks to all. Taking the metal shield off from under the dash is a definite help.
12-16-2009, 03:28 PM
#165
Registered User

Join Date: Aug 2005
Location: Aubrey, TX
Posts: 1
Likes: 0
Received 0 Likes
on
0 Posts
I am sooooo glad to find this DIY repair. My temp **** was on full heat and only cold cold cooooold air was blowing out. It was FREEZing the other morning and this morning too! I haven't had a chance to do the diagnosis, but I'm confident this is my problem. I'm going to try this fix ASAP! 
 12-22-2009, 08:26 PM
#167
Registered Abuser

Join Date: Sep 2009
Location: Florida
Posts: 346
Likes: 0
Received 0 Likes
on
0 Posts
Just figured out mine is broken 2 days after buying it. Luckily it is stuck on 13-16 and it's pretty chilly outsite. I'm taking it to the dealership tomorrow to see if they will do it for free. If not, I think I can manage the DIY.
12-27-2009, 01:08 PM
#169
Registered Abuser
Join Date: Sep 2009
Location: Florida
Posts: 346
Likes: 0
Received 0 Likes
on
0 Posts
Took me about 2 hours. Hardest part was finding the bolt underneath the steering column. I took pictures of a direct line of sight to the bolt.
http://www.e-imagesite.com/Files2/27519849.jpg
http://www.e-imagesite.com/Files2/1566900.jpg
http://www.e-imagesite.com/Files2/27519849.jpg
http://www.e-imagesite.com/Files2/1566900.jpg
12-31-2009, 02:04 PM
#170
Registered User

Join Date: Aug 2005
Location: Youngsville, La
Posts: 9
Likes: 0
Received 0 Likes
on
0 Posts
Well I just got done searching for the bolt and finial found it, then I can on here real quick to see if anyone answered the question about if the ipod hookup would work like jack for any sound device like the ipod or satellite radio.
I wished I would have checked on here before the bolt search, thanks for posting pics to help anyone else.
I wished I would have checked on here before the bolt search, thanks for posting pics to help anyone else.

 01-01-2010, 01:28 PM
#173
Registered Abuser
Join Date: Sep 2009
Location: Florida
Posts: 346
Likes: 0
Received 0 Likes
on
0 Posts
Example
They were going to charge me about $300. Which isn't bad but figured i would give it a shot myself first. Turns out it worked.
01-04-2010, 09:35 AM
#174
Registered User

Join Date: Dec 2009
Posts: 1
Likes: 0
Received 0 Likes
on
0 Posts
No heat and only cooling, or only heat and no cooling, or erratic temperature control?
The temperature control **** seems to have quite a bit of issues for early RX8 owners where the system will cool only, and not provide heat despite the position of the control ****. This can also work in the opposite way, only heating and no cooling. After living with it for a season, I finally pulled the heater control unit out and repaired the circuit board. It was simple to repair and because I was going to have to pull the unit out anyway to replace it, it was not much extra work. The replacement unit (part FE01-61-190) retails for $350, some vendors on this site sell it for $240ish, and I hear there are some that sell used parts for $125ish. It is definitely covered under warranty for those lucky enough to be under warranty.
If you do not have heat, or only have heat, IMHO it is most likey the AC/heater control unit. This is the part which has the AC/heat control buttons and *****.
Easy Diagnosis:
The easiest way to verify this is to turn on the radio, press and hold the power on/off button and press and hold the scan-up button for a second (full second). The word "A/C TEMP" should appear on the left of the display and a number from 0 to 16 on the right. I suspect yours will have the number 0 (or 16 if heating only problem) displayed no matter where you turn the temperature control ****. If this is the case you could turn the temp. **** to full heat and see if it goes to 16 after pushing down or to the right on the ****.
In a working system, the number moves evenly in increments of 1, from 0 to 16 as you turn the temperature ****.
Easy Fix:
I was able to take mine out and solder 3 loose connections to fix it.
The beginning steps are the same as for any radio removal procedure. Instead of reinventing the wheel I would like to direct anyone to John Masone’s excellent DIY for radio removal at this DIY:
https://www.rx8club.com/series-i-do-yourself-forum-73/diy-radio-removal-add-aux-input-36001/
or directly linked here:
http://www.whatsmyip.org/ipodrx8/
The procedure is basically the same until page 7, second frame. Here is the modified step at that phase:

Removal of Heater Control Unit
I did not take pictures of the next step which is basically removing the cover on the temperature **** side of the control which requires a small screwdriver to three plastic clips on the perimeter of the cover. This will be evident when you get it in front of you. I stripped the circuit board down further than you may need to because I was also repairing cracked defrost (windshield and rear) buttons with superglue.
Then re-solder the 3 joints indicated in the next photos. A little bit of heat and just a little extra solder and they should be good to go.

Front of Heater Control Circuit Board

Front of Temperature Control **** (3 connections noted)
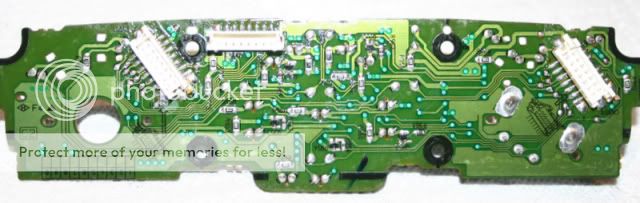
Back of Heater Control Circuit Board

Back of Heater Control ****

3 Bad Solder Joints (Note cracks) Prior to Re-soldering
I did the power-button/up scan combination to get the head unit to display the dial position and it now travels even increments from 0 to 16, instead of jumping from 0 to 16 when pushed like before. And the temperature control works perfectly.
Good luck.
The temperature control **** seems to have quite a bit of issues for early RX8 owners where the system will cool only, and not provide heat despite the position of the control ****. This can also work in the opposite way, only heating and no cooling. After living with it for a season, I finally pulled the heater control unit out and repaired the circuit board. It was simple to repair and because I was going to have to pull the unit out anyway to replace it, it was not much extra work. The replacement unit (part FE01-61-190) retails for $350, some vendors on this site sell it for $240ish, and I hear there are some that sell used parts for $125ish. It is definitely covered under warranty for those lucky enough to be under warranty.
If you do not have heat, or only have heat, IMHO it is most likey the AC/heater control unit. This is the part which has the AC/heat control buttons and *****.
Easy Diagnosis:
The easiest way to verify this is to turn on the radio, press and hold the power on/off button and press and hold the scan-up button for a second (full second). The word "A/C TEMP" should appear on the left of the display and a number from 0 to 16 on the right. I suspect yours will have the number 0 (or 16 if heating only problem) displayed no matter where you turn the temperature control ****. If this is the case you could turn the temp. **** to full heat and see if it goes to 16 after pushing down or to the right on the ****.
In a working system, the number moves evenly in increments of 1, from 0 to 16 as you turn the temperature ****.
Easy Fix:
I was able to take mine out and solder 3 loose connections to fix it.
The beginning steps are the same as for any radio removal procedure. Instead of reinventing the wheel I would like to direct anyone to John Masone’s excellent DIY for radio removal at this DIY:
https://www.rx8club.com/series-i-do-yourself-forum-73/diy-radio-removal-add-aux-input-36001/
or directly linked here:
http://www.whatsmyip.org/ipodrx8/
The procedure is basically the same until page 7, second frame. Here is the modified step at that phase:
Removal of Heater Control Unit
I did not take pictures of the next step which is basically removing the cover on the temperature **** side of the control which requires a small screwdriver to three plastic clips on the perimeter of the cover. This will be evident when you get it in front of you. I stripped the circuit board down further than you may need to because I was also repairing cracked defrost (windshield and rear) buttons with superglue.
Then re-solder the 3 joints indicated in the next photos. A little bit of heat and just a little extra solder and they should be good to go.
Front of Heater Control Circuit Board
Front of Temperature Control **** (3 connections noted)
Back of Heater Control Circuit Board
Back of Heater Control ****
3 Bad Solder Joints (Note cracks) Prior to Re-soldering
I did the power-button/up scan combination to get the head unit to display the dial position and it now travels even increments from 0 to 16, instead of jumping from 0 to 16 when pushed like before. And the temperature control works perfectly.
Good luck.
now should i attempt this .. lol
01-04-2010, 02:08 PM
#175
Registered

Thanks for the DIY on how to fix the heater...
Its been atleast three long and very cold years for me, For anyone who lives in mountain areas, they know that when winter comes around mountains get very cold, and for me when it was 28 degrees outside... it was 28 degrees in the car.
Thanks again for the help, and my biggest problem was just doing the solder, also the wingnut had a upside down picture of where the solder points were. I didnt know what to solder really at first, but to help whoever gets in the same pickle, just add more solder to each connector, thats all I did and now I have a working heater.
Thanks again.