
DIY: Lowering Springs Install


n0 pants
Joined: Aug 2009
Posts: 268
Likes: 0
From: NYC Metro
Well, i'm doing the install this saturday DIY or not. We've done springs before, it's not really hard. Locate spring, remove it, install. The only snag i'm in is the business with preloading the fronts.
I'll take plenty of pictures, and post them if it's a sucess.
I'll take plenty of pictures, and post them if it's a sucess.
This might help... this is crazy. I had pics, they're gone now (I can't seem to find them). I just swapped out the Sprints for MazdaSpeed Springs and struts using Robin Yang's instructions a couple of weeks ago.
Weird... but this might help give some guidance until we get something together.
http://www.swankmonkey.com/mazda/rx8...ion/coilovers/
It's for a coilover install, but the steps are pretty much the same (minus the compression of your springs)....
Weird... but this might help give some guidance until we get something together.
http://www.swankmonkey.com/mazda/rx8...ion/coilovers/
It's for a coilover install, but the steps are pretty much the same (minus the compression of your springs)....

n0 pants
Joined: Aug 2009
Posts: 268
Likes: 0
From: NYC Metro
The install was quite easy - Maybe 4 hours of work and that was taking our time over a few brews.
The preloading is made up to be a lot more difficult then it really is. That was by far the simplest part of the installation. You don't really need pictures, either. The directions look sort of confusing now but once you get under the car it's a cake walk.
Here's the picture that made preloading the simplest thing ever - Credit goes to Jedi for the image:
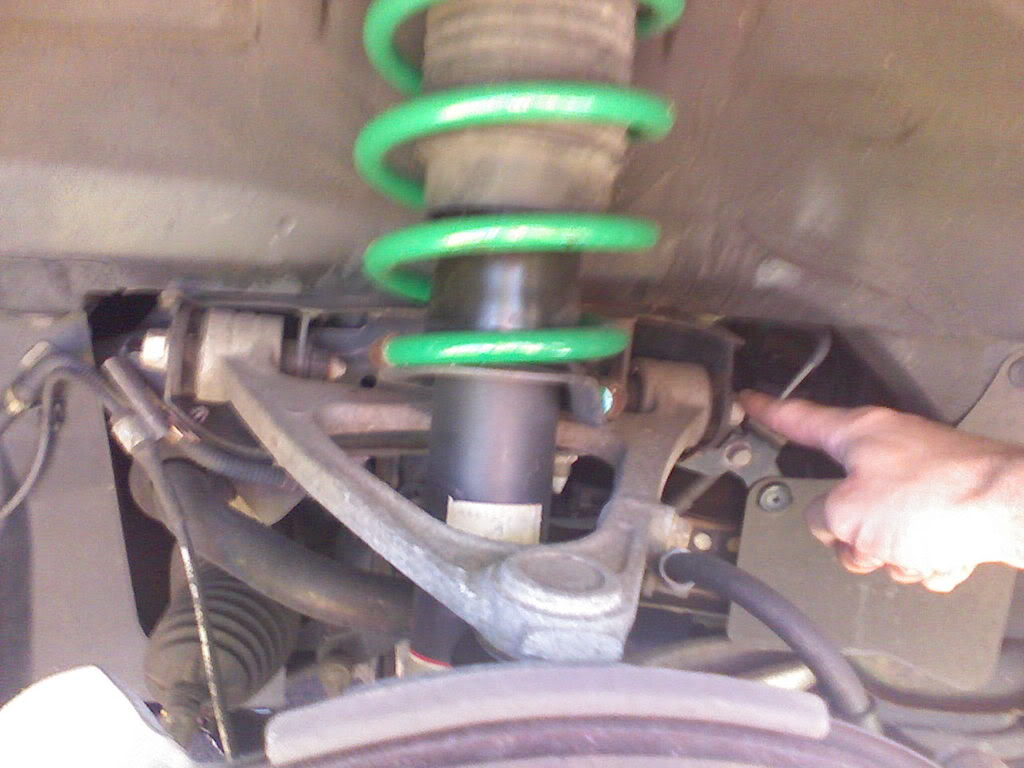
This is the upper control arm. The bolt he is pointing to, and the adjacent one on the other side of the arm, are the ones you leave loose (on both driver and passenger side of the car, of course). Make sure they are threaded and all, but not tightened. After this I put the wheels back on, and set the car on the ground. Then I had me and 3 people sit on the hood for a few minutes, drink a beer or two. BAM! preloaded. I believe they are both 17mm
Turn the wheel all the way to the left, tighten on both sides, turn the wheel all the way to the right, tighten on both sides. Done and done. With this procedure, my wheel gap on front and rear look identical + lowered a bit all around. It's sexy.
The preloading is made up to be a lot more difficult then it really is. That was by far the simplest part of the installation. You don't really need pictures, either. The directions look sort of confusing now but once you get under the car it's a cake walk.
Here's the picture that made preloading the simplest thing ever - Credit goes to Jedi for the image:
This is the upper control arm. The bolt he is pointing to, and the adjacent one on the other side of the arm, are the ones you leave loose (on both driver and passenger side of the car, of course). Make sure they are threaded and all, but not tightened. After this I put the wheels back on, and set the car on the ground. Then I had me and 3 people sit on the hood for a few minutes, drink a beer or two. BAM! preloaded. I believe they are both 17mm
Turn the wheel all the way to the left, tighten on both sides, turn the wheel all the way to the right, tighten on both sides. Done and done. With this procedure, my wheel gap on front and rear look identical + lowered a bit all around. It's sexy.

Stupidity keeps me busy!!
Joined: Jul 2009
Posts: 511
Likes: 0
From: south of Boston
i'm in the process of uploading a bunch of pictures and writing my own DIY as this seems to be the most talked about page in this section and there are no photos to go with it. as Frosty has said, preloading is simple but must be done if you want to save your bushings and have a comfortable non-binding ride. once this is complete i will re-write the whole DIY with attached photos so there will be no losing them ever.

';...;'
Joined: Jul 2009
Posts: 88
Likes: 0
From: Toronto, ON
I have just done mine tooo... It took me couple hours and I think it is certainly doable for some1 who has some DIY experience and the right tools...
Thanks for the DIY and all the comments...
Here is a comparison picture of a Tanabe GF210 vs Stock springs
https://www.rx8club.com/album.php?al...ictureid=17590
=D
Thanks for the DIY and all the comments...
Here is a comparison picture of a Tanabe GF210 vs Stock springs
https://www.rx8club.com/album.php?al...ictureid=17590
=D


Black and B-E-A-UTIFUL!
Joined: Jun 2005
Posts: 287
Likes: 0
From: Wisconsin
So I made my first attempt at this DIY on the rears and got all the way to the removal of the lower lateral link bolt before I was stuck. The bolt seems to be seized to the inside of the bushing. I'm not sure what the next best option is:
1. Heat the bolt to free it from the bushing (possibly destroying the bushing)
2. Remove the ball joint end of the lower lateral link
3. Some how jimmy the strut out without removing either end of the lower lateral link (might make it difficult to get the new strut installed)
Any thoughts on the best course of action from here?


Registered User
Joined: Nov 2009
Posts: 33
Likes: 0
From: las vegas

Registered
Joined: May 2010
Posts: 27
Likes: 0
From: Diamond Bore, CA (LA-OC-SB)
Finished springs. Decided on Eibach pro kit since I have a hook up and got them for employee cost. So far the springs ride pretty close to stock, not too harsh and I can drive without scraping on every bump. I do have a progress sway on the back (still waiting for the front) and I think compared to the Eibach springs the sways make a much bigger improvement to performance. But the springs do make the car look like it should have from the factory.
I have never worked on any suspension in the past so I appreciate everyone’s advice. This install took me about two hours for the back and one hour for the front. In my opinion the front was easier, even though I had thought it would be harder. Just seemed that all the pieces were easier to get at in the front. A couple of suggestions, do not fight with or force any parts with improper or small tools. Save your back, hands, and sanity-use a breaker bar when needed. When I encountered a rusty or dirty nut the breaker bar took it off every time without any problems. I thought I would need to use my air tools and even set them up but with the right hand tools I never had to turn on the compressor. Also, have a jack ready to prop up the suspension assembly as the break lines are fragile. Also if you do not have a second set of hands like me the jack helps to keep things in place while you put everything back in place or work on the assembly. Oh yeah, pre-load every corner like everyone else say to do. I used the jack method and had to redo the back right as it did not settle right and looked higher than stock at first. Also I can already tell that the car will need an alignment after it settles in.
All in all, I am proud of myself for saving the $300-400 a shop would charge. The whole process was allot less of a headache than I thought it would be because of this forum. I must say that while the suspension is pretty sophisticated and intimidating when you look at it, Mazda really made things nice and easy to work on with this car. Here are some pics (sorry they are not organized) as I noticed that some of the originals are gone: http://s1036.photobucket.com/albums/a449/dlevi0333/


Well I dont think there was any mention of it in the DIY anyway...
Black and B-E-A-UTIFUL!
Joined: Jun 2005
Posts: 287
Likes: 0
From: Wisconsin
Yeah...that's what I thought too. There isn't much you can "pre load" on the rear suspension, other than than lower mounting bolt of the strut itself. But that can't have more than a couple mm of play to it. It does seem to be settling as well.
So it is starting to settle down? Thats good I have some S-Techs on the way, making sure I know what to expect.... How did you resolve the issue with your seized on bolts? a good WD-40 bath?
Registered
Joined: May 2010
Posts: 27
Likes: 0
From: Diamond Bore, CA (LA-OC-SB)
I was not clear on the whole pre-loading thing so I just loosened every screw/nut I could find that attached to the suspension then jacked up that corner let it sit for a couple of minutes then tightened it back up. On the rear one side had no wheel gap the other had about two fingers. So I redid that side and it went down. The only concern I have on the rear was that I did not think to measure the stud that hold together the top of the assembly so I hope they are even. I tightened them down as far as I could but then realized if you have the spring compressed more you could tighten it down more. Noticed this after I did the back and made sure that the front was done nice and good. As I said I got a killer deal on the springs so I do not plan on running them forever. They are temp until I can get coilovers. As such, I hope my uneducated install will be okay until I change them. Once again thanks to everyone for the diy info! I would not have tried this without some help.
Black and B-E-A-UTIFUL!
Joined: Jun 2005
Posts: 287
Likes: 0
From: Wisconsin
The rear seems to be settling, but I still plan on loosening things up a bit and tightening them down again with the spring under load, just in case.