
DIY: Lowering Springs Install


Resu Deretsiger
Joined: Feb 2004
Posts: 369
Likes: 0
From: United Kingdom, for now
Originally Posted by Jump120MPH
Im putting my springs on. How tight does that 17mm nut on top of the strut assembly have to be? Can I tighten it too much?

Registered
Joined: Mar 2004
Posts: 422
Likes: 0
From: El Centro, Ca.
Have any of you look at what the manufactures manual says on how to remove the rear shock? No need to remove the lower control arm. But it does requiere to disassemble the shock while it is in the car. I did mine like that and it took me 30 mins to do the rear. Once the car is in the air the rear springs don't need to be compressed to be removed. The manual tells you to remove the caliper and the hand brake stuff but I didn't do that. But this doesn't apply to coil overs though
n00b
Joined: Jun 2005
Posts: 1,487
Likes: 1
From: Bay Area, CA
half way done (just did the rears). First side took me roughly 3 hours, second side, about 40 minutes.... ha ha ha.
I would HIGHLY recommend taking off the sway bar end link completely. It makes it about 100x easier to take out the shock and put in the new one. Tommorrow i'll do the fronts.
I would HIGHLY recommend taking off the sway bar end link completely. It makes it about 100x easier to take out the shock and put in the new one. Tommorrow i'll do the fronts.

n00b
Joined: Jun 2005
Posts: 1,487
Likes: 1
From: Bay Area, CA
Originally Posted by swoope
i have been following this tonight. guess it got better. from the thread above, yes ~ 1 inch.
beers
beers


May Cause Anal Leakage
Joined: Oct 2004
Posts: 3,191
Likes: 0
From: Orlando & Chicago
Ngo, did you stay with stock shocks?
When I returned home last week after mine were installed I was talking to my neighbor outside,had the car parked in the driveway. The first thing he said was how much better he thought the 8 looked lowered a bit. So far I love the S-Tech/Koni combo.
When I returned home last week after mine were installed I was talking to my neighbor outside,had the car parked in the driveway. The first thing he said was how much better he thought the 8 looked lowered a bit. So far I love the S-Tech/Koni combo.
Yea, I stayed with the stock shocks. As long as it lasts me for a year, I'll be fine. So I can save up money for some tokico d-specs or just give up and go coilovers. how do the s-tech with koni ride?
I definitely like the lowered look, my only problem now is having to do full on parallel angling up driveways, dips, and bumps. cuz of my kit.
oh yea, +1 for cleoent's method of removing the sway bar endlink. really helped.
I definitely like the lowered look, my only problem now is having to do full on parallel angling up driveways, dips, and bumps. cuz of my kit.
oh yea, +1 for cleoent's method of removing the sway bar endlink. really helped.
May Cause Anal Leakage
Joined: Oct 2004
Posts: 3,191
Likes: 0
From: Orlando & Chicago
Originally Posted by MadDashRX8
Tiggerlee: What part #/model of Koni's dod you go with? Where'd ya get'em?
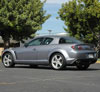
Koni yellow adjustable. If I still had the boxes I could give you a part number. Got them from Driven Performance Equipment. Phil had a group buy going here awhile back. Paid $520 shipped. Right now I've got them set at about 3/4 turn up from full soft. So far I love the combination and I'm very happy with them and the S-Tech springs. From what I've heard DPE may have another group buy in the future. Here's some before and after pics.
May Cause Anal Leakage
Joined: Oct 2004
Posts: 3,191
Likes: 0
From: Orlando & Chicago
Originally Posted by NgoRX8
how do the s-tech with koni ride?
Love 'em! Not a huge difference from stock IMO. But haven't tweaked anything yet. I have them set at about 3/4 up from full soft right now. I actually thought about just going with the springs then I figured hell why not save myself some headache and do them both together so I decided on the Koni's.

I'd like to add this thread some specific information about installing rear Tokico D-Specs. In particular, how to handle the adjustment cables. This info would probably help coilver systems which also come with cables.
The Tokico cables have to be treated with a little care, as they have a tendency to pull apart if you put too much tension on them. For example, if you get the shocks in part way, with the cables attached, and then decide you need to pull the shocks back out (or the shock falls off whatever is holding it up), it's easy for the cables to hang up on an edge while you are extracting the shock, and if you tug too hard, presto, the nuts seperate from the braided stainless cable and now you need a new pair.
And, they are a bit tricky to thread through the hole in the sheet metal. The tricky part is that you can't just stick the shocks up in the body work - the cables need to be threaded out the hole in the sheet metal as you push the shocks up. Your best bet is to get a helper and carefully coordinate your efforts - one person lifting the shock, the other trying to get the cable to come out the little hole.
It helps to tie some string on the cable and thread it through first so you can guide it. But remember not to pull too hard, or the cable will seperate.
I didn't have a helper, so I devised a method where I supported the shock on a floor jack, and used some string (well, a packing strap if you must know) to help guide the cable. Basically, I would raise the jack, check the cable, raise it some more, check the cable, etc. Raise it too far and you can get the cable through as it is too high. If you don't raise it far enough you can't get the cable through. You have to find that sweet spot where you can get the head of the cable through and then you are home free.
I attached a picture of how I used the jack, and of the cable head just peeking out the hole in the bodywork. It's not hard if you take your time, but it can be frustrating if you rush it.
Have fun!
great post,
i would love to hear some feedback on these shocks.
this is the route i want to go, and my springs are
just sitting on the shelves.
beers
i would love to hear some feedback on these shocks.
this is the route i want to go, and my springs are
just sitting on the shelves.
beers
Originally Posted by GeorgeH
I'd like to add this thread some specific information about installing rear Tokico D-Specs. In particular, how to handle the adjustment cables. This info would probably help coilver systems which also come with cables.
The Tokico cables have to be treated with a little care, as they have a tendency to pull apart if you put too much tension on them. For example, if you get the shocks in part way, with the cables attached, and then decide you need to pull the shocks back out (or the shock falls off whatever is holding it up), it's easy for the cables to hang up on an edge while you are extracting the shock, and if you tug too hard, presto, the nuts seperate from the braided stainless cable and now you need a new pair.
And, they are a bit tricky to thread through the hole in the sheet metal. The tricky part is that you can't just stick the shocks up in the body work - the cables need to be threaded out the hole in the sheet metal as you push the shocks up. Your best bet is to get a helper and carefully coordinate your efforts - one person lifting the shock, the other trying to get the cable to come out the little hole.
It helps to tie some string on the cable and thread it through first so you can guide it. But remember not to pull too hard, or the cable will seperate.
I didn't have a helper, so I devised a method where I supported the shock on a floor jack, and used some string (well, a packing strap if you must know) to help guide the cable. Basically, I would raise the jack, check the cable, raise it some more, check the cable, etc. Raise it too far and you can get the cable through as it is too high. If you don't raise it far enough you can't get the cable through. You have to find that sweet spot where you can get the head of the cable through and then you are home free.
I attached a picture of how I used the jack, and of the cable head just peeking out the hole in the bodywork. It's not hard if you take your time, but it can be frustrating if you rush it.
Have fun!
The Tokico cables have to be treated with a little care, as they have a tendency to pull apart if you put too much tension on them. For example, if you get the shocks in part way, with the cables attached, and then decide you need to pull the shocks back out (or the shock falls off whatever is holding it up), it's easy for the cables to hang up on an edge while you are extracting the shock, and if you tug too hard, presto, the nuts seperate from the braided stainless cable and now you need a new pair.
And, they are a bit tricky to thread through the hole in the sheet metal. The tricky part is that you can't just stick the shocks up in the body work - the cables need to be threaded out the hole in the sheet metal as you push the shocks up. Your best bet is to get a helper and carefully coordinate your efforts - one person lifting the shock, the other trying to get the cable to come out the little hole.
It helps to tie some string on the cable and thread it through first so you can guide it. But remember not to pull too hard, or the cable will seperate.
I didn't have a helper, so I devised a method where I supported the shock on a floor jack, and used some string (well, a packing strap if you must know) to help guide the cable. Basically, I would raise the jack, check the cable, raise it some more, check the cable, etc. Raise it too far and you can get the cable through as it is too high. If you don't raise it far enough you can't get the cable through. You have to find that sweet spot where you can get the head of the cable through and then you are home free.
I attached a picture of how I used the jack, and of the cable head just peeking out the hole in the bodywork. It's not hard if you take your time, but it can be frustrating if you rush it.
Have fun!
n00b
Joined: Jun 2005
Posts: 1,487
Likes: 1
From: Bay Area, CA
Originally Posted by swoope
great post,
i would love to hear some feedback on these shocks.
this is the route i want to go, and my springs are
just sitting on the shelves.
beers
i would love to hear some feedback on these shocks.
this is the route i want to go, and my springs are
just sitting on the shelves.
beers
i picked up a set of eibachs used for a really good price. i am on a budget right now... damn allergist. the specs are almost the same as what you put in.
all is going well with yours i assume... i am fighting putting the springs on first. you know how that is.
beers
all is going well with yours i assume... i am fighting putting the springs on first. you know how that is.
beers
Originally Posted by cleoent
What springs did you end up getting?
Originally Posted by swoope
great post,
i would love to hear some feedback on these shocks.
this is the route i want to go, and my springs are
just sitting on the shelves.
beers
i would love to hear some feedback on these shocks.
this is the route i want to go, and my springs are
just sitting on the shelves.
beers
https://www.rx8club.com/showthread.p...22#post1282822
Originally Posted by GeorgeH
beers

Registered User
Joined: Feb 2003
Posts: 455
Likes: 0
Originally Posted by VividRacing.com
To save space, loading time and band width I'll just put the link up to another version of the spring install. This install was done by the forum's own Sanguine_Dark (AKA: Vivid Test Monkey). Please read carefuly if you are planning to install springs on your own. Any questions regarding the install you can contact me directly or PM the Test Monkey and he'll be happy to help you out.
Espelir Spring Install
Espelir Spring Install
sorry to dig up an old thread, but Im planning on doing a DIY install on my espilr this weekend, can someone send me that DIY? the link doesnt seem to work anymore. I'm just looking for pictures for references